Pages

Wednesday, March 29, 2017

Sprout Patterns Cashmerette Turner Dress


Let me start out by saying that this fabric was given to me by Sprout Patterns (sister site to Spoonflower) to review, so this is a sponsored post. However, all of the comments are mine.


First, the most appealing feature of purchasing the pattern printed on the fabric, is that you don't have to lay anything out! All you have to do is prewash the fabric (which is highly recommended) and cut out.

Okay I did jump ahead a little because when you first go on the site, you need to pick a pattern.  The site has quite a few of the popular indie pattern companies listed. After picking the pattern, fabric is the next choice. This was the longest part of the process for me. I actually spent a couple of hours on the site one day and went back the next day to choose the final fabric.


You can pick a premade set (pattern + fabric) or you can choose your pattern (I chose Cashmerette's Turner Dress) and then choose your fabric.  The site allows you to pick several pieces of fabric at once and try them on your silhouette. The silhouette revolves so you can see front, back and sides of your fabric. You can even move the print around to look the way you want.

The last portion of this process is if you're a complete maverick, you can design your own fabric and then add it to your pattern. A lot of variety which practically guarantees that you can make a one of a kind garment.

After you choose your design and pattern you pick your fabric choice ~ there were four available to me ~ I chose the Modern Jersey. Pick your pattern pieces. I'm sure you're asking why? Well this is if you want to use more than one design for your garment. Next pick your size and for this pattern your bust size.

Now here is the first disclaimer ~ 
I am a standard size 24 with a C/D bust cup in Cashmerette Patterns. I pretty much fit Cashmerette's patterns right out of the envelope. My only concern when I did this was whether the sleeves would fit in the biceps, but that turned out not to be a problem at all.

If you've made the Turner Dress before you know that this is a simple sew once the pattern is fitted. My only confusion in sewing this was that the instructions tell you to leave the white borders that have the piece names printed on them, as part of the pattern piece when you cut it out.

Second disclaimer ~
I took this to #CarriageCornerSewCamp to make and couldn't remember if I was supposed to sew the white border as part of the dress or cut it off. I ended up leaving it on and using 1/2" seam allowances like the pattern states. This made the dress fit me perfectly, however, you could still see all the notch marks on the side seams once the bodice was assembled. So I'm thinking that you are supposed to cut the white border off and then sew the garment together.

A few pictures of the dress in action ~


By the way, I machine stitched the hems by turning under the white borders on both the bottom of the dress and the sleeve hems. Pressed them flat and stitched. This was perfect for me because the dress hem ended at the bottom of my knee ~ a good proportion for me.


Conclusion ~
This is really an innovative idea. The fabric comes with the pattern pieces printed on it so you just cut and sew. If you hate the process of laying out pattern pieces, pinning (or putting down weights), cutting or rotary cutting the fabric, this puts you miles ahead in the construction process. 

The disadvantages are that you can only choose the fabrics offered, the service is costly, and if you aren't a standard size the program makes no adjustments. My dress started at $86 and the price increased by your fabric choice.  Before shipping and handling, my dress cost $117. Honestly this is what gives me pause about the service. Finally if you need to make many pattern alterations or you're outside the pattern's size range, this service is not for you because it doesn't do customizations. 

They do offer a sewing service (White Glove Service) for an additional fee, so if you or someone you know wants a garment and don't have time to sew, it's an option. If you could get a discount or believe this service is worth the money, then this was a wonderfully easy and fun process. 

So now I have to wait for a warm spring day to wear my pretty new Turner Dress!

...as always more later!


Tuesday, March 21, 2017

Meet me at Fabric Mart on Friday!


I will be at Fabric Mart in Sinking Springs, PA on Friday, March 24th with the ladies attending the Sew Camp at the Carriage Corner B&B and Gaylen (GmarieSews). We should be there around 11am. If you want to come by and say hi, or shop with us, please feel free to join us!

Oh and there are some day tripper sewing spots still available for the Sew Camp weekend. Contact Gaylen (hello@carriagecornerbandb.com), if you suddenly have no plans for the weekend and would like to spend quality time sewing with fellow sewing enthusiasts.

Hope to see you there!

Monday, March 20, 2017

Simplicity 8094 - 4x


I'm on a top sewing binge. It's been tops, tops, tops for the last month. I see inspiration everywhere. A top I saw on QVC a couple of months ago inspired this one.
Joan Rivers Top from QVC


This top reminded me of my versions of Simplicity 8094 and I've wanted another one in a black ponte. The inspirational garment moved this version to the top of the queue. The ponte and the pleather are both from the collection. I used the pleather in this garment in 2013 and the ponte is from my last purchase from Metro Textiles.

Since I used the godet in the last two versions there wasn't any change made to it. Though, instead of inserting it from the hipline down, I put it in the entire side seam. That made it a really interesting feature of the new top. It also means that the top will have to be washed on delicate and hung to dry because the pleather can't go in the dryer.


I did make a change to the original sleeve to insert the pleather to mimic the inspiration top. It was simple. I just cut the sleeve and inserted the pleather on either side. 

Since I was sewing over a "holey" piece of pleather, I added a 5/8" strip of black silk organza over the pleather piece. Then I stitched through the piece when stitching the sleeve's side seam. This insured that the pleather piece was stabilized and gave the stitches a solid piece to hold on to.


So a few pictures of this one in action ~

I'm wearing RTW ponte jean leggings and a tank top with this top


Conclusion ~
I've loved wearing my other versions of this top and I'm sure I will love wearing this one too. It works so well over my leggings, skinny jeans and regular jeans. It just works. So I will probably make more in the future. Don't know when but fall will come again so I will use the pattern then ~ that's a lot of "I wills" LOL!

There is another top on the cutting table ~ it will be up soon.

...as always more later!


Saturday, March 18, 2017

Are you an innie or an outie?

I read this article on Yahoo about a bedridden Grandmother who'd taken up "Paint by Numbers" painting as a way to relieve the boredom of being bedridden. 


It made me realize that I love being indoors. I'm not an outdoors girl at all. When the weather gets better, I love it but not because I want to head outdoors and do outdoor things...more because I like the warmer weather, the sun, and the longer hours.

I have to make myself go outside. If I'm off for a few days, I'm perfectly happy to stay inside and sew, watch TV, read a book, etc. Outside activities hold no attraction for me.

So my question of the day is "Are you an Outside or Inside girl?" And if so, why? Also do you develop cabin fever if you have to stay inside too long. Does it reflect in your sewing?

I ask because here on the East Coast the weather has been very winterish for the last week and a half. Bitter cold and then loads of snow and more snow. I've been very happy burrowed in the sewing cave creating and after the article and the weather, I just wondered.

Talk back to me!

...as always more later!

Wednesday, March 15, 2017

Denim McCalls 7095

This top really worked my last nerve. My fabric choice, the sleeve cap and my sleeve choice all made this top much more difficult and time consuming than it should have been.


Let's start with the pattern. I've made this pattern three times before always using a drapier fabric. I thought this fabric was lightweight enough to handle the gathering but my fabric choice was debatable for this pattern.

The fabric ~
It was purchased last fall from Michael Levine's online store, where there is still some left. When I bought it I thought it was a little heavier, topper weight instead of blouse/shirt weight. It took awhile before I figured out what I wanted to do with it. 

A note: I also found this fabric on fabric.com for a couple dollars less a yard where it's presently out of stock but the site says it will be back by March 31st.

I prewashed this piece even though I was concerned about the embroidery on it. However, if there was going to be a problem I wanted to know about it before I started constructing the garment. It went through the washer & dryer okay with a small amount of puckering around the embroidery that was easily pressed out. I'm glad that I did prewash it in hot water with a very hot dryer, being hard on the fabric let me know how it would react. In the future, my tunic will be washed and hung to dry to avoid future shrinkage around the embroidered area. 

Construction ~
I decided on a tunic/top because I like the ease of wearing and I can add a sleeveless turtleneck or tank top under it for a little extra warmth. I assembled the shell and it was pretty long. It made me rethink where I wanted to go with the tunic. 

Before I decided on the length, I went ahead and put the sleeves in. What a disaster! My previous makes were from ponte, rayon and velvet. Soft fabrics that I could ease the extra from the sleeve cap into the armhole. It must not have been too bad because I didn't remember the sleeves being a pain to insert. However, the denim was not as friendly to work with and inserting the sleeves was a total pain. The sleeve cap has way too much ease in it for a less drapier fabric.

Honestly it stumped me for a minute. I measured the armhole of my garment (which I'd widened about an inch or two) then measured the sleeve cap. There is an 8" difference. I realized that my TNT dress/top/tunic sleeve has a sleeve cap about that width so I decided to make a new sleeve using that pattern piece as a guideline.


The sleeves are different on all four versions of this top. The first has flared sleeves with a pleated lace/ribbon added to them. The second is color blocked with elastic in the sleeve hems. The velvet version's sleeves are lengthened and flared. This time I gathered the sleeves into cuffs. The cuff pattern was borrowed from my Butterick button downs.


Pictured above is the finished sleeve that just wouldn't go into the tunic. So I ripped it apart. I laid my TNT pattern piece on the fabric and recut the sleeve cap.


However, I didn't want to give up on the embroidery at the sleeve hems. So I took my scraps and pieced them together to make a band of embroidery which I added to the sleeve hems.

After wrestling with that problem, I realized the top was dress length but a little too short for my comfort level. That resulted in a couple of wasted hours of trying to make the dress long enough to cover my knees. I added a ruffle to the hemline made from the scraps of the remaining fabric. However, the ruffle only made the dress look juvenile ~ great for a 12 year old but not a 58 year old woman ~ so I removed it.

The tunic sat while I figured out what to do.

Finally I decided to remove some more of the fullness in the body, unpin the ruffle, cut some of the bottom off, hem the tunic to just below the border and hem the sleeves.

A few photos of the tunic in action ~


Conclusion ~
I'm not sure if I did this amazing piece of fabric justice. To me this is definitely a case of a so-so fabric/pattern match. By the time I was hemming it I was so tired of this garment. Why did a simple little tunic become an epic sew? Especially after I saw this picture of the fabric used in the latest edition of Vogue Pattern Magazine. My version seemed tame & predictable.


I like tunics ~ just tunics that hit me a couple of inches above my knees. I want more of them but I definitely need to choose my fabrics better to achieve the right drape and coverage. When I finished this tunic, I wasn't sure it worked for me until I took the pictures. 

What's up next? Another repeat top is on the cutting table hopefully I can do it justice...

...as always more later!


Sunday, March 12, 2017

Butterick 5678 + Vogue 7700 = Mashup x Three

This is my third version of the button down shirt mash up. Halfway through finishing my second version I knew I wanted more. I thought two more but the fabric I used for this one pretty much squashed making a fourth one right away because this fabric was so needy.

Here is my finished garment ~


...and the picture from RTW that inspired it ~


I started with another precut from Fabric Mart. I bought this one because I thought it was pretty on FM's site but it was stunning when it arrived. It had a really soft hand even after washing. 


I'm enamoured of these precuts because they are bright, floral and/or print and 2, 3 or 4 yard cuts. I've bought quite a few and all of my recently made button downs are from precuts, as well as, my version of Vogue 8772.

Since this fabric was soft I needed to add a lot of support to it. It frayed when you looked at it. It was limp and it pulled out of shape with handling. So I added lightweight fusible interfacing to shoulder seams and the Design Plus fusible tape to the necklines and button placket to stabilize the plackets for the piping I added.


The piping was a major part of this button down. After making the blue and white one that had piping on the collar and cuffs, I realized I really wanted the piping down the button blacket too. So for this one I set out to pipe the collar, cuffs and button placket.


Adding piping to the button band ~
  • I added the piping by cutting off fold over portion of the blouse front on the left side only and added a 5/8" seam allowance to the front piece.
  • For the new fold over portion, I added a 5/8" seam allowance to it.
  • The fusible bias tape was added to the edges that were being piped.
  • Piping was basted to each edge. Then the pieces were sewn together.
  • I folded it together to make the button placket, pressed and topstitched it down.
The cuffs were made the same way that I made them in this post. Adding the piping definitely lengthened the amount of time it took to make the shirt. Otherwise the construction process was exactly the same as the last two except there is quite a bit more handstitching involved in this one.

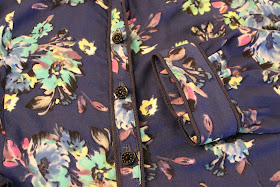
Here is a close up of the vintage buttons that I used on the front of the button down.


A few pictures of the finished button down ~


This shirt is worn with a RTW tank top
and a RTW denim skirt purchased from Jessica London


Conclusion ~
This fabric was so needy that halfway through the construction, I'd sworn off making any more button downs any time soon. Then in this month's Threads, there is an article about how to add binding and ribbon to button down collars and cuffs and I got the fever again.

So I probably have another one or two I want to make before the weather turns really warm...and I'm kicking around an idea about lengthening the pattern pieces to dress length. We will see what actually comes out of the sewing cave. I won't say that I'm not going to use this pattern mashup again soon since I have a list of items in my head that I need to work on.

More tops are up next on the blog.

...as always more later!


Thursday, March 02, 2017

Following Up...

First a reminder about the sewing retreat at Carriage Corner ~ March 24-27th.


Gaylen wrote an amazing post about why she wants to hold Sewing Retreats, you can find it here.

The itinerary for the weekend ~

Friday, March 24th ~ 
Arrive by 10am. Then there will be a shopping trip to Fabric Mart where transportation will be provided so that we can travel as a group. Lunch at a local restaurant. Back to the Inn to set up your sewing area and a wine & cheese get together at the local yarn shop. Dinner on your own and free sewing time after that.

Saturday, March 25th ~
Sew all day - lunch and dinner provided

Sunday, March 26th ~
Check out of your room by 11am but sew until 5pm.

Gaylen only has two spots left to stay at the Inn and a couple of daily sew-ins, so if you're still interested contact her at hello@carriagecornerbandb.com.  I will be there and I hope that you'll join me and Gaylen for a weekend of sewing fun!

Bloglovin' ~

I don't read blogs from a reader.  I use my blog roll and/or other sewists blog rolls to peruse blogs on my iPad. I read this way because I have a good 90 minute commute both ways daily.

So it was interesting to learn that Bloglovin' now gives you the ability to leave a comment on a blog post, amongst other new features. I guess this helps readers engage with their favorite bloggers on a platform that they use often. However, I check in on Bloglovin' sporadically, so if you leave a comment or question there and expect me to reply, it may be days or weeks before I see it. I suggest if you have a question that you hit the link for the original blog post and leave it here.

It's a little much to look for and answer questions across several social media platforms, so I hope you understand that if you need information, here is the best place to ask. Not even my email is safe, because I read it on the fly and mean to reply but sometimes don't get back to an email for weeks.

Finally no matter where you've left a comment ~ here, Bloglovin' or Instagram ~ I so appreciate the time you've taken to leave one!

Fabric Budget for 2017 ~

Okay so we know I can't NOT purchase fabric. I proved that by breaking that pledge the second week of January! So when Kisha wrote about having a yearly monetary fabric budget, I was intrigued. See I've never done this. I've just bought fabric by how much disposable income I had. That meant sometimes I could only afford a piece or two and sometimes I could shop to my hearts content.

But now I own A LOT of fabric and I'm trying to limit how much more I add to the sewing cave. A monetary fabric budget is appealing to me because it will keep me accountable, yet allow me to purchase a piece or two. I've set a number for the year, not too high and not too low, something I can manage without feeling constrained.

I've already subtracted my January and February fabric buys and it was eye-opening. If I keep having large spending sprees, I will have no more fabric money by June, so I'm being very discreet about what I purchase. And no, I'm not sharing what my fabric budget is! *LOL*

On the Cutting Table ~

The third button down has finally been finished and of course I'm already getting amnesia and pining for a new one! *LOL* I wore both versions to work and they wore so well that I'm thinking I need to keep making them. 

So while I have a list of things I want to sew - pre-spring items cause even though the weather is fluctating around here - I know spring is coming! I will be interspersing these between the other makes.

Next up on the blog is that button down and a few other tops that I'm working on.

...as always more later!