Pages

Wednesday, June 28, 2017

One more sleeve hack...

This time I decided to share the technique before the dress' reveal. Partly because it was a good sewing weekend and I didn't want to stop and take pictures and partly because my photographer wasn't around.

The sleeves are what makes the difference between the last two dresses. The rose and white dress has a split sleeve with a banded tie. How that banded tie is constructed is what's featured in this post.


Honestly, that tie took me three tries to get right and I almost gave up on it! I photographed all the steps so that I would have them memorialized in case I want to do this again...okay, not so sure about that last statement!

Here is how I made the split sleeve with tie ~

The sleeve alterations are the easy part. Take the sleeve and fold it in half, then press it flat:


Lay the pressed sleeve flat and cut the pressed edge leaving a full inch from the sleeve cap:


Serge finish the edge and press back 3/8" just pass the serging:


Stitch all the way around the cut edge:


Put the sleeve aside until it's time to insert it into the garment.

To make the band ~
- I decided that I wanted the band to be 2" wide, so I started with a 3" band. 
- That gave me 1/2" seam allowances. 
- I made a pattern piece for the tie that was 3" wide and 17" long. 
- This is what fit the hemline of the sleeve measured with enough fabric to form a knot with a tie that didn't hang over too far on my arm. 
- I rounded the end of the pattern because I didn't want a square ended tie. 
- Each band consists of two pieces sewn together. 

My finished band/tie was a trial and error situation. I made two attempts before the third one looked the way I wanted it to. I'd also cut my sleeve too long so I had to remove 4" from the hemline of the sleeve.

Attaching the band ~
The rounded ends of the band was clipped and graded before the band was turned and pressed flat.


The two pieces of the bands were sewn together until where it needed to be attached to the sleeve hem.


Then the band was stitched to the sleeve hem. Finally the entire band was topstitched.

Here is what the final sleeve looks like on the dress on Lulu. Yeah, my girl really needs some legs...*sigh*


I posted the construction pics to Instagram last week and promised that there would be words/directions to explain the process here. I hope that these are clear. If not, please feel free to leave a question and I will answer it.

Next up on the blog are the last two Concord Tee dresses. I know that I said I would make five but I got tired of working with the pattern, so I've ended up with four. I think I hacked myself out. LOL! 

Also all the other Concord Tee's will be shown with the bottoms I made or am making to go with them. I have nothing new to say about their construction, so they will make an appearance later. I have worn this pattern out. There are other patterns on my list and/or garments that I want to sew so I'm moving on.

...as always more later!


Sunday, June 25, 2017

The Dress Discussion - "What's Up with Wearing A Dress Everywhere?"

Two of my favorite bloggers recently wrote about how sewing and wearing dresses are discussed in the sewing blogging community. 

As a sewist who loves a dress for all of these reasons ~ easy to wear, a lot of creative opportunities to make, one piece to put on ~ I'm gobsmacked when other sewists opine that dresses are fancy. Especially since to me, dresses can be dressed up or down...worn with heels, flats, sandals, boots or sneakers and worn anywear...even the grocery store!

I also don't understand why dresses are confined to fancy events or church. I wear maxidresses to picnics, but fancy seems to be the word associated with dresses.

So what do you think? Are you a sewist who loves sewing and wearing dresses? Or are you a sewist who wears a dress ONLY when you have to? Are dresses part of your regular life, worn everywhere? Or do you sew a mixture of garment types?

Talk back to me because this is the Question of the Day!

...as always more later!

Thursday, June 22, 2017

Next Sew Camp at Carriage Corner B&B

The weekend of July 21st is when it's happening! Be there or be square! Corny I know but seriously, if you want to have a great weekend that includes a trip to Fabric Mart, 48 hours of non-stop sewing (okay you can sleep if you must), other amazing sewists to talk sewing with and the perfect place to stay...you should register for Sew Camp!

I was there in March with some amazing sewists and we had an awesome time! I wrote all about it here!


I'm sure the other participants are willing to testify to the great time we had!

You can get all of the registration information on the Carriage Corner B&B site. I happen to know that there are a few spots left for this session. I highly recommend that you check it out and hope that you can join Gaylen and the other sewists that weekend for a wonderful weekend!

...as always more later!


Monday, June 19, 2017

Adding the Ruffle Sleeve to a Concord Tee Pattern

As I said in my previous post, I saw this sleeve on a young lady in the streets of NYC. When I saw it I immediately thought of the sleeve from View D of McCalls 7542. Cause it's so obviously "The Year of the Sleeve!"


I know this is a popular pattern and I own it for ALL of those sleeve variations. I'm sure that other versions of the sleeves will show up here on future garments.

The sleeve for this tee was the easiest to make ~


- The most important thing is to make sure the diameter of the sleeve is the same as the diameter of the ruffle.  
- I measure the sewn sleeve's hem diameter.  
- Then I measure the circle that fits closest to my sleeve hem and mark that on the pattern piece.
- The circle is traced onto the cut out ruffle piece.
- I carefully cut the center out and then serged it to finish it.
- The ruffle hem was stitched down a 1/4" and pressed.

Finally the sleeve was pinned to the sleeve and sewn down.


Seriously that's it. Easy Peasy!

Now the Flamingo Ruffle took a little more work ~
For drama I used two circles. At first I thought that I would make two of the same size ruffle and sew one a little lower down from the first ruffle. However, after a good night's sleep, I realized that one ruffle should be larger than the other one.

To achieve the larger lower ruffle, I added 1.5" all the way around the circle. there was no set formula to it, I just went with what I thought would look best. 

  1. First the edges are serge finished and hemmed by turning the serged edge under and stitched flat. 
  2. The circular opening/stitching line has been drawn onto both pieces. 
  3. The circles are layered over each other so that the stitching lines match.  

Next the centers were stitched together on the stitching line.
The centers were then cut out and pressed flat.


Then the edges were serge finished.


The double ruffle was stitched to the sleeve.
I pressed the seam up and stitched it flat on the outside of the sleeve.


Here's a view of the double ruffle attached to the sleeve. Now a couple more things you should be aware of:

- I started with a sleeve that was one inch longer than the elbow length notches on the sleeve pattern. 
- My thought was that this would get me a sleeve that was almost to my wristbone. 
- I didn't want it too long because I didn't want it dragging into things.

It did provide the drama that I wanted and I'm thrilled with the final result!


I really am happy with this dress and hope that the tutorial will help you make a dress or tee with flamingo sleeves!

There are a few more tees and dresses on the way, so that's what's up next on the blog.

...as always more later!


Friday, June 16, 2017

The Concord Tees - Hacked Edition

Honestly I've been meaning to get around to making more Concord Tees after I made my first one last spring. As with all good sewing intentions, it took awhile for me to get back to this.


I ended up making four hacked t-shirts. I pulled knits from the collection and started sewing. Well actually cutting first, the first ones were cut using the pattern I traced last spring. I really should have checked the fit before I cut them out...that's why I stopped at four.

Because of that these fit a little closer than I originally wanted. Probably because I've gained back 10 pounds. I will wear them, however it caused me to rethink what size to use for the next batch.

Let's start with these four... 
As usual I don't sew anything straight out of the pattern envelope. I mean I have a basic one and I know what the pattern can do so I decided to take it for a "hack" ride. I kinda feel like I could buy some standard loose-fitting tees but it's harder to purchase interesting tees in different fabrics that fit me.

Hacked Version #1 ~


This one is made from one of the organic cotton fabrics I bought from Organic Plus in late 2015. Instead of using the band for the neckline, I used a piece of 5/8" ruffled elastic from the collection. It was applied directly to the neckline to give it a frilly look. The sleeve band was also omitted. Instead I used a twin needle to hem the sleeve. I already own several white tees and wanted something a little different from the others.


Those are the only construction changes for this tee. However, by adding the ruffle elastic, it really drew the neckline in and gave it an elasticized look. At first I wasn't sure about this but the tee grew on me. It's worn with a new TNT rayon crepe skirt, exactly like these. I love this silhouette. It's going to be my go to outfit for summer!

A few pics...


Hacked Version #2 ~
I used a cotton/lycra blend from fabric.com for this version pulled from deep within the fabric collection. 


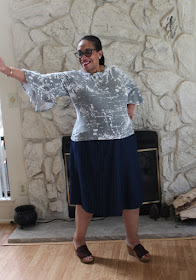
It came about because I saw a similar one on the street in NYC. A young lady was walking into Starbucks wearing a gray t-shirt with those bell sleeves. It reminded me of the sleeves from McCalls 7542. So I combined the Cashmerette Tee and the sleeves from View D to get this rendition.


Seriously it was as easy as that and I was thrilled with the final result. My only suggestion is that you make sure that you measure your sleeve opening and the opening of the ruffle to insure that they are the same diameter.


We photographed this with a flare denim skirt that I made last spring. I'm not quite sure I like these two pieces together. However, after taking pictures of six outfits that day, I was done with photographs. Of course, later on I found my grey sweatshirt looking TNT straight elastic waisted skirt (see the black one below). That's how I will most likely wear this tee!


Hacked Version #3 ~


This fabric is a 2 layer embroidered knit that was gifted to me about eight years ago by Karen Heenan, who blogs at By the Seat of my Pants. Y'all know I watch a little too much QVC and I saw a tee by Isaac Mizrahi that inspired this one. His version had a peplum on it but I wanted something a little looser, longer, and straighter. 

To get this look, I cut the top of the tee off at the waist curve. Then I added 17" of 54" wide fabric, gathered at the top and with a side seam. I matched the side seam and stitched down. It was only after it was hemmed that I realized it looked like a slimmer version of a Turner Dress hack.

Oh and the sleeves aren't hemmed...just serged. I haven't decided if I want them hemmed or not. Since they look okay in these pictures, I'll probably just leave them as is.

One more thing ~ because this is a gifted top, I thought I would wear a gifted piece of jewelry with it...so thanks Marcy for the bracelet! 

Pictures of the Top ~


Color Blocked Version ~
My last one is not a hack at all. I just color blocked it using a black 'n white herringbone knit & a black ponte. This is the only scoop neck version I made from this series of tees. Otherwise there is nothing special about it except for using two different fabrics.


I'm wearing this with my TNT black ponte straight skirt with an elastic waist. I've made quite a few of these skirts in several colors and fabrications. I really want a couple of made by me Tees to wear over them. Because believe it or not, I do have days when I don't want to wear a maxidress or maxi skirt.


This is the simpliest hack. It involves just pulling some fabric from your collection or scrap bin and having a go at it. I have a couple more fabric combinations in my head that I will eventually get to! Cause I had a ball sewing these up. 


Finally ~
I was really thrilled with how these turned out...so much so that I immediately traced off more pattern pieces and made dresses from the tee pattern which you saw in my previous post. I know there's been alot of interest in how I made the flutter/ruffled sleeve on the dress and the tee. So that's what's up next on the blog.

...as always more later!


Wednesday, June 14, 2017

The Concord Tee as a Dress ~ Part 1

I probably should have started the series with the hacked t-shirts but I love, love, love the dresses I made from lengthening the t-shirt pattern. So I'm sharing the dresses first especially since I took these pictures in 90+ degree weather! Admittedly, I'm easily swayed by the internet (but only for good! *LOL*) so after a couple of Concord Tee Dresses showed up on Instagram, I knew that I wanted a few for my wardrobe.

To get a pattern for the dresses, I just added inches to the bottom of the t-shirt pattern using my TNT dress pattern as a guideline.


The Ponte Lace Version ~
First all of the materials for this dress are from the fabric collection! Yes!!! Second, it's a quick sew. Double Yes!!!

Materials:
Beige/Lace Ponte Print from the collection via Fabric Mart
Black Lace from the collection via Fabric Mart
Black ponte scrap from my scrap pile

I used a beige/lace ponte that I bought from Fabric Mart in 2014. The bodice for this dress had some of the fabric in it. Since I only used it for the bodice, I had plenty left. When I pulled fabrics for t-shirts, this piece leapt out at me. 

Originally I had a very involved pieced sleeve for this version. I'd pulled the black lace, to cut up to add to some of the lace ponte scraps and some black ponte scraps. However, when I cut the lace sleeve out and held it up to the body of the dress I loved how it looked. So I changed directions and went with the all lace sleeve. I love the dichotomy of the look.

I also need to talk about my sleeve length. I'm using an elbow length sleeve in most of my t-shirt dresses and in the upcoming tees. For years almost all of the dresses I made were sleeveless because I was soooooooo hot due to my own personal summers or men-o-pause. Now that I'm safely on the other side, I'm always cold...so some type of sleeve is very welcome now.


Oh one more thing...these dresses have a back seam in them. The first one because I didn't have enough fabric to lay them both pattern pieces on the fold. I used it for the second one because the back seam turned out so well on the lace ponte version. I will be using the back seam going forward. Otherwise, just follow the t-shirt instructions and you have a dress instead of a tee.

A few more pictures of the dress ~


Last summer I made a series of looser fitting t-shirt dresses. One of the "constructive" criticisms I received was how to take all of the extra fabric out of the back and sides of the dresses. It's interesting because I really did want looser fitting dresses, something that I could throw on and wear on really hot days. It was a deliberate choice.

Just as these are a deliberate choice to be a more fitted t-shirt dress. The top and shoulder are closer fitting. There is a waist curve to give some definition to the sides and because Jenny has really worked this pattern out, the sway back adjustment has already been made too.


The thing I regretted by the end of last summer was that I hadn't made five of the t-shirt dresses when I made the first three. I won't make that mistake this time! Three more will be made before I move on!

Black 'n Gray Flutter Sleeve Knit Dress ~
(Otherwise known as the Flamingo Sleeve Dress!)


This one has an interesting back story. I bought 3 yards of fabric for $5 from the man around the corner from my job. For the last two years, working at my new job (is it really new anymore after 2 years?) this store has been stocked with women's garments that could be purchased wholesale. However, in good weather they would always put stock on racks outside the store and sell them cheap. He would also have a cart with fabric in it. On occasion I've bought a piece or two from him because it was quality fabric for inexpensive prices. 


Last week I noticed that the store was empty. Then on Thursday I walked by and he had some racks filled with merchandise and a cart with fabric. He sold me three pieces for $10 and told me that the rent went up on the store so he and his partner decided to let it go. It's kinda sad, he's had that store for 20 years and now...forced retirement. These stories are all over the garment district and they make me feel sad and old...*sigh*

Anyway, here's the dress... 


After I added a flutter sleeve to one of the tees, I knew I wanted to add the same sleeve to a t-shirt dress. Then because you know I'm kinda extra, I thought two circles would be kinda cool and would give the dress more ummmpphhh. The sleeve definitely accomplished that! This dress was my daughter's favorite from the day.

I'm going to write a separate post on how to make the flutter sleeves because this one is just tooo long! Especially since the sleeves are the only difference in construction between dress one and two.

More pictures of the "Flamingo Sleeve Dress" ~


I love this one especially since I got the sleeves to work. However, we took these photographs on a really hot day and this dress was too hot to wear in the heat. While the fabric is thin, almost see thru, there must be some wool or a weird poly in it because it was hotter to wear outside than the lace ponte one was. Although I was very comfortable in the dress in the air conditioning inside.

The next three dresses will be made from a lighterweight poly knit that I bought from Fabric Mart last year. Some sewists are calling this fabric a LiverPool Knit. I'm sure you're wondering why I'm not using an ITY, a cotton blend or rayon blend for these dresses. I've just found that I need a knit with a little more body for my dresses. I'm more comfortable that way.

So this is the first in the series of my Concord garments posts. If you don't already own this pattern, I highly recommend that you purchase it especially since it works for curvy, plus-size and regular size women who are well endowed. Just a reminder that it's sized 12-28 with cup sizes C-H and can be purchased here.

Yes, I just did a small infomercial for this pattern but I love it and hope you will too!

...as always more later!