Pages

Thursday, May 24, 2018

Sewcation Eve

When the seasons change...when the earth reawakens after a cold winter...or when the season turns to the days of darkness...I have a yearning to spend quality time with my sewing machine...making new garments for the coming season.

At that time I have soooooooo many ideas fighting each other in the creative area of my brain that I almost feel like I'm drowning in ideas to sew.  I make lists. I buy fabric. I make plans. Anything to release some of that creative pressure...especially since I have a day job and am unable to just sit and sew until there's a release.

That's normally when I schedule a Sewcation. It allows me to get some of the garments out of my head or off the paper and into my closet. It's like a gate opening, things flowing out, relieving some of the pressure and allowing a release of the creative build up.  


I don't know if this happens to anyone else but it definitely happens to me every season...for as long as I can remember. I mean I used my Summer and Christmas breaks in high school and college to just sew. Even in my married life, I bargained with my husband, one week of being alone to sew.  It's just something I've always needed to recharge and refresh my creative batteries.

So we've reached that time of the year when I need 7-10 days just to sew. I have a plan. I've picked some pieces to sew that are a little complicated to intrigue me. However, there are a few pieces that are easy sewing to quell the fast, faster, fastest part of me that still lives in the dark recesses of my creative soul.  And most importantly I've tried to be realistic with my list...no long list of garments to be sewn that will frustrate me.

Here's what I've chosen to sew ~

Butterick 6333 - View B

Butterick 6551 - View B

McCalls 7404 - View B
...cause I love a good high/low hemline

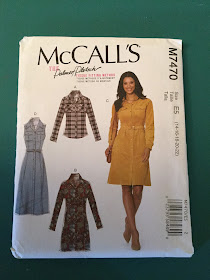
McCalls 7470 - a straight shirt dress
I want View D with some short sleeves 
& View C again with short sleeves

I've pulled together some fabrics mostly new (hangs head in shame - NOT!) that have been prewashed and are ready to be cut. There's a theme here and just to let you know blue is my favorite color. 


I've also gone through the notions & buttons stash and picked out what I need to complete each garment. So everything is prepped and ready and I sit here typing up a post...anxiously awaiting for tomorrow to occur when I can go in.

I may or may not have a post before the "show you what I made" posts go up. I may also put a few in-progress pics on my IG account. So follow me there if you aren't already.  Well that's everything...

...as always more later!

Friday, May 11, 2018

Butterick 6261 in Glen Plaid Suiting

If you've been reading for awhile you know that I swore off Butterick's Connie Crawford patterns years ago after having a bad experience with one. But this one came across my feed and I thought I would give them another try...


My version is not exactly the same as the pattern picture but it works for me because it has the elements I wanted. It's a swingy topper with some interest made from one of the many glen plaid fabrics from the collection which goes perfectly with a pair of black jeans.


Materials ~
- Black 'n White Wool Glen Plaid from the collection by way of Fabric Mart
- Black lightweight fusible interfacing from Fashion Sewing Supply
- 4 buttons from the collection

Another garment made totally from items in the Sewing Cave which makes me soooooo happy! This is a ltwt. wool vest that I can wear during the spring before the heat sets in and it will be perfect again come fall. I made this in February. I'm just posting it to the blog because well it was "Shirt Month" last month.

Pattern Information ~
Can we talk about the pattern and it's sizing, first. Since its a Connie Crawford pattern the sizing goes up to a 6x. It's also a loose-fitting pattern and I needed not to succumb to my tendencies to choose a size with too much ease. To help me with this, I googled the ease wearing chart and came up with these two resources. The first one is an article on Craftsy by Patti Palmer about Ease.  The second one is the actual ease chart on the Butterick website.


Via Craftsy website

After reviewing the chart, I decided that 10" ease qualified as loose fitting (check that it's 5 7/8" to 10" for a jacket) and anything else would end up looking sloppy on me. With that decision, I chose to make a size 2x. Though I'm printing that chart out and putting it with my measurements on my bulletin board so that I don't have to look for it again!!!

Construction Info ~
I made this considerably more challenging because I used an uneven glen plaid instead of the even small check that the pattern was photographed in. All that plaid matching took time.  Then I decided to add black piping to the front of the jacket and the collar. More time but I like how the solid line of black defines the front of the jacket.


Additional construction information:
1. Added black bias tape to the shoulder seams to stabilize them
2. I used 4 buttons instead of the three recommended. I usually like an odd number of buttons but I put an additional one above the bustline seam.
3. I also added a small snap to the front to keep it closed.

Sleeves:
Disregard the pattern instructions where it tells you to sew the sleeve into the jacket and then hem it. You can do it but then you have to drag the entire jacket around the sewing machine. 


I topstitched the hem facing and then hemmed the sleeves before I inserted the sleeves into the jacket. It was just easier to do these tasks.


3. Even though the pattern tells you to machine stitch the hems down on the jacket and the sleeves, I hand stitched them.  I wanted a clean finish on the jacket.

I cut my sleeves on the bias because I was too lazy to try to match the plaid across the front and back of the jacket. I figured the bias wouldn't need to match, it would just coordinate...because bias! And then no matter what I did, the sleeves did not go into the jacket right. 

Even after I worked out a solution to make the sleeves fit and hang properly, when I put a lightweight turtleneck under the jacket, it felt awkward on. So I decided to ditch the sleeves entirely and make it a vest.  


That's when I decided to add the piping to the armholes to tie it to the front of the vest.

A few pictures ~


Conclusion ~
I'm still not sure I like Connie Crawford patterns. I'm sure these patterns probably work wonderfully for others, it's just not all patterns are for all sewists. I'm just one of those that it doesn't work for and this is a one and done sew for me. I'm totally uninspired to use this pattern again.

So a couple of things:
- I'm kinda bummed because I tracked this pattern down and paid 50% off for it instead of the normal $2.
- I'm glad that I used a fabric from my old "professional" life for this project. It shows me that I can use these fabrics in my new life.
- I love the flare/swing of this vest.
- The black piping and black buttons are the best part to me.
- When I wore this to work, it was comfortable and even though I looked a little dressier than normal, I would wear this outfit again.

I'm moving on to the next garment...

...as always more later!


Tuesday, May 08, 2018

Met Gala - 2018

The theme for this year's Met Gala is "The Heavenly Bodies: Fashion & The Catholic Imagination." Besides the normal fashion mags covering the event online, you could also watch it live on the E! Network. The stars were asked to wear their "Sunday Best!"

I haven't written about a Met Gala in years because I've felt so-so about the dresses but this year I LOVED 90% of what was worn! So this is a picture heavy post that I've divided into categories based upon my interpretation of the theme.  All pictures are credited to Getty Photos which I yanked from the Internet.

Okay let's start with the co-chairwomen of the event ~

Amal Clooney in Richard Quinn
Reminds me of an outfit Lana Turner wore in Imitation of Life

Rihanna in Maison Margiela by John Galliano
The Twitterverse went crazy over this look! Me not so much!

The other co-chair was Donatella Versace and I was unimpressed by what she was wearing.

Next up - The Angels ~

Amanda Seyfried in Prada

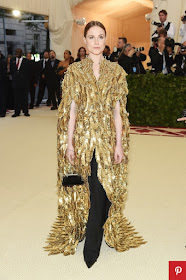
Rachel Evan Woods in Altuzarra

Kate Bosworth in Oscar de la Renta

Katy Perry is a literal angel with those wings!
She's wearing Versace

Yara Shahidi in Chanel

Rosie Huntington Whiteley in Ralph Lauren
...that halo headpiece!


The Madonnas/Matrons of the Catholic Church ~

Ariana Grande wearing the Sistine Chapel as interpreted by Vera Wang

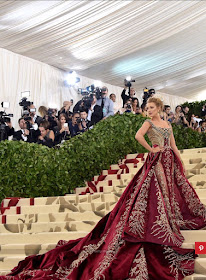
Blake Lively in Versace

Emilia Clarke in Dolce & Gabbana

Rita Ora in Prada wearing another amazing headpiece!

Sarah Jessica Parker in Dolce & Gabbana

Cardi B in Moschino and I kept thinking a Tudor Queen

Diane Krueger in Prabel Gurung with a Philip Treacy headpiece


The Knights of the Round Table ~

Zendaya in Versace

Priyanka Chopra

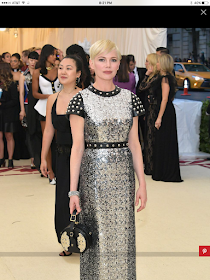
Michelle Williams


The Looks I Just Liked ~

Come through Ashley Graham!
She's wearing Prabal Gurung

Lily Aldrige in Ralph Lauren
(expect to see a version of this on me this summer!)

Nikki Minaj in Oscar de la Renta

Tracey Ellis Ross beautiful in pink wearing Michael Kors

Lena Waite wearing a Gay Pride cape!


These are my picks!  They are what made me sit up and take notice or sigh in wonder. I LOVED the choices the actresses, designers and stylists have made. I loved the amazing headpieces. And one more time, I can't wait to see this exhibit. The exhibit runs from tomorrow, May 8th until October 8th. I hope if you're coming to NYC during that time that you make your way over to the Met to see the Exhibit!

...as always more later!


Saturday, May 05, 2018

Shirt Month Wrap Up

April was some month, huh?!  I've shown 8 shirts that were sewn either earlier this year or specifically during the month of April. I combined them all together so that they were given the platform they deserved, thus April being Shirt Month! I'm finished sewing shirts for awhile because the weather is finally changing and I have loads of spring things I want to make.


So let's review ~

First was the "Hurrying Spring Along" shirt that was made from a border print cotton sateen and a sponsored post for Elliott Berman fabrics.

Next up was a Black shirt with black 'n white gingham accents - because I don't own a black shirt and need one.

My third shirt was a mid-weight chambray shirt - the perfect casual shirt to wear over jeans and one of my personal favorites for the month.

Then there is the black/white/gray dot shirt - that had so many techniques included in it's construction and still it worked.

The fifth shirt was a designer inspired pinstripe shirt with white collar and cuffs - the one that will probably get the least amount of wear.

A funky orange print shirt was the sixth shirt...a lot of print matching with that one! 

Seven and eight were versions of white shirts because everyone needs one right?!


I'm happy with most of the shirts but that's due to wearability factors rather than sewing ones. I've gotten sewing the buttons on by machine down and am using two new sewing machine feet...especially my gathering foot which is a time-saver and revelation. By sewing so many of the same garment type back to back, it's caused my sewing skills to elevate to another level - so I'm thrilled about that!

I love being able to play with the design features - adding contrasting fabric to the collars, cuffs and front button bands, changing the sleeves, adding embellishments and making fabric choices - these all have contributed to making sewing so much fun this month.

Quarterly In & Out Totals ~
I've used up quite a bit of fabric - 21 yards - which doesn't include the Border Print Shirt since that was a sponsored post.  That total makes me happy because that's 21 yards out of the collection. However, my March totals for fabric in (from Sew Camp weekend) is 21.5 yards and then I bought some more shirting in April from Fabric Mart (y'know the stuff that wasn't on the website when we were there) another 14.5 yards.  Then I bought 3 yards of an amazing digital linen that was on sale at Fabric.com and 3 yards of an embroidered stripe from EOS.  

This makes my end of quarter results - 13 garments sewn, 34.5 yards of fabric out and 42 yards in.  That means I've added 7.5 yards more than I've sewn out. Imma have to be really careful for the next few months about purchasing fabric before Sew Camp. I know I can't escape buying fabric from Fabric Mart with an onsite visit but I need to be more vigilant until then. Since my main goal this year was to sew out more than I bought in at the rate I'm sewing, Imma need to burn my credit cards! *LOL*

Conclusion ~
I want to thank everyone for following along, leaving a comment and/or suggestion and appreciating my shirts.  I've enjoyed making and sharing them on social media. My shirt wardrobe has really been beefed up and I will be ready when fall rolls around. I truly hope that you gained some inspiration, maybe a few design ideas and some sewing tips/techniques from the series. Because now that it's May, I will be moving on to sew a variety of other garments.

Thanks again!!!

...as always more later!


Wednesday, May 02, 2018

Shirt Sewing Tips

I added some tips to a couple of my shirt making posts and then I decided to just put all of the tips in one post ~ also adding some more information and links to blogs and equipment in case you need them. So while this post is a little long, I'm hoping that you can refer back to it whenever you need tips on making your own shirts.

Buttons/Buttonholes ~
- Buttons
To me button placement is so important on a shirt to prevent gaping.  As I said before I use a lot of buttons on my shirts. The first button I place on the shirt, is in the valley between my breasts. Then one is placed above and below that one. This is to guarantee that there's no gaping. I typically set my buttons 3.5" apart.

This is the beauty of making your own shirt. You can use as many buttons as you like. I also used a larger button than most RTW shirts have. I hate trying to button those tiny shirt buttons so I've sized up. As a plus size woman I find that good button placement and a great fit add up to a well-fitted shirt. I highly suggest that you use the size button and a placement that works for your body, not just what the pattern suggests!


- Making Buttonholes
I use a seam gauge to mark my buttonholes down the front of my shirt. However, another method of marking is to use a simflex guide. I've made a lot of buttonholes in my sewing career. There are many ways to mark your buttonholes and loads of tutorials on the internet. 

I honestly use pins to mark the top of my buttonholes because I can line them up on the red lines of my buttonhole foot. I snug my buttonhole foot between the stitching lines on the buttonhole band so my buttonholes fall exactly in line and stitch from there. You can see a quick video of my sewing machine in action here. Let me stress that this is NOT the right way to do things. 

You should use proper markings to line up your buttonholes. A great example of this is a picture from one of the people I follow on Instagram - here.  Look at how Sarah has marked not only the start of the buttonhole but the length of it too.

I mark the way I do from experience. Although I will tell you that I start making my buttonholes from the bottom of the shirt and work up. This way if my first or second buttonhole sucks (it happens even after making a test buttonhole) I can remove the thread in an area that's not quite so noticeable.

My final tip is to use a chisel and block to cut open your buttonholes. Afterwards, I apply Fray Check to the front and back of the buttonholes. Also, I let the Fray Check dry before cutting the buttonholes open. I've found this method prevents those little flyaway threads that can occur when cutting buttonholes open.


Interfacing ~
My interfacing of choice is from Fashion Sewing Supply.  Pam has the best interfacing for garments. I used both the Pro-Woven Light Crisp fusible interfacing or Pro-Sheer Elegance Medium Fusible for my shirts. I highly recommend that you purchase an interfacing sample set from Pam so you can feel the different weights.

Otherwise, I apply interfacing following the pattern instructions. 

Making shirt collars ~
I know that Pam Erny who runs the Fashion Sewing Supply online interfacing store has a collar technique on her blog, Off the Cuff. It's the post that's dated, October 8, 2012. Sewists have successfully used her method to get great collars since she's an excellent shirtmaker so they come highly recommended.

However, I don't use her technique. I use a set of steps that I've done for years. I wanted you to have the professional way of making a perfectly pointed collar before I explained how I sew mine.

1. I sew the long side of the collar first using a 5/8th seam allowance.


2. Then I stitch each side seam also using a 5/8th inch seam allowance. However, I double stitch over the intersecting seam portion.

3. The corners are clipped.


4. Next I take the collar to the ironing board and press it over the pointed end of my clapper.


5. Then I trim the sides of the collar and the longer edge


6. I use my bamboo pointer and push the collar edges out as far as they will go


7. Another press to set the collar flat

This is my method. I'm sure others use a different method or Pam's.  Drop a comment in the comment section letting me know which method you use.

Matching Prints/Plaids/Stripes ~
You know I advocate a single layer technique when you need to pattern match. I also believe you should run your pattern pieces in the same direction to insure that you get a pattern match all the way across your garment. I've talked about this in numerous posts.

However, Gaylen of GMarieSews does an amazing job of pattern matching pockets on her husband's shirts. When we were at Sew Camp, we got to see the shirts she makes for her husband in person. So here are a few of her tips:

First - I trace my pocket pattern onto medical table paper (you can use any tracing paper you have on hand for this). I use this for my pattern work because it's easy to see through. I cut out several pocket patterns so I always have a fresh one to work with for each shirt.


Second - Once the left front of the shirt is cut out, I position the pocket pattern on the front where it needs to be sewn.  When I have the pocket where I want it, I take a pencil with a rounded point so I don't rip the paper and trace the critical elements of the design onto the pattern piece.


Third - I lay the pattern piece directly onto the fabric matching the print to my drawing, carefully pinning it in place, then cutting the pocket out.

Fourth - prepare the pocket as you normally would.  When you're ready to sew the pocket to the shirt, line up the print, pin the pocket in place and sew it down leaving the top open.


Gaylen's husband wearing the shirt

Design Changes ~
I don't know if this qualifies as a tip but I'm adding this.  I talked design inspiration in this post. However, I really want to encourage you to think outside the box on the details you add to your shirts. It's what makes each of them different and reflective of your personal style.

Embellishments like piping and binding, embroidery and ribbons can be used. Different fabric for the undercollar, cuffs and button bands really add a creative touch to shirts. The fabrics don't need to match, just coordinate which gives your shirts an artistic flair. 


Also, please realize that you can use fabrics that aren't normally used for shirts. I've made 13 now and used a variety of fabrics...polyesters, shirtings, cotton sateens. I have several more in mind that I want to make using linen, silk blends, some voile and cotton. Since you're the designer, you're not limited to standard fabric choices.

Simple Common Sense Sewing Techniques ~
1. Change your sewing needle. 
I changed mine after every two shirts. You want your stitching to be precise especially in the topstitched areas and a dull needle won't give you the stitch quality you want.  So change your needle!

2. Add a button to the side seam.
I add a button into the side seam of all my shirt makes. That way if I lose one I don't have to search through the loose button stash to find one.

3. Make sure you're using the correct foot to sew your garment. I noticed a huge difference in my stitches when I changed to a straight stitch foot and throat plate. So if your sewing machine comes with different feet try them out and see if they provide better stitches than just using the basic foot on your machine.

Sewing Library Suggestions ~
I always think you should own a book or two on sewing...or maybe even start your own personal sewing library.  To that end, I recommend the following books to help sew the best shirts you can:

1. Shirtmaking: Developing Skills For Fine Sewing by David Coffin

2. The Shirtmaking Workbook: Pattern, Design, and Construction Resources - More than 100 Pattern Downloads for Collars, Cuffs & Plackets also by David Coffin

3.  Easy Guide to Sewing Blouses: Sewing Companion Library by Connie Long.

For web inspiration, definitely read Pam's Off the Cuff ~ Sewing Style blog. It's a treasure trove of shirt making techniques and tutorials, as well as being chock full of inspirational sewing. There are pages of tutorials on Grainline Studios blog. You can access them here.

Hopefully something in this compilation of information will help you when you're making a shirt or deciding to make one. As you know there are quite a few shirt patterns out there - both from the Big 4 and from the Indies. Hopefully you will be able to develop a TNT pattern so that you can take creative journeys with your shirt pattern.

Next up on the blog is the wrap of Shirt Month...I've really enjoyed sewing these shirts. I hope you've enjoyed following along!

...as always more later!