Supply List ~
- 3 yards of a midweight cotton stretch shirting by designer Isaac Mizrahi purchased from Emmaonesock.com also from the collection
- 1/2 yard of gray/orange print batik from the collection
- 12 1/2" 4-hole orange buttons from Pacific Trimmings
- 2 pkgs of 1/2 foldover bias binding from Pacific Trimmings
- Light Crisp Shirt Fusible Interfacing from Fashion Sewing Supply
Construction & Design ~
Most of the shirts I've sewn use the silhouette of yoke & gathered/pleated back with a straight hem. I was weary of that shirt type. It prompted me to make some changes to my existing pattern pieces. I thought I would add the back princess seams into the mix yet keep the back yoke. I also wanted the curved hemline typical of button down shirts.
After some pattern alterations, I had new pattern pieces to use for this new version of my TNT shirt pattern.
Adding space to the lower side back piece
Added space to the center back piece
Putting all the pieces together to insure they work
I know the question is, why not just use a new pattern with the features I want, because I do own quite a few shirt patterns. However, I would have to start the fitting process all over again using a new pattern. I know where to make changes for my body using these pattern pieces. I'm not starting new...I'm just adding to the pattern that's already working for me. Plus I really don't like to fit new patterns...it's one of the reasons that I use TNT patterns over and over and over again.
After sewing the shirt together, there was excess fabric in the back seams. So I took it all out...everything that I added to the pattern pieces was taken out...*sigh!* I need to adjust the pattern pieces because I really want to make this shirt silhouette type again.
The other challenge was to get the print to match across all of these seams, as well as from the yoke back to the back princess seams. So I single cut the back pattern pieces. It took a lot pins, some slow sewing and a good layout to get it to work. It matches across all of the seams except one under arm seam and I'm good with that.
Binding ~
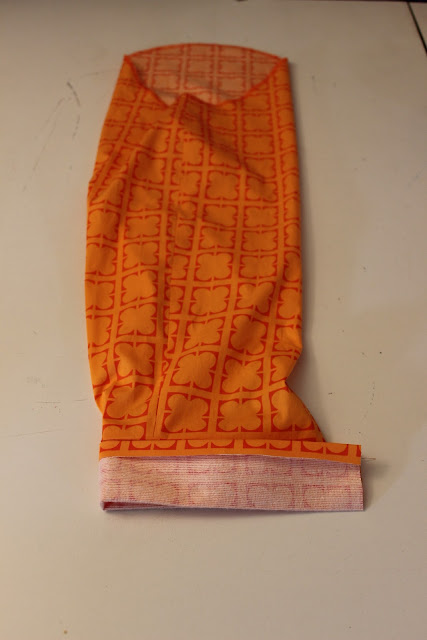
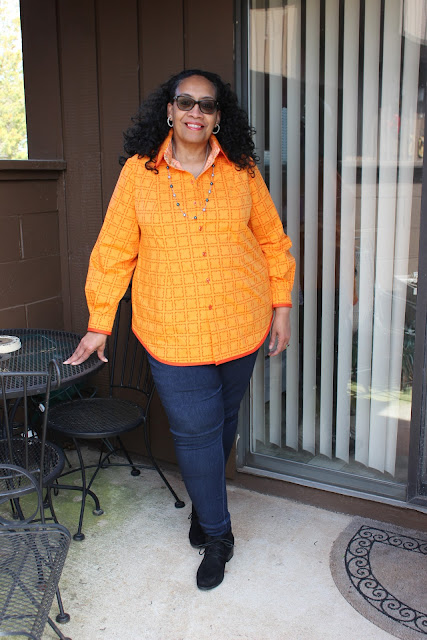
The design change to this shirt is that I added bias binding to the collar, cuffs and hemline. I wanted to use the binding to enhance the shirt's print. Adding it to the collar and the hemline were pretty standard. But I had to stop sewing for the night and sleep on it to come up with an idea for the application to the cuffs.
I photographed the process so when I want to use it for a future shirt, I can refer back to it. Readers if you want to incorporate this into one of your shirts, please feel free to borrow it.
Apply the band to the sleeve, then press it in half
up towards the sleeve
Align the binding next to the creased line of the cuff.
Stitch the binding down with a row of stitching on each side of the binding.
Finish and apply the cuff following the pattern instructions
I really like how the binding is applied but the cuff has a clean finished look. Which is what I wanted more than anything.
A few pictures of the shirt ~
Conclusion ~
Honestly I never thought about the logo print on the fabric when I dreamed up this shirt. I'm not sure I would have used it if I'd realized I would be matching all those stripes and the print beforehand. I just wanted to make some pretty shirts. Thankfully, I did use the fabric because this shirt is different from the previous ones I've made...though I used my seam ripper ALOT...this was slow sewing...really slow sewing! Also, this shirt has a slimmer fit with more button down shirt features.
This is shirt number 6 for the month and I have 2-3 more to make before I'm done. Since the weather is cooperating by just starting to warm up, I think I will get those last couple of shirts completed before it gets hot.
My next post is about my shirtmaking tips. I felt like including one tip per blog post wasn't enough. Having one blog post with all the information seemed more appropriate so that's what's coming up.
...as always more later!


Carolyn, I love that you use TNT patterns and continually tweak and redesign them. Great details on this one, and you look FABULOUS in orange!
ReplyDeleteWhat a lovely bright orange shirt. I love orange! It came out really well, but I'm feeling your frustration with the unpicking; I do a lot of that here too. Thank you for sharing the application of binding to the cuff, so simple to create a fabulous look.
ReplyDeleteBeautiful colour and I love that curved hemline!
ReplyDeleteFabulous, love the colour as well, really suits you. One question though, or rather something I would like to see. Since I went back to sewing in 2009 my wardrobes are full, just how full are yours, because I only have a very slow production line, yours is phenomenal?
ReplyDeleteWhen I changed jobs 3 years ago I gave away 90% of my wardrobe. So starting from nothing with this new position, I've worn out most of the clothing I wore/bought the first year from repeated wear. I have more of the garments I made in year 2...so to answer your question, there's been a natural elimination of clothing to my wardrobe over the years. I'm just starting to get a little full now.
DeleteLovely fit, particularly since this is a first try on princess seaming the shirt. You really have developed a fine sense of where and how much to alter a pattern when you want to make a change. Also, using seam binding to trim the collar, cuffs, and hem looks terrific.
ReplyDeleteDot - actually the Butterick pattern and very first shirt have princess seams. I added them back but using a yoked back for this version. Thanks for admiring the shirt!
DeleteThat is one fantastic shirt. I love everything about it, especially the hemline. A great look.
ReplyDeleteThis may be my favorite one yet. You inspire me.
ReplyDeleteLove, love, love this gorgeous marigold shirt. The orange bias binding really highlights the curves and details of the shirt. With this make it's really starting to feel like spring!
ReplyDeleteI've been making more shirts since last summer too, so I'm looking forward to your post on shirt-making tips. Yours always look so professional, with your style and flair added!
My sewing is nowhere near your level, but I've gotten to the point where I don't think my shirts look homemade, at least from the outside. But I'm still struggling with sleeve fit, since I always need a full bicep adjustment. I still have trouble getting the sleeve cap the right shape and height while still making the seamline match the armhole.
This is a great shirt. I love the color on you . All that matching would have made me a bit crazy but you nailed it . Looking forward to the shirt tip post !!
ReplyDeletegreat use of that fabric, and I like the fit on the back, sharp!
ReplyDeleteAwesome shirt and it looks beautiful on you.
ReplyDeleteOh, I really love this orange shirt on you! It is lovely! The logo matching made my head spin... one day I will venture into more precision with stripes/plaids/etc. For now, your logo matching is amazing, and well worth it for a nice shirt.
ReplyDeleteAbsolutely love it.
ReplyDeleteThis is my favorite yet!I think because it fits you closer and is a beautiful color for you.
ReplyDeleteBeautiful work! I love the details, and that you took your time and matched everything. The shirt looks terrific on you. The fit is great and is a great color for you. Good for you taking your time. I bet at times the slower rate became almost meditative. To do all that matching, I have hand basted to be sure that everything is accurate. You take your time and the process becomes meditative. Thank you for your posts!
ReplyDeleteThis is one of my favorite of your shirts. The binding is so beautiful and the shirt just suits you so perfectly.
ReplyDeleteFabulous color for you! I absolutely love the back with the princess seaming. The fit is sheer perfection. When you first mentioned shamrocks in the fabric, I thought my cataracts were worse than the doctor said but when I looked a little more closely, I could see them. (I cannot wait until the surgery is behind me and I can see correctly). You know I love back (and front) yokes but adding those princess seams really made this perfection
ReplyDeleteI love this shirt! I love how it turned out and really, really like the way you added the bias to the cuffs! Brilliant! I may, in fact, use that. g
ReplyDeleteThis one is stunning! The fit is perfect.
ReplyDeleteLove this top! Binding was a great design idea!
ReplyDeleteLove your shirt. I love orange. Well done on you pattern matching.and thankyou for all your information. This is definately going into my resources folder. 😊
ReplyDeleteI have been admiring all your shirt makes. Such a wonderful variety of fabrics and trims. I like this one a lot. Great color for spring!
ReplyDeleteI love the binding/trim treatment on this one! Bookmarking for future reference, thank you again for being so generous in sharing your journey.
ReplyDeleteHi Carolyn. Has anyone offered you a book deal yet? I am a sewing lurker, with literally NO skills in the clothing area - only home dec. But I have read your blog for probably 5 years, and I think your posts are a fantastic combination of how-to and why. So very useful I might just have to try sewing myself a shirt! This orange shirt may have been slow sewing, but it is a WINNER! Thanks for your contribution to the blogosphere. But, you should get a book deal!
ReplyDeleteI've only recently found your blog but I have to say the posts are something I really look forward to. I will probably never make the kinds of clothing you make, I have no need for them, but I LOVE your process and the way you lay out the explanations. I've learned a lot in each post. I think maybe your brain and mine work the same way, maybe they are twins.
ReplyDelete