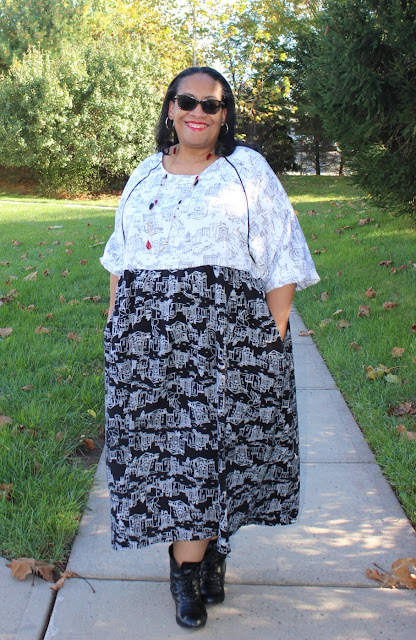
Like many of you, I own a lot of patterns! And as you know in 2021, I've been on a mission to sew more new patterns and not just use my TNT patterns. Since I've accumulated quite a few Style Arc Patterns, they've been on every one of my to-sew lists.
This Style Arc Hope Dress is one more that made the list and my summer cut pile.
I was attracted to the embellishment possibilities and also because I love a big loose dress in the hot/humid summer. While I cut this one out in a black/white rayon print, luckily it works well as a transition dress too.
Supplies ~
The coordinating black & white fabric was purchased in 2016 from Marcy Tilton's booth at Sew Expo in Puyallup.
9" black invisible zipper
black corded piping purchased from Daytona Trimmings
All of the supplies for this dress were in-house. I didn't purchase anything to make it happen and that makes me proud!
Construction ~
This is an easy to construct dress. There are over 300 versions on IG. You can see them here. I, of course, complicated my dress. First, I added an invisible zipper to the dress bodice back. I HATE, HATE, HATE, loop and button closures on the backs of tops and dresses. They always make me feel like the button is going to pop open and my back will be exposed. So it was the first thing that had to go.
Even though honestly, I didn't need a back neck opening. My head slides into the dress easily. Meg from Cookin and Craftin did that with her version and I understand why she omitted the back closing.
I was really intrigued by Birdy's version where she added piping to the front and back bodice sleeves. I knew I had to do the same. Birdy used piping that was the same color as her fabric. I wanted piping that would incorporate the black into the white top so I contrasted mine.
Otherwise, all of the sewing construction is the same. I even added the pockets because I was intrigued by how they came together. Totally understand why other sewists are using this method when adding side seam pockets because it gives it a little more elegance.
A Few Pictures ~
Conclusion ~
This is a one and done dress. While I like the idea of the pattern, it's not a dress I want to own several versions of. Also, mine is just a little too loose. I think I cut a size 26 and could have gone down to a size 24. Here's a good photo of how much fabric there is...
If you're looking for a dress with a little more fitting, my version ain't it! Will I wear it? Sure will. Cause you know there's gonna be one of those hot, humid and sultry summer days and this will be perfect because it won't be touching any skin. Right now I'm gonna wear it with a pair of black tights, the boots in the picture and my black sweatshirt hoodie. Perfect for fall!
I also pushed my sleeves up to give them a little more puff so you can't see the elastic hemline. It is the one feature I like because I'm loving big puffy sleeves right now.
We did take more pictures today...so the Panel Print Shirt is finally up next!
...as always more later!


I love this dress Carolyn! I like the way you've contrasted the bodice and skirt. Thanks again for another informative post :-)
ReplyDeleteI really appreciate your feedback on patterns, Carolyn. This B&W is a nice combination.
ReplyDeleteI'm intrigued - what is the pocket method used?
ReplyDeleteBarbara - it has you stitch the front pocket to the front of the skirt creating a slot entrance. It's pretty cool!
DeleteThis is a winner!
ReplyDeleteI absolutely love this!
ReplyDeleteCute dress : )
ReplyDelete