Pages

Sunday, November 30, 2014

Vogue 8840 finished plus more

It's been a long weekend full of family, food and Christmas decorating.  Have I ever told you that I don't really like to put up Christmas decorations?!  Well I don't...mostly because you have to take them down! *LOL*  I mean I love the way homes are done up for the holiday and I'm especially in awe of those who spend quality time lighting up the outside of their homes.  However, if I could pass that up or better still decorate the tree, roll it into a closet and roll it out year after year, I'd probably be happiest!

With that longwinded introduction, I'm sure you're wondering if I sewed any this weekend?  Well actually I did!  I finished Vogue 8840 and a sweater vest and skirt combo. I love all three pieces but photographing them proved to be quite challenging.

See it's getting dark outside by 4-4:30pm lately which cuts into my Sunday sewing time considerably! Honestly, I'm just getting geared up good on Sunday, so to stop by 2pm to take pictures hasn't quite jelled with me yet. It seems like just a few weeks ago, I could sew until 5-6pm and then take pictures to post to the blog. So bear with me while I get adjusted...*sigh*

Anyway, Vogue 8840 is done and I have some so-so pictures to share. 


Stats ~
Fabric:
A double sided ponte from Fabric Mart

Notions:
Silver clasp from Pacific Trimmings

First though a little construction information.  The pattern alterations I made are in the proceeding post. Otherwise, this was an easy sew. I did check the pattern instructions but since I've altered the pattern to make it a jacket instead of a top, I didn't follow them exactly.

The facings that were added to the jacket needed a little extra work to keep them from flipping out.  Besides edge stitching the back facing, I added topstitching to the neck, center fronts and hemlines of the sweater jacket. Then I stitched in the ditch, in the center back seam and both shoulder seams, to prevent the facings from flipping out.


I also decided to make two design changes from the amazing jackets that Nikki made. The first was to add a closure at the neckline and the second was to add pockets which I liked until I saw the pictures of me wearing the sweater jacket.

Since the construction was relatively simple, I took no pictures of the process. But I did take a few pictures of how I made the tabs to add the silver clasp closure to the jacket front.


I cut a strip 14" long by 3" wide. Flipped the back over and pressed the sides to the middle. I added two rows of stitching on either side of the tab. Then I added a decorative stitch (Stitch #106 on Janome MC 8900) down the center of the tab.


I cut the strip in half. Folded it back an inch on both strips and looped it around the bar of the closure. Pinned the tab down onto the jacket.


Pinned both tabs onto the jacket front.


Stitched it flat using my zipper foot to get close to the bar. Also added a few hand stitches in there to insure that the tabs were secure. This is the feature I love the most about the jacket.

Some more pictures ~


As I said previously, I realized that I hated the pockets on the jacket.  They are too high and poorly attached so I removed them.  


Have to settle for the revised sweater jacket on Lulu 
because the sun went down!

You can see the back seam with a little topstitching 
added to give the back some definition.

Don't know if I'm going to add the pockets back or not...part of me liked having them on the jacket which is unusual since I'm not a pocket girl at all. So I'll see since I still have the pockets. 

One more thing, this is one comfortable sweater cardigan. It's soft and warm and I'm sure it will get a lot of wear this winter. I would really like to make another one with a few adjustments. I just don't know when I'll get to it since I have so many things I want to sew this winter!

...as always more later!


Friday, November 28, 2014

Vogue 8840 - Pattern Alterations

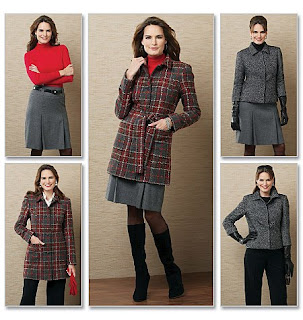
To recap ~ I want to make this sweater jacket...


...using this pattern...


Of course pattern alterations were first because honestly how many of us sew things right out of the envelope? AND I needed to make a few changes to the top pattern to make it work as a jacket.

I added 3" to the shorten/lengthen line to the jacket front to make it knee length. 2" was also added to the center front so that it will close.


I also made facings for the front pattern piece and the back neckline. The back neckline piece was cut a little deeper so that I can add a tag and to give the jacket a little designer edge.


Making the front facing

The back facing (which I altered again before I cut the fabric)

I added an inch to the back pattern pieces to add a back seam to the jacket to give it a little more definition. 


The final change was made to the sleeve. The pattern is a cut-on sleeve and to add length there is an additional piece to sew to the cut-on portion.  I lengthened this piece 4.25" to make it wrist length. I also narrowed the seams so that the wrists weren't so large.


That's it for pattern alterations...simple and easy but enough to change the top to a jacket. Next up cutting the fabric out and constructing the jacket.  I will share the finished jacket soon!

...as always more later!


Wednesday, November 26, 2014

The Fabric Inspiration Dress

The inspiration for this dress was discussed in this post.  The fabric really drove the creation of this dress.


This is a perfect work dress and I love the empire waist silhouette on me. Since this is a second make of a variation of my TNT dress pattern, there aren't any construction changes.

However, I did layer the mesh and pinstripe fabric for the dress' empire top and took a few pictures of the construction process:


Dart traced on the bodice front

Mesh piece pinned to the pinstripe top

Mesh and pinstripe fabric backs pinned together

Front bodice and skirt sewn together

Inserting the invisible zipper
marking the zipper to match the sides 

...and even with the marking, I was an 1/8" off in the end

Basted the sides together to insure that 
they would match when machine stitched

I love the play of the mesh printed top versus the pinstripe skirt and how it really works in my "Creative Corporate" dressing theme. 

A few more pictures of the dress ~


I do have two more yards of the pinstripe fabric left and I want to make the shorter jacket from this out-of-print pattern - Butterick 5535 - purchased in August 2010.


I will probably sew it sooner rather than later...just have to make a few decisions about whether to line it or not, add embellishments and what type of buttons to use.  I'd really like the dress and jacket to be coordinates that can be worn together.

Thanksgiving is tomorrow in the US. This year I'm off the Friday after Thanksgiving, working the Friday after Christmas, because my firm is open both days. I will have the grandbabies with me Friday, since my daughter and SIL both have to work. However, I will be in the sewing cave for the rest of the weekend. I can't wait!

...as always more later!


Monday, November 24, 2014

McCalls 6844 in Pictures

I thought I'd share some pictures of me wearing the McCalls 6844 sweater jacket. The dress is my Bubble Dress made at the end of the summer & worn with the jacket. All construction information for the sweater jacket is in this post

Warning: this post is a little picture heavy

Here is how I will wear it to work...


Close up of the collar and cuffs

This is how I will wear it out...

...since it's holiday time and I tend to go out with friends more during this time of the year...here is how I will wear it out.

Love how the sweater jacket dips 
a little lower in the back!

...and it covers the important parts! 


I'm wearing the McCalls 6844 cardigan with a bow-tied version of the Sewing Workshop Mission Tank and RTW leggings.  


Honestly, this is a new closer look than I've normally worn.  The recent weight loss made this outfit possible...however, it's also playing havoc with my sewing. All of the side seams on garments have to be adjusted for the inches lost. I know I should be happy but I'm seriously stressing! *LOL*

This is what I'm working on next ~


I pinned this to one of my boards on Pinterest, saw it last week during the cold snap and thought I would love to have this sweater jacket to wear this winter. 


Pulled this gray/white ponte from the collection and will add two silver closures that I found at Pacific Trimmings at the neckline and at the bustline also possibly some patch pockets. 

I will use this Vogue 8840 pattern which is sadly out of print...


...yes, I'm totally influenced by the pretty jackets that Nikki from Beaute' J'adore just made.

One final picture...of me and Miss Sammy who is 10 months old now and is the sweetest baby evah! Seriously, she has the sweetest disposition so totally different from her brother and sister.


Up next is The Fabric Inspiration Dress...

...as always more later!


Saturday, November 22, 2014

Progress

I was flipping through the blog looking for a post when I flipped into my posts from last November where I was discussing my new Canon and the frustrations of trying to learn how to use it.

Now one year later, I've mastered taking my own photos with the tripod and even my daughter has become comfortable taking pictures with the Rebel. Quite a few YouTube videos, a lot of begging for info on how to best take pictures, lots of visits to sites on the internet and the willingness to persevere, has resulted in better pictures...well at least I hope they are! *LOL*


One of the first pics on the new camera
Why did we think we could take them at night? 

During the winter, I primarily stuck to pictures in front of the fireplace in my living room.  In the spring and summer, my daughter and I have moved to outside the front door of my condo...finally venturing a little further from my front door by walking to the kiddie park to photograph my garments. 


One of my favorite pictures - loved the sun dappling
and how the focus is on my face versus the dress

I'm finally starting to see "pretty pictures" in my mind, which I think you need to be able to take great photographs. Not that I take great photographs, but my daughter and I are trying. I've learned a little about backgrounds, lighting, the best time to take photos and to take loads of pictures to end up with 3 or 4 good ones.  Seriously, we take about 50 photos (at least) to get a couple of good ones. It's amazing how many funny faces I make when we're taking pics...*LOL*


Loved the color of the foliage on this tree and just wanted a pic in front of it!
Love how the tree is framed in the background of the pic...

Originally I was using the camera's timer to take pictures, walking back and forth in 10 seconds, to take a shot.  I finally bought a Canon remote control, and figured out how to work it, which felt like a major breakthrough!  So I will be using the remote going forward and I'm pretty excited about that.

Here are a few pictures taken during the year - from worse to better! *LOL*


At the very beginning

Learning to crop and get what I need

Serious cropping

Getting better but still cropping

Learned to take better close-ups

Natural light is best!

It's cold here on the East Coast again, so I think the Muse Dress will probably be one of the last garments we shoot outside.  Also since I'm back inside I will probably be taking a lot of the shots myself.  I'm still "shy" about setting up the camera and using the remote outdoors but inside, well hey, it's just me!

Anyway, I thought it would be great to update my camera journey and share my daughter's and my own progress...

...as always more later!

Monday, November 17, 2014

McCalls 6844 - A Ponte Cardigan

I wanted to do something different this weekend and I've been wanting to try this pattern out for awhile...


I decided to make it up in some of the black ponte that arrived from Fabric Mart a couple of weeks ago.  Of course, I couldn't leave well enough alone and added a liquidy leather type fabric from the collection for the shawl collar and as part of the sleeves.

Here it is pictured on Lulu...


This is a simple sew...seriously simple.  The challenge is in getting the fit right, especially since in some of the 92 reviews of this cardigan on Patternreview, they state that the pattern runs big.

Pattern Construction ~

  • I cut version A in a size XXL which fit me through the body without any alterations. 
  • The sleeve bicep measurement is exactly what my bicep measurement is, so I decided to sew it as the pattern states instead of making alterations to the pattern first. 
  • The finished sleeve is snug, but not uncomfortable, so I will make a very slight alteration for the next version.
  • I did alter the shoulder seam to shorten it. However, I will shave another smidgen off for future versions.
  • The shawl collar was pressed flat. The pattern has it roll loosely but I wanted a more set collar.
  • I also tacked the collar down at the shoulder seam, at the hemline, and in the bust area so that the collar would stay flat all the time.

Of course there will be more versions, especially since I really want to make this in both views B and D. 

Design Details ~

  • I sewed the pattern just as the pattern instructions stated okay almost as they instructed because I made a few design changes.  
  • I used a liquidy pleather like fabric from "The Collection" for the top of the shawl collar.
  • The liquidy pleather was also used as part of the sleeve hems to carry it through the cardigan.
  • Finally I added four lines of straight stitching to the hem area of the sleeve just 'cause I thought it was cute.


A few more thoughts ~
I hate set in sleeves in knit garments.  I won't do that again. I think you get a better look when you insert the sleeves flat but I did want to sew the pattern at least once the way the instructions were written.

I love the curved hem on the back and how it's just a little longer than the front. This will work great over separates ~ a top and skirt or top and pants combo and of course it will work over quite a few of my dresses.

Other than that, it was an easy sew. I've already dreamed up my next project using this pattern which will show up here sooner or later!

Here are more pics of the cardigan on Lulu...


Jacket worn with a version of the Sewing Workshop Mission Top

Sewing Workshop Mission Top with a bow tie blogged here


Back of the cardigan

The pinstripe and mesh dress still need to be completed. I was in the mood for simple.  So I sewed simple because there is always next weekend.

...as always more later!