Wednesday, February 25, 2015

My Journey This Year...

Last year really felt like I was just sewing through the motions ~ lazy sewing. I made a lot of basics and did some okay sewing but the imagination, exploration and general joy was missing from my sewing, in my opinion.  And let's face it, though I love that you guys follow along with my sewing dreams, my opinion is the one that counts most!

So since I need to construct another wardrobe *sigh* I want to add some of that joy and exploration back into my sewing and my closet.  While there will be basics - hey I need new closer fitting black, navy and gray suits - I will add some fun and funky pieces to go along with them.  

I also want to sew some complicated, unusual pieces that really are me. I wear more classic silhouettes for work but personally I look more like this, this or this. I feel like I need to stretch my sewing wings. 

Also, in years past, I've bought and shared alot of fabric here. I don't know if you've been paying attention but last year and fo sho this year there will be a lot less fabric being bought around here.  I really need to delve deeply into the fabric collection and play with some of the beauties shelved there.

Today, I opened the curtains to the main section of the fabric collection because I was looking for some black fabric...and it was awesome touching some of those gorgeous pieces. So I apologize up front that many of the items that get made this year will be from "stashed" fabric.

I want my sewing journey this year to be a combination of many different things...so erase last year from your memories...because this year is going to be vastly different and I'm sooooooo excited about it!

A pic of my view...


Finally, I'm headed to The Sewing and Stitchery Expo in Pullayup this week.  I will be there for the weekend - Saturday and Sunday - so if anyone is around, I would love to meet up! I will be with my girl Gaylen (GMarie) so leave a message on the blog or at my email and I will try to meet up with you.

(photo credit:  Sewing & Stitchery Expo)

I'm not taking any classes but I'm so thrilled to be going that I don't know what to do!  Seriously, sewing bucket list adventures here!  This means there will be no posting here this weekend but I hope to do a recap when I return...or you can follow my adventures on Instagram.  I will be taking pictures of everything and everyone in sight and posting to Instagram. Did I say I was excited!  Seriously excited!!!!


Monday, February 23, 2015

OOP Vogue 7632 - The Vogue Woman Pattern Alterations

This pattern has been in my pattern collection for over a decade.  


I found an online link to a Palmer/Pletsch fashion forecast featuring the pattern dated 2004. I've had it so long because I've always wanted to make the suit. It's it just a classic and wonderful outfit!

As much as I love the two pieces together, I'm just making the skirt now. Even though I started with a pattern in the size 18, 20, 22 range, I did need to make a few alterations to the pattern pieces.

To begin the alteration process, I started with my TNT straight skirt pattern pieces. I know that I may be adding a little too much space to my garment but I'd rather start big and cut back then try to figure out how to add space. Please, please don't say anything because truly I'm still trying to adjust to seeing myself as smaller rather than larger. 

However, my daughter and I did recently retake my measurements and they are larger than the measurements printed on the pattern pieces so alterations needed to be made.

The Skirt Back 
These were the easiest alterations to make since the back of the skirt is just a seamed back.  Although I did make a change to the pattern design. The pattern calls for a side zipper but I'd rather have a back invisible zipper.  So the center back piece that should be cut on a fold has been given a 5/8" seam allowance plus an additional inch for width.


The side back piece was also given another 5/8" width on the side curve and both pieces were lengthened 2" at the lengthen/shorten lines.

The Skirt Front
Due to the inset pleats in the front of the skirt, I had to be careful where I added width to these pieces. So I added to the side curve on the front side piece only. Then I measured and measured again to make sure that I had enough space to cover my body. I also lengthened these pattern pieces the same 2" that I lengthened the back pieces ~ again at the lengthen/shorten lines. This allowed me to gain the length I needed without affecting the pleat inserts.


I also added six inches to the center front and center back of the waistband.


I will cut out the fashion fabric next - a floral brocade that I got from Fabric Mart last fall. I have more than enough fabric for the skirt in case I need to recut anything but I think I should be okay.


So this is what I'm working on now. Pictures of the finished skirt to follow!


Saturday, February 21, 2015

Butterick 6142 - A Pleather and Wool Version

When the Butterick 6142 pattern was released, it reminded me of this top I'd pinned to one of my boards on Pinterest:


At the time I started working on the pants, I thought I would get both pieces finished prior to Christmas week, well that didn't happen!  As you can see since it's the middle of February! *LOL* When I finally cut the pattern pieces out I changed a few of my original ideas for this outfit. Some were design changes and some were added after the top was a little too tight.


  • I omitted the lace because the stash didn't yield up anything that wouldn't make the outfit look like eveningwear.
  • I changed the fabric from black ponte to a black poly/wool crepe suiting I purchased from Fabric Mart during one of the 50% off sales. Please note this probably added to some of my challenges since the pattern clearly states that you should use a knit fabric for the pieces.
  • Pleather accents were added also to the top and the pants.
  • A lining was also added to both the top and pants by underlining the fashion fabric.

Here's my finished garment:


Pattern Alterations  Design Changes:

The Shaped Hem Tunic ~
I made minimal changes to the pattern pieces. Again there is a little buggin' out going on here because I'm not use to NOT making huge changes to the pattern pieces. Here are the pattern alterations and design changes I made.

First - the back and front pattern pieces are single pieces.  Two large pieces that you lay on the fabric and cut out!  Of course, I couldn't leave well enough alone and I put a center back seam in the top's back.  


I marked the center back, cut it from top to bottom and added 5/8" seam allowances to both pieces. I decided to go this way because I wanted to add sleeves to the top. This top with sleeves was just not slipping over my head without some assistance.  I took it even further and added a 9" black invisible zipper to the neckline also.

Since I used a woven, I added a little to the center front of the top to gently glide over my abdomen and hips by simply slicing up to the waistline marking and spreading the pattern pieces.


If I make this pattern again, I'm going to cut the front apart and add space that way. If...I...ever...make...this...pattern...again! *LOL*

The Sleeve ~
The sleeve pattern from the dress was used for the top...although I still needed to make changes to the biceps...cause I haven't managed to lose any weight there! Again I started with an older sleeve pattern to make the alterations.  And that's when this started to go south and head there so quickly. *sigh* I put those dayum sleeves in three times...and removed them three times. I just couldn't get them in without a multitude of wrinkles down the length of the sleeve or way too much fabric in the sleeve cap. Then I just got disgusted and threw them in the garbage. My top is sleeveless...I couldn't take any more.

Then I tried the top on and disaster...it was too tight. Peoples, annoyed was an understatement for how I felt at that point. But I put my thinking cap on and decided to add a pleather triangle on the other side of the top to match the one on the top front. BTW the pleather piece ended up on the front because I wasn't paying attention when sewing the front and back together. So I improvised ~ yet again. 


Miracles of miracles this last improvisation worked...except it made a funny wrinkle on the back. Now I really was done...seriously done...turned everything off and went upstairs and read a book.  Pick this up six weeks later, I've lost another five pounds, so I try on the top and mercy me, it fits. Well actually the triangle stuck out because the top was loose, so I altered where the fabric and pleather triangle met and wallah...top fits.

I know I've talked about slow sewing lately and using the best techniques BUT I just wanted this done!  So I turned under all the edges at the neckline, the armholes and the hemline, topstitched, pressed and it was finished. Thank you God ~ it's no longer a wadder! 


The Pants ~
I originally made the pants out of a jersey ponte during the blogging hiatus. Based upon that make, I altered the pants pattern for a better fit. To make this version I went with the currently altered pattern because I wanted to see how they'd wear in a woven fabric. Well that was wrong!  Those suckers were so tight they wouldn't go over my thighs. So I decided that sewing for my new shape wasn't working and I put the pants to the side.

But once the top fit, I was inspired to figure out how to make the pants work. I decided to add a 3" pleather strip to the side of each pants leg and use 1/2" seam allowances to attach them to the pants. Since there are pleather accents on the top, I thought this would work well with the pants.  This meant taking the pants apart but I was fine with that, as long as the pants became wearable.


The strip did work so I added the elastic to the waistline (more on it's application in a future post), ripped the inner leg seams and made them a little smaller, then hemmed the pants. Outfit complete.


Conclusion ~
This is not a work outfit. I've been going out a lot more after work and I would definitely wear this out and about in NYC.  Also, both the top and pants are a closer fitting silhouette than I've been accustomed to wearing. Honestly, this is taking some getting use to but baggy garments lately have just made me look like I'm wearing someone else's clothes...not a good look!

Finally, I'm a huge fan of the mixed materials look in garments. I love mixing pleather with wools and pontes. I have a few ideas for a couple more garments using pleather - don't know if they will make it out of my sewing machine before spring comes - but as long as the trend continues I will be making more versions of it.


Thursday, February 19, 2015

Throwback Thursday - A Dress from 2009

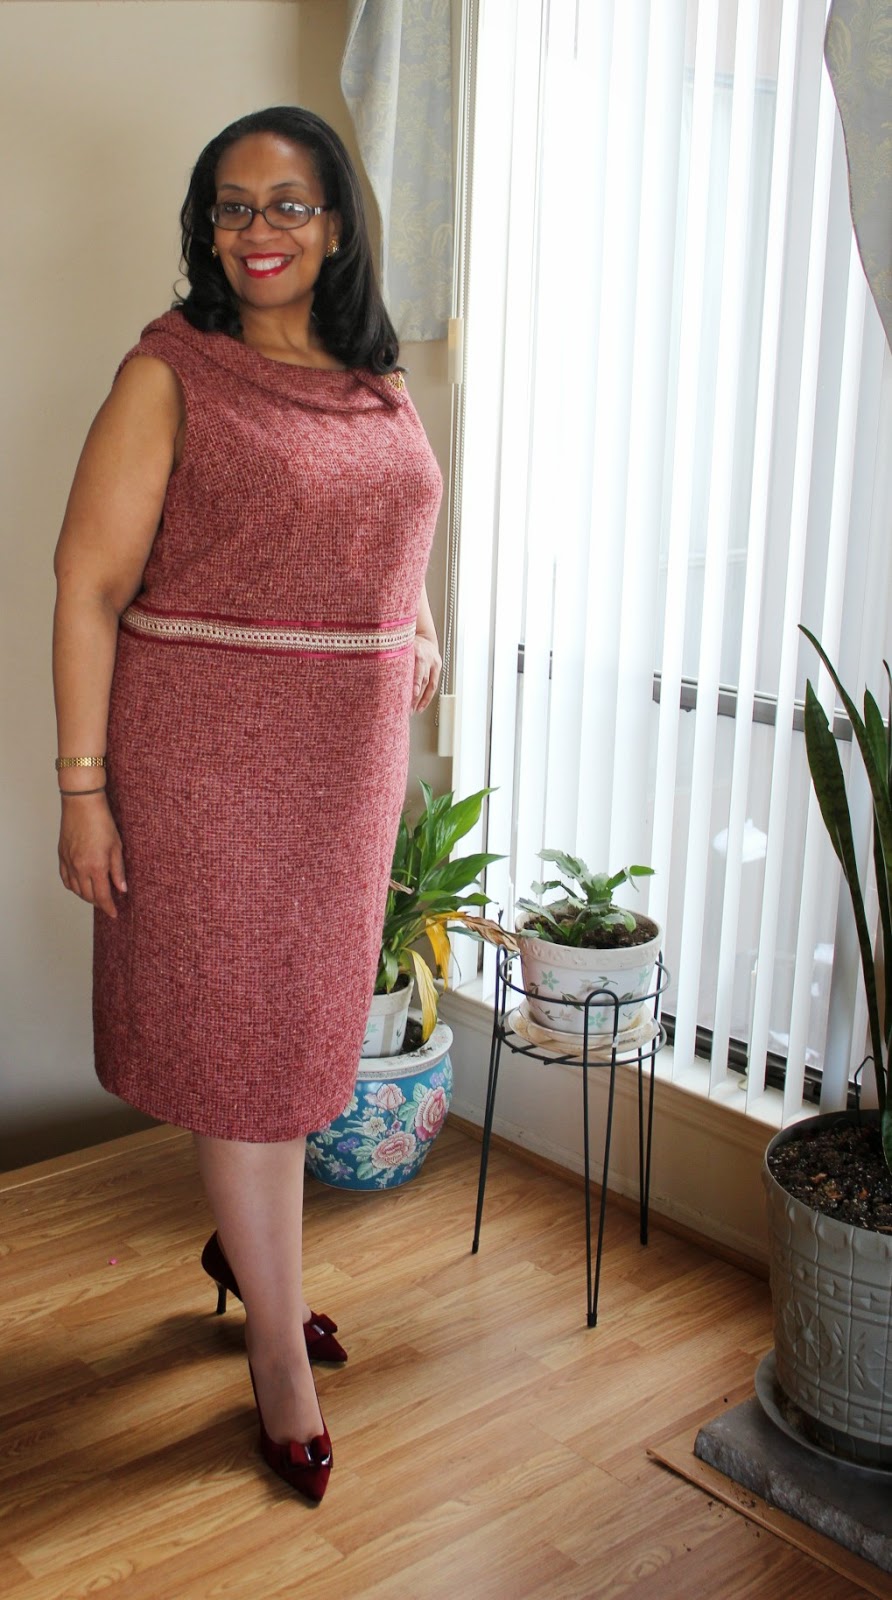
I've been pulling garments out of my closet trying to find pieces that aren't loose wearing on me.  I touched this one a couple of weeks ago. I made it in 2009 but just didn't want to donate it because of the amount of work that went into making it.  So it sat in the closet.

After trying it on, I decided it needed to be added back into rotation.  Here I am wearing it now:


 ...and here it is from 2009.


I think it fits looser now than when I made it. *sigh*  At least it will get a wearing this winter and may just hit the donation bag during the spring. I'm starting to think that it's time to stop holding onto things and let them go. Realizing that I'm going to have to sew a whole new wardrobe!

All the construction details are in these posts on the blog. A few more pics of the dress on me now...


Finally a picture of the shoes - these are by AK Ann Klein and are three years old.  I bought them in beige, black and this raspberry color. The beige and black pairs are too large now because I stretched them out wearing them with my heavier feet. Isn't that a nicer way to say fat!?! *LOL* I never wore this pair so another new pair of shoes! Yes!


Next up is Butterick 6142 - a shaped tunic and pants outfit!


Tuesday, February 17, 2015

Vogue 8995 - It's All About Refitting and more Refitting

I've made Vogue 8995 before.  It made my top five of 2014 garments. It should be an easy sew because the pattern alterations have already been made - BUT - and there always seems to be a but! My weight loss means that nothing fits like it use to.


So I started with the pattern alterations I made for the spring linen version. I've had to make several more alterations to make the dress fit me now. Thank goodness for a lot of seams because it made the alterations easy. As an aside, I'm now wondering if the original dress will fit come spring. *sigh*


Anyway, I've taken the back waist seams in an additional half inch on either side to give the back a closer fit. I'm sure that many would say that I could take it in even more but to be honest, I'm just not that comfortable with such a close fit yet. I also keep thinking what if I gain some weight back...what will I wear then? I'm straddling a fine line here and one step to either the left or right could end me up in the soup - so I'm straddling it and being cautious.

On the front I've pegged the center piece so that it looks more like the original pattern and not my hybrid above. I probably could peg the side seams a little to give it a bit more defined fit but more of that line straddling - y'know!

Okay how about some stats:

Fabric ~
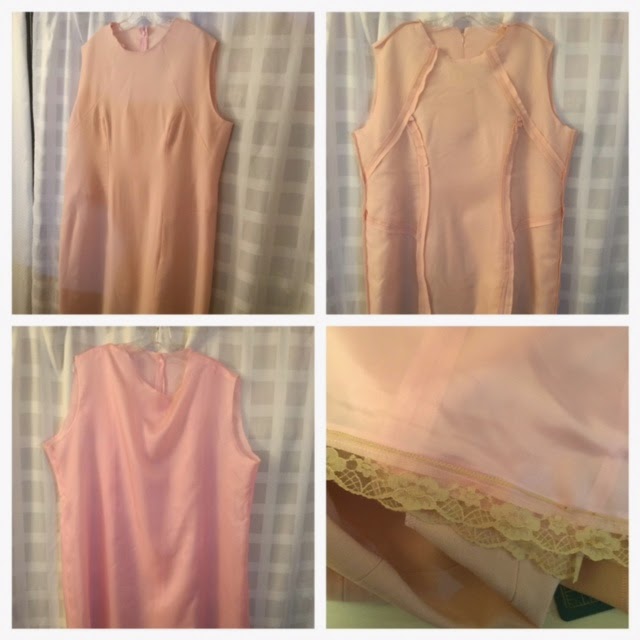
2.5 yards of light pink worsted wool crepe purchased from Fabric Mart eons ago.

Notions ~
22" pink invisible zipper
1" lace that was tea dyed and left over from this dress
2.5 yards pink bemberg rayon lining purchased from Elegance Fabrics in NYC
Silk organza used to underline all of the pieces
Pink rayon seam binding

A few construction pics and info:

As stated in my previous post about this dress, I underlined each piece of the wool crepe with silk organza. I went back and forth about adding piping to the neckline and sleeve hems and finally decided not to. The bemberg rayon lining was added to the dress.  Some of the construction details are shown in the collage below...


The other interesting part of my construction is the sleeve bindings. I bought Vogue 1435, the new Tom and Linda Platt dress and jacket (it's in the queue, btw) and I was reading the instructions.  For the jacket they have you bind the edges of the sleeve openings. I really liked the technique and thought I should add it to the construction of my dresses especially since I prefer unlined sleeves.

So I used the rayon seam binding that I normally use for hems to bind the sleeves. First, I serged the seams close to the stitching line. Then I folded the seam binding in half over the seam and machine stitched it on. However, after pressing I didn't like the way it covered the seam. So for the second armhole, I hand stitched it down. I liked that coverage better. Now I really should take the first one out but honestly it's not bad enough to take out. Though I will be hand stitching the binding down in the future.


Otherwise, I have nothing new to say about the construction of the dress. Any other pertinent information is contained in the original posts

The theme of this dress is fit, fit and more fit. I did a lot of trying the dress on and then ripping out seams and resewing them. I think this is going to be a reoccurring theme throughout my sewing this year especially if I lose any more weight. 

Here are the pics of me wearing the dress:


Jacket made in 2010 - Simplicity 2958


Conclusion ~
This dress fits looser than my original version which was a little tight on me. I will probably end up taking in the side and front seams next fall if I continue to lose more weight but it works for right now.


BTW, my shoes are by Tahari.  I bought them two years ago and wore them once in real life and once on the blog...my feet were just too fat to wear them comfortably...and I paid too much for them to give them away.  Fast forward two years and they now fit comfortably again. They're a little higher than what I've been wearing but I will add some comfort pads to them. Okay this benefit of losing weight I can get with cause I have some amazing shoes sitting in boxes waiting to be worn!

Next up is a "Throw Back Thursday" outfit. As I was checking the closet for wearable garments, I tried on this dress and couldn't believe it fit again. So I will be sharing it next. Again...thank goodness I couldn't give it away!

...Miss Sammy was visiting for the day and her Mom took some amazing pictures of her.  Here is just one...


Sunday, February 15, 2015

There was a little sewing while I was away!

I think I'm going with just pictures and not a lot of words for these pictures. These are a few of the pieces I made while I was away.

Butterick 6142 Pants & Wool Sweatery Vest ~


The slim fitting pants are Butterick 6142 (more about them in a future post) and a vest cut-out that I bought from Fabric Mart back in the fall. I've worn this out with friends and to work on Friday when the dress code is a little more relaxed.


Vogue 8840 sweater jacket plus straight skirt ~
I added a quick elastic waist straight skirt to the Vogue 8840 ponte jacket to make it an outfit instead of just a single piece. Let me state upfront that I hate my shoe choice in this picture. I wore my gray suede shoes with it when I wore it to work.


Vogue 8666 - An Altered Dress ~
I made this dress four years ago when I was working on the Birthday Gala Dress. I was auditioning dress styles...made this one but didn't like the way it fit me.  However, I hung it in the back of the closet and there it stayed until I needed a dress for a holiday party last December. It was a little loose but it took only 10 minutes to alter the fit and this is how I wore it to the party.


I want to make this again in a ponte for spring!

Pebbled Pleather Skirt ~
I had a dinner out with friends & family during Christmas. I wanted a funky casual look instead of my normal jeans & sweater/cardigan or skirt & twinset look. I'd ordered a yard and a half of a pebbled pleather from Fabric Mart before Thanksgiving to use for accents on garments.  But when it showed up it said that it really wanted to be a quick, elastic waist straight skirt. So I made this skirt to go with the vest pictured above.


So that's the round up of pieces made during my blogging hiatus. I didn't sew a lot while I was away. My mojo disappeared and I really just took a break from everything.

Next up the pink wool crepe Vogue 8995 dress.


Saturday, February 14, 2015

A Bitterly Cold and Snowy Saturday

It's cold outside here in my corner of the world.  Bitterly cold and snowing so I've pumped my little space heater up high to keep the chill out of the sewing cave. My Vogue Dress is almost done, as well as another outfit.  My daughter and the grandkids will be by on Monday (President's Day in the US - so a holiday) to take pictures.

My sewing mojo has finally come home and I have loads of ideas of things I want to sew again. It's been missing so long this time, I was wondering if it knew it's way back home ~ *sigh*

Although, there will be a lot more fit going on around here instead of just sewing since I've managed to lose 40 lbs since November 2013. I had a few stops and starts at the beginning but lately I've been losing weight pretty steadily by just changing my diet.  I eat ALOT of green vegetables, protein via chicken, some fish and I've eliminated almost all junk food from my diet. That's not to say that I don't have an occasional potato chip, or a mini snickers bar but I don't consume no where as much as I use to. I'm still inbibing my beloved Mountain Dew but instead of drinking almost 2 liters a day, I now have 20 ounces.

So not only is almost everything too large...some things I can still pull off wearing but most will need to be donated. I've had to purchase new bras & underwear and no longer need the support garments that I use to wear. Things jiggle now in a most unflattering way so I guess I'm going to have to figure out some type of exercise to tighten things back up...something I'm not looking forward to because I'm so not an exercise girl.

Now, I haven't lost so much weight that I'm no longer plus sized. Let's just say I'm a whole lot closer to 200 lbs than 300 lbs now. I've managed to lose all of the menopause weight plus a little more. The dr. is very pleased with my weight loss and I do feel better than I'd been feeling.


The thing that is really disheartening and I haven't had the nerve to face is the fact that so much of my wardrobe that I've sewn, no longer fits. Some is just obviously too big and I will have to make a decision about. Some things can be worn but are obviously loose and a few things I've altered to fit the smaller me.

All of the dresses pictured above will definitely be given away - maybe not the center navy blue one - still trying to decide if I will alter that one or not. But the rest were loose-fitting to start and now they just hang on me. I think I'm most sad about losing this one though...


It was an amazing make and I know I only wore it 4 or 5 times... My main problem is that I HATE to alter. H-A-T-E to alter but if I don't want to walk the streets nekkid, I will have to alter a few things. 

You will probably start to see less dresses here and more separates since they are easier and quicker to make especially if you use elastic in the waistlines. I'm also on the fence about trying some new styles now that I'm getting a waistline again...so we'll see.

Just wanted to give an update prior to posting the new pics...there will be quite a few posts from Monday on...so I guess I'm back! 


LinkWithin

Related Posts with Thumbnails