Showing posts with label Chico's Chic - Winter 2018. Show all posts

Tuesday, January 22, 2019

Blue Dot Patterns ~ Dover Jacket (Wearable Muslin)

One of the garment types I really want to add to my fall/winter/early spring wardrobe is a loose fitting jacket. I want to wear them with the Pembroke turtleneck tunics I've made, as well as, my shirts and over jeans and leggings.


I saw the BlueDot Patterns - Dover Jacket and it really tickled my fancy.


However, there were a few challenges...
1. It's only graded up to a size 18 - no plus sizes at all!
2. It's a pdf ONLY pattern
3. The sleeves need to be lengthened

I hemmed and hawwed a few days before downloading the pattern because LOADS of pattern alterations PLUS taping the pattern together. But as I looked at the pattern drawings, I realized that a lot of the alterations would be very easy to make because it's a simple silhouette.


So my first challenge was to tape the pattern together. I managed to do that one evening after work while watching Bye Bye Birdie. Yes I LOVE corny old movie musicals! *LOL* It wasn't difficult to tape together because it doesn't have a lot of pages. The taped pattern easily fit on my sewing table.

Pattern Alterations ~
These are extensive. I altered almost all of the pattern pieces. So I traced the main body pieces and the alterations to them are listed below.

1. Front bodice bottom - added 1.5" to the piece from top to bottom by slicing it open and adding the extra space. This gave me an extra 3" in the front.

2. Back bottom piece - added 3" to the pattern. Sliced it from top to bottom and added the extra space.  This gives me an extra 6" to the back.

3. My finished hip measurement is 71" which will allow me to put a sweater or top under the jacket, as well as sit comfortably in the closed jacket.

4. I added a 1/2" to the front and back bodice pieces by slicing and spreading.


5. While the original finished bodice measurements fit, I wanted a little extra space for what I wore under the jacket.

6. Then I lowered the front and back pieces 2". If you look carefully at the picture of the jacket front - the seamline runs right across your bustline. This works if you're small busted but any amount of boobage and it will look a little wonky.


7. I checked where the seam would fall on my body and decided that I needed to lengthen it 2" for it to clear my bustline. That alteration was made to the front and back pieces.

8. The front facing piece had 2" added to match the jacket.

9. The sleeves were also altered. C'mon you know if I make them on regular patterns I would need to add to them here too. I added 1/2" to the front and back sleeve. 

10. For the next make I will need to add another 1/2" to both back and front sleeve piece. When sewn, these were still a little tight and pulled across the jacket front.

11. I also added length to the sleeves because the 3/4 length sleeve won't keep my arms warm. 

See extensive! I'm sure you're wondering why I didn't find a pattern in a size closer to my measurements. Honestly I don't know. I saw this, knew it was what I needed & wanted also that it would work with quite a bit of the suiting and jacket fabrics in the collection. Plus I was in the mood for the challenge of making it work.

Fabric Choice ~
I really wanted a denim jacket. I've got an entire section of denim fabric in all weights, colors and prints that I've amassed over the last couple of years. I didn't use as much denim as I thought I would last year, probably cause I went shirt crazy! Anyway, since I made so many alterations to the pattern, basically grading it up to a size 22-24, I wanted to try the pattern out first.  

If it worked well great! If it didn't, I would move on. I used a printed denim left over from making this wrap skirt last summer.  The first challenge: the fabric was shorter than I thought it was. I'd actually folded it in such a way that I couldn't see a huge piece was cut out ~ insert very loud groan here. I tried to move pattern pieces around so they would fit. The pattern tetris drove me back to working on one of the blankets I was crocheting for the grandchildren.  After a time out, I figured out how to get all the outer pieces cut out of the denim. 

Construction ~
This was easy to put together. I understand why Diane rated this a beginner to intermediate pattern. But me being me and no longer capable of just sewing a pattern as is, I made a few additions...

a. I didn't have enough of my fabric to cut facings or pockets.  So I omitted the pockets.

b. I cut facings from a blue/white gingham from my scrap pile.

d. After the sleeves were made, I realized you could see the white background of my printed denim.  So I cut blue/white gingham cuffs (15" x 3") to cover the sleeves undersides. Also to tie it to the facings on the inside.

e. I added 2 more buttons than the pattern calls for because I don't like flappy fronts.

f. To insure that everything in the inside of the jacket coordinated, I added a band of the blue & white gingham to the hemline.  I encased the hem for a bound look and I handstitched it down.


f. Last I topstitched close to the front edges and again at the edges of the facings like the pattern suggests. I used a triple stitch for the topstiching. 

(The color is off here but you can see the topstitching and basting lines)

To insure the topstitching was in the right place for the facing edges, I ran a line of basting stitches around the facing.

A few pictures of the finished jacket ~


Conclusion ~
I LOVE this pattern. I can see it in several different fabrications, even a ponte knit. I hope to make a couple more of these before the weather warms up. It's been especially cold this winter and I need ALL THE LAYERS!

I did add a lot of construction techniques to the jacket that are not included in the pattern. Some of it is because I wanted the insides of the jacket to look finished. Other techniques were done because I just like those sewing techniques better. All of these added more sewing time to a simple-to-sew jacket but it was worth the sewing journey...making it a very satisfying sew.

I would highly recommend purchasing this pattern if you're looking for a great casual jacket to add to your wardrobe. It has great bones and you can really have fun with design decisions for your garment.

...as always more later!


Wednesday, December 05, 2018

Black Ponte Jacket with Lace Trim

This jacket is made using McCalls 7481 as the base and it's Chico inspired.  


I found the inspiration jacket on Chico's website and it started this sewing journey.


All of the pattern alterations were completed that's why I started with it. I have two successful versions of the jacket in my closet another reason to use it.

Supply List ~
- 2.5 yards of black ponte fabric from Fabric Mart
- 1.5" lace from Joyce Trimmings
- 3" lace from M&J Trimmings
- black 'n white bias binding from the collection via Fabric Mart
- Five 7/8" black buttons from Pacific Trimmings
- One 1 1/8" black button from WalMart

Construction ~
I made no alterations to this pattern besides choosing the length and omitting the lining.  The Chicos inspiration jacket has a mandarin collar. I decided to use the collar from the pattern. Then I made it a journey because I added lace to the collar. Being extra again...

Side seam pockets were added but they hung funny. I thought of a couple of ideas to make the pockets work but ultimately decided that I didn't need them.  So I unpicked all of that black thread on black ponte fabric. As I was doing it, I realized that I've really grown because there was a time when I would have just chucked the outfit. But my unpicking heros, Grace and Lara have convinced me that ripping is worth it. Sometimes you've just got to do it to make your design idea work.

My silk organza pressing cloth got a work out on this project. I normally don't use one on ponte fabric but since I was doing some heavy duty pressing, I didn't want to put a shine on the fabric.  It was a good decision!


The highlight of this jacket is the lace on the collar, the sleeve and jacket hemlines.


The bias binding finishing on the inside just makes my heart sing. I only had enough in the notions stash to trim out the facings and the hemline.  So the side seams are just serged. BTW, while this bias tape came on a roll, it had to be pressed into shape to be used. It's some of the leftover binding tapes I bought from Fabric Mart over a decade ago.


A Hong Kong finish was used because I love how cleanly it finishes the seams. To me its worth the extra time and effort this finishing takes. There are loads of tutorials on how to sew Hong Kong binding in a garment, just Google it. I would hate to recommend one since there are various sewists showing how the technique is done and probably one of them is a fave of yours.

A few pictures ~


Wearing it with my TNT sleeveless white 
shirt made earlier this year!

This picture illustrates why I should stand up straight!

Wearability Factor ~
I wore this to work and out to lunch with a sewing friend this week. I dressed it down with sneakers and a ponytail and even then someone at work mentioned how dressed up I looked! LOL! I'm just not winning that one. However, since I made the jacket from ponte, it was very comfortable to wear. My other two makes include an outerwear jacket and a special events jacket


Conclusion ~
This is my third version of this jacket and I still haven't made it the way it appears on the pattern envelope! I think that's why I like the pattern so much ~  because of it's possibilities. I did check on the website and this pattern is now out of print. Which is sad because it's a great pattern to take creative journeys.  The pattern is still on the website if you want one. I'd like to use this pattern to make a few more everyday jackets, so expect to see it again.

The other thing I really liked about constructing this jacket was the details. All those extra special things really made the sewing fun. This is the type of sewing that makes me happiest. I can sew a quick project but it's not what makes my creative being sing. Give me a sewing challenge, throw in as many elements as possible to end up with a cohesive and unique garment and I'm happy. I was very happy making this jacket! *LOL*

This was the last garment I made during my Thanksgiving Break and my favorite make of the bunch. It was also the most intensive. I honestly didn't think I would get it finished in time to be photographed during the last session with my daughter. I'm glad I did. 

There is one more garment left from the photos, the Rivermont Top. It will be up next. The last of the "Border Print Series" shirts will be on the blog after that. 

...as always more later!


Friday, May 11, 2018

Butterick 6261 in Glen Plaid Suiting

If you've been reading for awhile you know that I swore off Butterick's Connie Crawford patterns years ago after having a bad experience with one. But this one came across my feed and I thought I would give them another try...


My version is not exactly the same as the pattern picture but it works for me because it has the elements I wanted. It's a swingy topper with some interest made from one of the many glen plaid fabrics from the collection which goes perfectly with a pair of black jeans.


Materials ~
- Black 'n White Wool Glen Plaid from the collection by way of Fabric Mart
- Black lightweight fusible interfacing from Fashion Sewing Supply
- 4 buttons from the collection

Another garment made totally from items in the Sewing Cave which makes me soooooo happy! This is a ltwt. wool vest that I can wear during the spring before the heat sets in and it will be perfect again come fall. I made this in February. I'm just posting it to the blog because well it was "Shirt Month" last month.

Pattern Information ~
Can we talk about the pattern and it's sizing, first. Since its a Connie Crawford pattern the sizing goes up to a 6x. It's also a loose-fitting pattern and I needed not to succumb to my tendencies to choose a size with too much ease. To help me with this, I googled the ease wearing chart and came up with these two resources. The first one is an article on Craftsy by Patti Palmer about Ease.  The second one is the actual ease chart on the Butterick website.


Via Craftsy website

After reviewing the chart, I decided that 10" ease qualified as loose fitting (check that it's 5 7/8" to 10" for a jacket) and anything else would end up looking sloppy on me. With that decision, I chose to make a size 2x. Though I'm printing that chart out and putting it with my measurements on my bulletin board so that I don't have to look for it again!!!

Construction Info ~
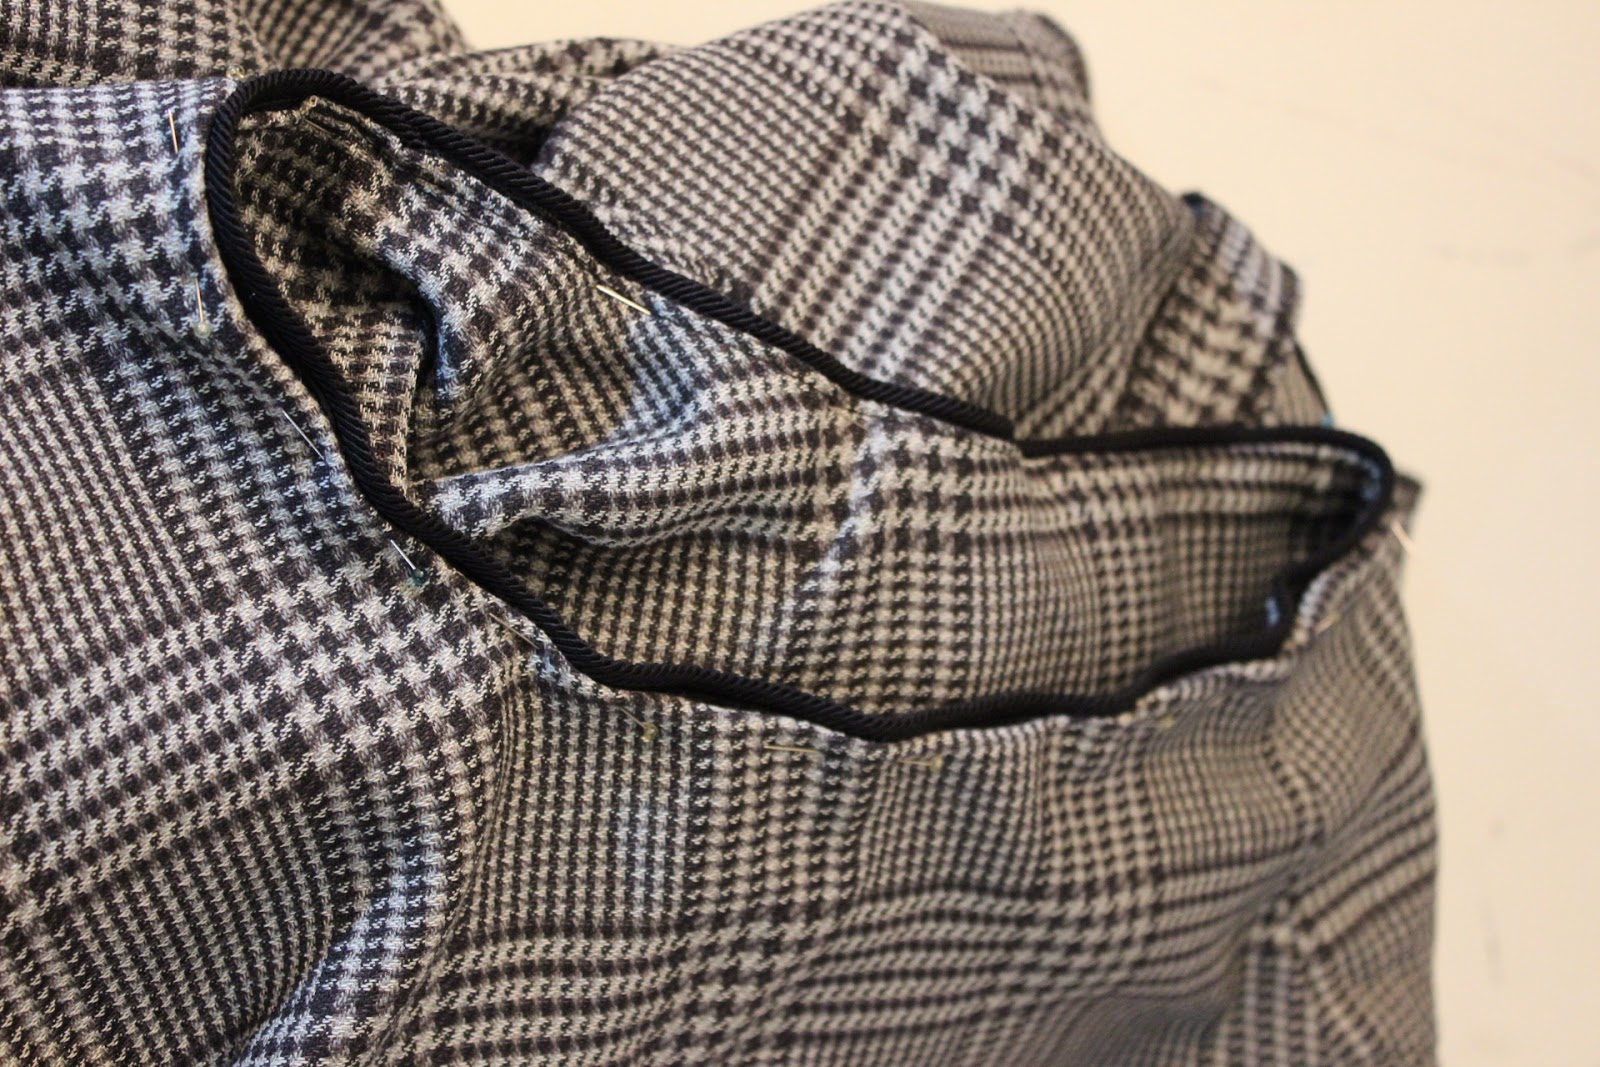
I made this considerably more challenging because I used an uneven glen plaid instead of the even small check that the pattern was photographed in. All that plaid matching took time.  Then I decided to add black piping to the front of the jacket and the collar. More time but I like how the solid line of black defines the front of the jacket.


Additional construction information:
1. Added black bias tape to the shoulder seams to stabilize them
2. I used 4 buttons instead of the three recommended. I usually like an odd number of buttons but I put an additional one above the bustline seam.
3. I also added a small snap to the front to keep it closed.

Sleeves:
Disregard the pattern instructions where it tells you to sew the sleeve into the jacket and then hem it. You can do it but then you have to drag the entire jacket around the sewing machine. 


I topstitched the hem facing and then hemmed the sleeves before I inserted the sleeves into the jacket. It was just easier to do these tasks.


3. Even though the pattern tells you to machine stitch the hems down on the jacket and the sleeves, I hand stitched them.  I wanted a clean finish on the jacket.

I cut my sleeves on the bias because I was too lazy to try to match the plaid across the front and back of the jacket. I figured the bias wouldn't need to match, it would just coordinate...because bias! And then no matter what I did, the sleeves did not go into the jacket right. 

Even after I worked out a solution to make the sleeves fit and hang properly, when I put a lightweight turtleneck under the jacket, it felt awkward on. So I decided to ditch the sleeves entirely and make it a vest.  


That's when I decided to add the piping to the armholes to tie it to the front of the vest.

A few pictures ~


Conclusion ~
I'm still not sure I like Connie Crawford patterns. I'm sure these patterns probably work wonderfully for others, it's just not all patterns are for all sewists. I'm just one of those that it doesn't work for and this is a one and done sew for me. I'm totally uninspired to use this pattern again.

So a couple of things:
- I'm kinda bummed because I tracked this pattern down and paid 50% off for it instead of the normal $2.
- I'm glad that I used a fabric from my old "professional" life for this project. It shows me that I can use these fabrics in my new life.
- I love the flare/swing of this vest.
- The black piping and black buttons are the best part to me.
- When I wore this to work, it was comfortable and even though I looked a little dressier than normal, I would wear this outfit again.

I'm moving on to the next garment...

...as always more later!


Wednesday, January 31, 2018

Simplicity 8059 in a Blackbird Fabric

I like this pattern. I really, really like this pattern! Obviously I do since this is my 7th version of it and I have a few more pieces of fabric dedicated to making more. For winter I like layering pieces and this cardigan makes a fantastic layering piece.  


See I have a rule when it gets extremely cold - 2 layers under my coat sleeve and since I sit near the front door at my job - those 2 layers are necessary to keep me warm during the day.

Simplicity issued this as a summer pattern and there were some amazing versions of it made by the sewing community for spring/summer. However, I always saw it as a fall/winter cardigan because of the ease of wearing and the ability to do some funky things with the front tie.

Materials Used ~
My last version was a wool jersey one.  This new one is influenced by a piece of fabric that Gillian from Crafting a Rainbow was gifted by BlackBird Fabrics. When I saw the fabric I fell in love and had to have a piece. I also wanted to try out BlackBird Fabrics since they are a new to me online fabric spot. I have to tell you the experience was wonderful. I received my fabric quickly even though it came from Canada and the quality is amazing. An aside here to say that I received the fabric faster than I have from some online spots in the US!

Since I've made this pattern so many times there are no new sewing challenges or techniques here. I let the fabric and the funky ribbon purchased from Joyce Trimmings speak.

A few pictures ~


As I said above, I have plans to make more of these cardigans because they work for my lifestyle...and because they are a wonderful showcase for interesting and pretty fabrics.

This was the first project from my Christmas Sewcation. It was a wonderful way to start because I got something accomplished right out the gate. 

Final shot ~
The girls were here with their Mother while we took pictures. However, they spent most of their time inside on the iPad and watching TV.  They ventured outside for just this picture...so here's Sammy posing with me and Aleena streaking by in the background! Please notice the pink ~ this little girl loves pink and she wears a little of it or a lot every day ~ even her sneakers have a little pink in them!


...as always more later!


Sunday, January 28, 2018

A Boucle Vogue 9286

This is my second completed garment in "The Crazy 8 Wardrobe Plan - Vogue 9286."


I bought this pattern last summer because I liked the big slouchy top. I thought it would work well over a turtleneck or crew neck top and some jeans or leggings. That it would add a little polish to my casual work wardrobe as well as a little warmth during the winter season.

Normally I put my pattern conclusions at the bottom of my post but I've moved this one up to the top of the post. Why? Because as usual a Vogue Easy Pattern is easy to sew but not easy to fit. I made the classic mistake of looking at the measurements and thinking wow, with all of that space I won't have to make any adjustments for my abundant abdomen or bodacious booty...ummmm wrong! I cut out the largest size an XXL and I should have started with a size L instead of the one I chose. It was just toooooo much fabric on my body!


Materials ~
Pink Boucle fabric from Fabric Mart (purchased December 2016)
Black Ponte remnant
Design Plus Bias Tape Fusible Stay Tape
Two 1" black covered snaps


Pattern Alterations ~
Originally the only change I made to the pattern was to lengthen the front and back pieces by 3" at the lengthen/shorten line.  I wanted my top to be more tunic length than top length. I like my abdomen and some of my thighs as well as all of my bottom covered.

Because the sleeves are off the shoulder, extra large and gathered into a cuff, I didn't need to make any changes to the pattern. That was a plus for this pattern.

Construction Techniques ~
Since I was using a very ravelly boucle, I needed to serge finish the edges of the fabric as quickly as possible. But I didn't want to stretch the neckline or armholes out by handling the fabric too much.  So I ironed fusible stay tape to the neckline, the shoulder seams and the armholes. Sewed the pattern as per the pattern instructions and then disaster struck!


I tried the garment on and it was huge...HUGE!  As I said above...I chose the wrong size to begin with so because of that I had to take the top apart, cut it down and sew it back together. The first change I made was to was the front.  The v-neckline was flopping around since there was just too much space. To solve this challenge, I cut it down the front and sewed it back together with a 1" seam allowance. Even cutting down the facing and reapplying it. This change allowed the neckline to lay flat.

The second issue was that the sleeves were hanging too far down my arms. Luckily, I'd only basted the garment together to try it on. So I removed the basted side seams and the sleeves from the body of the top. I cut 1.5" off each side of the body. I added the bias tape back to the armhole, serge finished it and then sewed the sleeve back on.  This solved the problem of the drooping sleeve. However, I still had to cut 1" off the bottom of the sleeve because it made the cuff droop down my hand.

Since I'd basted the sides with a 1.5" seam allowance, I trimmed off 5/8" and then sewed the side seams with 5/8" seam allowance. Yeah alot of work right?! If I'd just believed that I needed a smaller size, I wouldn't have had to jump through hoops to make this fit.

The last touch was to add a strip of black soft fusible interfacing from Fashion Sewing Group to the hemline after assembling the garment.


The cuffs are button cuffs but my fabric was thick and I just didn't feel like wrangling it under the sewing machine to make buttonholes, so I added black covered snaps to them.


A few pictures of the topper ~

Seeing the full extent of the topper!
Yeah, that's a lot of fabric...

My daughter making me laugh gives
a good view of the back of the topper


Conclusion ~
The construction of the garment is easy just as the pattern says, it's the fit that you will need to be careful about. I did add a few extra steps because of my sizing issue. Also I chose a very fiddly fabric to work with so I needed to do a little more work to preserve the integrity of the fabric. Then I added a piece of the selvedge as trim in the back yoke seam to give it a design element. But looking back on the process, that was the easiest part of the design.

It's a cute oversized top that will work with a turtleneck under it but I have no plans to use this pattern again. I purchased the pattern for the top only and it wasn't talking to me as I was working with it. Not sure if its because I chose the wrong size, or if this is just one of those designs that you only need one of...anyway I'm moving onto the next garment on the list for my Crazy 8 wardrobe!

...as always more later!


LinkWithin

Related Posts with Thumbnails