Showing posts with label The Anatomy of a New Dress. Show all posts

Sunday, May 13, 2012

The Anatomy of a Dress Final

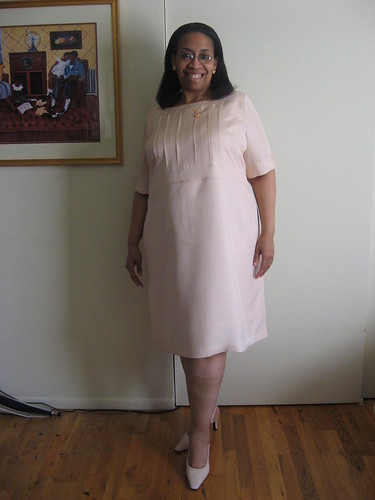
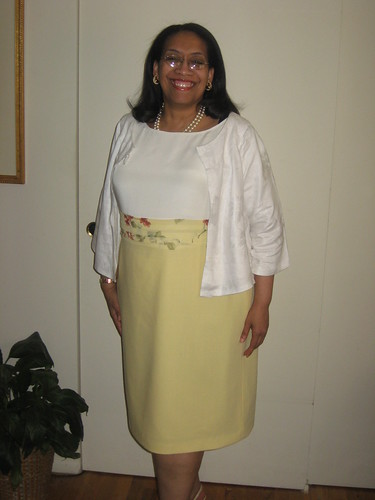
It's taken a minute to get pictures of me wearing the dress but finally here they are:


To recap...
Pattern:
TNT Pattern
Materials:
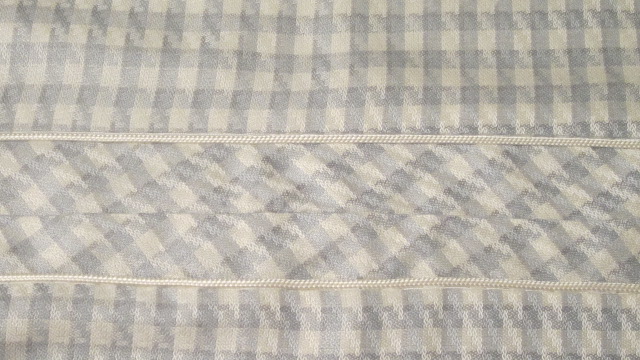
plaid silk/linen blend from the collection
Notions:
22" invisible zipper
white piping
rayon bemberg lining
polyester lace
rayon seam binding


All of the construction posts are here. As for the grain issues that I experienced when I cut the dress out, I fudged by adding additional length to the bottom pieces.  I believe there are two solutions to off-grain fabric.  One - chuck it.  The grain is so off that there is nothing you can do to salvage it.  Or two - add some length to the hemline so that you can fiddle with the hem to make it work.  Now I don't know if these are acceptable methods.  They are just things that I've worked out from my years of sewing.  


In this case, the grain is just slightly wonky and not something that I'm sure a less experienced sewist would notice.  But as I continued to cut pieces out, I noticed that I couldn't get them to line up even using a single fabric layout.  It was helpful that I cut the bodice separate from the skirt of the dress and that I added piping along with the insert cut on the bias.  All of those elements helped to camouflage the fact that the plaid did not perfectly match.


My daughter took these pictures for me today along with some of the 10 yard adventure wardrobe shots and of course, the Little Prince had to get in on the action.  Here we are together...


and one of him doing his favorite thing...watching TV!


Here's wishing all Mothers 
a Very Happy Mother's Day!


...as always, more later!


Wednesday, May 02, 2012

The Sleeve Details

I'm a huge fan of piping and was heavily influenced by those ads Cynthia Guffey did for the sewing machine companies back in the 80s.  Not only were the dresses impeccably sewn with matching piping at the neckline and armholes but then they would have this awesome embroidery running down the side or at the hemline. Does anyone remember those ads, besides me?


So I've been adding piping to garments for years trying to perfect that look...and now twenty years later I have my own method (culled from reading books, taking classes and by trial and error) for inserting the piping into sleeve hems. This isn't the only way that I do this process but this is the simpler application and let me add the disclaimer here...I'm sure that there are more professional, correct, by the book ways of inserting the pipingThis is just how I do it.  Sherry, who authors the blog, "Pattern...Cloth...Scissors" just posted a tutorial on how to make piping from beginning to end and add it to a waistline seam.  I would definitely check out her tutorial! 


Okay now that we've gotten that out of the way, first after cutting the pattern out, I cut 1.5" off the sleeve hem and set the strip to the side.


Then I hand stitch the piping 5/8" onto the edge of the sleeve 
leaving about a 1/2" of piping on either side.

The strip that was cut off was serged on both sides.
Next the strip was pinned to the sleeve's hem covering the piping.

Sewing the piped edge down using my zipper foot.

I use my bamboo point turner to mark a seam line as close
as possible to the piping so I'm sewing right up next to the piping.

Right side of piping inserted in the sleeve's hemline

Wrong side of piping inserted into the sleeve's hemline

The sleeves with the underarm seams sewn but not yet pressed open.

The underarm seam is pressed flat.  The extra piping cut off and 
finished with a seam sealant (Fray Check) and then
stitch witchery is placed under the seam and pressed.

The finished sleeve in the dress after a line 
of stitching has been added close to the piping.


Again, this is one of the ways that I apply piping to sleeve hems.  The other method involves applying the piping in the sleeve hem with the underarm seam sewn so that the piping is encased in the hem and the process can be found in this post.  


I will admit that after all the hand stitching I did in the dress that I got lazy at the end.  If I were a "couture" sewist, I would have gone the extra mile and encased the piping.  But last Sunday I wasn't...and since I sealed the cut piping ends and stabilized the seam, I'm not worried about the piping fraying.  Now, I'm not recommending that you follow me off the cliff, I'm just showing you what I did in this garment.


As a follow-up, I've finished the lined flare skirt from the Ten Yard Adventure Wardrobe and I've cut out a wide legged pair of pants too.  I know they need some type of lining because they are a little see-through, I just don't want to lose the drapiness of the fabric, so I'm working this through in my head.  


...as always, more later!


Monday, April 30, 2012

The Anatomy of a New Dress - The Details

The dress is finished.  I sewed the last stitch in last night.  Now don't go scrolling down to see pics of me in the dress because there aren't any.  I plan on taking this dress with me to Chicago this weekend to wear to the Haute Couture fashion show on Sunday. I will have pictures of me in it then because I knew when I started this journey that I was making the dress for this trip.  So how about some details...


First, this dress has ALOT of hand stitching in it.  All of the piping was hand basted in before being machine sewn down.  Since there is piping at the neckline, the sleeve hems and two rows of piping in the waist insert you can imagine that this took some time. Then the lining is hand stitched to the zipper tape and the hem at the bottom of the dress, as well as, the sleeve hems.


Even though this dress is similar to other dresses I've made before with the base of the dress being made from my TNT dress pattern, there were some details that stood out. Some because I've made them before and some because of the time and effort associated with bringing them to fruition in this dress.


The piping at the neckline is a common detail in my dresses.  I like the way it defines the neckline and I will continue to use this feature in my dresses.


The piping at the sleeve hems were a journey and I'm planning a post on how I added them to the sleeve for later in the week.


The bias inset at the waistline is the eye-catching detail (the money shot) in this dress.  It was the most challenging part of the dress and caused me to change direction after the first insert didn't work.


I love lace on the hem of my lining.  It makes the lining feel like a slip (luxurious lingerie) and adds a special-ness to the dress.  


Finally a pic of Lulu wearing the dress...


Now that the dress is done, I'm much happier with it.  Yes, the silhouette is familiar but this is a silhouette that I'm most comfortable wearing and that I believe I look prettiest in.  Since confidence is a huge factor in making you feel better about anything, I'm gonna keep on wearing and making this silhouette! *smile*


I've already moved on...starting my first piece on "The Ten Yard Adventure" wardrobe. This dress is pressed and hanging, waiting to be packed for the journey to Chicago...


...as always, more later!


Sunday, April 22, 2012

The Anatomy of a New Dress - Pt. 3

"Or the Construction of the Band..."
In the middle of making this dress, I just got the feeling that I've made this dress before.  And in all actuality I have, if you consider this:


and this:


and finally the Birthday Gala Dress.
I'm a little disappointed because I thought I was going somewhere new on this journey when actually I'm just treading the same path.  So is there something new here I'm suppose to learn?  Or do I have this silhouette stuck in my head?  Or even worse still have I no creative imagination left to elevate the level of my TNT dress pattern to?  Believe me, those few questions gave me great pause yesterday and even caused me to stop sewing for a minute.  I put the pieces down and watched television, played Boggle with my niece and nephew and bought some stuff from QVC.


After pondering on this, I realized that there really are only so many dress silhouettes and interpreting a silhouette season after season in different fabrications with distinct embellishments is not a bad thing.  It's just not the journey I thought I was making. *sigh* So I left the pieces for the night and headed upstairs.


Today, I decided to just go with the flow.  It's not a new silhouette.  It is the same journey but maybe there is something to learn here...and there was...the thing I learned was to dig deep when your original idea isn't working, to ramble around in the creative ideas stored in the back of your mind, and find something else when your garment is just.not.quite.there!


Which brings me to the purpose of this post because my dress is not finished yet. However, the center band deserves it's own post because of the detailed construction process, and as you can see from the three examples above this detailed waistband is predominant in all of these dresses. As you know, my original idea was to cut the center band on the bias to give the dress some added drama and to emphasize my non-existent waistline in a flattering way.


The band pattern pieces were cut 5.5" deep with 5/8" seam allowances on either side.  I realized that the bias bands will have some give so I needed to stabilize them.  My choices were to use a fusible interfacing or a silk organza underlining.  I went with the silk organza thinking the fusible interfacing might shorten or make the band too rigid to match the bodice and skirt pieces.


I hand basted the silk organza to the front and back bands.  Then I added a line of machine basting in the center of the band to avoid poufing. This stitching was removed later.  The bands were then stitched together and the piping added to the top and bottom of the band. After that I sewed the dress bodice and the dress skirt to the band.


The invisible zipper was next.  I used Somerset's tip of marking the invisible zipper where you want it to meet the seams in the back and basted the zipper in.  Since the match worked and believe me I was holding my breathe while inserting the zipper, I decided to try the dress on at this point...something I never do...but boy am I glad that I did.


Because the band was too big!  
It puckered in the middle of the dress front.  It puddled in the dress back.  It looked horrid for all of the work that I've put into this dress.  As I was standing in the mirror I thought, "just add a tuck to the center."  When I added the tuck, it lifted everything up and the dress had the look I wanted.  So I take the dress off and head back to the sewing cave.  I take the perfect invisible zipper out, sew in the tuck and this is what I ended up with:


As you can see I sewed the tuck into the back of the band instead of the front...and I love how it added dimension to the band.  Okay, I'm now so far away from the dress that inspired me that's it's not funny!  But, this dress is me, even if I have made this silhouette several times before.


One last thing...the reinserted invisible zipper is not my best.  There is a lot of bulk in the center back seam and even though I've trimmed the seam and hammered it down with my clapper, I had to sew away from the coils by the bulkest part to get the zipper to slide up and down.  However, the piping matches!!!  


Here's the dress on a hanger as it is now:


It still needs a lining, piping added to the neckline and the sleeves sewn in. Hopefully, I will finish this up next weekend...though I'm thinking maybe I should sew a few skirts, just to prove to myself that I can sew something up quickly instead of everything being a journey...


...as always, more later!


Tuesday, April 17, 2012

The Anatomy of a New Dress - Pt. 2

The first part of bringing this dress to reality is the pattern alterations.  Of course, I began with my TNT dress pattern because it has all of the basic elements of the ASOS dress that I'm interpreting.  I've made a similar dress to this one in the past. So I thought about looking for the pattern pieces but that dress is a little tight on me now and I would rather trace new pattern pieces than alter the old ones.  I really want to insure that this version fits me now.


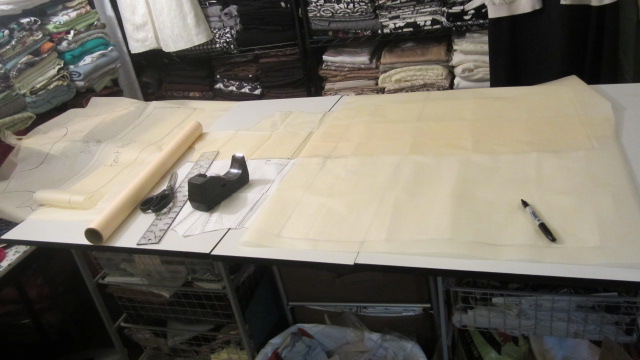
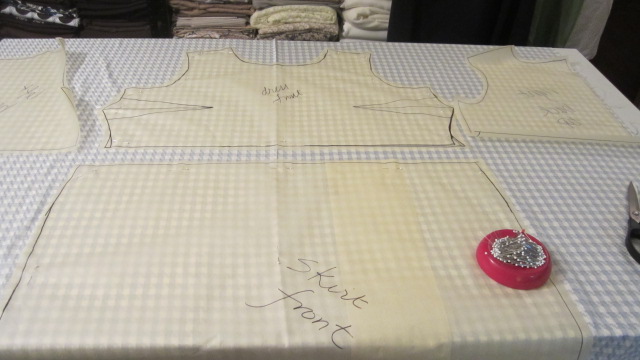
So starting with the dress front, I traced a dress bodice, waistline band and dress skirt in full pieces...no cut on the fold pieces.  This will allow me to lay the pieces on the fabric singly and match the plaid without any difficulties. 


For the back pieces, I traced left and right back bodices pieces, left and right back skirt pieces and the same for the waistline band.  Again to make it easier to match the plaid at the back and side seams.


As with all pieces I trace, once I've traced the pieces off, I lay them back on top of the original pattern piece to make sure that I've got all of the pieces traced correctly and working well together, as well as, insuring that the patterns are exactly like the original pattern piece.  


That's why if you look closely at some of my pattern pieces, they will have darker lines that aren't part of the original traced piece.  It's where I made sure that all of the pieces work together and if they didn't I redrew the lines.


After all the pattern pieces were cut out, then laying them onto the fabric and cutting the fabric happened.  But I did take time my time because I really want to match as many of the seams as possible even if the original dress' side seams don't match.  Zoom into the picture and you can see down by the hem, no pattern match. 


Making sure the pattern match worked was a little more difficult when I realized that the fabric is slightly off grain.  I will make it work, though.  So the weekend should bring the construction of the dress.  I hope so because I'm pretty excited about getting this one finished.  


And on another note, I've decided that no matter what the temps are saying outside, I'm gonna sew spring.  If I can't wear it yet, I will be able to sooner or later...summer is coming! *smile*


...as always, more later!


Sunday, April 15, 2012

The Anatomy of a New Dress

I was struggling this weekend.  I knew I wanted to sew but I had no idea what I wanted to make.  I've had an idea for a dress, and it will probably make an appearance in the future, that wasn't really singing to me yesterday. But I really wanted to sew...so I found another piece of fabric that was interesting and left it on my cutting table and went to bed.


This morning, I decided to read some blogs before working on the new dress.  In the back of my mind, I'm stashing away ideas for my summer vacation, a cruise to the Caribbean in late August.  On EricaB's blog, she has a great flowing long skirt...and as I was rereading the post, I clicked on her links and stumbled upon this blog, "Atlantic-Pacific."


Of course being the Nosey Nellie that I am, I went back to the last/first post and started reading and that's when I found this:


photo courtesy of 


I've wanted a soft plaid dress like this since forever.  I know that I've diligently searched for fabric like it but obviously haven't found much because I don't have a lot of it in my collection.  But being persistent, I decided to carefully examine every shelf to see what I had because even though I've just recently put it all away, believe me I don't remember every piece. 


Touching, looking, pulling...I found this:


...a silk/linen blend that I have 3.5 yards of...that I purchased at least 15-16 years ago from a little fabric shop (Sevens) in Bloomfield, NJ...when I was living in Montclair, NJ.  I use to buy quite a bit of fabric from this shop because it was local and because she had great fabric...plus it was inexpensive and I had two little girls and a teenager at home at that time.  Not a lot of fabric money was in my budget.  


I was thrilled to find it after all of these years of hiding in the collection and it's perfect for my version of this dress.  Yes, the check is a little smaller but the color is comparable.  Now I love her dress' close fit but that won't be happening on my plus size body.  To achieve some distinctiveness, I've decided to add a waist inset with the fabric cut on the bias.  I will also add some piping to certain areas of the dress.  And of course, I'm starting with my TNT dress pattern.  So that's what I'm working on today...


...as always, more later!

LinkWithin

Related Posts with Thumbnails