Wednesday, January 31, 2018

Simplicity 8059 in a Blackbird Fabric

I like this pattern. I really, really like this pattern! Obviously I do since this is my 7th version of it and I have a few more pieces of fabric dedicated to making more. For winter I like layering pieces and this cardigan makes a fantastic layering piece.  


See I have a rule when it gets extremely cold - 2 layers under my coat sleeve and since I sit near the front door at my job - those 2 layers are necessary to keep me warm during the day.

Simplicity issued this as a summer pattern and there were some amazing versions of it made by the sewing community for spring/summer. However, I always saw it as a fall/winter cardigan because of the ease of wearing and the ability to do some funky things with the front tie.

Materials Used ~
My last version was a wool jersey one.  This new one is influenced by a piece of fabric that Gillian from Crafting a Rainbow was gifted by BlackBird Fabrics. When I saw the fabric I fell in love and had to have a piece. I also wanted to try out BlackBird Fabrics since they are a new to me online fabric spot. I have to tell you the experience was wonderful. I received my fabric quickly even though it came from Canada and the quality is amazing. An aside here to say that I received the fabric faster than I have from some online spots in the US!

Since I've made this pattern so many times there are no new sewing challenges or techniques here. I let the fabric and the funky ribbon purchased from Joyce Trimmings speak.

A few pictures ~


As I said above, I have plans to make more of these cardigans because they work for my lifestyle...and because they are a wonderful showcase for interesting and pretty fabrics.

This was the first project from my Christmas Sewcation. It was a wonderful way to start because I got something accomplished right out the gate. 

Final shot ~
The girls were here with their Mother while we took pictures. However, they spent most of their time inside on the iPad and watching TV.  They ventured outside for just this picture...so here's Sammy posing with me and Aleena streaking by in the background! Please notice the pink ~ this little girl loves pink and she wears a little of it or a lot every day ~ even her sneakers have a little pink in them!


...as always more later!


Sunday, January 28, 2018

A Boucle Vogue 9286

This is my second completed garment in "The Crazy 8 Wardrobe Plan - Vogue 9286."


I bought this pattern last summer because I liked the big slouchy top. I thought it would work well over a turtleneck or crew neck top and some jeans or leggings. That it would add a little polish to my casual work wardrobe as well as a little warmth during the winter season.

Normally I put my pattern conclusions at the bottom of my post but I've moved this one up to the top of the post. Why? Because as usual a Vogue Easy Pattern is easy to sew but not easy to fit. I made the classic mistake of looking at the measurements and thinking wow, with all of that space I won't have to make any adjustments for my abundant abdomen or bodacious booty...ummmm wrong! I cut out the largest size an XXL and I should have started with a size L instead of the one I chose. It was just toooooo much fabric on my body!


Materials ~
Pink Boucle fabric from Fabric Mart (purchased December 2016)
Black Ponte remnant
Design Plus Bias Tape Fusible Stay Tape
Two 1" black covered snaps


Pattern Alterations ~
Originally the only change I made to the pattern was to lengthen the front and back pieces by 3" at the lengthen/shorten line.  I wanted my top to be more tunic length than top length. I like my abdomen and some of my thighs as well as all of my bottom covered.

Because the sleeves are off the shoulder, extra large and gathered into a cuff, I didn't need to make any changes to the pattern. That was a plus for this pattern.

Construction Techniques ~
Since I was using a very ravelly boucle, I needed to serge finish the edges of the fabric as quickly as possible. But I didn't want to stretch the neckline or armholes out by handling the fabric too much.  So I ironed fusible stay tape to the neckline, the shoulder seams and the armholes. Sewed the pattern as per the pattern instructions and then disaster struck!


I tried the garment on and it was huge...HUGE!  As I said above...I chose the wrong size to begin with so because of that I had to take the top apart, cut it down and sew it back together. The first change I made was to was the front.  The v-neckline was flopping around since there was just too much space. To solve this challenge, I cut it down the front and sewed it back together with a 1" seam allowance. Even cutting down the facing and reapplying it. This change allowed the neckline to lay flat.

The second issue was that the sleeves were hanging too far down my arms. Luckily, I'd only basted the garment together to try it on. So I removed the basted side seams and the sleeves from the body of the top. I cut 1.5" off each side of the body. I added the bias tape back to the armhole, serge finished it and then sewed the sleeve back on.  This solved the problem of the drooping sleeve. However, I still had to cut 1" off the bottom of the sleeve because it made the cuff droop down my hand.

Since I'd basted the sides with a 1.5" seam allowance, I trimmed off 5/8" and then sewed the side seams with 5/8" seam allowance. Yeah alot of work right?! If I'd just believed that I needed a smaller size, I wouldn't have had to jump through hoops to make this fit.

The last touch was to add a strip of black soft fusible interfacing from Fashion Sewing Group to the hemline after assembling the garment.


The cuffs are button cuffs but my fabric was thick and I just didn't feel like wrangling it under the sewing machine to make buttonholes, so I added black covered snaps to them.


A few pictures of the topper ~

Seeing the full extent of the topper!
Yeah, that's a lot of fabric...

My daughter making me laugh gives
a good view of the back of the topper


Conclusion ~
The construction of the garment is easy just as the pattern says, it's the fit that you will need to be careful about. I did add a few extra steps because of my sizing issue. Also I chose a very fiddly fabric to work with so I needed to do a little more work to preserve the integrity of the fabric. Then I added a piece of the selvedge as trim in the back yoke seam to give it a design element. But looking back on the process, that was the easiest part of the design.

It's a cute oversized top that will work with a turtleneck under it but I have no plans to use this pattern again. I purchased the pattern for the top only and it wasn't talking to me as I was working with it. Not sure if its because I chose the wrong size, or if this is just one of those designs that you only need one of...anyway I'm moving onto the next garment on the list for my Crazy 8 wardrobe!

...as always more later!


Wednesday, January 24, 2018

McCalls 7481 - Hack'd

This was the second piece completed during my Christmas Sewcation and the first piece of my Crazy 8 Wardrobe Plan. Just to remind you the details of the plan are in this post.

It's McCalls 7481 ~


Inspiration ~
Earlier this spring, I made this jacket using an African print. I've worn that jacket twice ~ both times out to dinner with friends. I've never worn it to work and I don't know why?  I stumbled across the inspiration jacket during my Pinterest travels. 


I follow Blair from Atlantic Pacific on Instagram, Pinterest and her blog. I'm constantly inspired by her looks and copied a garment she featured years ago too. When I saw this pic I immediately thought of McCalls 7481 as the starting point.

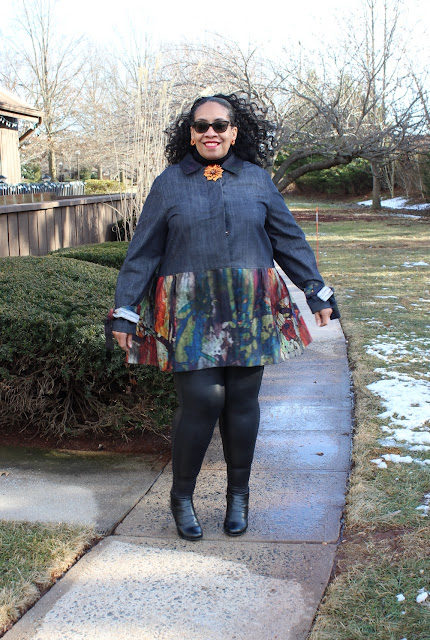
What I most admired about the jacket is the floral print and how it extended into the gathered bottom. It looks like it's made from a silky type fabric. However, I immediately saw it in a denim and I KNEW I had the perfect fabric in the collection to make it work.


This lightweight denim fabric is from Fabrixx in San Francisco.  Shams was shopping there and sent me a note asking if I wanted some. People seriously I have the best sewing friends! Definitely wanted some - it was just a matter of determining how much to buy...I ended up with 2 panels though later I wished I'd bought 3.

Anyhoo, when I added this jacket to my Crazy 8 Wardrobe plan I knew it would be a project. I was hacking a pattern and I was using a fabric that I hoped would work for the design. Also this style is a little out of my comfort zone. It has more of an artistic/art teacher flair to it. Clothing that I love on others but rarely make for myself.

Materials Used:
Ltwt denim border fabric from Fabrixx
Black midweight denim from Smuggler's Daughter
Ltwt fusible interfacing from Fashion Sewing Supply
Large Snaps from Pacific Trims

Pattern Alterations/Construction Techniques ~
This a great pattern to start with because it comes ready to color block.  Since I've already used the pattern all of the pattern alterations have been made to it. 


Now while the pattern has separate pieces to use in color blocking, I still traced and adjusted my already altered pieces because I didn't want to fiddle with new pattern pieces. 

My pattern changes:
1. Cut the front and back pieces adding 2" below the waistline.
2. Omit the lining since it's a denim jacket.
3. Used the front & back facing pieces I'd made for the previous jacket.
4. Omitted the pockets again ~ honestly I regret omitting now that I've worn the finished jacket.

Construction techniques:
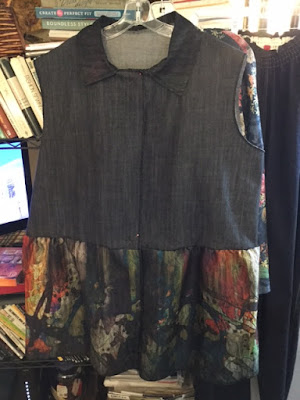
a. Since the goal was to have a fully gathered skirt on the jacket, I used the lower front panel piece from the pattern. I cut it on the fold for the back but I used the entire length of the border print. 
b. Then I cut two front pieces from the border print using the same pattern piece.
c.  The gathering was accomplished using the dental floss technique that's worked so well for me in the past.


d. I cut the collar using a darker piece of the border print to bring some of the border print to the top of the jacket.


Sleeves ~
Let's be honest I have fat upper arms and I almost always need to make adjustments to the sleeve pattern pieces.  This pattern was no exception. Although I'd already made alterations to the sleeve pattern piece when I originally made the jacket, the sleeve didn't work as cut. I don't know if it's because my fabric is an unforgiving denim or what but they just didn't work.

Thank goodness I had enough fabric left over to recut new sleeves. I decided to add a seam down the center of the sleeve so that I could get the extra space I needed where I needed it.


By adding a center seam I solved most of my problems with how the sleeves fit and hung.  I also made the armholes a little larger when I put the sleeves in to take up some space in the jacket front that was pulling in a funny direction. 

I could tell something was wrong not only by how the jacket felt when I put it on but also how it looked. See I've started to take quick pics on my iPad when fitting. It helps me get a better idea of how a garment hangs and looks, as well as how it feels.

Now my upper arms are considerably fatter than my lower arms and wrists. So to insure that my wrists don't look like they are floating in a too big sleeve, I added ties from the border print to the bottom of the sleeve.  This way I can tie the sleeve, giving it a better fit at the wristbone.


A few construction shots ~

Pinning the gathered skirt onto the jacket 


The jacket without the sleeves after 
the bottom has been added

There was a lot of thought and care given to the interior of this jacket since it wasn't lined. I hand stitched the jacket hem as well as the sleeve hems. The front plackets were hand stitched down after I sewed the fabric covered snaps to the front bands.


A few pictures of the jacket in action ~

Wearing the jacket with a RTW pin at the neckline

Jacket front opened so you can see the covered snaps


View of the back gathered skirt

A gust of wind showing the jacket's flow

Conclusion ~
I thoroughly enjoyed making this jacket probably because I had the time to think through the challenges and execute them. I'm also thrilled that while it's not an exact replica of the inspiration jacket, it works for me.

This isn't a silhouette I usually wear and I'm even happy about that. Also, some would think this should be an outerwear jacket but it's cold here on the East Coast. It also looks like it's gonna be a very cold winter, so warm layering pieces are on my creative horizon right now.

This was my second garment of my sewcation and took the longest to complete but so worth every minute I spent working on it.

...as always more later!


Sunday, January 21, 2018

A New Collaboration and a New TNT Shirt

Anyone who knows me knows that I love Elliott Berman's fabrics.  If you come to visit the NYC Garment District either with me or ask for my recommendations, Elliott Berman is ALWAYS on the list. 


So I was thrilled and honored when Eugenia of Elliott Berman asked me to collaborate with them. Over the course of this year, I will be making several garments from fabric that can be purchased either on their website or at their site in NYC.

During the last decade or so that I've been blogging, I've made a few garments with fabric purchased from Elliott Berman. My favorite being this Versace Inspired Dress that I made in 2011 using a wool knit.


Why do I love Elliott Berman fabrics?
One reason is the quality of their fabrics. They import a selection of unique fabrics, designer goods, the diversity of their inventory and the fair pricing for the goods. Also, they are a great friend to the sewing community - sponsoring events with PatternReview.

It also didn't hurt that my friend Shams is blogging for them and spoke so highly of how easy it was to work with Eugenia and the team at Elliott Berman.  Now you don't have to go to another blog to see my makes, all of them will be here alongwith some pics on Instagram.

So this is my first garment for them - a TNT shirt from my Crazy 8 Wardrobe. 


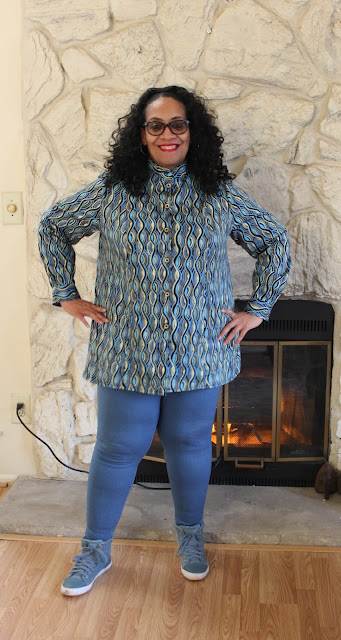
I chose a printed cotton sateen with a tribal inspired influence for my shirt. I asked Eugenia for a shirting fabric to use as my first make. We were walking the floor and she was pulling out various fabrics for me to look at. When we got to this one, it was love at first sight!

Now while I picked this one from the NYC store/warehouse, here are some on their website that you can order if you're looking for a high quality, interesting print for a shirt. 

This is my TNT shirt pattern so there are no new techniques with this shirt. However, for this version I chose to use a mandarin collar instead of a stand and separate collar. 


To make the shirt interesting I manipulated the fabric, cutting the stripes horizontally for the cuffs, the mandarin collar and the back yoke.


I also used some interesting yellow & black buttons I had from the collection. The challenge was that I needed eight buttons and only had six. So I made a covered button for the mandarin collar and the last buttonhole carefully matching the fabric so that the buttons would blend into the garment.


Buttons, fabric manipulation, a collar change and this amazing piece of fabric are the standouts in this shirt.

A few pics of the shirt ~


As I stated above I will be making a new garment using Elliott Berman fabric about every three months. If you're on Instagram, may I suggest you follow them at ebtfabrics. They offer some amazing discounts for their Instagram followers. Also, don't hesitate to check out the website. They do ship overseas. I've ordered from them in the past, their orders ship quickly and are well packed.

I finally spent some quality time with my daughter/photographer so there will be a few more posts after this one. If you've read this far, you should know that the same daughter is the family hairdresser, and she added the curly fall to my hair for these pictures. Since we shoot several garments at once, the photos in the next couple of blog posts will also feature this hairstyle. Just thought I would tell you before you asked! 

...as always more later!


Wednesday, January 17, 2018

Sew Camp - March 23-25th

I'm planning on going to Carriage Corner Sew Camp March 23rd - 25th, this year.


I had a really good time last year so I'm going back. I made some great friendships, got to shop at Fabric Mart's brick and mortar store, and had some awesome conversations. The recap of last year's trip is here.

If you're interested in attending, here's the schedule for the weekend. Registration and cost information can be obtained from the website.

Friday, March 23rd:

  • Arrive at Carriage Corner by 10:00 am.
  • Fabric Shopping at Fabric Mart.  We will plan to leave by 11:00 am.
  • After getting your fabric fix, lunch will be at a charming little cafe called Crave, cost of lunch is not included.
  • Upon our return from FabricMart, we’ll get the sewing area set up and you can sew to your hearts content.  (If you're traveling and don't want to bring your sewing machine, there are 2 machines available for use, on a first come basis)
  • Friday Dinner will be a happy hour at the B&B with small bites available, we have both the gazebo and the fire pit to allow you to enjoy the outdoors.
  • The sewing space will be open through the night for the late night stitchers.

Saturday, March 24th:

  • Sew all day ~ start early, stay late, leave in the middle for a nap ~ it’s your choice and your pace.
  • Breakfast will be prepared by me and served at 8:30 am.
  • Lunch & Dinner will be catered.

Sunday, March 25th:

  • Sew all day ~ start early, stay late, leave in the middle for a nap ~ it’s your choice and your pace.
  • Breakfast will be prepared by me and served at 8:30 am.
  • Lunch will be catered in.
  • You need to be checked out of your room by 11:00 am, but can stay and sew until 5:00 pm.

There will be coffee, tea, water, sodas and snacks available all weekend.

How to Register:

Please send an email to hello@carriagecornerbandb.com, with “Carriage Corner Sewing Retreat” in the subject line indicating that you want to attend.  Please send a number that Gaylen can reach you at to call and get your details.  A return email will confirm the details of that conversation.

If you want to register with a friend or bring your significant other, please let Gaylen know in the initial email.

Hope to see you there!


Monday, January 15, 2018

Dr. Martin Luther King Jr. Day - 2018


In such discouraging times as these, I take solace in the words of Dr. Martin Luther King Jr.

May I stress the need for courageous,
intelligent, and dedicated leadership...
Leaders of sound integrity.  Leaders not in 
love with publicity, but in love with justice.
Leaders not in love with money, but in love
with humanity. Leaders who can subject their
particular egos to the greatness of the cause.


Characteristics sorely lacking in the White House these days.

...as always more later!


Friday, January 12, 2018

It's in the Air!

If you're on any form of social media, you may have seen sewists talking about wardrobe sewing...especially on Instagram the makenine2018 hashtag is trending...at least in my feed. Also quite a few sewists are talking about sewing from their fabric collections...c'mon y'all know I would never use that "S" word! *LOL*

Then MimiG started sewing 10 Must Have Me Made Garments that are based upon sewing every day wearable garments. I've started to think there must be something in the air cause you know I'm sewing my own "Crazy 8 Wardrobe."

So what is it about the beginning of this year, that has collectively caused the sewing community to look at what we've been sewing, and realize that we need to make more garments that reflect the lives we actually live. Or that maybe we should sew from some of that amazing fabric we spent 2017, 2016, 2015, etc. collecting.

I don't know about others but I am still trying to sew up a completely me-made wardrobe. I miss wearing something I've made everyday. Especially now that it's so cold here on the East Coast, I'm swathing myself in sweaters and cashmere to protect myself from the bitter chill.

To remind you here is what my Crazy 8 Wardrobe consists of:
1. A jacket - McCalls 7481
2. A cardigan - Heidi Cardigan by StyleArc Patterns
3. Two shirts that button down - TNT pattern
4. A blouse - Vogue 8772 
5. A topper - Vogue 9286 
6. A pair of jeans - Ames jeans by Cashmerette Patterns
7. A pair of pants - TNT pants pattern or the Eleanore Jeans by Jalie Patterns
8. A bonus piece - a vest from Vogue 9273

During my Christmas Sewcation I completed the jacket using McCalls 7481.

Jacket during construction with pants in the background

I also made a pair of trousers made from denim that need some alterations but I think I can make them work. I'm presently working on the Vogue 9286 topper and I hope to complete one of the two shirts from the list this weekend too. 


It's Martin Luther King Jr. weekend here in the USA and our offices are closed on Monday...giving me an extra day of sewing time so I hope to get all of the pieces mentioned above completed.

However, I won't make my self-imposed deadline of January 31st and I'm cool with that. I will have made four of the nine items on my list but there's no way I will get the next five outfits completed in 2 weeks. I still want to sew all of these items so I will be working on this list until they're completed. Especially since these items are all things that I want to incorporate into my every day wardrobe.

This is what I'm sewing/creating/working on now.  Blog posts of the finished garments soon.

...as always more later!


Tuesday, January 09, 2018

The NYC Sewcialist Soiree...

...was held on one of the coldest days of the year! The coldest days of the year people! -13F degrees and I don't do cold!  If I wasn't involved in the planning of this, I might not have attended because it was that dayum COLD! However, I'm so glad I was there! 

First a few comments about my outfit. When we planned this I fully intended to make me a sparkly pretty new party dress. Then the first weather reports came in about how cold it was gonna be and I thought okay maybe I will make it, take it and change. Ummmm no! Since the tri-state area was on Day 11 of a 13 day arctic weather blast, that minus degree temperature just made me want to be warm and comfortable.

So I wore my Rivermont peplum top, some black leggings and my Steve Madden embroidered mules. I'm telling you, warm and comfortable were the key words of the day! LOL!

Picture stolen from Marcy Harriell (@oonaballoona)

A few pictures from the Event ~

The Event Space...

The Attendees...


The Pattern Swap Table...


The Food Spread...


The Sponsors...
I really want to thank all of the sponsors who donated gifts for the event. You were all amazing to work with and were so gracious and liberal with your donations. Thank you, Thank you, Thank you! You can see all the gifts donated and the winners here.

photo credit:  Syreetabriana IG

If you're interested in learning about future events, and have an Instagram account, follow the NYSewcialHour to receive updates.

A final thank you to the three most amazing women who were on the committee with me.  Syreeta (IG: Syreetabriana) the most organized, creative, woman with the most amazing follow through. We wouldn't have done any of this without you because YOU were the driving force. Claire (IG: domesticcoquinette) the hostess with the mostest! The food was AMAZING all because of you. I'm still in awe of the spread you created and the cake was divine. 

Grace (IG: wzrdreams) there would have been no Soiree to have if you and Carol (IG:makeitanywear) hadn't thought up the NYSewcial Hour that meets the last Tuesday of every month at The Houndstooth Pub in the NYC Garment District. So thank you for wanting to spend time with other sewists and starting the ball rolling!

As far as sewing and my sewcation, I finished three pieces before the Christmas Crud claimed me and I went to bed.  Even though I didn't finish a lot of pieces, I'm glad that I did have the time to sew and get the piece of mind that sewing brings me.  My photographer will be available MLK weekend, so photos and blog posts then.

...as always more later!   

LinkWithin

Related Posts with Thumbnails