Sunday, April 30, 2017

McCalls 7542 as a Dress

I always saw the sleeves from this pattern on a dress. The top on the pattern is too short for my comfort level but those sleeve variations are what drew me to it and finally made me buy the pattern. Which is probably why it's one of the most bought and sewn patterns in the sewing community now!

I chose the sleeves from View B because I loved the drama of them. Also, I loved them on the top that Candice from Sew-My-Time made.

After purchasing and checking out the finished measurements on the pattern pieces, I knew that I would have to do extensive alterations to make it fit me. Honestly, if I was a fit master or enjoyed fitting puzzles, I would have started from scratch.

Materials ~
3 yards of embroidered cotton from Fabric Mart
3.5 yards of Bemberg Rayon from Elegance Fabric in NYC

Notions ~
22" invisible zipper 

Pattern Alterations ~
Since I knew I wanted a dress, I used my TNT dress pattern as the basis of my pattern sandwich to make the following alterations to the neckline, shoulder and sleeves.


They were:
1. On the front piece, I shortened the shoulder seam.

2. Even though this pattern has bust cup sized pattern fronts, the D cup size made my dart too low for my bustline. So I used the bust dart from my TNT dress pattern instead.

3. The shoulder seam on the back piece has a back dart so I widened the back dart so that the shoulder seam would match the dress front shoulder.

4. The changes to the sleeve are in the prior post, however, I did use the sleeve cap from my TNT pattern and NOT the higher sleeve cap on the pattern.

5. Otherwise the only other change was to lengthen the pattern pieces.

I've read several reviews by sewists I admire who have worked on the pattern. Sewists whose bodies don't fit the pattern right out of the envelope also so I would know some of the challenges that were in store for me. Even armed with that knowledge I ran into some setbacks.

Construction ~
First, I've gained back 10 lbs since the last time I made my TNT dress...*sigh* so of course it's a little tighter than I want it to be. I got it basted together and realized that I needed to do something about this cause it was tight in my abdomen area...and I hate the belly hug. I hung the dress up and walked away from it for a minute. After a few horrific train rides to work with loads of times to work out the fitting puzzle, I decided to add a side gusset to the dress.

I'm sure you're thinking ~ WHAT?  And why didn't she just make a muslin before she cut out her fashion fabric? My first response is you know me right? You know I hate making muslins. My second response is there is almost always a way to fix something, I just needed to come up with a solution...and my final response is I honestly didn't think about the extra 10 when I laid the pattern out.

Side Gussets for the Win:
To add the side gusset, I cut a strip of fabric 2" wide and 36" long. I inserted it into the dress' side seam using 1/2" seam allowance for the body of the dress and 7/8" seam allowances at the underarm seam.

A picture of the gusset in the dress ~

Unless you're looking for that gusset, you wouldn't even know it was there!

I'd always planned on lining my dress. One reason was because the fashion fabric is cotton and will cling to my Spanx. Yes, I wear Spanx in the summer because I need something on my thighs to keep them from rubbing together ~ "Fat Girl Problems." 

A lining will allow the dress to slide over my Spanx. I also hate facings and a lining let's me omit them. Finally, I'm hoping the lining will help the cotton fabric from creasing too much

I also added an invisible zipper because I hate those little button & loop closures. They never feel secure enough to me and since it's a dress, a zipper.

The Sleeves ~
This was the drawing point for me. I love the drama of that sleeve. However, the pattern calls for the wrong side of the fabric to show on the finished sleeve. Since I'm using an embroidered fabric where the wrong side is just not as pretty as the front, I decided to line my sleeves.  Can we say more challenges!
  • To accomplish adding the lining, I cut the sleeve pattern from the lining fabric and stitched it to the fashion fabric, turned and pressed.
  • Then basted the two pieces together near the cut out line for inserting them to the main sleeve. 
  • This cut edge was then serge finished and attached to the sleeve hem.
  • Of course the first one went in with no problems. I had to put the second one in three times before it was correct...and to get it in correctly, my daughter had to pin it in for me.
  • The seam between the lower sleeve and the short sleeve was pressed towards the sleeve and then topstitched down. This prevented the seam from showing when I raised my arms.
  • And a tip, make all changes and sew all seams while the sleeves aren't in the dress - cause it's a lot of dress & fabric to move through your sewing maching - ask me how I know! *LOL*


But it was worth it because the sleeves are everything I thought they would be!

A few pictures of the dress in action ~


Conclusion ~
I'm glad that I took this sewing journey because I love the resulting dress and "The Sleeve Swag". Although after attaching the first sleeve, I did wonder if it was too much of the embroidered blue fabric. Then the second sleeve was inserted and I saw how the light blue lining fabric added some dimension to the fashion fabric, so I was good.

As I stated before, I will never make the top because it's too short for me. I may revisit this as a tunic. However, expect to see several of the sleeve variations from the pattern on future garments, because I already have a few ideas percolating. 

One final thing, we photographed this dress like I will wear it to church even though I originally planned to wear it to work. Even with sneakers it's a little too fancy for work.

BTW, I have another dress on the cutting table because it's finally getting warmer outside and spring/summer means dresses!

...as always more later!


Wednesday, April 26, 2017

McCalls 7542 - The Sleeves

I'm working with McCalls 7542.  Since we all know that patterns don't fit us right out of the envelope, I needed to make several changes to the pattern to make elements of it work for me. For me the sleeve is where I needed to make the most changes, especially since its the sleeve that's the focus of this pattern and my garment.


Normally I share all pattern information in the post containing the finished garment and write a separate post about the technique later. This time though if I couldn't get the sleeves to work, there would be no outfit. So I did something I don't normally do or rarely do. I made a sample.

See I always alter my sleeves for my bodacious biceps. Unless I'm using a Cashmerette Pattern, I need to make this pattern alteration EVERY.SINGLE.TIME. I've developed various techniques to deal with this depending on the type of sleeve I'm using. Since this is a short sleeve with the ruffle added to the bottom of it, I made a pattern sandwich using my TNT short sleeve, the McCalls sleeve pattern and tracing paper to make a new sleeve.

After I had a sleeve that worked for my biceps, my next concern was making sure the hole in the pattern would fit the hemline of my new sleeve. I measured the cutting line and it was too small. Then I measured the stitching line and it was too small. So I added 1/4" all the way around the stitching line seam and used that for my new cutting line.


I made a sample from a cotton shirting that I had on hand using the sleeve from View B.


...and it worked! I can't believe that it worked...or that I took the pictures with the timer on my iPad! *LOL*


Yeah that's how I look when I'm working in the sewing cave! And yes, I took the time to serge finish the upper and lower sleeve parts. Hey I might want to put it into a shirt or a tunic some day!

Anyway that's how I made my sleeve sample work using McCalls 7542 for the next garment up on the blog!

...as always more later!


Sunday, April 23, 2017

Saldana Dress from Sew Sew Def Magazine

I'm always looking for a new maxidress style because I love them. They are a staple of my spring/summer wardrobe. So I was intrigued by the Saldana Dress in the inaugral issue of the digital sewing magazine Sew Sew Def.


Let's start out by stating that this is a digital/online magazine and the pattern is included as a pdf. Now y'all know I had to really want this maxidress to print out a pdf pattern for it!  I am a card-carrying, full-fledged member of the "No PDF Patterns" club, but as in most cases exceptions can be made.


Printing out and taping the pattern together ~
The printing for this pdf was pretty painless. The instructions provide excellent details on how to set your printer and print the test page. I was seriously impressed with these instructions because they didn't assume that you know "how" to change the settings on your printer. I always feel like I'm guessing when printing out a pdf pattern test page ~ another reason they don't really appeal to me. It seems more like luck when it works then skill. These instructions gave me a clear understanding of what to do.


My next challenge with pdf patterns is cutting the pages out and taping them together.  Now while there were some terrific tips making the process easy, I still am not a fan of this part of the process. As I spend an entire afternoon cutting and taping, I'm always aware that in the time spent I would have already alterated pattern. That's before I even get to the third step of the tracing the pdf pattern to make alterations to it. However, this is my challenge and no fault of the designer.

The Instructions ~
Honestly I was really impressed with the instruction sheet/package. I love it's appearance, it's easy to read and has a wonderful table of contents. Every piece of information you need to successfully complete this dress is in the package. The sewing instructions are clear with large easily understandable graphics. May I say again how impressed I was with the presentation!

Materials ~
- I used a lightweight borderprint scuba knit purchased from Chic Fabrics.
- White ITY knit from the collection
- Stay Tape to stabilize the shoulder seams

Pattern Alterations ~
This pattern goes up to a size 2X and while the hip circumference is wide enough for my hips I wanted a little more ease for my personal comfort. So I did a pivot and slide technique from the waist down to add 4 more inches to my hip area.


The other pattern alteration I made was to the sleeves because I have bodacious biceps and even though I'm using a knit, I needed more space. So after the sleeves were traced, I cut the sleeve from hem to the sleeve cap (leaving an inch) and then spread the sleeve. This gave me the additional space I needed. Then I traced off a new longer sleeve pattern.

Construction ~
I made this a considerably more challenging task by picking a borderprint scuba knit with a minimal amount of stretch...and with stripes to match.

The construction of the maxi is easy and the instructions are really good so I just followed the instructions. Although, I did end up taking a little of the width out of the skirt bottom because it wasn't hanging well.

Design Changes ~

This is where my version deviates from the pattern. One I used a scuba knit instead of an ITY knit or a knit that has the stretch recommended by the pattern. I have challenges wearing tightly fitted clothing and will always default to closely fitted.

The binding for my neckline is made from some white ITY knit from the collection. The scuba knit didn't have enough stretch so I used a fabric that did. 

I felt like I needed some of the color from the border in the top of the dress. All of that stripe manipulation was great but I needed something to tie the top and bottom of the dress together. That's why I added part of the border print to each of the sleeve hems and to fill in the v-neckline. The neckline was just a little too low for me, although to be fair, the pattern does state that it has a low cut v-neckline. 

My side slits are also sewn shut. I added enough fullness to the skirt that I can walk easily in the dress without them. Actually when I was thinking of sewing this, I never saw the side slits in my mind. These are the "design" changes I made to my version.

Pictures of the finished dress ~ 


Conclusion ~
Since the dress is supposed to be made from a knit fabric with a certain amount of stretch (which is clearly marked on both the pattern pieces and the pattern instructions) it can be constructed on your serger.  I did a combination of sewing machine and serger sewing. My initial stitching was on my sewing machine using the 1/4" setting because ALL of the seams are sewn with a 1/4" seam allowance. Another thing that's clearly marked everywhere, but I was grateful for the setting on my sewing machine and the sewing foot so I didn't have to remember. A wonderful feature of my machine since it's a quilters sewing machine!

If you bought this issue or subscribed to the magazine, the pattern is included. I do recommend that you download the pattern and make your own version. If you're on Instagram you can see more versions of the dress using the hashtag #saldana, #saldanamaxi, #thesaldana. 

I really like my maxidress but I probably won't use this pattern again. I have a couple more maxidress patterns I want to try this summer and a couple I want to revisit from last summer.

One last thing, I'm kinda proud of these pictures because I took them myself - even the ones outside on the deck! Next on my cutting table is a version of McCalls 7542 - that's what's up next!

...as always more later!


Tuesday, April 18, 2017

Stripes & Lace Button Down

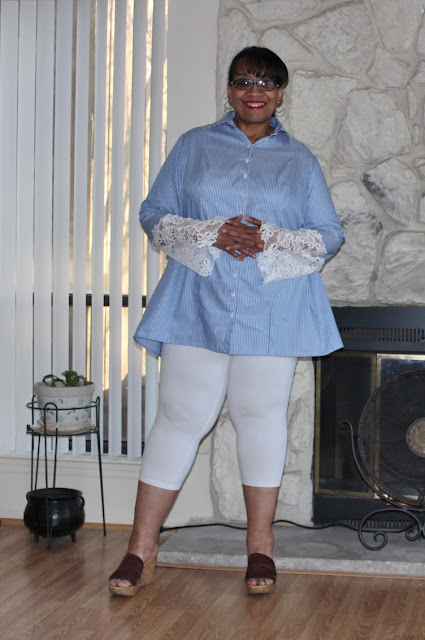
It seems like my spring sewing so far has been inspired by photos I've saved during the long dreary winter months. There are a few designers whose work I really admire so I follow them on Instagram. Isaac Mizrahi is one of those designers. I found this button down blouse on his IG feed.


I've been holding onto it waiting for spring. Well spring has arrived and I'm ready to make my version of it. I've even photographed it with white capris and my favorite summer slides. BTW, these will be the last of the photos taken by me in front of the fireplace. The trees are budding and it's starting to be really pretty outside my front door so I will be moving back outside with my next garment.


Here's a picture of my materials ~


Fabric:
Cotton/Poly Blend Shirting from Fabric Mart

Notions:
Lace purchased from Fabric Mart several years ago
Pearl shank buttons from the button collection

Pattern:
I used my TNT button down mashup pattern ~ Butterick 5678 & Vogue 7700. The only change made was to the sleeve to add the lace detail.

The original shows the lace under the hemline of the sleeve but I didn't like my lace that way so I placed it over the hemline. It's the only change I made to my version of the designer shirt.

A few pictures of my new shirt ~


I've fallen in love with this button down mash-up. It fits in the front but has a nice swing to it from the extra fabric in the back. Since I've made it longer than my first version, it's very comfortable to wear and works with skirts as well as my jeans and leggings. There will be at least one or two more before I head into serious summer sewing.

Next on the cutting table is a new maxidress pattern. I've been accumulating a few new maxidress patterns to sew this summer. I need to add some additions to my maxi dress wardrobe...cause y'all know I love a good summer maxi!

...as always more later!


Wednesday, April 12, 2017

Do you have a Sewing List?

It's the start of a new season - Spring - one of my favorite seasons! And as I do every cycle, I make a new sewing list. In years past, I've used a notebook, a scrap of paper and my iPad to make a list.

Last fall I made a very long and comprehensive list ~


It was a list that started to strangle me after a minute. It was too much and it made me feel as if I was accomplishing nothing...which is definitely a skewed point of view since I made 12 garments during the first quarter of this year!

So somewhere in there, I made a smaller list and I've sewn everything but one item from the list and one item is in process. That smaller list made me feel much more accomplished as I checked each thing off of it.

After that experience, I decided that I would start with a smaller list of items to sew for Spring. I thought about sharing it but sharing those lists always seem to jinx the making of any garments on it...so you will have to see each garment as it comes out of my sewing machine.

The point of this is to ask, "Do you have a Sewing List?" Do you make one at any point? The beginning of the season, the start of a big project, to give your sewing some direction?  Or do you free-style?  Sew whatever interests you at the moment? Or do you do a combination of list and free-style?  

This is the Question of the Day so talk back to me! Inquiring minds want to know - sewing list or not!

...as always more later!


Monday, April 10, 2017

McCalls 7481 and some Dashiki Fabric

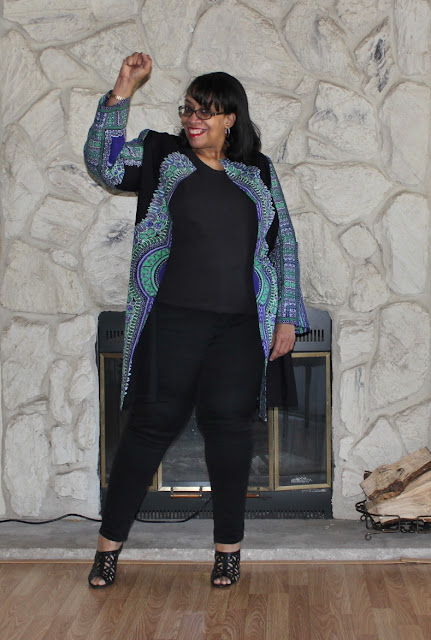
It's getting warmer and to celebrate that fact, I'm starting to sew spring. Since I bought this fabric to #CarriageCornerSewCamp and didn't get to work on it, I decided it should be the next thing up in my sewing queue.  So in that spirit, I started a topper to be worn with jeans and a tee or a tank top!


My Inspiration ~


I follow the singer Monica Brown on Instagram and loved this topper on her and thought it would be cool to add one to my wardrobe. Monica's dashiki jacket is made by DashikiPride.  

After looking at their pieces, I knew I could make my own. So I convinced Marcy to meet me at AKN Fabrics on Broadway to shop for some African Fabrics and bought this one home with me.


The pattern ~

I chose McCalls 7481 as my starting point and I made a couple of alterations to the pattern.

1. I added 5" of length to the front and back pieces. 2" at the lengthen/shorten line and 3" at the hemline.


2. To the front and back pieces I added an inch at the sides - grading down from a 1/4" to a full 1" at the hips.

3. 5/8" seam allowance was added to the back to make use of the print.


4. I also made facings since the pattern calls for the jacket to be lined and I wasn't lining this lightweight cotton jacket.

5. The pockets were omitted. I never put my hands in my pockets in a jacket like this so I left them off.

Honestly it doesn't close over my body in the hip area but since it's not made to close, that's fine for this time. If I want to use the pattern in the future, I'm going to need to add some more space so that it closes around my body.

A few pictures of the jacket ~


...and one more cause let's "Fight the Power!"


Conclusion ~
It's something new and part of my "I can wear anything I like" wardrobe. I love the dashiki print and may buy some more in the future since the African Fabric Store is only a couple of blocks from me. For now it's one of the first pieces of my spring/summer wardrobe and so I'm happy to be sewing for spring!

...as always more later!


Saturday, April 08, 2017

First Quarter Review - 2017

All things are finally starting to bloom...new leaves on the trees...spring flowers budding and I'm happy. I love Spring! Even though I've been sewing lighter weight clothing for the last couple of weeks, I'm looking forward to sewing more warm weathered garments.

First though I thought I'd take a look back at what I've made this first quarter of 2017.

January Sews ~

Simplicity 8059 Cardigans

One thing I've learned about sewing for where I am now, is that multiples of a garment work for me. I made four of these and have worn them many times since January because they are great for layering. It was the details that made each one different ~ fabric choices, embellishments and button choices. This was one of my best sews of the quarter.


February Makes ~
For such a short month, it was pretty productive for me.

Cashmerette Turner Tunic

I loved this pattern and plan to make several more this spring/summer!

Butterick 6389

Made from a boiled wool from the collection! I loved wearing this and should have made more since there is more boiled wool in the collection. Maybe in the fall.

Button Down Mash-up - Butterick 5678/Vogue 7700


I didn't wear a lot of button downs in my former life so making them has become a new adventure. I made a few last year using Butterick 5678 as a base. In wearing them, I've wanted a looser fit which I achieved by mashing the two patterns together. I also remembered that fabric makes a huge difference in how a pattern fits the body. Especially since I like the poly version better than the cotton one in terms of the how the fabric flows.

March Makes ~

One more button down mash-up

Denim Border Print McCalls 7095

Ponte & Pleather Simplicity 8094

Cashmerette Turner Dress from Spout Patterns

A total of 12 items for the last three months. I'm pleased with that amount because I'm no longer sewing for speed, I'm sewing for pleasure. Also, since I wear jeans and leggings as bottom pieces, most of my fall/winter makes are tops. Truthfully I own a lot of cardigans and turtlenecks from my former life that still work. 

Spring sewing ~
I notice that as the seasons change, I tend to "refresh" my pattern and fabric selections. This is not to say that I'm not going to use some of the items already in my collections but a jolt of newness always helps to inspire! 

Here are some new pieces that have joined the collections ~

Fabric haul from Fabric Mart Visit

 Laces picked up from Chic Fabrics and more denim from Fabric Mart

Patterns purchased from the last JoAnn's pattern sale

This is what's currently on my cutting table and almost completed so it will be up on the blog next. Now that spring is actually here...my mind has exploded with the possibilities of things to sew because...dresses!!! I'm making a list of things to sew going forward so stay tuned.

...as always more later!


LinkWithin

Related Posts with Thumbnails