Showing posts with label Five in Five. Show all posts

Tuesday, October 15, 2013

Vogue 8935 - Finished

This took a little longer to complete than I thought it would...but sometimes that's just how it works out.  I have a queue of fall garments to wear and the temps just haven't dropped enough yet to wear them.  So I guess my sewing mojo has taken a bit of a hit due to that...

Anyway here is Vogue 8935...


A few stats...

Pattern ~
Vogue 8935 - the pattern consists of a loose-fitting, pullover top with a collar sleeves with a button pleat and stitched hem. A straight skirt without a waistband and a pair of straight leg pants are included in the pattern.  It's a Very Easy Vogue pattern that any level sewist could sew up easily.


Fabric ~
Navy/beige poly/wool blend pinstripe from the collection by way of Fabric Mart
White cotton pique from the collection by way of fabric.com

Notions ~
Navy blue rayon bemberg lining
9" navy blue invisible zipper
A pair of 1/2" shoulder pads
navy blue rayon seam tape
2 - 1/2" pearl ball buttons
2 - 1/2" clear & gold buttons

Construction ~
Pattern alterations for the top are contained in this post.  For the skirt I used my TNT pattern because why mess with what works.


  • I used fabric to give this pattern some pizzazz.
  • I also cut the pinstripe on the bias for the skirt to add some visual interest to the outfit.  Though to be perfectly honest, I did a so-so job in cutting it out and matching the chevron'd pinstripes.  Because the pinstripe is pretty subtle it doesn't look terrible but it definitely could have been done better.
  • The collar and cuffs for the top were cut from the contrast cotton pique fabric so that the top would look like it has a shirt under it.
  • The top was given a closer fit to lose some of the boxy-ness that the pattern envelope displayed.
  • My neckline is low cut.  I could have fixed it but I didn't want to have any trouble getting this top on and off.  So I'm opting to wear a cami with it.
  • I added a pair of 1/2" shoulder pads to the top because even though I narrowed the shoulder seam, it laid kinda flat on my shoulder.  Adding the shoulder pad gave it some ummph and squared my shoulders off. 
  • There is quite a bit of hand stitching in this garment - hand stitched the collar neckband down.  Hand stitched the hems in the top & the skirt and I even hand stitched down the waistband.
  • Used two buttons & buttonholes for the waistband closure.
  • Two pearl buttons were used on the cuffs - it really adds to the business vibe of the white collar/cuffs and the pinstripe fabric used in the body of the outfit.
  • The skirt is fully lined.
Construction Pics ~


Sleeve cuff with pearl button


Inside of the cuff

Close-up of the collar

Two buttons on the waistband with invisible zipper

Conclusion...
This is a nice outfit and will play well in my work environment.  However, this is a one and done use of this pattern...something that's infrequent in my world.  It is an easy sew and I knew this pattern had a lot of potential when it first came out. It was just a matter of bringing that potential out so that everyone else could see it.  As stated above, choosing the right fabric was crucial to making this outfit work but I don't need another outfit from this pattern.

A few more pics...

The chevron pattern looks pretty good on the skirt
despite my concerns...
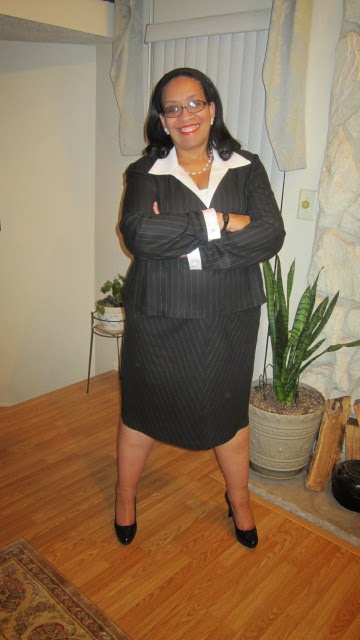
Trying to give off that "Pro-fessional" Look! hahahaha

Mary Beth this crossed leg pose is for you! *smile*

This is my third garment from the Five in Five grouping.  I won't be working on the last two dresses for awhile because I need to move onto my Butterick coat since it's due by the end of the month.  I will pick the Five in Five project back up after the coat is finished.

Finally, thanks for the love on the Internet post.  I read each and every comment left along with several that were sent to my email address.  I appreciate the fact that you enjoy sharing my creative journey and that I've encouraged so many of my plus size sistahs to sew again! Halfway through the day, I thought maybe it wasn't the best plan to write that as a blog post but at the time I was very annoyed. Truly the comments written by that person should have been like water off a duck's back, but isn't that how people get away with having those kinds of attitudes when no one shines a light on them?!  Anyway, have no fears, there was never a chance that I was going to quit blogging...I'm having too much fun here...overweight styling and all! *LOL*

...as always more later!


Sunday, October 06, 2013

Chugging Along...

Another weekend without much desire to sew...but I did get a little more done on the Vogue 8935 outfit.  The top is almost finished...


...and the skirt has been started.


It's looking like I imagined and the top fits without the extra boxy-ness that the original pattern has.  I've made a few changes to the outfit during construction, besides the pattern alterations, which I'll discuss in the reveal post. However, I'm happy with how the pieces are looking so far.

I'm thinking that I won't have the "Five in Five" garments done in the time frame I'd originally imagined...but I'm okay with that.  I'll definitely finish these pieces next weekend and then I'm moving onto the coat project.

Just wanted to give an update...

...as always more later!


Sunday, September 29, 2013

Vogue 8935 - A top and skirt

This pattern has been on my "must sew" list from it's debut in the last Vogue pattern release. Admittedly the artwork on the pattern looks kinda blah but I could see the potential in the pattern.  It will work well for my corporate workplace yet be comfortable...a huge factor in anything I make these days.


From the beginning I knew I wanted to make it using a wool blend navy pinstripe from my fabric collection.  Somewhere along the line, I decided that I wanted the collar to look like it was a blouse inside a top.  Yeah, I never go simple...*sigh*


Navy blue rayon bemberg, wool blend pinstripe
white cotton pique

So after much thought I came up with a way to make this work.  Some of this is pattern alterations and some is fabric choice but I think I'm on the right track.

First up pattern alterations...

The top front ~ 
These alterations were made by creating a pattern sandwich using my TNT dress pattern, the Vogue 8935 top pattern piece and pattern paper to trace off a new top front pattern piece.


These are the specific changes that I made to get a better fit for me.
~ I shortened the shoulder seam by 2"
~ I used the shorter version (View A) for this top
~ I curved in the side seams to take some of the boxy-ness out of the top

The sleeve ~


~ Again using the pattern sandwich method this allowed me to add to the pattern's bicep area so that they would fit my bodacious biceps. Now I know this doesn't look like a "normal" pattern sleeve piece but I don't care because it works and fits my "not so normal" biceps.
  
~ I also cut the hem band from the sleeve and added 5/8" seam allowances to both pieces to end up with two separate pieces.

The back piece ~


~ Added a 5/8" center back seam for a better fit
~ A curve was added to the side seam
~ Added an inch to the hemline by tracing the pattern out to the dress' hip line instead of the top's hip line

Fabric choices ~
A navy blue wool blend pinstripe from the collection, probably from Fabric Mart
White cotton pique from fabric.com was used for the collar and cuffs
Navy blue rayon bemberg to line not only the top but the skirt

Style changes~
  1. To make the top look like two pieces instead of one, I cut the collar and facing out of the cotton pique.  I also cut the sleeve band from the same fabric.
  2. A seam for the center back was added to the top's back to remove some of the boxy-ness of the top.
  3. Added a lining to the body by using the top's front and back pieces.
  4. The skirt will be cut on the bias to give a chevron look to the skirt...adding more detail to the finished outfit.

You can always make a pattern straight out of the envelope and sometimes I do but most times I don't.  To me patterns are just jumping off points for ensembles I envision or am influenced by from other sources.  That is definitely true with this one.

Next post will be about the construction of these pieces...

...as always more later!


Tuesday, September 24, 2013

Navy & Black Square Necked Dress

Or the second dress in the Five in Five series...

This dress was driven by the fabric.  Seriously.  I found this fabric at Emmaonesock...


...and I added it to some black wool crepe from the collection.


To end up with this dress...


Making the dress ~
I don't think I had a specific inspiration dress in mind for this one.  It's a mash up of quite a few dresses I've looked at and been inspired by in the fall fashion magazines, catalogs and on Style.com.  However, to get this dress, I started with my TNT dress but used the square neck facing pieces from out-of-print Vogue 8442 to make changes to the dress front and back neckline.


I also altered the pattern so that it would have an empire waistline.

Pattern Sandwich:  Original TNT Dress Pattern,
Square Neck Facing Pattern & Tracing Paper 
to make new pattern pieces

New pattern pieces ~ dress bodice and dress skirt

The dress top and sleeves were made from the EOS fabric...


...and the dress skirt from the black wool crepe.  A lining was added to the dress by using the pattern pieces.

A few construction details~
Since I'm trying to incorporate the things I learned from the Cynthia Guffey 7 Skills video, I added tailor tacks to the darts instead of marking them with paper and tracing wheel.


Tailor tacks

Then ironed the center leg flat and stitched between the tacks.

Making the darts this way, helps to eliminate the pucker that you get when you sew the darts incorrectly.  And even though I know not to backstitch at the dart tip, I've been guilty of doing it.  So now, I do the turn around thing at the end of the dart that Cynthia describes, as well as, no longer starting to sew the dart at the tip.  It's amazing how those simple changes have changed the appearance of my darts.

I used the back facing pieces for the dress back from the Vogue pattern.  This way it had the same high square neckline as the Vogue inspiration dress.


That back zipper is almost perfect but I can live with it!

Resisting the urge to add piping to the neckline and the waistline, I let the fabrics do the talking.  Other than that, the dress is constructed like I normally would.


A few more pictures of the dress~


I really like this dress.  So much so I almost posted it before the Lacy Pleather Dress.  I can't wait for chillier days to wear this one out and about. The EOS quilted lightweight silky fabric that I used for the top was an absolute joy to sew with and it went so well with the wool crepe without any additional fiddling. Love that!

However, I have to tell you that this will be the last black dress I sew for awhile.  It seems like that's the only color or black 'n white variation that I've sewn for the last month.  I definitely need to add some color to my sewing! *LOL*

The third of the Five in Five garments is laying on my cutting table.  Since this is a top and skirt pattern combo that I haven't used before, I will most likely split up the pattern alteration and construction posts.

...as always more later!


Sunday, September 22, 2013

The First of the Five in Five Dresses

The first of the Five in Five outfits was inspired by this dress from The Avenue...


...and after a quick trip to Mood Fabrics one Friday evening to pick up a couple of yards of black ponte...along with another quick stop at Pacific Trimmings to get a zipper...this is the combo I started with to make my version of the dress and my first Five in Five piece.


Pattern ~
Dress from my TNT pattern

Fabric ~
Midweight cotton/lycra ponte from Mood
Leftover scrap of lacy pleather from Mood

Notions ~
20" black invisible zipper
black bemberg lining
ltwt. fusible knit interfacing strips
Seams great tape
Seam tape
Stitch witchery
Black cotton bias binding


Pattern Alterations ~
Naturally I started with my TNT dress pattern but I needed to make just one alteration to the dress front to achieve the high bodice look on the inspiration dress.


I measured down a few inches and made a line straight across the dress front and added a 5/8" seam allowance.  The dress bottom was cut with the dart remaining in the dress front because I like darts on my dresses. A 5/8" seam allowance was added to that piece also.  Now the inspiration dress has princess seams in the dress front.  I could have gone that way but I was inspired by the dress. I didn't want to make an exact copy of it.

Pattern Alterations

Close up of dress front on Lulu

Construction ~
The back of the inspiration dress also has a yoke and princess seams. Again, not something I was inspired by but I did want the princess seams. So I used the pattern pieces from the back of the CK Dress to get a closer fit in the back of the dress.


Now I'd originally planned to add a slotted seam and the metal zipper to the back seams. But somewhere in putting the dress back together, I was on autopilot and just added an invisible zipper. I stitched the dress front and back together and when I was pressing the seams open noticed that I did not add the metal zipper. I guess I could have unpicked the zipper but honestly it just wasn't that big of a deal. I left the invisible zipper in. I'll add the metal zipper to another dress in the future.

I added a lining to the dress because my preference is lined dresses. The inspiration dress is not lined which is common in RTW ponte dresses. Also if I hadn't lined the entire dress, I would have had to line the pleather piece so it just made sense to line the entire dress.

A few more construction points...
  • I added seam tape to the shoulder seams to insure that the pleather and ponte wouldn't stretch out.
  • The center front seam on the dress where the ponte and pleather are joined, as well as, the shoulder seams were pressed back onto the ponte side of the seam and then topstitched flat.


  • Since the pleather had quite a few holes at the neckline, I added a strip of black Seams Great to the back of it while sewing the lining to the dress. I thought it would help hold the stitches in.
  • I used a cotton black bias binding to enclose the armholes by stitching it on using a 3/8" seam.  After pressing it flat, I topstitched it down.
  • Topstitching was also added to the neckline.
  • The hem was turned up 1.25" and pressed flat.  I added a strip of stitch witchery to the hemline.  Using a twin needle, I stitched it flat.

A few pictures of the dress...


Worn with the Lacy Pleather Jacket

Back view of both pieces

Do you want to make your own?
I know I adjusted my TNT pattern to make this dress but if you wanted a pattern to start with to make your own, you could use Vogue 8786.


This pattern even has the princess seams below the front and back yokes. You can easily change the back neck slit into a zipper closure.  Wow!  Now that I'm looking at this pattern, I guess I should have just used it, right?! *LOL*

The dress goes perfectly with the pleather lacy jacket.  It wasn't my intent when I made the jacket but that's how it ended up.  At first I wasn't sure the two pieces wouldn't be too trendy for my workplace. Now though I really like them together and believe that I can wear them with no issues.


Finally even Bill Cunningham of The New York Times Style Section has observed women's return to dresses.


...as always more later!


LinkWithin

Related Posts with Thumbnails