Showing posts with label Guest Blogger. Show all posts

Wednesday, September 21, 2016

Gaylen Boards the Style Maker Fabrics Train

I met Gaylen years ago on a sewing board that has evolved into Artisans Square.  We talked on and off online for years before she visited NYC. We've become great friends bonding over our love of fabric and her gifts to me of knitted socks. BTW, when are my next pairs coming?! *LOL* I knew that she loved Style Maker Fabrics but hadn't really showcased them on her blog...so I asked her to join the Style Maker Fabrics Train.  

Here's her blog post ~

As so many of my recent sewing projects have been decided, this one started the same...with an email from Carolyn.  It said, "Do you want to buy that Rifle Floral to make a garment and then blog it?"  Do I?  Of course!


I started drooling over the lovely Rifle Paper Les Fluers as soon as I saw them hitting Instagram However, I am not buying fabric right now, and Carolyn is acting as my personal Susie Orman as she has been denying all of my purchase requests.  In fact, she had denied this when I first ran it past her (I'll provide the background in the next week or so). 
 
So - when Carolyn emailed and asked if I wanted to buy it - I was all over it.   This was my first order with Stylemaker fabrics and hope there are more 'approvals' in my future.  

The site was easy to navigate and I really appreciate that Michelle sells her fabric in full yards as many small online only shops seem to sell in half yards.


Once the fabric was in my hot little hands, it went straight into the washer and dryer.  I have 3 dogs and I need easy care clothing.  Then I spent 3 days trying to figure out the perfect garment.  I was torn between a Southport and a shirtdress.  


So, based on an email with Mary of IdleFancy, I made the Southport/Shirtdress hack.

First - I took new measurements and re-traced my pattern (and this, my friends, is why I don't cut my PDFs!).  I think this time I cut a straight 16 - I can see it needs a full bust adjustment in the future - but honestly I'm fine with how it appears now because it doesn't pull at the center front buttons.
  
When I traced the skirt - I added the same amount of width at the center front as the bodice for button bands.  I used the maxi skirt pieces and added 5" at the lengthen/shorten line and called it good.  Everything else I did the same.


Construction:  
I fully lined the bodice with white batiste, but not the skirt.  To do this, I sewed both bodices together at the shoulder seams, then put them right sides together and sewed up the neckline and armholes, turned the bodice rights side out, sewed up the side seams and serged the center front edges. Interfacing was added to the button bands before finishing that front edge. Interfacing was added to the center front of the skirt, then it was folded under and topstitched just like the bodice.

To highlight the pale pink in the fabric - I used a pink ribbon at the waist and pale pink buttons.  I also added some buttons to the waist tie (which is way too long and needs to be shortened by about 12" on each side). Working with this fabric was a dream!


I loved working with Michelle to figure out this order. Most important to any online order ~ the shipping was prompt. I will definitely be doing it again!  I think this is fastest turn around in fabric history for me - it was sewn within a week and has been hanging out waiting for it's photo shoot! Carolyn - thanks for "Approving" this purchase!

No problem my friend and I'm glad that you had a great experience and got such a pretty dress out of the deal! Also, you and Jay took some great photos!

Everyone, don't forget that Michelle is offering a 10% discount off your total order using the code SEWSEPT plus $5 shipping NOW through the end of the month! I really hope that you'll surf on over and check the site out. I guarantee that you will be pleasantly surprised but don't blame me if your credit card gets a work out!!!


National Sewing Month continues with more posts!      

Monday, September 19, 2016

Check out Lori's Garments made from StyleMaker Fabrics

I thought it would be appropriate to have a few sewists who have sewn with the fabrics from StyleMaker Fabrics, share some of their garments and interactions with us.  When I think of sewists using Stylemaker Fabrics - Lori from Girls in the Garden leapt to my mind. So I asked Lori if she would share some of her garments with us. 
 
So here's Lori's experience ~
We are so fortunate to have so many online fabric shops available to purchase amazing fabrics. Today, I want to talk about one in particular Style Maker Fabrics, which is a great source for fabulous fabrics.


Michelle, the owner of Style Maker Fabrics, does an incredible job of selecting high-quality fabrics that are also current with what you see in RTW. I love her customer service, just a quick email or Instagram Direct Message, and I have the perfect fabric for a certain pattern.

Take this one for instance, my Jasper Sweater:
 

I emailed Michelle with the pattern and told her the idea in my head.  She sent me pictures of some options, including fabrics that were on the way to her. When I saw the French Terry, I knew I had a great stripe knit to go with it. Here's all of the French Terry selection.  

Putting this blog post together, one of the things I thought about was how I found Style Maker Fabrics. It was in an earlier issue of Seamwork Magazine and the site was listed in the resources page.  A new fabric site?  I had to go check it out and was so happy I did.  I love the way the fabric is categorized...

Latest Type
Fabric Type
Garment Type
Shop by Color

Talk about helpful, I use the garment type quite often, it really makes a difference when you can't touch the fabric.  But if you do need to touch the fabric, just order a swatch. 

For the sweater below, I bought this knit from Style Maker Fabrics, one of many great jersey knits available.


I've had the pleasure of working with Michelle on a couple of blog tours and she is wonderfully organized for these events.


Sweater Knits here

Follow Michelle's blog for even more ideas on how to use the fabric and to see her beautiful creations. Then if you still need more inspiration, head on over to her Pinterest Boards, where ideas abound. From Style Maker Fabrics new spring/summer offerings, I ordered several pieces of fabric and did a good job sewing them up. 

Below is a couple of collages of my outfits, including one for my daughter.
 
 All details here on these garments


Lori thanks for your perspective on dealing with Michelle and using the fabrics from Style Maker Fabrics.  Because as you can see, Lori has made some A-M-A-Z-I-N-G garments with Stylemaker Fabrics. I hope that you'll surf on over to Michelle's site to check out the new fall fabric collection. Don't forget the discount is in effect until September 30th.

National Sewing Month continues with another blog post later this week!


Friday, May 31, 2013

Guest Blogging and things...

Karen, who authors the blog, Did You Make That, as well as belonging to The Guardian UK's Fashion Bloggers Network, (hey I have to brag on my girl a little, okay?! *smile*) asked if I would write a post for her new blog series, Fabric Focus, so of course I said yes! 

Especially since Karen asked me to write a little about one of my favorite fabrics ~ linen!  If you've been reading here for any length of time, you know that I have two fabrics I love to sew...linen and wool crepe!  I'm kinda seasonal like that! *LOL*  

Anyway, hop on over to Karen's blog and read all about linen.  I hope that you'll find the post informative and worth referring to in the future.  I also hope that it will make you want to purchase a few yards and sew something up!


+ + + +

My niece's prom dress is up on the Mood Sewing Network.  I have pictures of her in the finished dress, taken at the piers in her hometown.  You can read all about it here.


+ + + +

I have to work tomorrow, so the sewing machines will be getting a well deserved rest this weekend.  I have no idea what I will be sewing next, so stay tuned!

...as always more later!

Wednesday, August 26, 2009

A Guest Blogger and Betty & Veronica

That's an intriguing title isn't it!? *LOL*

First let me tell you about the guest blogger who has authored tomorrow's post on Fit. I've asked my good friend, Colleen Jones, owner of Fancy Threads to write the post. We have been friends for over 12 years now and she is the one who taught me how to fit myself. Colleen is one of the most entertaining, patient and giving teachers I've ever met. Her passion for sewing shines through each and every conversation and her love and dedication to this artform is all encompassing.

Colleen gave me my first Adele Margolis book. She taught me "seam integrity!" At every step of my sewing journey she has encouraged me and I'm so happy to call her my friend!

A short bio of her accomplishments:

Colleen has made her living over the past 20 years fitting bodies. Be that in the area of custom clothing, or in production runs of 20,000 garments – her goal is the same – flatter the body – no matter what shape it is. Working with individual clients, or such known names as Avon, Victoria’s Secret, Lane Bryant and currently with Priscilla of Boston Bridal, Ms. Jones has earned accolades from industry veterans and home sewists on her ability to not only fit garments, but to teach and help others understand how to achieve more flattering garments thru proper fit. A student once said “some people read tea leaves, Colleen reads draglines and grainlines.” Colleen is currently employed by Priscilla of Boston Bridal as a Technical Manager.

So look for her blog post on Fit tomorrow!

*****************************************************************

Now onto the Betty & Veronica reference...

picture courtesy of Archie News

When I was a little girl I loved The Archies comic books. My brother preferred super heros, Batman & Robin, The Hulk, Superman...but it was always The Archies for me. Especially Betty and Veronica...two totally politically incorrect chicks if there ever were...but those were the times and I wanted to be Betty when I grew up! Cause even then you could tell Betty was the more normal, average girl!

Now why do I mention them...because of the comments left about how quickly I knocked off the MK dress. See one of my favorite issues had Betty sewing. Veronica bought designer gear because her daddy had money. Betty sewed because she came from average middle class folks like I did. Betty would see something in a magazine or a store window and go home and make it up...usually in an afternoon. Veronica would see the same thing and head to the department store. So in this particular story, they both saw the same outfit...Betty made hers, Veronica bought hers...and they ended up walking into each other wearing it.

This issue greatly influenced my sewing. Yeap, at 11~12 I was already channeling how to make designer garments at home...I guess I've always been a fashionista at heart! *LOL* Does anyone else remember that issue? Does anyone else remember The Archies!? So that's what all of the comments about how quickly I made the dress and how I adapted it...made me think of...Betty and Veronica! *LOL*

Please come back tomorrow and check out Colleen's post! I know you will enjoy it! And always....more later!

Thursday, August 13, 2009

New Sewists Thursdays - Sewing Sheers

It's Thursday again and time to share another new sewist's question:

Tanya asked...

"I’m pretty much a newbie when it comes to garment sewing, but I’m filled with ideas and excitement about the possibilities. Right now, I’m working on a dress for a friend’s daughter (Vogue for Me 7681, view A, but modified to be shorter and have a separate sash). My friend bought the fabric, which is a polyester chiffon for the overskirt, and what is supposed to be peau de soie for the actual skirt and bodice, but isn’t. It looks more like cheap lining material. In any case, the fabric is a flimsy, slippery mess that is giving me fits; it’s difficult to cut pieces properly, it stretches all over the place, and is generally uncooperative. Even basting it is tricky. Do you have any tips for working with slippery fabrics?"

So since my sewing friend Gigi has been sewing with sheers alot lately, I asked her to handle the question for me! If you don't already know Gigi as one of The Sewing Divas or as the author of her own blog, Behind the Seams...she kindly gave me a little background:

Gigi has enjoyed sewing and needlework since childhood. By the time she was in high school, she was completely addicted and hasn't stopped since. She sews every chance she gets and, when she isn't sewing, she enjoys collecting beautiful fabrics, sewing books, patterns and sewing machines (with a particular passion for industrials!). Her Sewing Empire is located in South Florida where she lives with her three kitties.

I would like to thank Gigi for so graciously accepting my offer to be a guest blogger and then taking the time to answer Tanya's question...so without further ado Tanya here is Gigi's advice....

Sheer, slippery fabrics can be intimidating for even the most experienced sewist! The first battle is cutting out the fabric because it wants to slither all over the place.

To make your fabric behave:

*Tape examining table paper or old newspaper (so the ink doesn't rub off on your fabric) to your cutting surface. Pin your fabric to the paper and cut through both the paper and fabric layers. A bonus will be duplicate pattern pieces which can be used as templates for staystitching. Simply pin the fabric to the pattern, staystitch, then tear the paper away. This will ensure that the fabric retains it's intended shape and size.

*If you're using a rotary cutter, simply tape your fabric to the mat before laying out your pattern pieces with weights. Be sure to use a new blade so that you get very clean cuts.

*It may seem silly, but gently blowing on sheers as you lay them out is an easy way to get everything lined up.

*If your fabric is washable, use spray starch to give it body and make it more manageable.

*Since the right and wrong side are often indiscernable, I like to put a small piece of tape on the wrong side so that I don't accidentally end up with two left sleeves!

Seams and Hems:

Because seams will show through to the right side, they should be narrow and neat. Good seam choices are:

*French seam


*Flat-felled seam (great for crisp sheers)

*Narrow overlocked.


The overlocked seam is not my favorite but it's fine when you want something fast and easy. For better wear, I would stitch with my regular machine and then trim down the seam allowances to 1/4" with the overlock.

I like to use a fine Microtex needle for sheers along with a fine thread such as Coats & Clark Fine. It's not a true necessity but it does give a very nice result. Because sheers and silkies can be very unruly, it's especially important to sew directionally.

As a rule, hems should be either very narrow (rolled) or very wide (double-folded).

It’s also possible to simply bind the hem. Narrow rolled hem:


Hem finished with bias binding:


Interfacing:

Silk organza is my interfacing of choice. Look for one that's close to the color of your skin. Depending on the fabric you are using, you may also be able to use self-fabric. Interfacing can be basted in or (as I prefer) held in place with a few dots of glue stick in the seam allowances.

Shopping for Fabric:

I prefer to work with either silk or rayon sheers. They drape beautifully and are a joy to work with. If this is your first time with sheers I recommend you stick with natural fibers. Yet, sometimes I am seduced by a pretty polyester print. Polys are more difficult to work with as they tend to pucker and are more difficult to press well. Breathability is also a factor. To check for breathability simply blow through the fabric. If you can feel your breath on the other side you are safe. Generally, poly georgettes and open-weaves are your best bet.

Pattern Selection:

My favorite type of garment for sheer fabric is, by far, a blouse. I look for styles with clean, simple lines. If a garment has facings, you’ll want to replace them with bias binding or a very narrow rolled hem. Shirt plackets work best if they are cut on and self-interfaced. I also love garments with tucks of any size, which look absolutely beautiful in sheer fabrics. Of course, dresses and skirts are also a possibility but will need to be either lined or partially lined.

Tucks on a white crinkled silk:


Here are some nice current patterns that would work well with sheer fabrics:

Simplicity 6891


Some sheer garments from my closet:


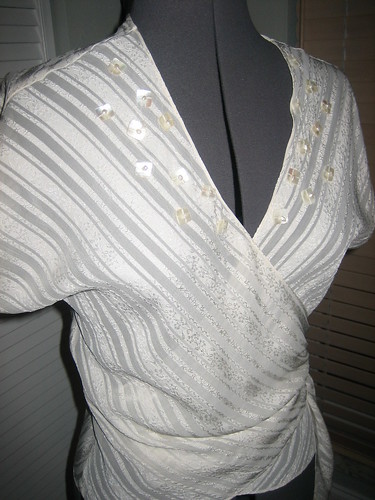
Silk ribbon chiffon wrap blouse. Here, I've finished the neckline with a very narrow rolled hem:

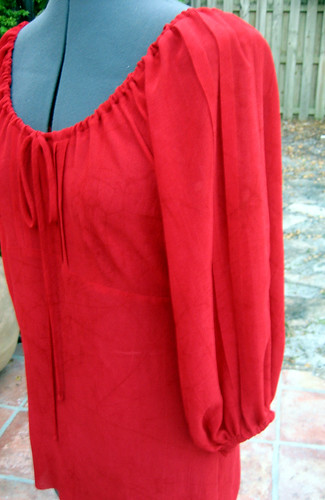
Silk chiffon peasant blouse. Hem is narrow rolled and the sleeves and front edge are finished with bias binding.


Silk organza "jean" jacket


So questions? Anything you don't understand or need clarification on? Please feel free to post your questions and like last week, I will post another blog post with answers or clarifications!

I really hope that not only the new sewists but some of us more experienced sewists are enjoying this series. I know that I've learned a thing or two! *smile* I would like to thank Gigi for so graciously sharing her knowledge and all the wonderful pictures of her garments! Please visit Gigi on her blog where she shares all of her sewing adventures.

Next week you will be stuck with me again! *LOL* But the end of the month will see another guest blogger discussing how to attain the best fit! So stay tuned...

Saturday, June 27, 2009

McCalls 5893

I know I've been like a TV promo advertising my guest blogger but as I said before, I'm really thrilled with the dress my daughter made...so without further ado, my guest blogger, my daughter Adrienne.


Hey everyone! I am a little thrilled and shocked that my mom asked me to do this! So I guess I will start with an intro...

I am the second daughter (or precious princess as my mom calls us!) and the mother of "The Little Prince".


I have been sewing since my freshman year in high school so about 7 years now. My mother got me into sewing. I loved it when I would see her in a new fashion forward outfit that looked like she would have bought from the store. And once I made my first shirt from the Burda Fast & Easy Magazine and got such great reviews, I was hooked. Now I sew every chance that I can which ain't easy with a 3 month old baby!!!

My mom asked me a series of questions to use as a basis for this post, so here they are:

1. What type of fabric did you use?
For this dress I was looking to make a bold statement. So I chose a purple border print in a rayon knit from my mom's stash.


2. Did you use any notions in this dress?
Besides thread...I left out the elastic at the bodice of the dress and added a black satin ribbon instead.

3. Why did you choose this pattern (McCalls 5893)?
I bought a maxi dress from Charlotte Russe and I wanted to make one of my own with my style added to it, even though this one ended up as a short version. I definitely see a longer one in my future!

4. Was it hard to sew? If yes, why? If no, why not?
No. It was pretty easy - just a little time-consuming since I don't sew very often anymore.

5. Construction Sequence:
I cut the pattern and fabric out. I sewed the bodice together and I left out the elastic. I used gathers instead so that I could lose some of the fullness. Then I sewed the skirt together...and finally sewed the bodice and skirt together.

This is where I asked my mom for help because I wanted to wear it to a picnic that day and I was running late. So my mom finished all the edges on her serger which gave the dress a funkysexycool look.

6. Any special tips?
No...I'm still an advanced beginner, so I sewed this straight out of the envelope.

Conclusion:
Overall this is a great quick and easy dress to make. It can be worn casually, as business wear or more formally. I really loved my version of the dress and got alot of compliments on it at the picnic!


Thanks Mom for letting me show off my dress and "The Little Prince"!

LinkWithin

Related Posts with Thumbnails