Showing posts with label It's All About the Basics. Show all posts

Wednesday, February 19, 2014

Painted Wool Herringbone Pieces ~ The Dress

At first I was just going to make a basic sheath dress with a little piping at the neckline and armholes.  My standard work dress.  Then I saw this dress on the Jones NY website...


...and I loved the tabs.  I knew that not only would they bring some interest to my "basic" sheath dress but they would help add to the allusion of a waistline...as Martha would say, "that's a good thing!"

I could have gone with same fabric tabs but I wanted a little more drama after all of the basics I've been sewing. What can I say? Even though I work in a conservative atmosphere and dress that way, underneath it all, I'm a brightly colored, vivid print kinda girl!  So I try to bring a little drama to my outfits within my company's dress code.

Construction of the Faux Leather Tabs with Buttons ~
That's why I indulged my love of faux leather with the side tabs. I didn't use a pattern piece for these tabs.  They are a combination of measurements and a quick tutorial that I read on Dixie DIY's blog.  This is what I did...

1. I pinned out the path of the belt ~ from the center back seam to a place on the front that looked good on my body.


2. The tab was made by taking the length from pin to pin, then adding 1.5" to the measurement.  My final measurements were 14" long by 2" wide.


3. Since I was using faux leather as my tab, I decided to use lining fabric as one side so that the tab wouldn't be too bulky.


4. Next I opened up the center back seam about 1" wide.


5. Inserted the band and stitched the seam closed.  Then I pinned the band down the back side and side front.  I know sewists are encouraged not to pin their faux leather but these slight marks can be eased out with a little rubbing. Also you'd need to be right up on that tab to see a tiny little pin prick.


6. The band was stitched onto the dress using a 1/4" seam.  The first band honestly wasn't stitched down as well as the second one.  Instead of stitching in the same direction, I went around the band causing the faux leather to pucker.  I didn't make that mistake for the second one.

7. A good press using my silk organza pressing cloth and my clapper to hold everything flat resulted in passable tabs.


8. I stitched black buttons with gold fluted edges down on the front of the faux leather tab.


More Construction Info. ~
I added black piping at the neckline and armholes.  This was always in my plan because the print is unusual and if there wasn't a start and stop place for the eyes, it wouldn't work as well.

The lining is the heavier satin lining for the same reasons I stated in my skirt post. The lining does have a little lace at the hemline. 


Again there is quite a bit of hand stitching in the construction ~ piping basted down prior to insertion, lining hand stitched to the zipper tape, the bias binding at the armholes sewn to the lining, and the hem hand stitched.


Otherwise, the dress is constructed just like all of the other sheath dresses recently made.


Dress Particulars ~
Pattern:
TNT dress pattern ~ if you want to make one of your own, try Simplicity 1586 because adding the tabs is easy to do.

Fabric:
100% painted wool herringbone 

Notions:
Satin printed lining
faux leather scraps
Two - 1" black & gold buttons
22" invisible zipper
black piping
brown striped bias binding (I found another roll in the bias binding stash!)
brown rayon seam binding
1" lace trim

Finally a few pictures of the dress...


Conclusion ~
Well we knew I wasn't going to stay with simple and basic for long, it's just not in my creative DNA.  I like the challenges that constructing this dress brought. It is my basic silhouette but with enough interesting details to elevate the style.  I'm really thrilled with the dress because if you put it next to one of the simpler sheath dresses, you can really see how the details make this dress distinctive.

As I was setting up the camera to take pictures, my Mom saw my dress and asked to see it up close.  I turned it around so that she could see the front and the back and then turned it inside out so she could see the finishing.  And then it happened...my Mom said, "that the dress was so well finished that you could wear it inside out."  Peoples, best compliment EVAH! *Score*  *doing the happy happy dance* *LOL*

I went back and forth over whether or not to make one final piece to go with this grouping or to move onto a new piece of fabric because I'm feeling very red. However, everything is threaded with brown thread so it just made sense to keep working with this color scheme.


I've had this brown knit fabric in the collection for awhile, though how long I have no idea because this piece is missing it's fabric tag.  Mentally I've paired it with this pattern for quite some time because  the pattern has a copyright date of 2006. That means both have been in the collection since before I moved.  Anyway, this is what's up next. I will be moving onto some red wool doubleknit after that...

...as always more later!


Wednesday, February 12, 2014

Painted Wool Herringbone Pieces ~ The Skirt

I purchased this fabric years and years ago from Textile Studios which is now out of the fabric business. Some of my sewing sheros bought fabric from them and made amazing garments and of course I wanted in on the amazingness! It is a painted wool herringbone that can be used on either side.  I bought five yards of this lusciousness.


I know that I said that I wanted to sew sheath dresses in solid colors to work with the multitude of cardigans that I own.  But this piece started to call my name...and it's interesting because it's not like I touched it recently...it was just buried in my creative subconscious...moved itself to the forefront and demanded to be used.

So a sheath dress was of course the first choice and since I've been sewing dress, skirt & pants combos...I went with the dress and a different TNT skirt pattern than I've used for the previously makes. 

The skirt's inspiration is once again from Pinterest.  It is a designer skirt by Preen.


Fabric will provide the embellishment/interest for my version and I'm going to use piping instead of zippers. Cause as much as I like that look, it doesn't work for my lifestyle.  I'm also losing the pockets because while they look great on the skirt above, I know they won't work well on my body.


Pattern ~
TNT skirt pattern last made here

Notions ~
9" invisible zipper
black piping
satin lining last used here
brown rayon seam tape
fusible jiffy waistband interfacing

Construction ~
One of the first things you should know about my skirt pattern is that the front piece is always cut larger than the back piece to accommodate the fullness in the front of my body. I think it's important to realize that we are not symmetrical beings...sometimes it's one side of our body that is longer/bigger/shorter than the other. In my case my front is larger than my back so my patterns have been adjusted for that fact.

The second thing is that I used both sides of the fabric to accomplish "the look" of the inspiration skirt. 


I added black piping to both sides of the front panel to replace the zippers used in the inspiration skirt.


I added a vent to the back of the skirt.

My waistband is slim - about an inch wide - because wider waistbands tend to cut into my flesh making them uncomfortable to wear. It's also cut using the painted side of the fabric. 


There are two black buttons on the waistband to keep the skirt closed.  I like buttons so much better than hooks and eyes or snaps.  I ditched those other closures years ago and have never looked back.

The lining in this skirt is the heavier satin lining that I used in the plaid pants.  The painted wool herringbone is a course wool and a lighter weight lining wouldn't have worked as well with the fabric. This is a personal choice developed from my prior experience using this type of fabric. Garments made from it always wear better and are more comfortable when I use a more substantial lining.


I've become obsessed with finishing seams with rayon seam binding. Instead of just leaving edges serge finished, I've been folding seam binding in half and stitching it onto the edges.  I really like how finished this makes the inside of a garment look.


Finally, hand stitching is an important aspect of this garment.  The lining is hand stitched to the zipper tape.  The waistband is hand stitched to the skirt and of course the hem is hand stitched down.


If you're interested in making your own version of this skirt, try Simplicity 1541. It has the elements of my TNT skirt and will work well to emulate the Preen skirt. The pattern is available in sizes 8-24.


A pic or two of me wearing the skirt with a RTW cardigan...


In my 20s & 30s, I use to sew a skirt in an hour or less.  The skirts were never lined and everything was machine stitched.  I was actually proud of that fact and bragged about it a lot. Of course that was decades ago, and my skirts take almost a day to complete now with all of the sewing techniques that I add to the construction.  But the process makes me happy and the extra work insures that the garment lasts for years.  After all of the work that I've put into this skirt's construction, I definitely want it to last.

The dress from this fabric is almost finished and I've decided to make a vest with the leftover piece.  I went back and forth several times ~ vest or a jacket with pleather sleeves.  As much as I wanted to make the jacket, it really doesn't fit my lifestyle...but a vest....well I haven't sewn one of those in years. So the vest with this skirt and a black turtleneck will work really well in my corporate environment.

A Parting Shot ~
I've had these shoes for over a decade and they are still going strong!


...as always more later!


Monday, February 03, 2014

Pinterest Inspiration

...or continuing along with the sheath dress quest...I saw this dress online at Talbot's and loved it.


Then found this one on Pinterest where the seaming drew my attention...


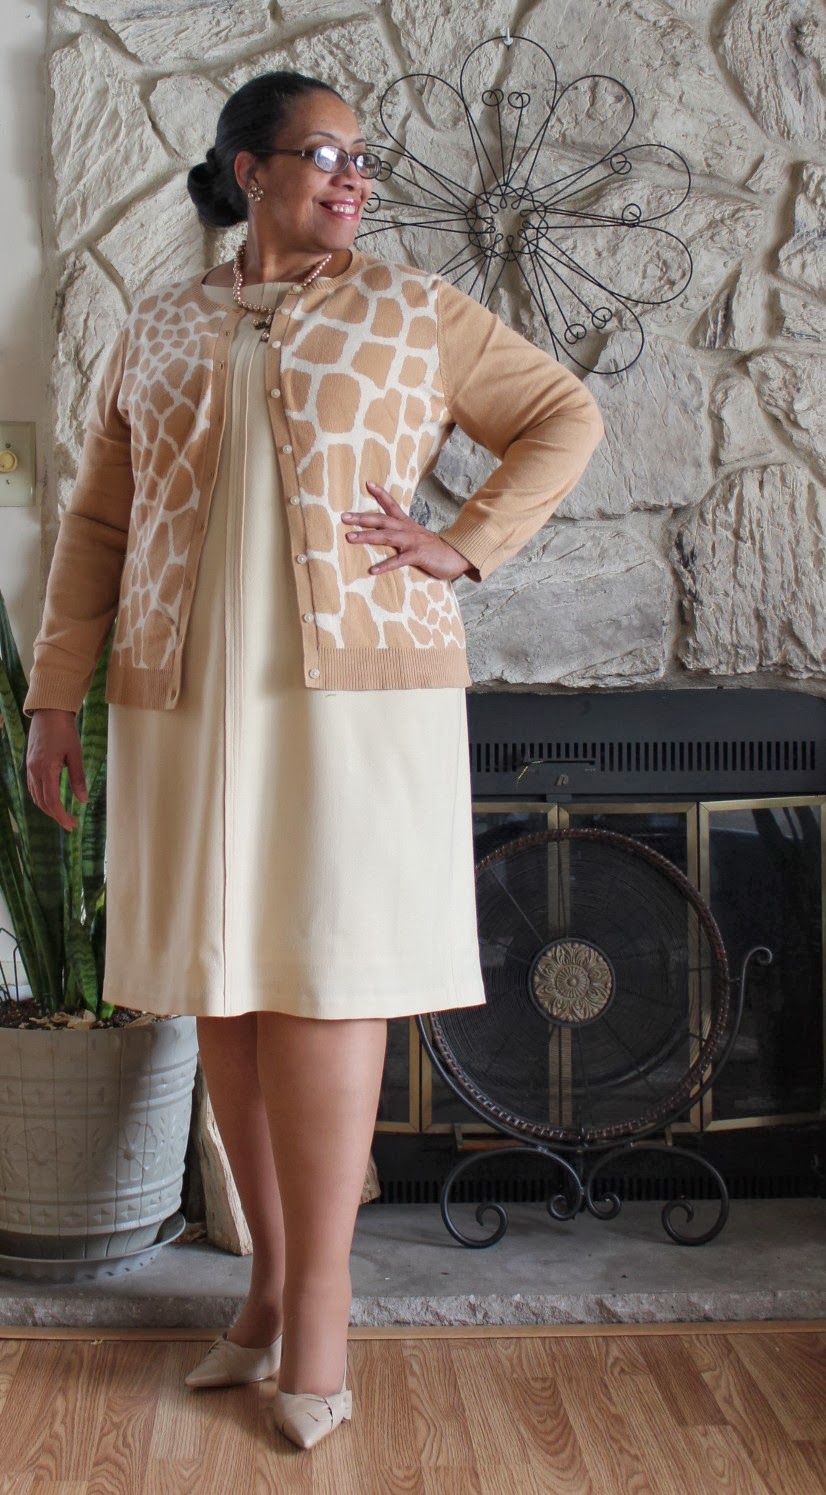
which when added to the basic sheath style of the Talbot's dress...throwing my TNT dress pattern into the mix...and this is what I ended up with...


Some stats:
Fabric ~
Midweight wool crepe from Fabric Mart

Notions ~
beige invisible zipper
silk batiste lining from Farmhouse Fabrics
beige rayon seam binding
beige cotton bias binding 

Construction Details:
I made a few alterations to my TNT dress pattern to get to my vision for the dress.
  
The first alteration I made was to add a center front seam. The was done by sewing right sides together. Pressing the seam open.  Then folding & pressing the excess under and topstitching the seam down on both sides.


The second change to my TNT pattern is that I sewed the center back and center side seams right sides together.  I flipped it over and pressed the seam flat.  Then pressed it to the side.


Finally I topstitched it flat.


I was trying to emulate the seaming that I liked in my inspiration dresses and I believe I was more successful with the seaming in the back than the front.


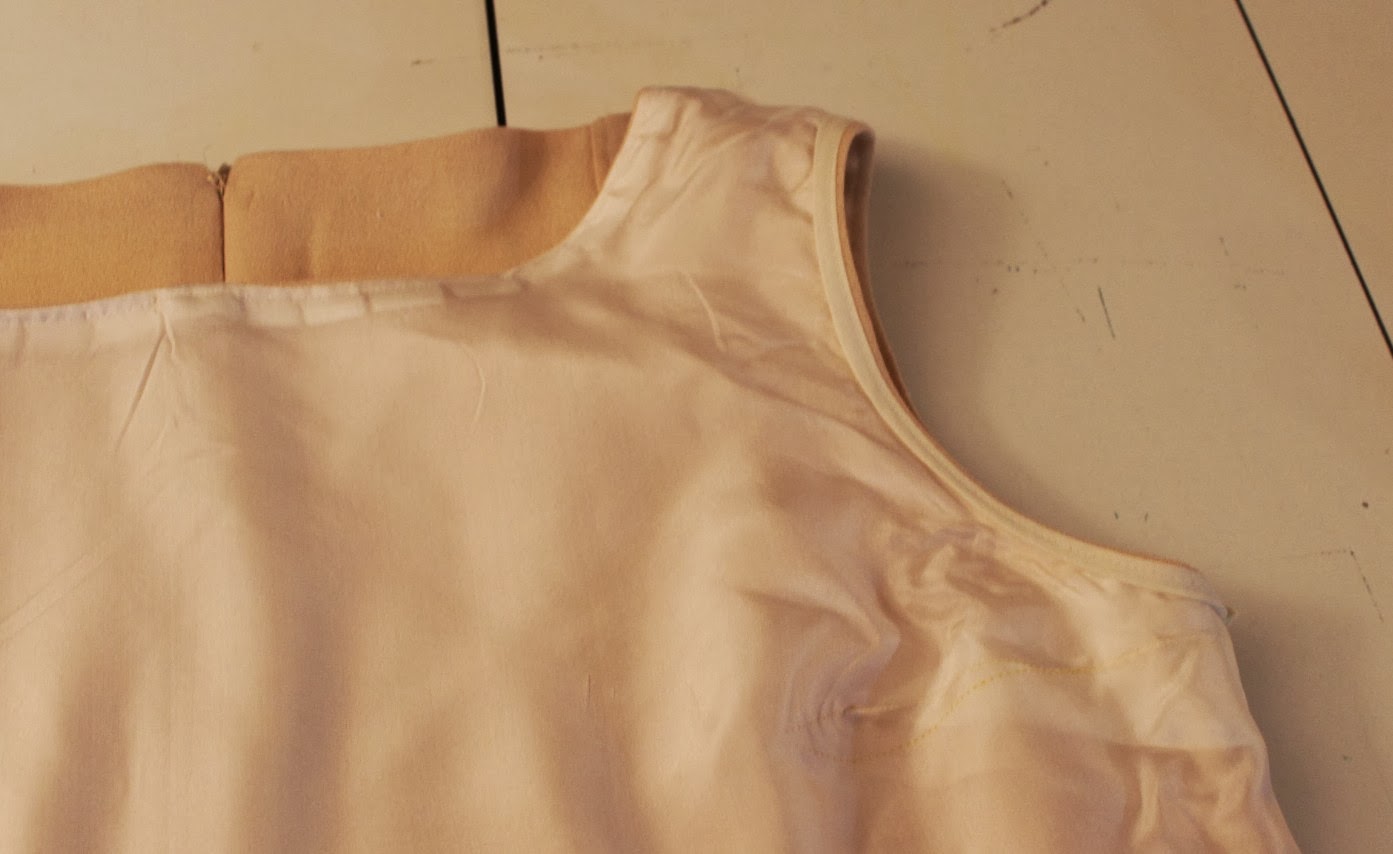
The dress was then sewn as I normally do.  I added an ivory silk batiste lining because I'm out of ivory rayon bemberg lining and of course I added lace trim to the lining's hemline.  I kinda like the wool/silk combo that the dress fabric and the lining fabric form.


...and the armholes were stitched with the bias binding finish...


A few more pics of how I will wear the dress with an Isaac Mizrahi blazer and cardigan in real life...


With three strand pearl necklace and Nine West heels


With Heidi Daus cross necklace and matching earrings

This is my first finished garment of February! I've already started working on my next piece...more basics but with a twist.

Finally there's been a lot of Barbie sewing in the blogosphere lately.  I saw this on Yahoo ~ Barbie has put her Malibu dreamhouse on the market. The listing is here. Let me know if anyone is considering purchasing it...I'd like to come by and visit! I will even bring my sewing machine to stitch up a few designer dresses for my girl, Barbie.

...as always more later!

Thursday, January 30, 2014

Pinstripe Magic ~ Dress & Skirt

I bought four yards of a wool crepe grey & cream pinstripe from Fashions Fabrics Club, that is presently sold out.  As an aside, I remember now why I stopped purchasing from them...it takes forever to get the fabric!  And it didn't help that a snowstorm shut the middle of the country down a few days after I ordered. However, that's neither here nor there because the fabric did arrive and only scraps of it remain now.


In my quest for more basics...what could be more basic than a gray wool crepe pinstripe fabric.  It's perfect for the conservative environment that I work in. So after a quick trip through the dryer (love, love, love this pretreating method now!) I was able to get a basic sheath dress, a pair of pants and an elastic waist longer length straight skirt from the fabric.  This post is about the dress and skirt which are the next pieces in my "It's All About the Basics" series.

A basic sheath dress from my TNT dress pattern ~


Notions:
22" invisible zipper
white braided satin piping
polyester charmeuse print lining
gray rayon seam binding
bias binding

This is my TNT sheath dress with some white piping at the neckline and armholes to give the dress a little pop!  To make the dress a little less boring, I used a vivid print polyester charmeuse print for the lining...


Lining Alone

Lining inserted into the dress

...and I used the last of this striped bias binding from the notions collection at the armholes.  I'm going to miss this bias binding...I've used it in quite a few dresses and made piping from it too.

T

This is how I will wear it to work...


...with a RTW ivory cotton cashmere cardigan and some Kenneth Jay Lane pearls that I purchased several years ago because they reminded me of Michelle Obama's Erickson Beamon pearls.


Gray long straight skirt ~


Notions:
1" non-roll elastic
polyester lining
gray rayon seam binding

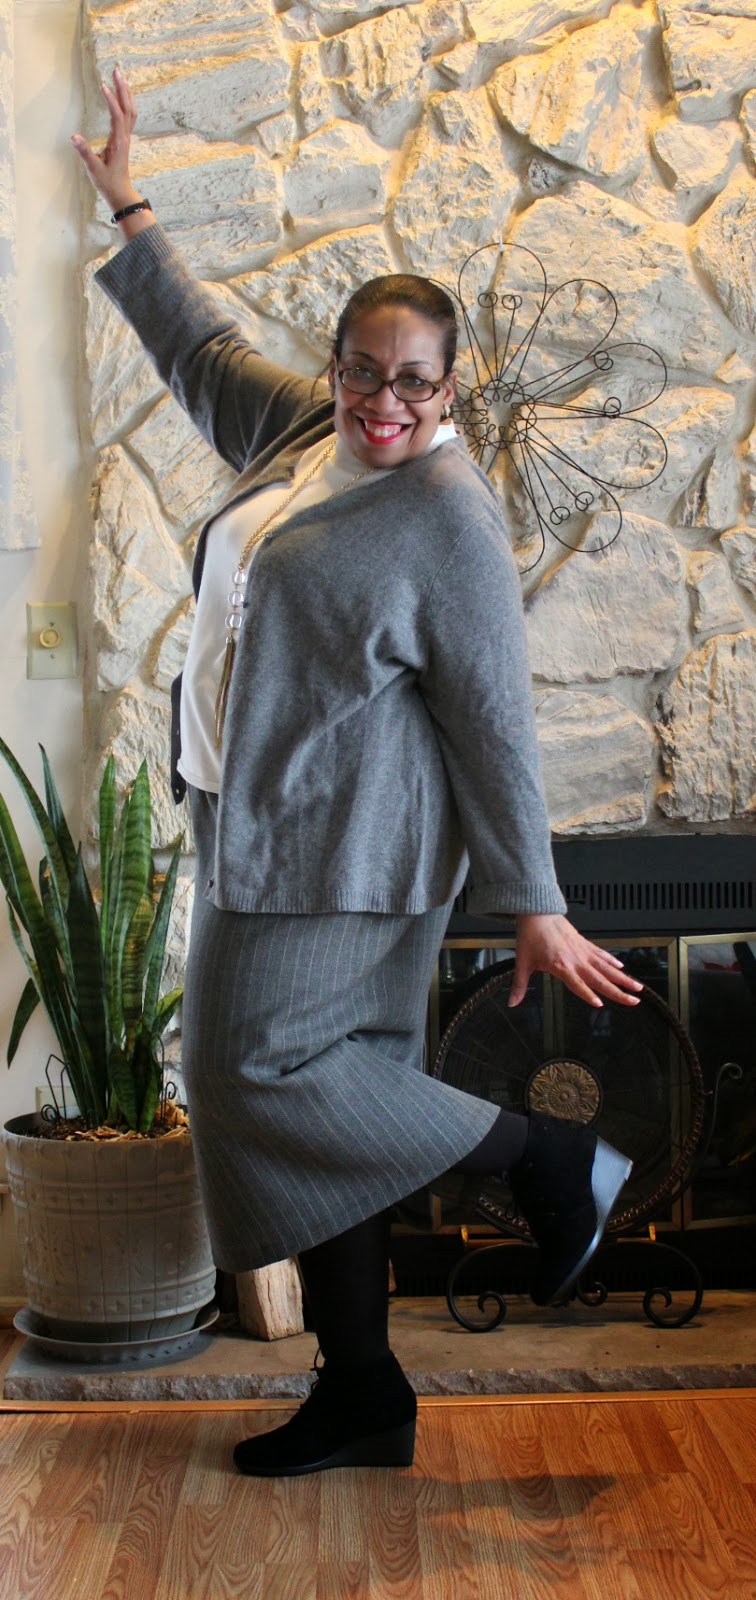
This is literally a large rectangle based upon my hip measurements with elastic in the waistline and a slit for walking ease.  I wanted the skirt to be close-fitting but not so tight that I couldn't sit in it.  I sit for most of my day so it needs to be comfortable.  To figure out the right measurement, I sat in my sewing chair and took my hip measurement, then added an inch.  This measurement is larger than my standing hip measurement, because let's be frank here people, fat spreads.


I added a lining to the skirt even though initially I wasn't going to.  I was going to do a quick and easy sew and wear a slip.  But me being me, I just couldn't let it rest. So the lining is the same rectangle just a little shorter with a 1" lace trim added to the hemline.


Honestly, I chose this length for the skirt because I wanted to wear it with these shoe booties. Hey I'm cold and I'm using everything I own to stay warm! *LOL*  


A few more pics of the skirt and cardigan, how I'd wear it to work...


Yes by this time I'd gotten quite silly!

I'm onto my next sewing adventure.  I'm finishing up another sheath dress before I return to the Crazy 8 wardrobe pieces and the Simplicity 3833 dress. I'm believing that it's not going to remain frigidly cold forever. When we return to decent winter weather, I'll pull out my new sheath dresses to wear.

...as always more later!


LinkWithin

Related Posts with Thumbnails