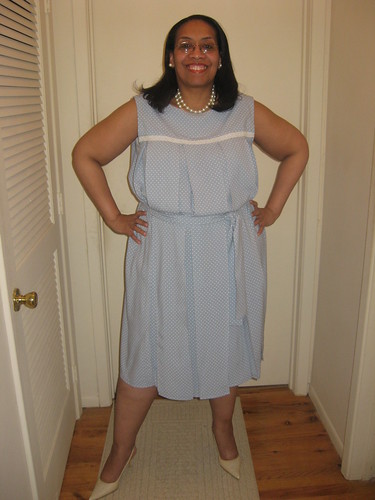
Tanya's new dress wasn't the only good thing to come from the Butterick dress construction post. Irene, who author's the blog, "Irene's Studio" left this suggestion:
"The style is wonderful. (Are daughters allowed opinions?) What if you made the tuck itself smaller? would that help the back to fall straight? Or ... stitching down the tuck further, to make it "open" further down???"
After reading this, I wanted to smack myself up side the head! Because the pattern instructions clearly tells you to stitch those pleats down...but me in my infinite wisdom decided to skip this part...Why??? Can someone please tell me why???
Monday night I stitched the pleats down and then I let the side seams out a little bit so now I have this:
So thanks Irene...your suggestion was timely and just what I needed!
...more later!
This dress is definitely a different look for me and when I put on the dress shell to check for fit, my daughter called it my Maid's Uniform...which definitely wasn't encouraging...*sigh* However, I was right the only real alteration needed was to change where the waistline fell...but...
...believe me when I tell you that this is not a pattern for a beginner or an advanced beginner. Inserting the side fronts and backs with the pleats is challenging. I almost chucked the dress twice this afternoon because of those pleats...and I was following the darn pattern instructions...
See the pattern has you mark the pleats, make the pleats finally clipping to the mark and then stitching the side front or back in. Well I clipped just like the instructions said and ended up with a hole. A hole that I had to figure out a way to hide and no matter what I did in the beginning, there was this small hole from the clipped fabric on my dress front piece...yeah NOT happy! I finally figured out a way to stitch it close and then reinforce the small seam so that it wouldn't pull loose but can I say again...NOT happy!
So for the second one, not only did I NOT clip the darn thing but I hand basted the piece in to insure that I got it in properly and then machine stitched it flat. This was the procedure I did for the back piece too but I circled around that back piece quite a few times before I finally sat down at the sewing machine to sew it.
I basted the sides together added the cap sleeves...minus lining...and tried it on for fit purposes. Thats when I got the maid comment...*sigh*
I'm having an issue with the pleats pulling in the back...so I'm going to take some out of both side seams before I resort to going in and taking the back sides out..."Please God don't make me have to take those back side panels out"...said in a soft prayerful voice!
Anyway, this dress is far from finished. I still have to make a lining...and I've pretty much decided that I'm going to cut the lining pieces from the finished dress pieces...again the thought of making those side pieces in the lining is enough to make me just put the dress away...and I'm not going there...not yet! Because I can "see" the finished dress in my head...and I think it will be pretty...a silhouette that's different from one I normally wear...but not one that I haven't worn before...
Okay this is where I'm leaving the dress shell...
...like I said before I have alot of work left to finish this and I won't get to work on it again until a week and half from now since I'm going away next weekend...
...as always, more later...
I mentioned a couple of posts back that I want to spend spring sewing some of the new patterns I've purchased...especially since I was really impressed with the variety of patterns that Butterick recently produced for plus size sewists. For my first foray into transitional spring/summer sewing, I've really been aching to make this dress:
I love that it's on trend...that it has an a-line skirt...some pockets and I'm also loving the tie belt and button placement...well almost all of the button placement. I've decided to leave the top two buttons off.
So it was with some trepidation that I pulled the pattern sheets from the envelope. I mean I don't use alot of new patterns. Every once in awhile something will strike my fancy and I'm willing to make the fit and pattern alteration journey. However, I was pleasantly surprised with this pattern. Because based upon the finished body measurements for a size 24, I would need to make very few pattern alterations.
Since there are no sleeves, I don't have to make a bicep alteration. Since the dress skirt is flared with extra ease built into it, I don't have to enlarge the skirt to make room for my abdomen and bottom. After placing the front pattern piece to my body and standing in the mirror to see how it fell, I determined that I only needed to lower the waistline because it's 2" too high. So that was the major alteration I made to the pattern pieces. The front and back pieces, as well as the front side & back side pieces were all lengthened by 2".
I also made a note on the hemline of all the pieces to cut them out with an additional inch added to the hemline...and that's it. That's all the alterations I made to this pattern.
Now there is an interesting design feature to this dress that you can't see in the line drawings or the pictures of the dress worn by the model. What I thought were seam lines in the front and back of the dress are actually tucks.
These tucks bring the fabric closer to the body at the waistline then gently releases it into the skirt. An interesting detail that was somehow omitted from the fashion drawings.
I've picked fabric (a Ralph Lauren tan tropical wool purchased from Fabric Mart), buttons (tortoise-shell like buttons - 10 not 12 as the pattern suggests) and a nutmeg bemberg rayon lining for the dress.
This weekend I will cut the fabric and begin construction...so stay tuned because I know this is going to be an adventure! *LOL*
...more later!