Showing posts with label Jackets. Show all posts

Sunday, November 05, 2023

A Woodland Border Print Simplicity 8687 - Part 1

First, I'd like to say thank you for all of you who still follow my sewing adventures and leave a comment.  I so appreciate you! Just one quick thing ~ I know blogger has made logging in more challenging so if you use "Anonymous" would you mind leaving your name at the end of your comment.  Thanks again!

Now to the actual blog post...

I use to write progress posts all the time for my makes.  Somewhere in the last couple of years I stopped. I'm changing it up again and going back to writing progress posts.  I appreciate being able to scroll through those old posts and see what I did and why.  Since I'm not sewing as much these days, I feel like I need to share why I make decisions as I'm making them in the moment.  My sewing decisions are primarily based upon my experience. The experiences that affect how I'm sewing going forward.

I purchased a bunch of Julia Cost's fabrics a couple of weeks ago after not buying fabric for almost six months.  That's a LONG time in my world!  However, purchasing it really jumpstarted my mojo which has been vacationing.  I want to use all three of the fabric pieces I purchased taking my time to make them sing.  I also know I want to use TNT patterns for these garments.  I want to manipulate the fabric not fiddle around with fit.

Also, I feel like I haven't been walking in my essence for the last year.  I create that's who I am. Ideas come to me, fabric is purchased or chosen from the collection, a pattern picked and I make garments come to life. Various factors have squelched my creativity but I'm reclaiming it with both hands and leaning into it. Because this IS who I really am.

Pattern:


I'm using Simplicity 8687 again. This will be my fourth version although it wasn't a very popular pattern in the sewing community.  PatternReview only has 7 reviews of it.  The hashtag on Instagram has 13 photos under the hashtag...and several of them are of my toppers. I think I saw something in the line drawings that no one else did.  I've also used very distinctive fabrics to make the jacket pattern sing which definitely changes the finished garment's appearance.

Fabric:

I purchased 4 yards of 55" wide lightweight cotton corduroy border print for this project. While I only needed 3 yards to make this topper, I like an extra yard of fabric to match the border print across the seams. I believe this is necessary for a good border print match.  Trying to be stingy with layout on fabric hurts the look you're trying to achieve.

Notions:

In my sunflower version I bound the hem facing and the hem with bias binding. I'd really like to do the same for this version. I also want to add green buttons for the jacket front.

Construction:

When I tried on the sunflower version, I can close it but my extra weight gain the last few years makes it a snug fit.  Not an obnoxiously too tight fit but I wanted the slightly looser fit of the originally sewn jacket. To achieve this I decided to cut the lower back pattern piece out with a 2.5" pleat.  This gives me the added space I need by adding a cool design feature.

The back and collar pieces are the only pattern pieces I cut on the fold.  Here are a few photos of the cutting out process. 

Cutting out the jacket fronts using a single layer of fabric


Jacket front pieces laying side by side

A few other things to note:

- Corduroy has a nap.  While I cut the pieces on the wide width I made sure the tops of the pattern pieces all faced one direction.  This was so the nap ran the same way on all of the pieces.

- Always, always, always purchase at least an extra yard or extra panel when working with border prints and panels.  It allows you room to experiment, match borders across all the sides and even recut if there is an error.

I'm well into constructing and making some design and trim options for the jacket.  That will be in the next post.


...as always more later!


Wednesday, February 17, 2021

A Denim Simplicity 8687

After finishing the Mildred Jumpsuit, I decided to sew something I'd previously made.  I have a drawer in my cutting table holding the projects I cut prior to the move. When I was going through the drawer I found this project and it coordinates so well with my jumpsuit that it had to be sewn next.


The reason I hadn't worked on it previously was, "Where was I going to wear it to?" Which has become the question regarding almost everything I think about sewing now. And in actuality has held me back from making some things, because WHY? I decided to finish this anyway for two reasons:

1. I needed to sew something I'd made before that would encourage me to continue to sew, and

2. Why the hell not? I mean the pandemic is still here almost a year later from when we originally locked down. It's going to take a minute to vaccinate everyone for us to get to our new normal...so I'm going with it and sewing things.

Supplies ~

A patchwork denim fabric from Stylemaker Fabrics purchased in 2019. It's still available here.

Yds of Blue & White Bias Binding from Bessie Pearl Textiles


Remnants from this dress that I cut into a vest also r
emnants from jeans that I cut up to use for facings and pockets in other garments.

6 - 7/8" gold buttons from the deep stash button collection - I've had these for years!

Pattern Alterations & Construction Info. ~

I cut this out awhile ago but I believe there were no additional pattern alterations that weren't covered in the other two posts about this jacket. I did make one change to the jacket from the other versions.

o  Instead of making the tucks in the sleeves, I gathered the sleeves into the ties.

o  At the same time, I also topstitched a tuck into the cut opening in the sleeve hem to make it fit a little tighter.

o  I used bias binding on all the interior seams since I really liked how the finishing looked in the first version. 

o  However, I bought a 1" double folded quilt binding and that's just too much binding on the seams. 

o  So I cut the binding at the main fold basically cutting it in half and giving me a lot more binding for my money.

o  Since I used denim from previous makes, I made sure the lighter blue denim was cut for the collar and cuffs.  

o  The darker black denim scrap was used for the front facings.

Besides being extra careful sewing the seams because the denim's patchwork seams are bulky and making sure to grade the seams, I used three different thread colors on the jacket.

Yes, I have thread coordination issues...but choosing to topstitch in the gold jeans thread tied everything together and gave it a true denim jacket feel to me.

The Buttonholes ~

Finally adding the buttonholes and buttons were a little challenging because of all the patchwork seams. I tried hard to insure that I was making the buttonholes in between the patchwork seams but I wasn't always successful.  

To make it easier for the automatic buttonholer I trimmed down all of the seams that were near the buttonholes. And STILL in some places the sewing machine struggled. I managed to get the six buttonholes made with patience and slow sewing...also accepting when they weren't perfectly lined up.

There is a little more and less space between the buttonholes because my sewing machine DID NOT care about being accurate when making the buttonholes. One is downright crooked but I'm leaning into the fact that my machine made all of the buttonholes and I didn't have to unpick any of them.

A Few Pictures ~


This will be the last time I use this pattern for awhile. I'm just not wearing jackets cause I'm not going outside. And at the rate America is vaccinating folks, Imma be working from home quite a bit longer.

I pulled some fabrics to make some winter Myosotis dresses so that's what's coming to the blog soon.


...as always more later!


Sunday, February 10, 2019

The Dover Jacket in Flocked Glen Plaid

I knew right after I'd finished my first Dover Jacket that I would be adding more of them to my wardrobe. It's exactly the type of topper that I need and want as a layering piece. All I had to do was figure out what the next fabric should be. I settled on a flocked glen plaid suiting and an embroidered denim. One piece is deep stash and the other is new to the collection. 

At first I was going to put both jackets in the same post but there is so much detail to each one they deserved separate blog posts. 


Flocked Glen Plaid Version ~


This version was inspired by a picture I saw on Marcy Tilton's site. Yes, I get her emails. Yes, I cruise her site 2-3 times a week. No, I rarely buy anything but her fabric selections are so inspiring. The picture above inspired me to look in my fabric collection, because I KNEW I had a flocked glen plaid on the shelves. I know Marcy's picture is about denims (and boy do I want the one on the far right!) but it did strike a memory.

Upon finding the fabric on the shelves, I was thrilled to realize it's the right weight to make the Dover Jacket. Since it's such a distinctive fabric, I knew it would make an interesting topper. A note...when choosing fabric for this jacket...make sure it's a fabric that gathers easily since the gathering is an integral part of the design.

Supply List ~
- 3 yards flocked glen plaid from deep stash
- (3) 1.25" buttons from notions collection
- leather binding from the notions collection
- Black fusible interfacing from Steinlauf & Stoeller

Pattern Alterations ~
This is the only additional alteration I did to the pattern for future makes ~
  1. I added 1/2" to the front and back of each sleeve from the shoulder curve down. 
  2. This enlarged the hemline considerably. 
  3. At 4.5" from the hemline, I sewed on an incline decreasing the hemline by 1.5" on each side.
  4. I also lengthened the sleeve by one inch.
  5. This allowed made sleeve hems circumference smaller and stopped my very small wrists from looking like they were floating in a too big sleeve.
Construction ~
Because the fabric is very busy, I added some accents to make the design work. I chose a very large button from the collection to add to the jacket front. I have no idea how long I've had these buttons or where they came from in the garment district. Just know that my button collection is as extensive as my fabric collection.


Due to the size of the buttons, my automatic buttonholer wouldn't make buttonholes. Honestly, I haven't made a 3-step buttonhole in about 20 years. I went to my copy of the Vogue Sewing Book to figure out how to make them again.


A few samples later and I had buttonholes large enough for my buttons. Though I'm glad I only had to make three of them.

I also added some leather binding leftover from other projects to the front edge of the jacket. That wasn't planned. I was looking for some buttons and found the leather binding in a plastic bag with the buttons I chose. I'd probably planned on using them together for another project that didn't happen. They were, however, perfect for this one.

Lastly, I omitted the front pockets from this version too. After wearing the original jacket, I didn't miss the pockets so left them off.

Some Pictures ~  


Conclusion ~
I'm glad that I used this fabric from the collection to make my second version. While it's not a heavy fabric it will be a good layer over a cashmere top for the coldest days or a cotton jersey turtleneck. It's casual enough for the office but funky enough to satisfy my creative needs.

This is the second jacket from the Dover Pattern.  My final version is coming soon!

...as always more later!


Sunday, November 25, 2018

McCalls 7817 - A Jacquard Jacket

I'm always looking for toppers that will work with my casual lifestyle.  Now while I'm drawn to very tailored jackets, realistically they don't fit into my work life. So when I saw this McCalls pattern in the fall offerings, I thought it would fit well in my wardrobe...


Even though this pattern has several sleeve variations, I'm sticking with the kimono type sleeves because I like simplier silhouettes. Refer to my sentence above about tailored jackets. I really am a classic silhouette loving sewist who likes bright colors and prints. This pattern gives me a great layering piece, which I need for the winter. It's simple, classic and stylish.


Supply List ~
Blue/Black Jacquard from Elliott Berman Fabrics
12 yds black bias binding from Pacific Trimmings
1 small snap

Pattern Alterations ~
- The shoulder seams were shortened by an inch 
- Did a pivot and slide to add 3" at the hemline and 2" at the hip area
- Added inseam pockets from McCalls 7481 

Construction Info ~
This is a simple sew and it goes together quickly. There are four pattern pieces - back, front, sleeve and sash. The time consuming element is the bias binding...and that's what drew me to the pattern.

I did add some time to the construction by adding pockets after I sewn the side seams. So everything had to be ripped open and sewn again. Because I used big and deep pockets, I had to hand stitch them to the jacket front so they wouldn't flop around inside the jacket.


The bias binding was applied using the Hong Kong method. The pattern tells you to fold it in half and sew it down. I wanted a cleaner look. Applying it using the Hong Kong application means that the bias is longer on the inside. Stitching in the ditch causes it to have a more finished look on the jacket front. 

I also added some ribbon ties from the bias binding to the side of and the front of the jacket to tie it together. I wanted to insure that the belt wasn't the only thing holding the jacket together.

A snap was sewn to the v-neck junction at the front of the jacket. This helps the v-neckline to lay flat. To me all of these additions enhance the wearability of the jacket.


After I added the snaps I noticed that the left side hangs a little lower than the right. I was going to fix it but I like the quirkiness of it, so left it. When you're looking at the pictures below realize that the fronts not meeting is deliberate.

A Few Pictures ~


The fabric is what makes this jacket work. I suggest if you make one for yourself that you use a bold fabric (like the pattern envelope) or a denim so that the jacket is distinctive. Your bias binding can be coordinating (like mine) or contrasting to add even more pop! Also, buy more bias binding than the pattern recommends. I bought 13 yards and used 12.

This is where I tell you that Elliott Berman supplied the fabric as part of my Brand Ambassadorship with them. If you're interested in purchasing fabric similar to the one I used, check out their new french jacquards here. One more thing about the fabric, it's warm. I'm looking forward to pairing this with other turtlenecks during the cold months of January through March.

I would make this again...probably in denim. Though I will have to adjust the pattern fronts.  To achieve the look on the pattern envelope, I need a little more fabric across the front. Even though I'm fine with the way this one hangs. But if I do make it again, I will definitely make the adjustments.

Even with that I highly recommend purchasing this pattern. It's a simple sew especially if you don't add all the elements I did. The finished jacket has a lot of bang for the buck and I'm sure it will get a lot of wear this winter.

...as always more later!


Sunday, October 21, 2018

Simplicity 8700 - A Denim Jacket

When the air gets crisp and it's chilly in the morning, my thoughts turn to jackets. I'm not really a coat maker but a cute jacket is right up my alley.


I've made a few in the last couple of years that I've enjoyed wearing.  So when I saw this Simplicity pattern...


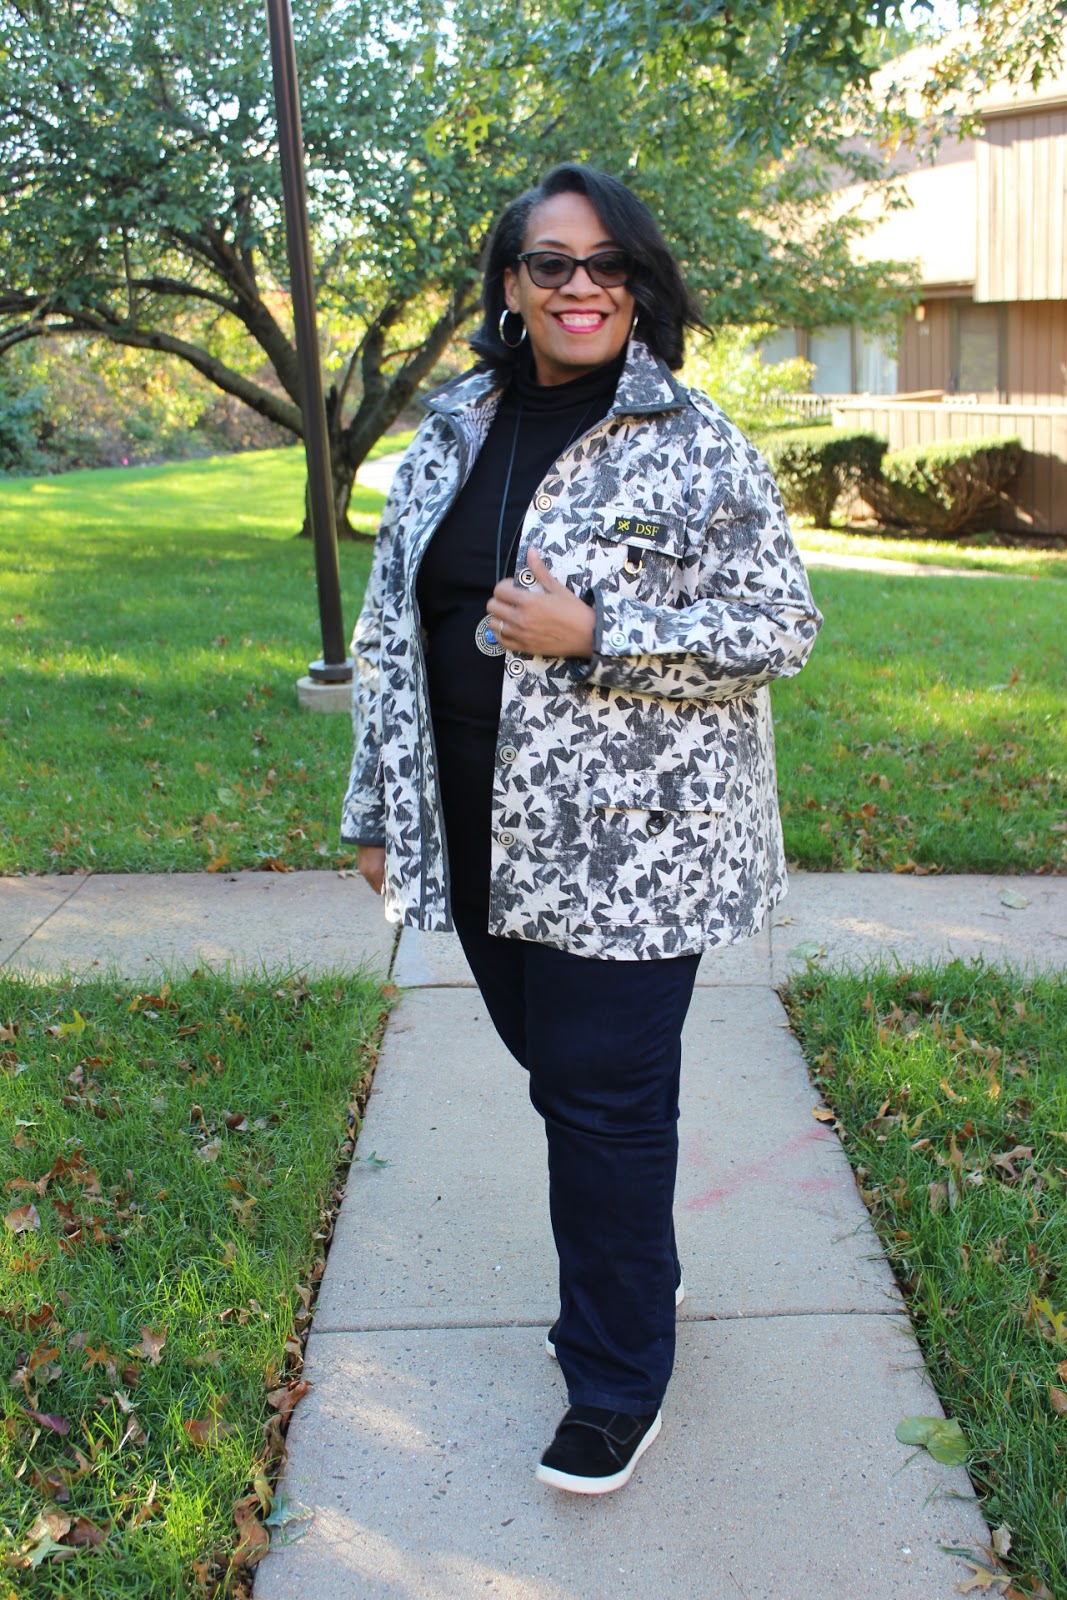
I knew I wanted to add it to my collection. But me being me, I was going all in to get the look I saw in my head. There are loads of photos and information in this post. So if you're not interested in the design and construction information, skip down to the photos and conclusion to see the finished jacket.

Supply List ~
1. Medium weight star denim fabric from the collection by way of Fabric Mart
2. Black 'n white stripe remnant - used in this shirt
3. 7 - 7/8" buttons from the button collection
4. 2 - 1/2" buttons from the button collection
5. 1 - 1" O ring from Lauren Trimmings
6. 2 - 2" O rings from Lauren Trimmings
7. Pieces of 1" black twill tape from the notions stash
8. 7 yds of smoky black bias binding from Pacific Trimmings
9. Black topstitching thread from SIL Thread

Pattern Alterations ~
Let me state that this pattern only goes up to an XL with a bust measurement of 46" and waist of 48". There's no hip measurement on the outside of the pattern envelope...but when I measured the pattern pieces it was 58" before the seam allowances were taken off. I knew I would have to alter the main pattern pieces to fit around my hips.

I made my alterations to the front and back piece...in the sides between the large and extra large cutting lines...slashing and spreading so that I ended up with 1.5" at the hemline on each side. 


Besides the side alterations for the back piece, I also did a pivot and slide of 2" on the fabric prior to cutting it out. 


There was no need to make an adjustment to the sleeve pattern because it was wide enough. It means that my version won't have the loose sleeve look of the pattern envelope but I'm good with that.

The final pattern alteration was regarding the front facing piece. Brittany mentioned it in her review so I knew to look out for the issue. To solve the problem, I drafted a back neck facing. so that the collar would be enclosed in facings which means I did NOT apply it as the pattern states.

I made a back neck facing by using the back yoke piece. I measured the width of the facing piece. Then I used my curved ruler to make the facing bottom deeper.  Here is a pic of it before I traced it off onto pattern paper...


Then I omitted the back yoke. Yeap, went my own way. It's a stretch denim jacket and I thought it just didn't need it. One of my reasons was the weight of the denim and some of it was the look I wanted. This is what my collar looks like with the front facing.


Design Changes ~
I acknowledge that I went overboard with my design changes. I threw everything into this jacket except for the kitchen sink. I may not have hacked the pattern much but I did hack the design!


My first thought when I saw the pattern was to add some O rings to the flaps. I saw this on a dress on Monica's Instagram account and I really liked the look. I'd been waiting for a garment to add that O ring accent to. I thought this jacket was perfect for it. So I added the rings to all of the pockets.


The second design change I made was to use leftover shirting materials from this shirt for my facings, under flaps and the shoulder tabs.

As pocket linings

For the tabs


The third change was to add binding everywhere to give this very busy print boundaries. So it was added to the collar, inserted into the sleeve band hems and down the front of the jacket. I also used it to bind the seams and hemline of the jacket.


The last thing was a "by chance" thing. I ordered some new labels from Dutch Label Shop. I wanted a label that better reflected where I am now in my creative journey. This label is designed to look like my blog header. After I sewed it onto the upper pocket flap, I thought it was perfect.

While I really like my design changes, they added considerable sewing time to this make...considerable time! 

Construction Information ~
I read the pattern instructions and then proceeded to sew the jacket in the order I wanted after the basic assembly was done. Most of my construction changes were sewn with the pieces flat. 

A few things I want to note:
I basted the sides together to check fit ~ once I realized the fit was okay ~ took it apart and added the pocket flaps. I didn't want to do all of the extra work for the pockets if the jacket didn't fit.
One of the suggestions that the pattern makes is adding twill tabs to the pocket flaps. The O rings were my design decision although I don't think they stand out as much as I thought they would.
Binding isn't suggested in the pattern instructions. That was all me trying to contain the fabric print a little. I'm glad I added it and used a hong kong type of finishing to attach it. However, adding it to the front really defined the button area and gave more definition to the jacket front.
- There's a lot of topstitching on ERRYTHING! From the tabs on the shoulders to the sleeves and hems. Everything is topstitched.
- The cuffs were way too large on my jacket. So I did my normal trick of making a pleat and adding a button.

Original cuff - topstitched with bias binding

Cuff with pleat added

A few pictures ~


Conclusion ~
This is one of Simplicity's "Pattern Hacking" patterns so it comes with several options to make the jacket. You can make it as simple as possible or you can go full in and add everything the pattern suggests and then a few of your own designs. As explained above, I went all in. LOL!

You would have thought that I'd have been realistic about the amount of time it would take to sew this jacket especially since I put every design detail into it. But no...about halfway through the construction I got annoyed! *LOL* When I finally thought about it I realized that it takes time to get a more detailed garment made. I needed the time to bring to fruition all the things I saw in my head. When I understood that the sewing became more enjoyable. Does this happen to anyone else? Just wondering if I'm standing on this creative cliff alone?

I will be using this pattern again. I can see it in different fabrics with less of the details I used in this one. Hopefully I will get more of them made before spring shows up because I always think I have more time to sew than I actually do! *LOL*

One other thing happened after I took the photos. My Mother saw me standing in the kitchen with the jacket on and asked where I bought it. I think that's the ultimate sewists compliment!

The first shirt from the border print series is up next on the blog.

...as always more later!


LinkWithin

Related Posts with Thumbnails