Showing posts with label #deepstashsewing. Show all posts

Tuesday, August 04, 2020

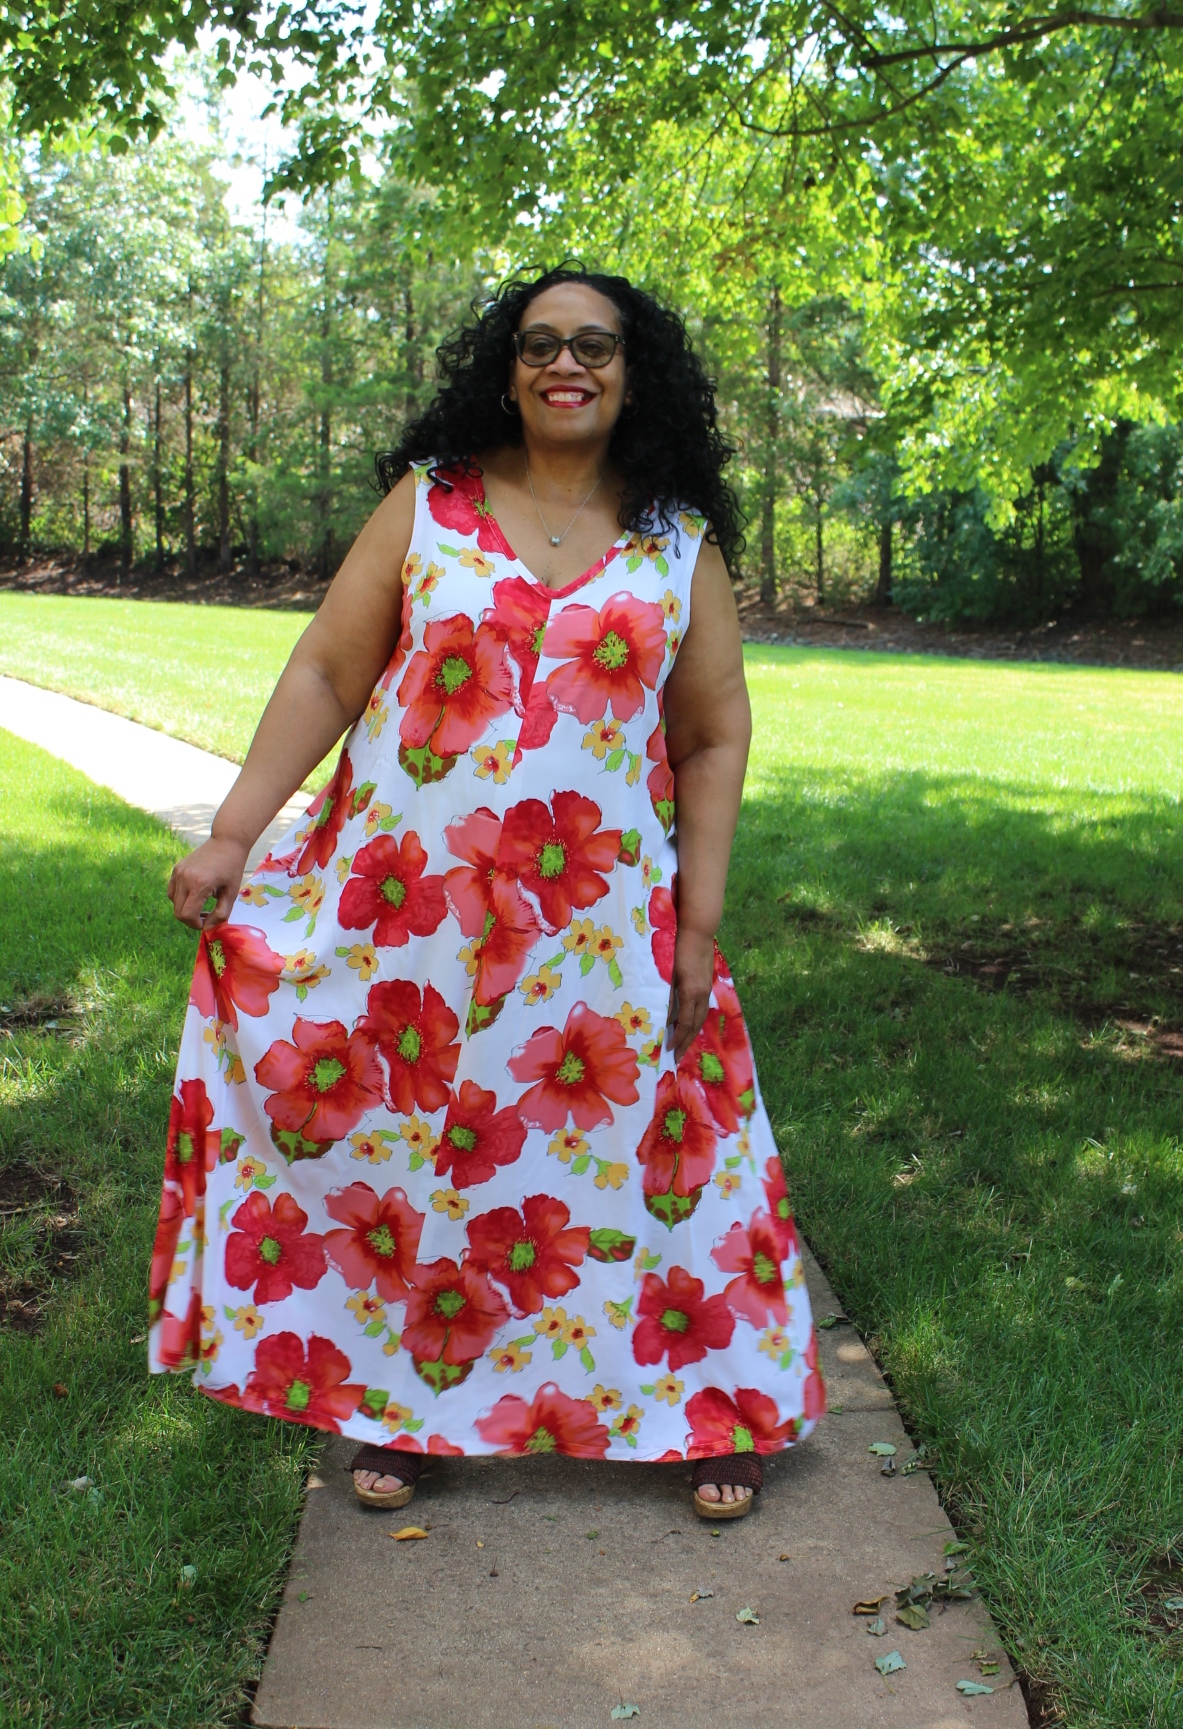
A Bold Floral Maxi

It's hot here.  It's August and we've recently gone through several heat waves.  August in the Mid-Atlantic states mean heat, humidity and high temperatures. With that in mind, I made the Lafayette 148 V-Neck Maxidress again.

Now even though I'm working from home, I still get dressed for Zoom meetings and for trips to the grocery store.  Plus I'm a little more nonchalant and slouchy at home with easy to throw on pieces getting the most wear. This is why I repeated this maxidress. It's comfortable, easy to wear and perfect for the heat!


I went deepstash for this one. The floral rayon fabric is from GStreet Fabrics in Rockville, MD. It's about 9 years old and it's from the last time I went to a GStreet Fabrics. I think this was in the first incarnation of the store and while it had nice fabric, it was not like the original GStreet of old. It was part of a fabric road-trip with Shams & Peggy in April 2011.

This piece of fabric was on the expensive side for me at the time - $12-15 a yard. I bought 4 yards of it. The tag only had GStreet Fabrics on it and the yardage. I remember loving it so much I just couldn't leave it. Otherwise everything else from that trip was from the $2.97 tables.

I used the pattern pieces that I'd altered with the changes described in my original Lafayette 148 knock off post.

The notions for this version are:
24" white invisible zipper
Design Plus Bias Fusible Stay Tape
Self made bias binding

The things I changed on this make:
o Made bias tape from the fabric scraps to bind the armholes
o Added stay tape to keep the neckline stable
o Omitted the neckline facings and used the self made bias binding instead
o There are no pockets in this one either

How the way the fabric drapes and moves makes this a favorite look!


The best thing about sewing repeats is that it's just about the sewing. I don't have to worry about fit or if pattern pieces go together because they do. I've already made it!

These photos were taken by my daughter too. Normally she travels in a group but today only one 9 year old little girl came with her. Of course she got in on the pictures too...


I have a couple more pieces to share before the month is out so they will be coming to the blog soon.


...as always more later!


Friday, January 03, 2020

Brown & Black Hawaiian Print Shirt

My Mother gave me this fabric from one of her trips to Hawaii in the 1990s.  See I use to ask my family for fabric when they travelled cause I thought it was a better souvenir than a t-shirt. Especially since I had small children at the time and wasn't going anywhere that wasn't family-oriented. This fabric sat on the shelves for almost 30 years. 


When my Mother brought it home, I had no idea what to do with it. I was still in the corporate business world and this just didn't fit into my creative process then. I touched this fabric in September when I was rambling through the collection, pulled it out and immediately cut it up. Starting the shirt before I left for Houston but the shirt shell sat since I returned. I finished this before Christmas because I wanted to include it in the photos my daughter was taking at the time.

Materials ~
3 yards ltwt. printed cotton from Hawaii - deep stash
Black bias binding leftover the Sienna Maker Vest
9 brown buttons from the button collection
Interfacing from Steinlauf & Stoeller

There are no new construction techniques in this shirt. This is mindless sewing. I can indulge in it and enjoy the process of sewing a garment I like wearing.

A few things ~
I only had enough bias binding to add to the collar.  I wanted to add it to the cuffs too but went with the flow.  That process is discussed in the construction of the Orange Issac Mizrahi Shirt.

o  This is the fitted back yoke version of the shirt. It felt right for this fabric instead of the full backed version.

o  I ran out of fabric for the inner back yoke so I cut it from some of the black shirting I have in the cave then added my label.


o  While I added width to the sleeves, this version does have buttoned cuffs. My last few shirts have had sewn on cuffs.

Pictures of the finished garment ~


My sewjo is now back and blazing ~ thank you Jesus! This was the perfect garment to make after my sewjo returned home. I truly enjoyed finishing this up. It will be perfect to add to my wardrobe and wear once my Holiday Break is over.

Worn with a RTW duster

One more thing, I don't know about you but my sewjo has become a part of my personality...who I am.  So I'm really off-kilter when it's gone too long. I do, however, realize that I'd become unbalanced by giving my sewing way more space in my life than anything else. 

One of the main things I've learned from this last sewjo vacation was that I need more balance in my life. I need to read more (like I've been doing recently), spending time watching my shows in real time instead of catching up later and making more excursions from the sewing cave. I go out but not enough. That way the next time my sewjo flees, hopefully it won't take as long to replenish my creative well...


...as always more later!


Sunday, July 07, 2019

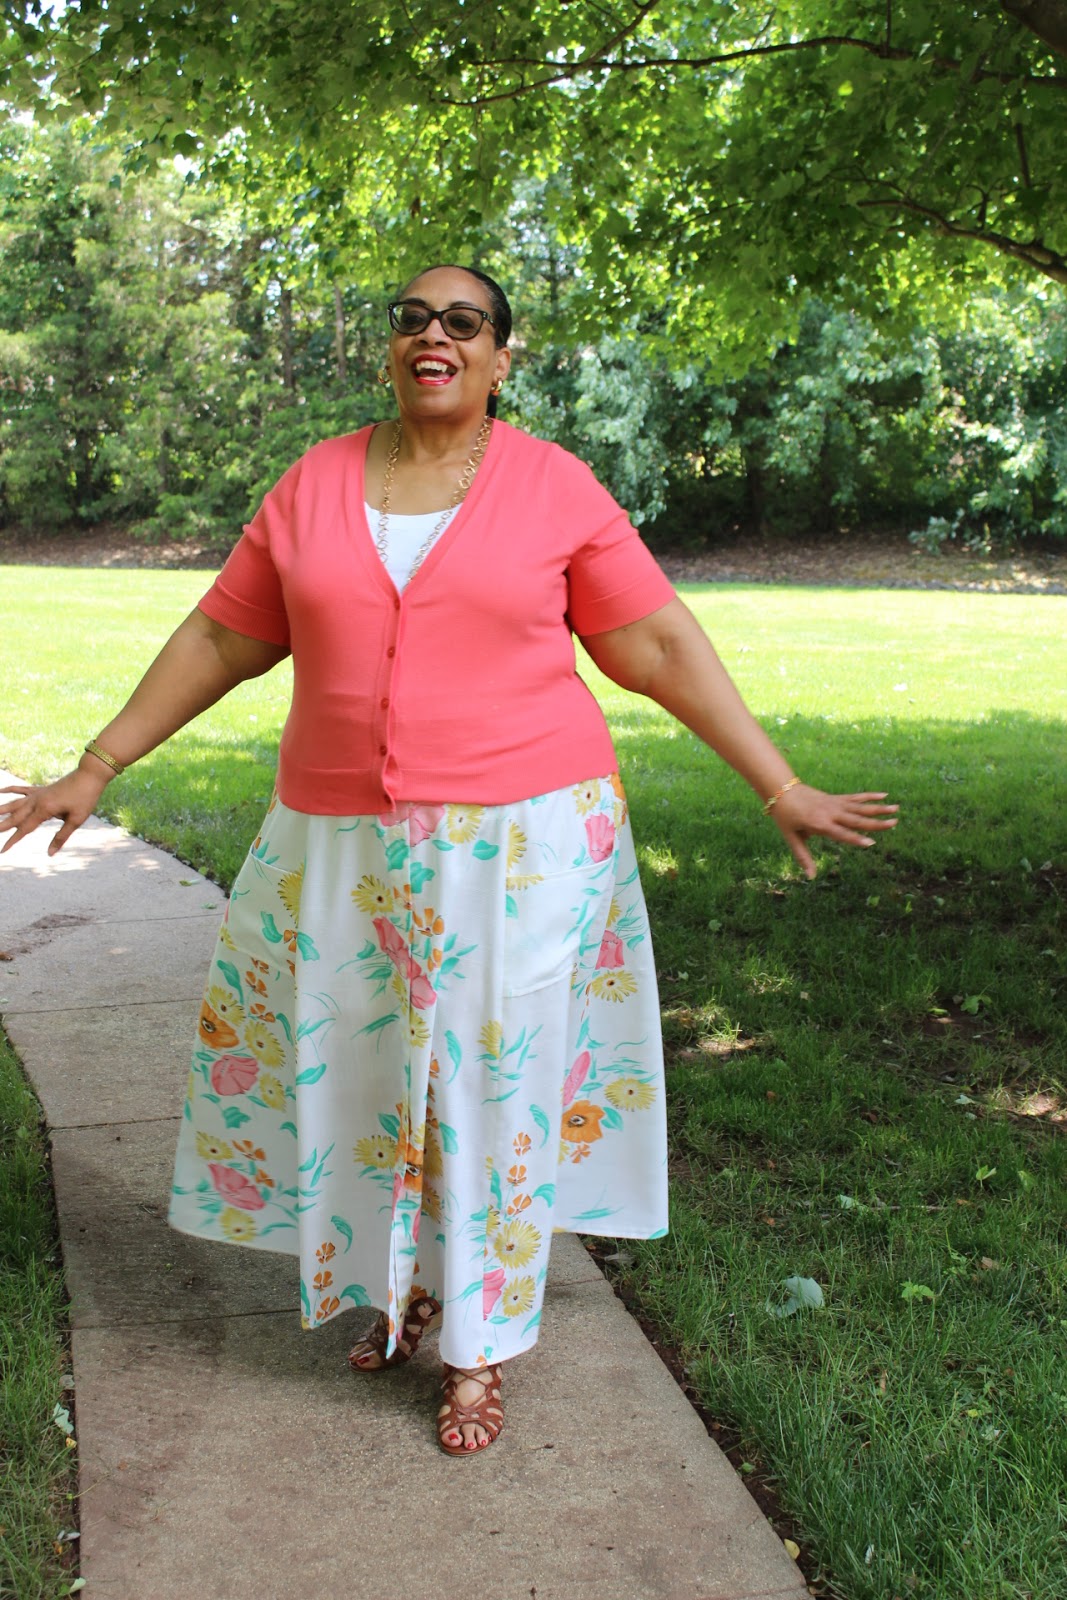
A Thirty Year Old Holyoke

After seeing some of the other versions of this skirt, I really wanted one of those soft swingy ones. So I pulled out a challis and cut out another Holyoke skirt...however, this post isn't about that skirt because it's only halfway done.


While I was looking for a nice soft rayon challis to make version two, my hand touched the fabric I used for what's technically my third Holyoke. This fabric has a back story...

I purchased this fabric in 1989 from Cloth World, the precursor to JoAnns. I remember the exact day...not because something spectacular happened but more because I was a really pregnant woman roaming around Cloth World buying fabric with my lunch money because I was miserable. I was pregnant with my third daughter, huge and ready to be done, but with several more months to go. 

At that time, I did buy fabric for future projects but not projects that would be years in the making. I didn't have that kind of money...not with two little girls and one on the way. But I loved this fabric and two other pieces like it. They made me feel good in a way that not much did at the time. So I bought them. 

I don't even think they manufacture this type of fabric anymore. It's a linen-like fabric that's probably more poly than linen and it was made to look like linen but not wrinkle like it. I made quite a few garments from this type of fabric back in the day. This is truly deep stash sewing!


I made one change to this Holyoke.  Instead of inseam pockets I decided to try and make some pockets that were placed on the outside of the skirt ~ sewn between the seams of the skirt.

This pocket was inspired by a skirt I saw on JJill's site. I liked it and realized it was an easy change to make to my pattern.  


Here's my pattern piece ~


The finished pocket is kind of deep and wide. After I made it I wasn't sure it actually worked. It wasn't until the skirt was photographed and my daughter raved about the pockets that I thought okay, I can live with them.
  1. As you can see I made the pattern piece by putting the side front and center front skirt pieces together.  
  2. Then I traced a piece that filled the space from side to side. 
  3. My pattern piece is 8" long with a 1/2" turn at the top and at the bottom - so 7" finished. 
  4. Wide enough to jam my hands or stuff into.
  5. I also placed the pockets further down than the inseam pocket because I wanted to slide my hands down into them.
It was simple to do and added no extra time to the construction of the skirt. Otherwise the skirt construction was exactly the same as the first one.

My buttons are from deep stash too. Buttons I've had since that same daughter was 9. So except for the new pattern, all of the pieces of the skirt have been marinating in my collection waiting for their time to be used.

A Few Pictures ~


I love that I'm fulfilling one of my 2019 goals - to sew several garments using deep stash fabrics/notions from the collection. This skirt is made from fabric that is as deep stash as it gets!

My third and final Holyoke will be finished and probably make it to the blog before the month is over. That will most likely be my last one for the season. I have so many things on my to-sew list that I really want to get made!

...as always more later!


Wednesday, April 10, 2019

A Lightweight Rayon Knit Pembroke Tunic

The season is starting to turn but we're still getting those colder days.  Days when it starts out pretty chilly, warms up around lunch time, and then gets chillier for the trip home. While it seems I should be giving up these Pembrokes, they actually still work now for the unpredictable weather. 


This beige rayon knit is very lightweight so it will work for the beginning of the spring season. The turtleneck is drapey and loose that will provide necessary coverage in the mornings when it's cooler but isn't tight when it warms up in the afternoons. It's also a lightweight fabrication that works well alone or as a layering piece.

Since this is my sixth version ~ can you tell I really like this piece ~ I have no new construction or design features because it just works. This one is made from #deepstash. While the fabric didn't have a tag on it, I know I've had it as long as the embroidered fabric I used to make the cardigan, so about 12 years of marinating.

Construction ~
Again no construction details but a comment about this fabric. I had to be really careful with it because it caught and pulled on everything. So I will be cautious what I pair it with to avoid ruining it. One more thing about fabric choices, since this is my sixth version, I've noticed that fabric choice definitely affects how the turtleneck part works. A sturdier fabric makes the turtleneck stand up higher and closer to my neck. The more lightweight fabrics have a looser turtleneck which hang more loosely around my neck.

While this is a TNT pattern, the fabric choice definitely affected how the sleeves hung off my shoulders. I constructed this version exactly the same as the last five but there is a difference. I didn't notice this when I put the top on. However, the pictures clearly show how it hangs. I could go in and make a change but I'm not going to...I'm wearing it as is.

Also Jenny wrote a great blog post on negative ease and how to use it in her patterns. Some of my versions are made the way the pattern suggests and some are made using thicker fabrics which needed a little more space which I added to the bottom width.  

So pictures ~


Wearing with RTW white jeans

This will be my last Pembroke Turtleneck Tunic for the season. I will probably try the Pembroke Dress with the banded neckline and a shorter sleeve in cotton knits for spring/summer. I like this silhouette even better than the Concord Tee and y'all know how much I love the Concord Tee

I've gained a lot of the weight back I lost four years ago. So several of those Concord Tees no longer fit the way I like and will be donated. Its a continual process of upgrading and making my home sewn wardrobe work for my lifestyle now.

...as always more later!


Sunday, April 07, 2019

Simplicity 8059 - An Eyelet Cardigan

I've made this cardigan several times over the last couple of years and it's become my go to pattern.


It was made to go with the latest Pembroke tunic recently completed. An early spring outfit to wear with leggings and/or white jeans.


Supplies ~
*Cotton Eyelet w/o stretch purchased from Fashionista Fabrics in 2007 
  (12 years old) so it's deep stash from the collection 
  (I blogged about the fabric here - and Fashionista Fabrics no longer exists)
*Silk Organza
*Ltwt fusible interfacing
*1" curtain matte gold grommets from Amazon
*1.5 yds beige ribbon from Joyce Trimmings from NYC Garment District

Design Decisions ~
I've made this cardigan a bunch of times, what makes this version interesting is the closure on the cardi front. I was inspired by this design I saw online. 


When I pulled the eyelet and the rayon knit from deep stash, I thought the closing would work on a cardigan with a little engineering.

The second decision was to cut the eyelet off the selvedge and add it to the cardigan hemline, as well as make it part of the ribbon tie that holds the cardigan together.

Construction Information ~
To make the grommets work without tearing the eyelet, I had to put some thought into making them work.

First I decided to beef up the front and facing because this eyelet is quite holey. To give the facing some strength I cut the facings from the fashion fabric, silk organza, and a fusible interfacing. The fusible interfacing was adherred to the silk organza which was then sewn to the facing on the edges. This not only beefed up the facing but it clean finished the facings.


After I attached the facing, I made a sample of the grommet before placing it on my cardigan.


Then I held my breathe, followed the video instructions, cut a 1" hole in my garment, then placed the grommet in...and it worked! Y'all I seriously did the joy joy dance in the Sewing Cave and I may have shed a tear or two of relief!


The second design challenge was adding the selvedge to the hemline. In an unusual move I decided to add it only to the body and not the facing bands.


The last thing was making the ribbon to close the cardigan fronts. It's made from a purchased beige ribbon with a piece of the selvedge lace sewn to it. I purchased a bunch of ribbons hoping one would work with the cardigan but none did. So I made my own.


I wrapped one piece of the selvedge edge around the ribbon and stitched it down. One row on each edge and then two down the center to insure that the ribbon and fabric wouldn't pull apart. Even though I really wanted a contrast ribbon for the cardigan, I'm happy with this solution.

A few pictures of the cardigan ~


Conclusion ~
This was a fun piece to make. I liked the challenge of adding the grommets to the cardigan and figuring out how to use the selvedge as lace. It was a great detail to add to my TNT pattern.  

The sleeves weren't hemmed in these pictures because I couldn't decide how to hem them. After seeing these pictures, I'm going to add a hem to them before wearing it out.  Otherwise, I really love this new version.

Parting Shot ~

Walking with the grandbabies to take pictures

That was the last piece from my Sew Camp weekend finished at home. I had planned to sew something for the granddaughters but that got cancelled so I have no idea what's up next. I'm floundering a little on what to sew because the weather is changing so do I sew for now or do I sew for summer? 

...as always more later!


Thursday, April 04, 2019

Silk Twill Printed TNT Shirt

Originally when I purchased this fabric I wanted to make a dress for work from it. At that time I lived in corporate workwear and while it was a little bright for that world, I bought the fabric anyway because I loved it.


This is another one of those #deepstash makes that I'm thrilled to have used the fabric in a different way. When I was shuffling through the shelf and picked it up, it said it wanted to be a shirt. I decided to feature the fabric and went with my gathered back TNT shirt.

Supplies ~
- Printed floral silk twill from the garment district years ago - this is deepstash fabric
- Buttons from the button stash - again aged well since they're from when I worked at the button company and that's almost 20 years ago now
- Fusible interfacing from Steinlauf & Stoeller

I made this one exactly like my white shirt so there are no new design or construction changes in this version. I loved the fabric and wanted to emphasize it. I've been wearing my other shirts with the gathered backs alot this winter and love the ease of wear. That's why I chose that silhouette for this shirt.

Photos of the shirt ~


I started the shirt at Sew Camp and everyone loved the texture of the fabric. Silk twill is not a popular fabric now but at the time I bought it there were quite a few pieces in stores. I do buy this fabrication whenever I find it especially if it doesn't have an exhorbitant price tag. Lately I've found it in solids rather than prints, so if you find a print silk twill grab it! Okay fabric enabling public service announcement done! *LOL*

A couple of the photos shows it with some tan knit pants. I thought they would match/coordinate with the shirt when I was sewing it. However, I'm liking the darker ponte jeans match better. BTW, this is pretty much my outfit these days with and without a cardigan at least until the weather gets warmer.

This was the first piece I made at Sew Camp and the one I spent the most time on. It's also the garment that everyone stroked because that silk is EVERYTHING!

The weekend weather is supposed to be lousy meaning there might be more fireplace photos in my future. I guess April showers really do bring May flowers. The Pembrokes and the Cardigan will be on the blog shortly.

...as always more later! 


Thursday, January 24, 2019

One, Two, Three Pembrokes all in a Row

It's January and cold here in the Tri-State Area.  I hate being cold and I've wanted to sew my own turtleneck type sweater for awhile. Because of that, I was especially grateful when Jenny released the Pembroke Tunic for Cashmerette PatternsMy first one was from a wool knit that I've worn quite a bit since making it.  

During the MLK Holiday Weekend, I made three more of them. Grab a cup of your favorite beverage and settle in. I've included them all in this post instead of three separate posts, because I'm not writing three different ones! Due to that, this is a picture heavy post with quite a bit of commentary...


Pembroke Tunic One ~ The French Terry Version

I purchased this piece of french terry from one of those little dress shops that line the garment district side streets. It was owned by an older Orthodox Jewish gentlemen. They were closing the store and selling the excess pieces of fabric. I bought this piece and another one for $10. While it's not new, it has been in the collection for almost three years. 

When I was floundering during my holiday break, I thought that if I made a quick project it would jumpstart my sewing mojo. I got the top made but it didn't spur me on to sew and the insides weren't finished. So when I decided to make more of these, this one needed all of the finishing done to the insides of the top.

I am glad that I ended up with this new top. It's the most basic of all of my versions but a wonderful addition to the wardrobe.

Some pictures ~


Pembroke Tunic Two ~ A Paisley Felted Wool Jersey

This fabric is OLD. I bought about 7 yards of this from Fabric Mart back when felting wool jersey was H-U-G-E! My intent was to make a twinset using the felted piece as the cardigan and the unfelted piece as the top underneath. 

(felted on the left/unfelted on the right)

After putting the wool jersey through the felting process, it lost all of it's color and vibrancy. I was totally unprepared for this because it had never happened before. As you can see above, the difference between the felted and unfelted pieces was too great for my original idea so I put them on the shelf to wait for inspiration.

This piece counts as #deepstash since it's at least 12 years old! YES!!! Also since its felted, I'm sure it's going to be really warm. Due to the bulk of the fabric, this version has the cowl that stands furthest away from my neck but it will be okay when wearing.

Some pictures ~ 


Yes, I'm wearing gray sneakers. My sneaker collection has gotten quite deep. When I find a pair I like, I tend to buy more than one color. This pair is from The Avenue and is on sale now. I own them in black and gray and they have a velcro strap that I think is AMAZING! Though my daughter called them toddler sneakers! LOL! 


Worn with Butterick 6389 felted wool vest from 2017

This is the first of my 10 #deepstash garments for 2019. I'm thrilled with that!


Pembroke Tunic Three ~ Black & White Version

When scrounging through the 
fabric bins looking for a piece to make another Dover Jacket, I touched this piece and automatically thought Pembroke. My only challenge was that I didn't have enough fabric to make a tunic with long sleeves. Since it was black 'n white doubleknit, I knew it would work with black ponte and I have a small stash of it on hand. Cause you always need black ponte - ALWAYS!

This fabric wasn't tagged and I don't know how that happened! I have no idea where it came from but I'm thinking its NOT Fabric Mart, maybe Metro Textiles. There's only 2 yards of it and it's been in the collection for at least 2-3 years since I don't remember purchasing it recently. So not deep stash but definitely not new.

After laying the tunic pattern pieces out, I realized that I would be scrimping on the cowl. I decided to cut both the sleeves and the cowl out of the black ponte creating a colorblocked look. I plan on wearing it under my black hoodie to add another layer of warmth.


Some pictures ~


I'm happy to have three new layering pieces to add to my closet especially with the temperatures in the teens. I'm putting this pattern away for a minute. I've made four of them and I'm ready for a new sewing adventure now.

...as always more later!  

LinkWithin

Related Posts with Thumbnails