Showing posts with label New Sewists Questions. Show all posts

Thursday, November 12, 2009

New Sewists Thursdays - The Proper Tool for the job!

Many people come back to sewing or start sewing to save money.  Some times when attempting to save money we scrimp on the tools of the trade.  Or maybe we don't gather all of the tools because we are not sure of what we should have...

So today's post will be about the tools that a new sewist should have in her personal sewing toolbox.

1 pair of dressmaker's shears - 7 or 8 inch
1 pair of pinking shears
1 seam ripper (or maybe 2 - since I have 3!!!)
1 tape measure
1 6" measurement gauge
1 Dressmaker's Ruler
Pkg of dressmaker's chalk
1 Wash-away pen
Rotary Cutter and blades
Pkg of handsewing needles
2 pkgs of sewing machine needles in every size
1 pkg of dressmaking pins
a pincushion - tomato or magnetic
pattern weights (if you use a rotary cutter to cut out patterns)

I also think that all beginning sewists should have a "how-to" sew book too...either The Reader's Digest Version, The Vogue/Butterick sewing book or the Simplicity book...but something that you can turn to for help with beginning questions.

I don't think a good carpenter goes out to work without a complete toolbox and a committed sewist should not start a sewing job without the proper tools either...well at least IMHO.

So if you are missing anything from the above list, I would encourage you to add it to your sewing toolbox.  Having the right tool for the job makes the job easier to do!

Now as usual this is a community discussion.  If you think I've missed anything or if you use something consistently that I've missed, please feel free to add it to the list!

...as always, more later!

p.s.  thanks for all the get well wishes!!

Friday, November 06, 2009

NST - Stretch and how to work its - The Answers

Listed below are the suggestions that were made to the last New Sewist Thursdays post:

Gwensews said...

Here is a terrific tool to use in calculating ease for all fabrics. CJPatterns.com has a PDF chart you can download and print to determine the stretch/ease factor.


Go to cjpatterns.com and click on "Tips and How To's". When that list comes up, click on "Perfect Sizing Worksheet" and download the PDF. She explains stretch/ease so well.

To be absolutely clear on my above post--the worksheet at cjpatterns.com allows you to calculate how much ease you will have using fabric with 25% stretch, 50% stretch, 75%, or no stretch at all, using the same pattern for any fabric. For instance, you have a pant pattern and a fabric with 50% stretch. You can calculate how much ease you will have using that particular fabric. Using the same pattern and a fabric with 10% stretch--you can calculate how much ease you will have.


****************************************************************
Michelle said...

I think there are quite a few things going on for Kathy, and one of them is just the "learning curve" that we all go through as we begin to understand the behaviors of different fabrics. One of the reasons that I don't sew with linen is because I don't like it's tendency to grow. A second thing to consider is the behavior of the fabric on the bias. When you look at the shape of a pants pattern, you can see that the legs of the pattern are aligned with the grain of the fabric, and the tilt of the hip area away from the leg means that that portion of the pattern is cut on the bias. Test your fabric to see how it behaves on the bias, some will stretch out more than others, and if this is the case you may find that you have a tight pair of pants because the area that is cut on the bias is elongating. This is one of the reasons that I like to work with fairly heavy twills and denim for pants...there is very little change in it's behavior either on grain or on the bias.


As for the knit dress that stretched from it's own weight, some knits stretch only in one direction (on the cross-grain) and some in both directions. It is important to test for this and also take into consideration it's stability and how much it will stretch when sewing. Everything you add to it (pockets, a sash) will add weight. The weight of a skirt will even cause a bodice to stretch vertically in certain knits. For this reason, it is important to really test your knits before cutting into them and deciding just what kinds of garments they are suited for. This is also something that you tend to learn with time...the dress that has the pockets half-way down the thigh...you now know to use a more stable knit for a dress of that style, or a knit that stretches only on the cross-grain.

While it may seem frustrating, all this is knowledge that comes with time. Fortunately, when you do have something mysterious happen...like a pair of linen pants that magically grow as the day goes on...you can come to blogs like this one and find an answer for what is causing it, and how to account for it in subsequent garments.


***************************************************************

scotbrit said...
Try underlining erratic fabric...might stabilize it.


***************************************************************

Gigi said...
Unfortunately, there is no teacher like experience. It took me awhile to learn that every fabric fits differently. There is no such thing as just cutting out your pattern and sewing it up even if you've made it before. Even if you made it in the same fabric since dyes can also make a difference in the weight and behaviour of the fabric. It's a good idea to allow 1" side seams in case you need extra ease and to try the garment on throughout the sewing process so that adjustments can be made. Also, where wovens with lycra are concerned, I've learned not to use any for skirts/pants/dresses that have more than 2% lycra because they can bag out terribly unless you underline (and then you've lost the stretch).


*************************************************************

JustGail said...
I always read, but sometimes it's about a week later than posted. I don't have any suggestions on predicting fabric stretch, especially when talking about stretch around a garment. Would it work to hang the fabric before cutting to see how it behaves? Or would the weight of the fabric be misleading compared to the weight of a finished garment?  I wasn't clear on the hanging fabric - I was referring to see how a garment might stretch lengthwise.


*************************************************************

Nancy K said...
I've had problems with stretch fabric in pants and have decided that they need to be sewn tight, much tighter than you'd ever sew a pair of pants without stretch. They need to feel tight. This of course will vary depending on how much stretch is in the fabric. I like to add to the side seams an 'in case' seam allowance so that I can accommodate different fabrics and then I fit as I sew. The pants I am making now have quite a bit of stretch in them, so I took in my side seams about 3/4" on each side and the cb about 1/4". I also like to sew the waistband on before I sew up the cb seam. Obviously I have to cut a waistband with a cb seam. Then I can easily fine tune my waist fit.


*************************************************************

Vicki said...
You have to think about the characteristics of each fabric. And you need to fit as you sew. All fabrics will behave differently and the more you sew the more likely you will be able to predict the outcome. Give yourself seam "insurance" for non stretchy fabrics and sew up in an order that allows you to pin fit up the sides. Never just sew up a garment and then try on!! With really stretchy fabrics you may need to go down a size but again if the shoulders are right you can take in the sides. Draping the heavy knits over a dress model or even a chair will give you an idea on how much it will stretch in length and then you can adjust the length of the pattern to match. Carolyn has done a great post on linen - it can have a mind of its own. Good luck! Now I will go back and read the other comments and learn a thing or two myself :)


*************************************************************

Carol said...
I read a tip in a book of mine, I think it may have been More Power Sewing, about cutting the back piece for a pair of pants, then stretching the seat area with an iron and steam, then put the pattern piece back on the fabric and recut where needed. With my jeans pattern, I have it traced in two sizes - I cut stretch denim a size smaller than non-stretch. Don't know if any of that will help.


*************************************************************

Marji said...
I left a comment on SG last week that I agree with Claudine that stretch fabrics (and I specifically meant stretch wovens) are not my favorite, and felt like I got jumped all over by a bunch of women who love them. I agree with Gigi that pants using a stretch woven that contains more than 2% lycra are just asking for trouble.  I do like a stretch woven with only 2% lycra for a straight skirt.  I also agree with everyone else that experience will help a great deal in learning what will work and what won't.


-One thing you can do is stabilize seams that you don't want to stretch by using a clear elastic or straight grain stay tape. That would include shoulder seams and the front surplice on a wrap.


I love jersey knits for tops and some dresses such as the ubiquitous DVF type wrap dress. A good knit to learn on is a stable double knit such as the ponte knits - they can be found at Joanns and Hancocks. They have the look of a wool double knit, but are synthetic and not horridly expensive.


*************************************************************

Sue said...
Here's a trick you can try if you are not sure how much a stretch woven will grow. Cut two rectangular pieces as if you were making a simple, snug miniskirt with an elastic waist, and pull it on over lightweight clothes. Wear it around the house as you sit, stand, reach etc. You will get a good idea how much it may stretch, and how good the recovery is.


I, like others here, am wary of many stretch wovens for pants - my rule of thumb is not a percentage of lycra, iy is a level of stretch. Any more than 10% across the grain, or 5% in length, doesn't make the cut except for workout wear.


I always stabilize the crotch seam, zipper area & any pocket edges on stretch wovens. I use lightweight selvedge or 1/4" twill tape.


As for knits, my rule of thumb is if it stretches more than 5% in the lengthwise dimension, it doesn't get made into anything over 24 - 27 inches long. That means I'll make a skirt or top, but not a dress or slacks.


*************************************************************
umjudis said...


Sometimes the fabric itself doesn't retain the stretch well. When purchasing, you can try holding the cut end in your fist. Stretch the fabric around it or curl your fist around it and then let go. (Hope that's clear.) If it holds the imprint of your hand/knuckles, the fabric has poor retention & will stretch out of shape easily. I also add 1" seams to the side to allow for fitting adjustments.

****************************************************************************
Sz said...
A tip I've used when making knit pants - as in one seams in slinky is to serge some swimsuit (the clear 1/4 inch type) elastic into the vertical seams. It helps them to keep from sagging & bagging during the day.

Please note that I've only posted the comments that offered suggestions on how to solve the challenge of working with stretch fabrics - and these answers run the gamut from working with knits to working with fabrics with a percentage of stretch in them. 

I have to say that I've learned a thing or two from these comments and Marji I will only be looking for fabrics with 2% stretch in them now!  I thought 4% was good but from your sage advice, I will look for a lesser amount of lycra.

I hope that this has been as enlightening to everyone as it has been to me.  Ladies thank you sooooo much for offering up your suggestions, I really appreciate it!

Tomorrow, I will be working on the second dress in the Cardigan Series and I want to see if I can squeeze in one more piece before the weekend ends.  I am really in the mood to sew...so if you are missing your mojo...it's at my house! *LOL*

...as always, more later!

Thursday, November 05, 2009

New Sewists Thursdays - Stretch and how to work it!

I received this question from Kathy (spottedroo):

"So here is my new sewist question. Or really new sewist problem: stretch. I am having the hardest time getting my garments to fit right because different fabrics stretch by different amounts (even if they are not labeled "stretch." I made a pair of denim pants that fit perfectly. When I tried to make a second pair in a not-at-all-stretchy rayon woven it was too tight to wear. Then I made a third pair in linen, and within a day of wearing them they felt like they were falling off. And knits are even worse. T-shirts have been fine but I've made two knit dresses where the fabric has stretched vertically from its own weight. One dress started with the pockets at my hips and by the end of the day they were half-way down my thigh! Very discouraging. Any advice you have is appreciated!"

Kathy ~ I can answer your question regarding linen...well I've already discussed linen here on my blog in this post.

But this week I would like to do something a little different.  I always receive these wonderful answers/comments/suggestions regarding topics that are discussed in New Sewists Thursdays and I wonder if anyone ever reads them.  So this week, if you have an answer, a suggestion, or even a comment regarding Kathy's question...would you post it?  And in case you are wondering...no I'm not taking the easy way out.  I have this same problem with fabrics with lycra in them.  Sometimes they work and sometimes they don't...so I'm looking for answers too.

So talk to both me and Kathy...help us out!  I will make sure that all the comments are collected and posted so that we all will have easy access to the information...

Thanks in advance for your willingness to share!


Thursday, October 29, 2009

New Sewists Thursdays - Linings

I've received two questions on linings:

Tricia asks:
"I am always struck by how beautifully all your dresses are lined - with contrasting binding and looking so neat. This is something I struggle with. My first attempt at lining was with a particularly slithery fabric and it did not go well at all. So, I just wanted to suggest lining a garment as a future topic for your new sewist feature."

Michelle asked:
"In this week's NST I noticed you mention that you liked to line your garments. Once, I was reading a sewing blog (but the name eludes me at the moment) and she mentioned that she doesn't like to line garments because then she would have to dry-clean it...Do you have to dry-clean a lined garment?"


First can I recommend a fantastic book on linings called, "Easy Guide to Sewing Linings" by Connie Long.  This book is published by Taunton Press and is part of the Sewing Companion Library.  Copies can be found on Amazon.com and at www.alibris.com.  However, I can't believe that I paid $20 for this book in 1999 and now 10 years later the cheapest copy I can find is selling for about $45!!!  If you can find a copy of this book at a yard sale or a library sale or even if you can afford to pay the $45 for it, believe me it's worth it.

The best thing about this book is that it tells you how to line EVERYTHING!  Everything from a coat, jacket to a sweater...how to line around vents and how to make lining pattern pieces for patterns that don't come with a lining pattern.

ETA from MelissaL88:
If you search on the Threads site, you will find the book as a PDF download for $14. Then you can print it out yourself and put it in a binder.
**Thanks MelissaL88!!!**


The first few lines of the book by Connie Long state:
"I consider adding a lining the ultimate way to clean finish any garment I sew.  A lined garment does not cling, is more comfortable to wear, is easier to slide on and off, and looks just as good on the inside as it does on the outside.  Adding a lining to a dress or skirt eliminates the need to wear a slip.  Lining even the simpliest style improves the garment's finished effect and is an important ingredient in sewing clothing that rivals high-quality ready-to-wear."

And that in a nutshell sums up why I line garments.  As to the how-to, I find that dresses and skirts are the easiest to line and where I started my lining journey.  That's because I could use the actual pattern pieces to cut out the lining fabric to make the lining.  It is also where I would suggest that new sewists start.  You can realize success by lining a skirt and then move onto other garments confident that you can handle this new skill.

So you are probably asking how to do it right?  How about I share some online references on how to line that you can print out and use when making your next lined garment.

1.  Threads article on lining garments
2.  From sewing.org "Learn to sew - lining"

I feel like I'm not doing this subject justice - but each garment piece comes with its own unique set of challenges on how to line it.  How to insure that it hangs correctly in the garment and best enhances the garment.  That is why I think it's better to direct you to the teachers I had so that you get the proper skills in learning the task.

Fabrics to be used for lining:

As with all fabrics there are different types of lining fabrics...you can purchase a lining fabric from $1 to many tens of dollars.  Remember you get what you pay for it...less expensive can have more problems with sewing the pieces together, shrinkage, dye fastness, etc.  However, most sewists would recommend a rayon bemberg lining because it enhances the fashion fabric it is applied to...because it is cool in the summer and adds warmth to a garment in the winter...because it breathes...because it comes in an array of awesome colors and two widths...and mostly because it is a joy to work with. 

I have used other fabrics to line garments with also...things like china silk, silk charmeuse, some silky polyesters, some lightweight woven silks, and cotton batiste.  These options can be pricy or inexpensive it just depends on where you find them.  They also can add a luxuriousness to your garment.

As for the slippery factor...the fabrics that I choose for linings have the ability to ease garments on and off but I've never experienced the slipperiness of say a silk chiffon when cutting out.  But when I lay a lining fabric out, I do have my extra magnetic pincushions on the cutting table to lay at strategic spots so that the fabric doesn't slide off the table.  I've also been known to use a can or two of food for stability.  I also pin the patterns securely to the fabric before I cut them out...because I still use shears to cut out...not a rotary cutter!

To me, linings should always be pretreated before they are inserted into the garment.  As a newbie, I have skipped this step and lived to regret it.  My lining shrunk...my fashion fabric did not...my garment became unwearable...all that work gone because I skipped a step.  However, I am a lazy pretreater...almost all linings go in the washing machine on a gentle cycle with hot water...yes, even the silks.  I am even harder on them because I then throw them in the dryer for a few minutes taking them out while they are still damp and pressing them dry.  But using this method, I have never had a lining shrink once inserted in the garment.  I have had a few pieces shred or develop tears during the pretreatment process but instead of being upset, I've been glad to have that happen.  That showed me that the fabric I was using was inferior and would probably not withstand the rigors of daily wear.

The drycleaning question...ummmm...to me this is a personal decision.  I dryclean 99% of my lined winter garments and 75% of my lined summer garments.  I rarely wash garments that have lining and alot of interior work but that's me.  I know other sewists who have developed means and methods for washing lined garments because they don't like dry cleaning.  This is something that I truly believe you have to work out for yourself.

Okay here comes the encouragement part of the post! *smile*  You have to try lining a garment.  You just have to do it.  If it doesn't work...realize what didn't work and use it as a learning experience.  If it was the lining fabric...chose another one.  If there were problems inserting it...find out why it didn't work.  Ask your question on one of the internet sewing boards like Stitchers Guild or PR.  Use the online references above or purchase a good sewing book but don't give up.  The old saw that practice makes perfect is so true with all parts of sewing.  Mostly don't be discouraged...you will perfect the technique if you just.keep.trying.

I hope I answered most of your questions...again let me state that I'm not sure that I've given this question a fair shake especially if you are looking for instructions on how to line a garment.  But as with most of these new sewists blog posts the information is general with links to give you more detailed instructions.  Hopefully this will start you along the path and encourage you to continue the journey!  And as always if someone has something helpful to add to the conversation...please feel free to do so!

Pictures of the VOT Dress are up next - so stay tuned!!!

Thursday, October 22, 2009

New Sewists Thursdays - Fabrics

Sewing Mama asked, "How do you choose fabric for your projects?"

Oh boy is this a loaded question! *LOL*  Because I believe one of the hardest things for beginning sewists to understand is that each piece of fabric has a distinctive personality.  It has certain traits because of the way it was woven or knit, the weight of it, if it was yarn dyed or dip dyed and if a finishing was added to it ~ all of these things can affect the way the fabric handles.

So let's start at the beginning...when I first started sewing I did not use the fabrics that I sew with today.  There was definitely a progression.  As my skills progressed and as my paycheck increased (*smile*), I had the opportunity and the ability to deal with better quality fabrics.  I also had experience.  I knew what worked for me and my lifestyle.

The first thing I would suggest is to work with as many types of fabric as possible and RECORD your adventures with them.  Say you made a dress out of a polyester blend...and you found that it worked for the dress you chose and you were happy with the end result.  Write down what made it easy to work with...did it take a machine stitch easily?  Did it press well?  Did it work well with the style of garment you chose?  etc. 

You will begin to build your own database of fabrics and styles that you like and you will have a reference to refer to for future garments. 


Also always use the pattern envelope's suggestions for fabric types...that information is placed there for a reason.  The designer/patternmaker had a good idea of what type of look they were going for and the fabric suggestions are aimed at helping you achieve that look.  When I first learned to sew, I rarely chose a fabric outside of this guideline.  It was my bible for fabric selection.

Now there is always a piece that will defy explanation when you make it up.  It will be the right fabric for the garment type and still something will be off.  First you should know that it happens to everyone.  When I worked in a showroom in the garment district ~ the patternmakers would have the sample makers make garments in several different fabrications.  The garment that made it into the line was the one that worked well in the fabric.  Sometimes we as home sewists have to make a garment from several fabrications to get the one that works best too. 

But SewingMama is asking me personally, and I have to admit that I don't have a secret formula.  I could tell you to take this pattern, add this fabric, sew carefully and you will get a beautiful well fitted garment but it doesn't always work that way...let us not forget "The Cheerleading Dress"!  *LOL*  But I do know what fabrics I'm comfortable wearing, as well as what I like to sew.  I've learned that even though I like corduroy pants for warmth, I can't stand the sound of them when I walk in them.  I've learned that as much as I like moleskin ~ its too hot to wear in the late summer and yet very cold in the late fall when the temperatures start to drop...but it tailors beautifully!  I've learned that I like working with wool crepe and 100% wools but I don't really like working with gabardine that much...it won't hold a press...and I absolutely abhor working with chiffon...especially polyester chiffon!

I've also learned what styles work best for my body...okay that's another whole post but since I know what works for me and what fabric types I like to work with...that's how I make my choices.  But again can I stress that these choices are based upon my own sewing experiences...and once again I'm encouraging you to just keep sewing.  Keep trying.  Keep learning and keep making mistakes...cause even after 39 years of sewing, I still make them and learn from them!

I don't know why this came to me but it is so appropo for this post...there is a scripture in the Bible that goes...line upon line and precept upon precept...is the way things are built.  Okay that was definitely paraphrased but sewing is the same way.  It is concept upon concept...triumph upon triumph and even failure upon failure that builds a knowledgeable, well-accomplished sewist.

And as an update...
I will be sewing this weekend...and I will take pictures and share...as always...more later!

Thursday, October 01, 2009

New Sewists Thursdays - Topstitching

It's Thursday so let's get straight to it..

Cissie asks:
"As an experienced sewist, but new to sewing for myself, I need to take "Topstitching 101". Any tips on how to get a more professional look with topstitching? Threads, needles, feet, etc?"

I like to topstitch.  It gives me an opportunity to highlight a part of my garment as well as use some of my decorative stitches.  It is also a wonderful but easy embellishment that can be added to a garment.

But for the very beginner's let's first define topstitching:

"As a decorative finish, on the outside, topstitching is similar in function to edgestitching only more noticeable" is how The Vogue/Butterick Step-by-Step Guide to Sewing Techniques defines it.  Then they give some instructions on how to do it: 
"Straight stitch 1/4" (6mm) from edge, seam or previous stitching.  Use presser foot as guide, or stitch where indicated in instructions."

The Dressmakers Technique Bible defines it as:
"Topstitching refers to visible stitches on the outside of a garment which can be functional but are normally just decorative.  Topstitching on the very edge is called "edge stitching" whereas "topstitching" is sewn approximately 1/4" (6mm) inside and parallel to the edge."

The how to instructions are more detailed:
1.  Choose suitable thread.
2.  Lengthen the straight stitch to approximately 8-10 stitches per inch.
3.  Stitch as necessary keeping the work straight to avoid "wiggles" - love this!  :)

A couple of tips:
*Use this on lapels and edges of a jacket and on pockets
*Use the edge of othe standard presser foot as a visual guide or attach a stitch guide foot to the machine to help keep the stitching straight.

As an aside...this is a really helpful little book and I would encourage you to add it to your sewing library!  But back to the matter at hand!

There are topstitching needles available.  They have larger eyes (openings) and the ability to hold two or more heavier pieces of thead at one time.  Do I have some in my collection, yes!  Do I remember to use them, no!  *LOL*

Second - topstitching thread.  This can be purchased probably at the craft store masquarading as a fabric store.  Topstitching Thread is a stronger, thicker thead that gives a bolder finish.  Again have I used it...yes!  Have I used it lately...ummmm, no!

Personally I believe the key to good topstitching is to maintain a straight line throughout the area of the garment being topstitched.  It really looks amateurish if you have "wiggles" (I'm so loving that word).  Now The Dressmaker's Technique Bible gives you several recommendations for obtaining a straight stitch.  But me, I use regular old scotch tape.  Yeap, that's it.  I'm usually topstitching a finished seam and when I do that I lay the scotch tape evenly down the center of the seam and use that as a guide. 

Now this next point is really important when using the scotch tape method...YOU MUST STITCH BOTH SIDES OF THE SEAM IN ONLY ONE DIRECTION!  If by chance you stitch top to bottom of the garment for one seam, then flip the garment and stitch bottom to top...you will get a wrinkling effect that no amount of pressing will remove.  On this I speak from experience!  So always stitch from top to bottom or from bottom to top on both sides of the seam.


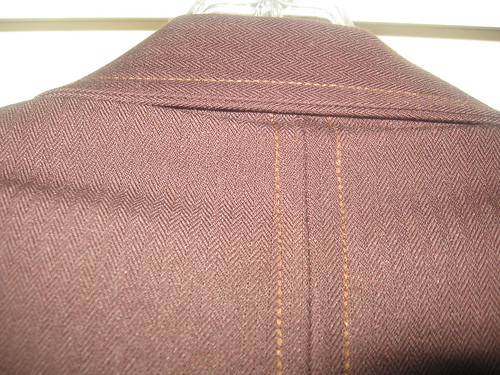
An example of topstitching on the back center seam of a jacket
as well as edgestitching on the collar.

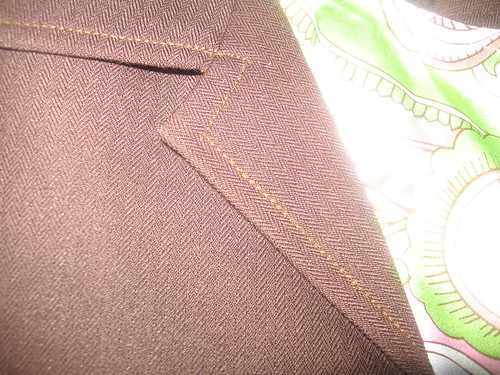
I also have been known to topstitch an edge or a lapel of a jacket.  When topstitching in those areas I always use the edge of my sewing machine foot as a guide...although if you have an edge stitch foot with your machine that would be great to use also.


topstitching on a jacket lapel

I love the line from the book that talks about topstitching thread having a bolder finish...and this is true!  However, since I am such a color stickler, you can't always match the topstitching thread with the regular thread you are using.  In those cases, I started using the decorative stitches on my sewing machine...starting with a triple knit stitch and graduating to a saddle stitch.  I don't know if these are standard on any other machine besides my Janome but it gives me that bolder finish I'm looking for!  Now I pretty much use one of those stitches and my regular Gutterman thread to topstitch...I know constantly making those rules fit my own world view!

But seriously, sometimes you can get some of the best results by taking a chance...being a little adventurous and doing something a little differently.

So to sum up:

1.  Topstitching is used to emphasis an area in your garment.
2.  It HAS to be sewn straight.
3.  You can use topstitching needles to perform this task but you don't necessarily need to!
4.  Topstitching thread is available to get a "bolder finish"
5.  Use your sewing machine foot to aid you with straight sewing...or your edge stitching foot.
6.  Don't forget to try my scotch tape method
7.  A decorative stitch can give you that bolder finish you want when topstitching an area.

Any questions, comments, suggestions...the floor is now open!

...and as an aside...I didn't get much finished on the jacket!  But it's suppose to rain all day on Saturday here on the East Coast and I'm in the frame of mind to shut myself in and sew!  I will keep you updated!!!

Thursday, September 24, 2009

New Sewists Thursdays is back!

Yes, I've finally gotten around to writing another New Sewists Thursdays post!  However, this post is a collection of information aimed at answering two specific questions.  The first question is from Elizabeth,

"I need a little encouragement. I am despairing that I will never reach tnt status with any pattern. Let me preface this with the fact that I am known for being a little impatient. Ok, a lot impatient. I know the fitting process is necessary but sheesh could it be a little faster please? Any helpful hints for us beginners that are not straight out of the envelope gals?"

I've written extensively on my blog about my journey with TNT patterns.  But the number one thing you must realize about tried and true patterns is that you HAVE to sew that pattern a multiple of times to end up with a well fitting garment and a TNT pattern.  You must be willing to wear the garment, figure out what you want to improve and then tweak your pattern.  And you must make it again and again...especially if you are not a wear it out of the envelope girl...oops person!  This is a process...sort of like a long distance marathon...not a sprint!  You may find immediate success with one loop around the track or you may need to run numerous loops around the track before you are satisfied with your final garment but in no way is this a sprint!

Here are the links to the previous posts:

The series on how my TNT Dress Pattern came to be is in three parts - Part One, Part Two, Part Three

Would you please TNT with me? - is about the reasons to develop a TNT pattern

This post details the list with a brief description of each one of my TNT patterns - 12 on a Desert Island

Various garments are detailed in some of the posts that I've labeled TNT posts.  You can scan through the search to read specific posts on construction or not!  *LOL*  I have to admit that TNT patterns are my thing!  Everyone has some specific sewing techniques that they are good at...this is mine.  Each person finds their own in their sewing journey but I believe that all sewists can develop a TNT pattern.

Okay next...

Karen asks, "I'm actually not a new sewist. I've been sewing for quite some time, but I'm new to knits. I desperately want to learn to sew knits, but I am afraid! I don't know where to start. I don't know what pattern to start with and what type of fabric to use. I have a serger and a regular machine with zigzag capabilities. Any suggestions/guidance would be appreciated!"

First, Claire who authors the blog, "clairekennedydesign.com" has written an amazing series of blog posts on fabrics which I think is a must read for anyone new to sewing or just getting back into sewing.  You can read her posts here!  They are detailed, include illustrations and should be bookmarked!

There are also several really good books that I would recommend you borrow or buy to learn how to work with fabrics and knits in particular.  They are:

Specific to knits:  The Stretch & Sew Guide to Sewing on Knits by Ann Person
and
Sewing with Knits, Classic Stylish Garments from Swimsuits to Eveningwear by Connie Long

General fabric books:  Claire Shaeffer's Fabric Sewing Guide and
Fabric Savvy and More Fabric Savvy by Sandra Betzina.

But Karen didn't ask about books did she...she wanted tips!  And after Lindsay's post today...I'm sure more of you are wondering if you can make knits work?!

So my tips...because I've sewn quite a few knit garments...

1.  Choose your knit fabric carefully.
I am really, really picky about what knit fabrics I work with...most of my garments are made from a knit with a little lycra in them...rayon/lycra knits being my favorite.  Now this is for closer fitting garments.  I've used more sweatery knits for cardigans.

2.  Stabilize key seams
I always, always, always stabilize the shoulder seams with twill tape, rayon hem tape or the selvedge edge of a woven garment.  I don't want them sagging from the pulling on and off or the day-to-day wearing.

3.  Use the correct needle and thread for the garment
Both Claire and Sandra's books give detailed information on what type of needle, thread and length to set on your sewing machine to use with knits.

4.  Learn to use the best techniques that you can! 
Again I'm going to refer to the books referenced above.  I read and sewed based upon the information gleamed from the books above.  You will be amazed at how many little tips you pick up!  Or if you are a more visual learner try Nancy's Notions..."Sew & Go Knits DVD".  She offers her show online at Sewing with NancyTV.  If you click Nancy's Favorites, there are two shows on Knits - Easy Fit, Easy Sew that you can watch at home at your convenience on your computer!

5.  Keep working with the garment until you get the fit you want! 
Oh drat there I go again not encouraging quick and fast results!  *LOL*  But seriously, how do you know what works for you if you don't experiment and then try again when something doesn't work?  Remember my earlier analogy a marathon...not a sprint!

Now a few disclaimers...being a plus size girl and liking a looser more relaxed fit, I don't have some of the stretch and recovery issues that someone desiring a closer fit might have. My garments typically don't lay right against my skin as many of the tees and tops that most women/men sew.  Let me emphasize again that this is my preference.  I don't like overfitted, too tight tops or dresses...they make me uncomfortable, however, someone else may be more comfortable.  So I tend to treat knits like wovens...the point is for them to glide over my body but have a little more stretch than a typical woven.

I also only sew a few types of knit garments...cardigans, loose fitting tees, tanks and dresses.  You have yet to see me make a wrap dress...can't figure out how to make one without looking like there is a war going on beneath the dress in the back!  I haven't made one of those wrapped/knotted front tops that are everywhere...another popular sew.  My pieces are more classic in nature and I've been sewing them for years.  BUT, I've had my share of disasters, oops and garbage pitches...again, you just have to get up dust yourself off and try something new.  Or if you truly don't want to work with knits...let it go!  There are so many other things to sew and adventures to have...it's a personal decision.

Can I also note here that I've been sewing since I was 11 years old and that I've learned much of what I know through books, TV series, videos and DVDs and from a few sewing classes that I've taken.  The reason I emphasize books and sewing shows is because I've learned so much from them. 
Sorry that this post has been more of an encouragement post than one chock full of information...but sometimes I think that's what we sewists need!  A pat on the back...a word or two of encouragement, understanding and support...and a shove back into the game!

Please continue to send questions to me for future blog posts...and I will share my next finished project with you soon!

...more later!

Thursday, September 03, 2009

New Sewist Thursdays - Pattern Sizing

Well it's Thursday again, so it's time for another "New Sewists Question."

Jodie writes:
"Here’s a suggestion for a new sewist question/answer. I’m a Jr. High Home Ec. teacher and one thing my students find confusing is pattern sizing (don’t we all). It might be a good idea to let the new sewers know that dress sizing and pattern sizing are not the same. Also some suggestions about what measurement to base their pattern size on (hip/upper bust), etc. might be good…."

I know that this is a challenge for new sewists because it seems that when you go to the pattern counter you should be able to pick a pattern based upon the size that you wear in RTW. And many new sewists are surprised when after making the garment per the pattern instructions, it does not fit.


The reason for this is because RTW garments don't have a standardized measuring system. Each designer/manufacturer is allowed to determine the sizing for their garments. It is the reason why you wear a size 8 in one line and a size 12 in another. Patterns, however, work on a set of measurements that are pretty average from pattern line to pattern line. Please note that I said "average" because the amount of ease in a pattern line is a whole 'nuther discussion!

So let's take this step by step. Before you hit the pattern counter, book or internet site, you MUST get a proper set of measurements taken. I know some think that a proper set is bust, waist and hips but that is actually just the starting point. I wrote a blog post on the extensive measurements I've taken, you can read it here. I truly believe that the more measurements you have, the better the fit you achieve. The big 4 pattern companies have a tech center or a place where they explain how to take measurements for using with their patterns...here is a link to the Vogue site.

When taking the measurements, be truthful. Don't fudge the numbers, don't get upset about the numbers and don't be scared of the numbers. Because everyday your body wakes you up and gets you through a day...treasure it. It's yours and it's precious.

Measurements are taken best when a friend is involved. That way you don't have to get into contortions or inadvertently read the tape measure wrong! *smile* Once again, I advise taking as many as possible...it can only help!

Now this next part is controversial. What measurements do you use to purchase a pattern? Personally, I think this is subjective ~ that there is no hard and fast rule. Because what works for me...may not work for you. But I know that people like rules. So the standby advice is to purchase a pattern that is closest to your actual bust, waist, hip measurements. The new advice is to purchase by your high bust measurement...but I don't do that! *LOL* I purchase patterns by my largest measurement which happens to be my hips/behind measurement. Though I think a new sewist should stick with the original rule of bust/waist/hip because you don't know what does and doesn't work for you yet.

As with all things sewingwise, there are exceptions. If you are a more experienced sewist, you have worked out the exceptions. As a beginner sewist you have to realize that this is a process. None of us were experts at the beginning...we worked through the challenges...even enjoyed them as we learned how to purchase the right style and size to fit the pattern to our bodies.

So to recap - to purchase the right pattern...you need an accurate set of measurements...once you have your measurements...then and only then do you want to look at the pattern tables to come up with the pattern size you need. Only after getting a clearer picture of what size you would be in a pattern, do I suggest purchasing one.

Okay some news & updates:

1. New Sewist Thursdays will be on hiatus next week. I'm on vacation and plan to sew, sew, sew so I will probably be blogging about my sewing progress.

2. Colleen will do another fitting post later in the month. I know you were looking forward to it this week but it will come...be patient! *smile*

3. Please continue to send questions to my email address. However, kindly remember to put "New Sewists Questions" in the subject line. I almost deleted one the other day!

Lastly...September is National Sewing Month! Please make sure that you support the month in some way since sewing is our artform and one that we are all so very passionate about!

I start vacation tomorrow afternoon and I'm soooooo excited. Sleeping late, watching junky tv, spending a little quality time with my main man, Danny and sewing, sewing, sewing! I'm going to try and remember to change out of my floppy t-shirt...but there are no guarantees! *LOL*

...and as always, more later!

Thursday, August 27, 2009

New Sewists Thursdays - A Primer on Fit!

Colleen says:
I make my living fitting bodies. I’ve been doing it in some form or another for almost my entire life time. My skills have evolved into a paycheck coupled with international travel for companies that I’m sure you know of and most likely own a piece of clothing or lingerie by one of them. In short, I’m good at what I do – but here’s the secret -- people overestimate the skills needed to achieve a good fit.

Many home sewists grow to fear it, they leave fashion sewing and start crafting, or quilting or making home dec items because the ever elusive ‘fitting’ is too difficult. I’m here to tell you – it isn’t!

I’ve known Carolyn for probably 15 years and we have many shared fun moments around our families and our sewing machines. If you bribe me with chocolate, I’ll tell you how she used to fit garments before we met and I gently guided her in a more suitable direction.

Carolyn asked me to share some very general points in a first of several blog posts on what constitutes good fit and some tips to achieve it. Obviously I can’t cover everything in a blog format, but I’m hoping you can take away a few things that will enhance your future projects.

Perfect fit:

Perfect fit, does not always give you the most flattering garment. The idea is to flatter your figure, not just fit it. I’m a plus sized woman, I can make any garment for my body, but I’m steering clear of the bikinis and micromini skirts. . . they don’t flatter me.

Labels:

Instead of spending time to label your perceived figure flaws, I recommend you simply embrace your figure and keep fitting and fitting and practicing!

Fabric:
Fabric weight and weave can make or break a garment – when you decide on a pattern, take a shoping trip and find a similar style and feel the weight of the fabric that works for the garment shape.

More than Measurements:

A perfect set of measurements isn’t going to make the pattern magically fit you because it is the relationship of those measurements sitting next to each other that is going to give you a good fitting garment.


Think of this for a moment. You are a bird, sitting in a tree, looking down on a snowman that someone built below you. What you see from above is three circles, one inside the other, perfectly nested inside each other.
If you took the measurements of the largest point around each section, you could put pencil to paper. And draw out a pattern and it would wrap around this and zip up the back without problem and Ms. Snow Fashionista would be out the door. . . However – we aren’t all built with our measurements equally distributed off of one main center column as a snow person is.

Commercial sewing pattern measurements give several key measurements to work with; however they don’t speak to how those measurements relate to one another.

What if the snow person has a middle section that is the perfect measurement, but what if it is pushed far forward, overhanging the lowest section? Would the commercial sewing pattern still fit perfectly if the measurements were exactly what they called for? Hmmmm, the answer is ‘it depends.’

(for the record, every student I’ve ever taught would sigh heavily when I uttered the words ‘it depends’ as they knew they weren’t getting a short yes/no question answered!)

First, let’s look at what she’d look like from the birds eye view. Her head and hips are in the same location – all the measurements are the same as the pattern, except this time her mid section is repositioned more forward.

The finished garment will not fit as intended because the position of the measurements in relation to the others is not the same.

I use this example over and over to illustrate if a woman has a larger than a B bust cup. Commercial patterns are under the assumption that the bust on the person wearing the garment is a B bust cup. But what if you are a “D” bust cup, and you buy a pattern based on your larger fuller bust – the pattern is still not going to fit well because the pattern assumes you are the ‘regular’ snowperson all aligned in the center or ‘normal’ position, but instead your body pulls the fabric forward to cover your bust, and you are left with drag lines (lines in the garment that pull or twist and don’t look pleasing to the eye).

My long winded point in illustrating all of this is to help you learn that the ‘relationship’ of measurements next to each other is as important as the measurement itself.

LEARNING TO FIT:

How did you learn to make your bed and smooth out the wrinkles? You put on the fitted sheet and it was nice and tight and smooth, then you snap the top sheet over and it lands in soft folds on the bed. Then what? Your eyes look at the cloth and you read the wrinkles and instinctively know which corner or edge to pull to smooth it out. Fitting garments is as easy as that – read the wrinkles and smooth them out.

While I see the merit in writing books on fitting ‘methods’ and ‘techniques’ – many many of them if learned and studied and followed thru on will give you beautiful well fitting clothing – what I don’t see is having to have a Ph.D in fitting in order to enjoy garment sewing!

So, smooth the wrinkles to the edges (seams), fold out any corners, creating tucks (darts) and soon you’ll be fitting clothing as easily as making your bed.


The secret here is to not only think of the measurement at hand, but the adjacent ones. In other words, if you want to make a dress to fit the snow woman who’s middle section is forward, you need to have a piece of cloth that will not only accommodate the lower section measurements (the hip) but also take into consideration that the abdomen extends further and that must be added (see the red line on the right is slightly longer on the snow woman than the original – EVEN THOUGH THE MEASUREMENTS OF THE INDIVIDUAL SECTIONS ARE EXACTLY THE SAME)

(Another way to think about this is to picture having to wrap the snow woman in paper like a gift. When you lay the snow woman down on the paper and pass the paper over the top of her, you need to accommodate that middle piece that extends past the larger section, so you have enough paper to wrap it all up in – if you cut the paper only long enough for the longest measurement, it won’t be long enough!)

I’m obviously oversimplifying this and not giving specifics on ‘how’ to accomplish this, but my main objective is to simply open your eyes to the ‘why’ your patterns aren’t fitting even when you painfully take exacting measurements and match them to the patterns you purchase.

Here is what I tell students to have fun with: Make your bed for the next week, paying attention to your natural ability to smooth out the cloth and make it nice and flat for each layer of your bed. THEN for the next few days, throw a pillow in the center of the bed and smooth out and make folds (darts) around the pillow to make a pleasing bed that way. After that, put something tall, like your bathroom trash can in the bed, and fold and dart around that. Play with it; see what fits it and what flatters it into a nice pleasing eye. Practice gift wrapping odd shaped items for fun. Paper is not forgiving – you will learn lots of things wrapping balls, or eggs, or flat bottomed bowls etc. Start analyzing the draglines and drapes in your garments, and start smoothing them out into seams and darts to fit better.

...so that's the end of Part 1 of Fitting with Colleen. If you have any questions or need clarification on any point, please leave it in the comments section. Colleen and I will be monitoring the comments and then will do another post to answer your questions. Please realize that this is a "starter" post on fit. No one achieves fit overnight or magically. It is something that is worked on and perfected. You just have to be willing to start and press forward until you've reached your goal...not giving up when faced with obstacles...sort of like me and invisible zippers! *LOL*

If you want to see Colleen's fitting abilities in action - these pictures are from 2004 with Colleen fitting my Uniquely You Dressform to me! The pics will only be up to the weekend...so enjoy!
And as always...more later!

Thursday, August 20, 2009

New Sewists Thursdays - Needles and Thread!

I still remember the first time I made something and it worked...both for my Barbie doll and for me. I remember the feeling of accomplishment and how empowering it felt. I knew that there wasn't anything I couldn't make if I put my mind to it! I also remember the awe (my own) and others when they realized that I had created something with my two hands. I was 11 years old and that's when I fell in love with this artform called sewing.

So it is very important to me to encourage new sewists! And in that vein we are going to step away from the technique questions this week and discuss some basics. Because believe it or not I've received quite a few basic sewing questions...

The first questions are from Theresa. She asks...

1) Thread - What type of thread is best for garment sewing? Quilters use 100% cotton thread for quilting because the thread will break before the fabric rips which is preferable as the repair is easier. Does this same theory apply to garment sewing? Does the type of thread depend on the the type of material?

Whew....this is a post unto itself! But since we are keeping it basic and assuming that you are just beginning to sew, I would recommend either a 100% polyester thread by Mettlers or Gutterman for garment sewing. To me these are better quality threads than Coats and Clarks and produce a superior sewn seam. (say that 3x!) However, if Coats and Clarks is all that you have available, by all means use it. I started out sewing with C&C and I made great garments using it.

I would, however, strongly caution anyone from buying and using the thread in the bargain bins! Gutterman and Mettlers use long fiber technology to ensure an even and optimum thread quality. The thread in the bins have short fibers, can be really fuzzy and doesn't feed evenly in your machine. Thus causing a lot of lint to accumulate in the crevices of your sewing machine, as well as, the thread to constantly break. It may be a cheap alternative but remember the old saw that you get what you pay for!

Threads Magazine did a great article recently called, "How Thread is Made and How it Affects Your Sewing." It's in the September 2009 issue and it's chockful of wonderful information on the process of creating thread along with how to choose the right thread for the job. There are three memorable points:

1. Don't match thread to fiber content

2. Don't rely on size alone when selecting the best thread for your project.

3. Do match your needle and thread

and finally a Carolynism...do match the color of your thread to the colors in your project!

If you don't have a copy of this issue, please get one! It will give you a greater understanding of thread and when & how to use it. BTW, there is also a great article on pressing while sewing in this issue also called "Learn the Right Way to Press as you sew!"

Should the bobbin thread be the same brand & type & color as the top thread? Does the quality of thread vary greatly with price?

Personally I find that I get a better stitch quality and seam when I use the same thread in the bobbin and in the machine. I rarely mix threads unless I need a different color for the top and the bottom of the garment. Now of course there are exceptions to this rule but we are going with the very basics here.

As for quality and price - please refer to the portion above about bargain thread versus regular priced thread! There is a difference!!!

2) Machine needles - I very rarely change my sewing machine needle 'cause I forget that it should be done. How often do you recommend changing the needle and what needle size is best for garment sewing?

Ohhhhh I'm getting ready to seriously burst your bubble. Please, please, please change your needle IMMEDIATELY! I change my needle after every project. Especially since I don't sew the same type of fabric from garment to garment. You want to achieve the best stitch quality so you need to use the right needle for your fabric. Also during the course of sewing a needle can get nicks, the point can become dull or the needle can develop burrs...these conditions will affect the stitches your machine makes...so another reason to change your needle often.

As you may or may not know, needles come in sizes. Each size is to be used with a specific fabric type. The smaller the number of the needle, the finer the fabric.

Then there are also different types of needles:

Sharps - have a sharp point for piercing fabric - comes in sizes 60/8 through 120/20 and used for heavyweight or densely woven fabrics. Also good for decorative topstitching.

Universal - has a somewhat rounded tip for piercing fabric - comes in sizes 60/8 through 120/20 - used with all types of fabric

Ballpoint - has a rounded tip and used primarily with knits.

Twin or double needles - Are two needles attached to one shank and usually has a distance between the two needls from 1.6 to 6mm. These are used for decorative stitching and hems.

There are also Wing, Topstitching, Denim/Jeans and needles for stitching on leather.

Needle sizes:

For a wonderful explanation of needle sizes - what the numbers mean and what types of fabric they should be used to sew...about.com has a great article about it here. If you want a chart that you can print out and put near your sewing machine - try this one. And finally a few tips from the book, "The Experts' Book of Sewing Tips & Techniques."

Coats & Clarks recommends the 8-hour rule. They suggest that a good sewing machine needle is only good for about 8 hours of sewing and should be changed after 8 hours.

C&C also recommends keeping your needles clean by removing fabric finishes that can build up on a sewing machine needle resulting in skipped stitches. To clean the needle use a cotton ball with oil, detergent or a cleaning solvent. Sew a line of stitches on a scrap piece of fabric before using the "clean" needle in your good fabric to remove any leftover residue.

*Personally I've just used a little alcohol on a cotton ball to remove any fusible interfacing or gook from my needle and this has worked fine. But that's what I do!*

C&C also advises you to discard any needle that is less than perfect because you don't want it to snag your fabric.

Finally can I add some "Carolynisms"

1. Keep a supply of Universal needles in all sizes on hand so that you never run out in the middle of the night.

2. Keep thread in a dust-free environment to prevent lint issues as well as maximizing it's shelf life.

3. Thread does have a shelf life. If your grandma gives you some thread from 25 years ago, check it carefully because it may cause problems in your sewing machine.

4. Discard needles carefully and if you happen to break one while sewing, make sure that you retrieve all of the pieces from your sewing machine. One small piece or shard can do some serious damage to your sewing machine.

Okay that's it for today! I really hope you've learned something or at least you will pick up the Threads Magazine referenced. The floor is now open...any comments, suggestions or questions are welcomed! Also if you have another reference (internet, book or magazine), please feel free to share it. Personally I believe the more information shared ~ the better!

Next week for New Sewists Thursdays - there will be a guest blogger who will do a two-part series on "How to Fit." Since September is National Sewing Month, some of the topics featured for New Sewists Thursday will be on picking a pattern for your size, some more fabric information - of course! - and another detailed post on a technique.

As always...more later!


Thursday, August 13, 2009

New Sewists Thursdays - Sewing Sheers

It's Thursday again and time to share another new sewist's question:

Tanya asked...

"I’m pretty much a newbie when it comes to garment sewing, but I’m filled with ideas and excitement about the possibilities. Right now, I’m working on a dress for a friend’s daughter (Vogue for Me 7681, view A, but modified to be shorter and have a separate sash). My friend bought the fabric, which is a polyester chiffon for the overskirt, and what is supposed to be peau de soie for the actual skirt and bodice, but isn’t. It looks more like cheap lining material. In any case, the fabric is a flimsy, slippery mess that is giving me fits; it’s difficult to cut pieces properly, it stretches all over the place, and is generally uncooperative. Even basting it is tricky. Do you have any tips for working with slippery fabrics?"

So since my sewing friend Gigi has been sewing with sheers alot lately, I asked her to handle the question for me! If you don't already know Gigi as one of The Sewing Divas or as the author of her own blog, Behind the Seams...she kindly gave me a little background:

Gigi has enjoyed sewing and needlework since childhood. By the time she was in high school, she was completely addicted and hasn't stopped since. She sews every chance she gets and, when she isn't sewing, she enjoys collecting beautiful fabrics, sewing books, patterns and sewing machines (with a particular passion for industrials!). Her Sewing Empire is located in South Florida where she lives with her three kitties.

I would like to thank Gigi for so graciously accepting my offer to be a guest blogger and then taking the time to answer Tanya's question...so without further ado Tanya here is Gigi's advice....

Sheer, slippery fabrics can be intimidating for even the most experienced sewist! The first battle is cutting out the fabric because it wants to slither all over the place.

To make your fabric behave:

*Tape examining table paper or old newspaper (so the ink doesn't rub off on your fabric) to your cutting surface. Pin your fabric to the paper and cut through both the paper and fabric layers. A bonus will be duplicate pattern pieces which can be used as templates for staystitching. Simply pin the fabric to the pattern, staystitch, then tear the paper away. This will ensure that the fabric retains it's intended shape and size.

*If you're using a rotary cutter, simply tape your fabric to the mat before laying out your pattern pieces with weights. Be sure to use a new blade so that you get very clean cuts.

*It may seem silly, but gently blowing on sheers as you lay them out is an easy way to get everything lined up.

*If your fabric is washable, use spray starch to give it body and make it more manageable.

*Since the right and wrong side are often indiscernable, I like to put a small piece of tape on the wrong side so that I don't accidentally end up with two left sleeves!

Seams and Hems:

Because seams will show through to the right side, they should be narrow and neat. Good seam choices are:

*French seam


*Flat-felled seam (great for crisp sheers)

*Narrow overlocked.


The overlocked seam is not my favorite but it's fine when you want something fast and easy. For better wear, I would stitch with my regular machine and then trim down the seam allowances to 1/4" with the overlock.

I like to use a fine Microtex needle for sheers along with a fine thread such as Coats & Clark Fine. It's not a true necessity but it does give a very nice result. Because sheers and silkies can be very unruly, it's especially important to sew directionally.

As a rule, hems should be either very narrow (rolled) or very wide (double-folded).

It’s also possible to simply bind the hem. Narrow rolled hem:


Hem finished with bias binding:


Interfacing:

Silk organza is my interfacing of choice. Look for one that's close to the color of your skin. Depending on the fabric you are using, you may also be able to use self-fabric. Interfacing can be basted in or (as I prefer) held in place with a few dots of glue stick in the seam allowances.

Shopping for Fabric:

I prefer to work with either silk or rayon sheers. They drape beautifully and are a joy to work with. If this is your first time with sheers I recommend you stick with natural fibers. Yet, sometimes I am seduced by a pretty polyester print. Polys are more difficult to work with as they tend to pucker and are more difficult to press well. Breathability is also a factor. To check for breathability simply blow through the fabric. If you can feel your breath on the other side you are safe. Generally, poly georgettes and open-weaves are your best bet.

Pattern Selection:

My favorite type of garment for sheer fabric is, by far, a blouse. I look for styles with clean, simple lines. If a garment has facings, you’ll want to replace them with bias binding or a very narrow rolled hem. Shirt plackets work best if they are cut on and self-interfaced. I also love garments with tucks of any size, which look absolutely beautiful in sheer fabrics. Of course, dresses and skirts are also a possibility but will need to be either lined or partially lined.

Tucks on a white crinkled silk:


Here are some nice current patterns that would work well with sheer fabrics:

Simplicity 6891


Some sheer garments from my closet:


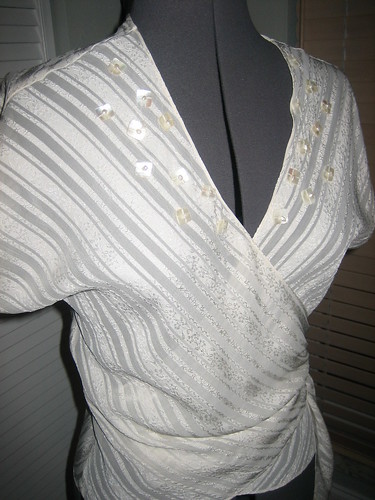
Silk ribbon chiffon wrap blouse. Here, I've finished the neckline with a very narrow rolled hem:

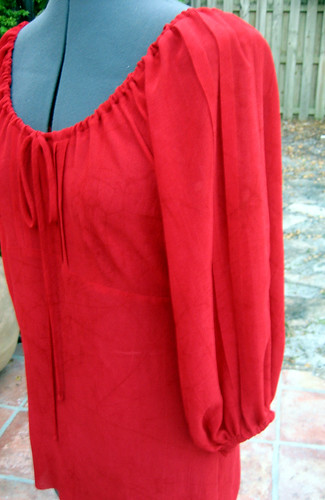
Silk chiffon peasant blouse. Hem is narrow rolled and the sleeves and front edge are finished with bias binding.


Silk organza "jean" jacket


So questions? Anything you don't understand or need clarification on? Please feel free to post your questions and like last week, I will post another blog post with answers or clarifications!

I really hope that not only the new sewists but some of us more experienced sewists are enjoying this series. I know that I've learned a thing or two! *smile* I would like to thank Gigi for so graciously sharing her knowledge and all the wonderful pictures of her garments! Please visit Gigi on her blog where she shares all of her sewing adventures.

Next week you will be stuck with me again! *LOL* But the end of the month will see another guest blogger discussing how to attain the best fit! So stay tuned...

LinkWithin

Related Posts with Thumbnails