Showing posts with label Christine Haynes Patterns. Show all posts

Thursday, December 22, 2022

Think Twice, Cut Once...

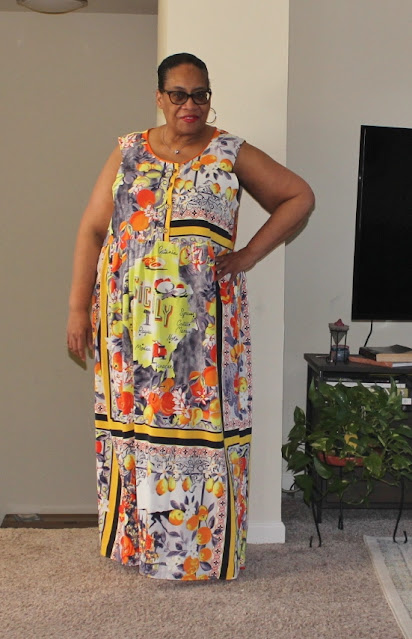
Originally I titled this post, "Remaking" but as I got into it I realized that Think Twice, Cut Once is way more appropriate. As you know fabric drives my creative spirit...and I've been looking for a fabric like this for awhile. It reminds me of some Dolce & Gabbana dresses from a few seasons ago.

Anywhoo, I found this RTW duster on HSN for sale. The fabric was everything I'd been looking for but hadn't found for an exorbitant price. So I purchased two of the largest sizes which were a 2x.

They arrived in a few days and I spent a couple of evenings ripping them apart. There was enough fabric to make a short sleeve maxi dress...the summer maxi dress of my dreams.

That was the easy part.  Deciding exactly what pattern to use, making sure that there was indeed enough fabric for my hopes and dreams, and then pinning and laying everything out, going over it several times, before finally taking a deep breathe and making those first few cuts...

Here is what I ended up with...


Now how did I get here...

First the pattern:

I used my Christine Haynes Verano bodice for this dress. The skirt is made from the two back pieces of both dusters.  They had the length and width I needed plus a bonus they were already hemmed. 

This is the third time using the Verano pattern so I would say it's reached TNT status.  The title of the post, Think Twice Cut Once, is because I had to cut the backs twice. I thought I had two different backs but ending up cutting two of the same side.  Not good.

Supplies:

Fabric ~

Using this fabric is like working with a border print, so I had to slow down the construction a little to think about how I wanted the finished dress to look. Also what I was willing to put up with since I had no extra fabric to pattern match!

To cut out the fronts, I used the already cut, interfaced and topstitched fronts...

The backs came out of two of the duster front pieces. I used the remaining front to cut facings.  Yes, facings.  

Piping & Buttons ~

In my mind's eye, I'd seen the bodice with piping and matching/coordinating orange buttons.  I just KNEW I had both in my abundantly equipped notions stash. Well yes and no...

I did have an orange ribbon that had polka dots on one side and was solid on the other.  I could make the coordinating piping using the ribbon and some purchased piping as the insert.


I did have a cache of orange buttons...but none worked. That meant I was going to resort to my favorite button matching method - covered buttons.  Which I do have a stash of for moments like this. However, when I went through the plastic bin that holds my covered button making stash, I found a bunch of other buttons in the bottom.

While the buttons don't match, they do coordinate with the fabric and the piping that I'd inserted. So I used them because I'd been dragging my feet on making the covered buttons.

Next I used facings to cover the piping. Since my fronts were already sewn down I needed to move away from the instructions and figure out how to make it work. The facings solved my issues.

Once the bodice was complete adding it to the skirt was no problem...

Here are my remade RTW dusters...

I have no idea why I only have one earring on in these photos?


I thought this was going to be a quick one day project even with the piping.  However, when I cut the backs out wrong, I set the dress aside and decided it could wait for my sewcation. BTW, RTW garments whether purchased new or thrifted are a great source of interesting fabric. And in this case solved a fabric desire and ended a chase.

I'm thrilled with the finished garment.  While I wanted short sleeves, once I chose the Verona bodice, I decided I didn't want the "challenge" of making and fitting a short sleeve to the bodice. It was supposed to be a fun, easy sew and I'd already complicated it with the piping & possible covered button situation.

I finished this garment during my Summer Sewcation.  As mentioned before, I didn't feel like taking pictures earlier this fall. So here I am - sharing them now before 2022 becomes a distant memory!


...as always more later!


Friday, September 10, 2021

A Seersucker Verano Maxi

As you know I loved my denim Verano. It was perfect for early spring and will be wonderful for the fall/winter season too.  However, I really wanted a summer version.  To me one of the best features of this pattern is the number of views offered.  So for my Summer Seersucker version, I'm using the top and full maxi skirt version.

This was one of the projects I took to Sew Camp and finished there.

Supplies ~ 

Yellow striped seersucker given to me by a friend over 20 years ago. It was from her aunt's stash who had passed and she gave it to me knowing that I would use it.  Even though it took a minute, I'm so glad that I finally used this deep stash fabric.

Yellow striped bias binding from Gaylen's notions stash

4 yellow 7/8" buttons from the button collection

Pattern Alterations ~

The other challenge with my original version was the low armholes.  I solved that for fall/winter by wearing t-shirts and turtlenecks under it which worked perfectly. Since I need this one to be sleeveless, I'm altering the front and back bodice piece armholes.

I really like how the armholes fit on my Myosotis bodice.  So that's where I'm starting to get the better fitting armhole for the Verano. Using the Verrano front bodice piece over the front of the Myosotis bodice, I matched center fronts.

* Then I added another inch to the side underarm seam.

* A 1/2" extension to the shoulder seam

* Blended between the two to get a higher underarm seam

I made the same adjustments to the back bodice pieces. Next time I will take a pinch out of the front and back armholes to make them fit just a little closer to my body.

The other change I made is that I did not cut the maxi skirt portion using the pattern pieces. I went with my standard full yard fabric. Which translates to 2 pieces that are 60" wide and 40" long.

Once finished it was too loose.  Now I like loosely fitting bodices but this was loose even for me.  To fix this I added ties to the side and loosely tied them together in the back.

The ties were cut 18" long and 3" wide.  I used 5/8" seam allowances all the way around and inserted them into the side seams using the 5/8" seam.  I wanted them to be long and wide enough to be a statement yet compatible to my bodacious body.

A Few Photos ~


Wearability Report ~

The day I chose to wear the dress to work was a perfect day.  It was a mildly hot summer day and the dress performed perfectly ties and all.  The only change I would make is to make the side slits higher. I cut a lot off the hemline which affected the slits on this one.

I will make another one of these next summer...cause summer is almost over and I have a few more pieces I want to make before it's finally gone!

A Parting Shot ~

My daughter was really into certain spots in the complex during this photo shoot. So she had me climbing the hill to take pics. Of course, the littles were with us!


There's more to share and it will be up on the blog soon...


...as always more later!


Thursday, March 11, 2021

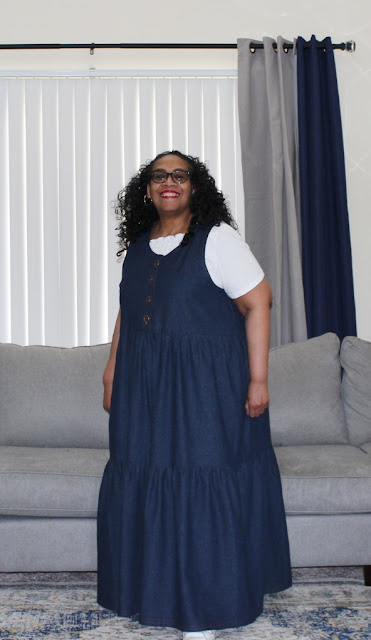
Verano in Denim

I love big, flowing, long dresses for summer and at home.  Since I'm home a lot these days (I wonder what this will look like to re-read in 5 years!) I thought a denim version of this pattern would be excellent to swan about in. When we're allowed to go back to work in an office (I have hope that it will happen in 2021) I will be able to swan about the streets of NYC in it.


Last year I purchased several patterns with this silhouette. My goal is to try them all out this year and then remake the heck out of the ones I love wearing! This is a style and silhouette that I really enjoy wearing. In changing up my home and work wardrobe, I'm going with the flowy and loose fitting especially for spring/summer wear.

As I said in a previous post, I'm sewing more indie patterns now. I've always wanted to make a Christine Haynes pattern but her designs didn't really fit my vision of my lifestyle. This one is absolutely perfect for who I am now AND it came in a paper pattern. Woo hoo for paper patterns! *LOL*

(photo credit: Fancy Tiger Craft Fabrics)

Supplies ~

Indigo blue denim purchased from Stylemaker Fabrics last month - it's available here

4 - 1" buttons from #deepstash in the button collection

blue/white floral bias binding from Bessie Pearl - previously used on the Simplicity denim jacket

Construction ~

I resisted my tendency to change the pattern prior to sewing it. Learning from the challenges of my jumpsuit pattern, I took my measurements and cut out a size 3x.  However, as originally designed, the bottom tier grazes the ankles and I wanted long, flowy and sweeping so I added 5 inches to the bottom tier.

Otherwise this was easy to sew. I did however, make a change to my darts.  They were a little low when I tried the top on. It was an easy fix, I just angled them differently.  Will make the change to my paper pattern.

Also, the armholes are very low. Way too low for me to wear without a top underneath it. Thankfully that was the plan for this version. Again I will make a change to the paper pattern to rectify this for my next version.

I cut the pockets out and went back and forth about adding them.  Finally putting  them in at the last minute probably because they were so easy to add to the second tier.

Now this dress is all about the gathered tiers. I know some sewists hate the gathering process but it doesn't bother me. I find it kind of meditative usually doing it while I watch a TV show. 

Gathering Tips ~

Here are a few tips I use when gathering huge swaths of fabric.

1. I don't use the gathering foot for large amounts of gathering because I can't control the gathering.

2. For really long pieces of gathering I don't use the two row method. I use the zig zag over dental floss method.  The dental floss is coated, glides through easier and is thicker than thread.  So there's no breakage.

3. I use a lot of pins and take the time to walk through the gathered tier to insure the gathers are equal all the way around.

4. After it's gathered, I stitch it down. Sometimes removing the pins and readjusting the gathers at the machine.

5. I take my time. I want the gathers to look even all the way around.

6. The gathered seams are pressed flat.  

7. Then I serge the seam close to the seamline and press again.

A Few Pictures ~


I LOVE this dress! It is everything I want in a dress. Comfortable, full and flowing. I wore it all day and will probably make only one more change. I think I'm going to shorten the middle tier 2 inches so that last tier's seam hits a little higher on my leg.  Otherwise this is how I feel about it...

I will definitely be making another one and I highly recommend that if you're looking for an easy to sew, easy to wear spring/summer dress that you get this pattern too!


...as always more later!


LinkWithin

Related Posts with Thumbnails