Showing posts with label The Katie Dress. Show all posts

Monday, April 17, 2023

A Sunflower Katie

For this make, the panel fabric totally drove the idea. I saw this fabric on Julia Allisson Cost's IG account and I knew I had to have some because...

Sunflowers are one of my favorite flowers.  They remind me of my grandmother's garden and the summers I spent on my grandparents farm. BTW, it was my grandmother who taught me how to sew.

The fabrics come from Julia's hand painted art.  Which means the fabrics are different and unusual and that always excites me. 

The Pattern:

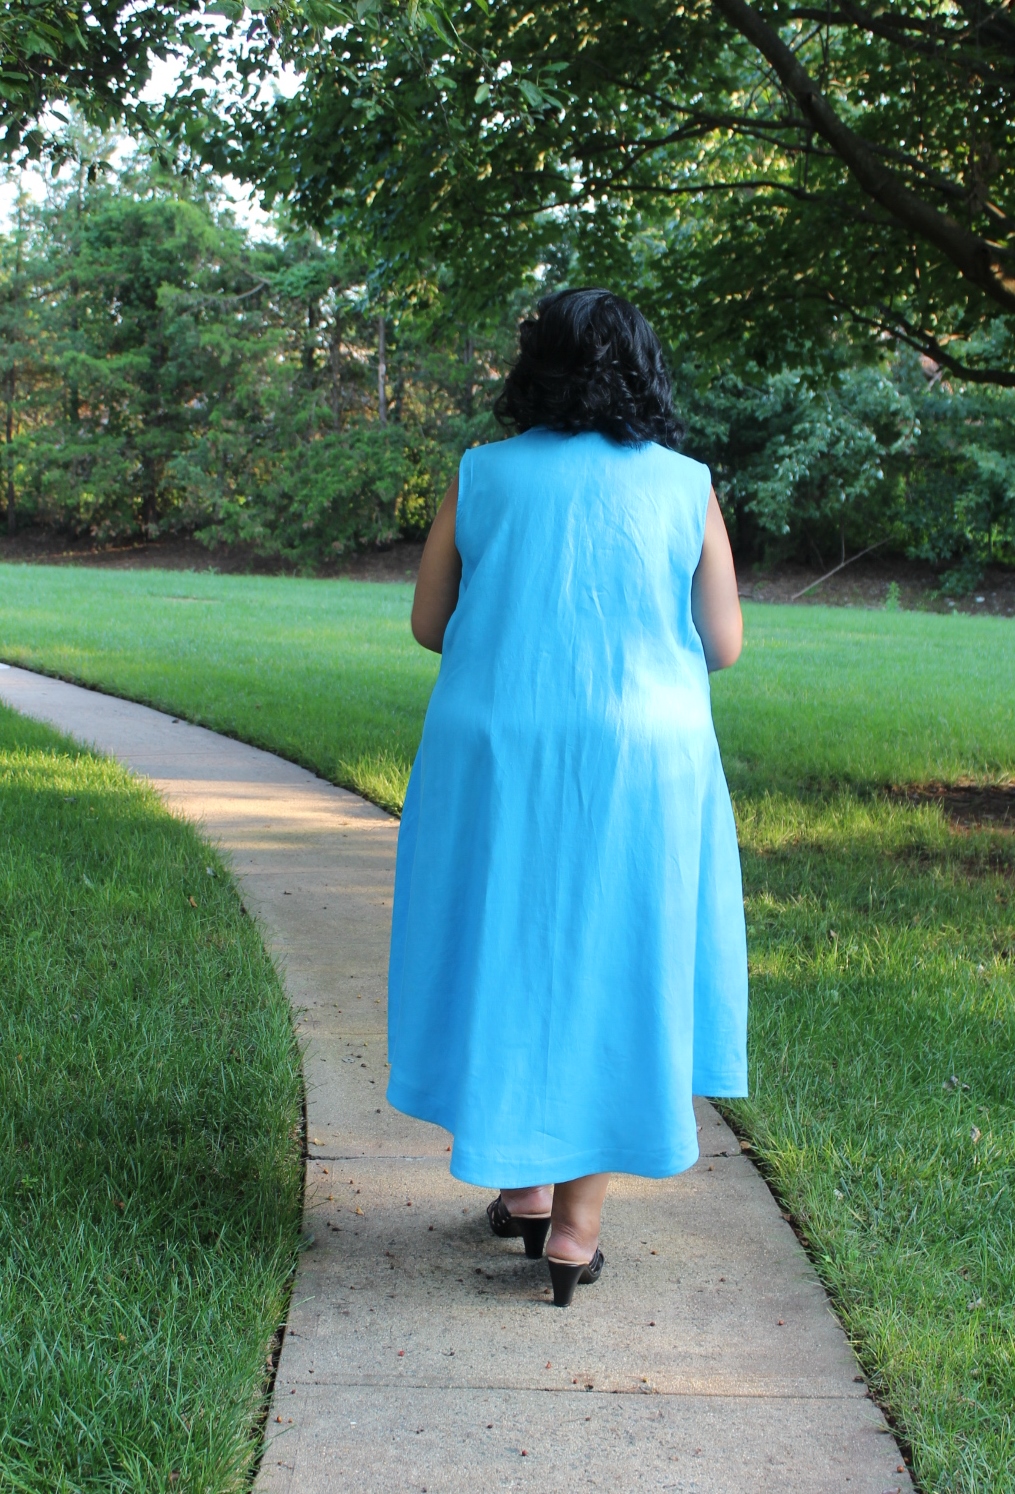
When I saw these panels on Julia's site, I knew they would make "the perfect" MimiG Katie shirt.  BTW, this is one of those TNT patterns I revisit over and over again.  I've made several and they're still on rotation in my closet. I love this silhouette because of the ease of wear, comfort factor and how different fabrics can make interesting variations of the pattern.

Pattern Layout:

The front & back pieces were placed directly on the sunflower print so all the other pieces could be pinned around them. I wanted the sunflowers to be the focal point.

The sleeves were cut into two pieces and stitched together because there wasn't a white piece wide enough for the full sleeve.

When I realized the button front bands were sewn on, I made sure the shirt front and the button front pattern pieces were laid side by side on the fabric.  This allowed the print to carry across the front of the shirt which is what I wanted.

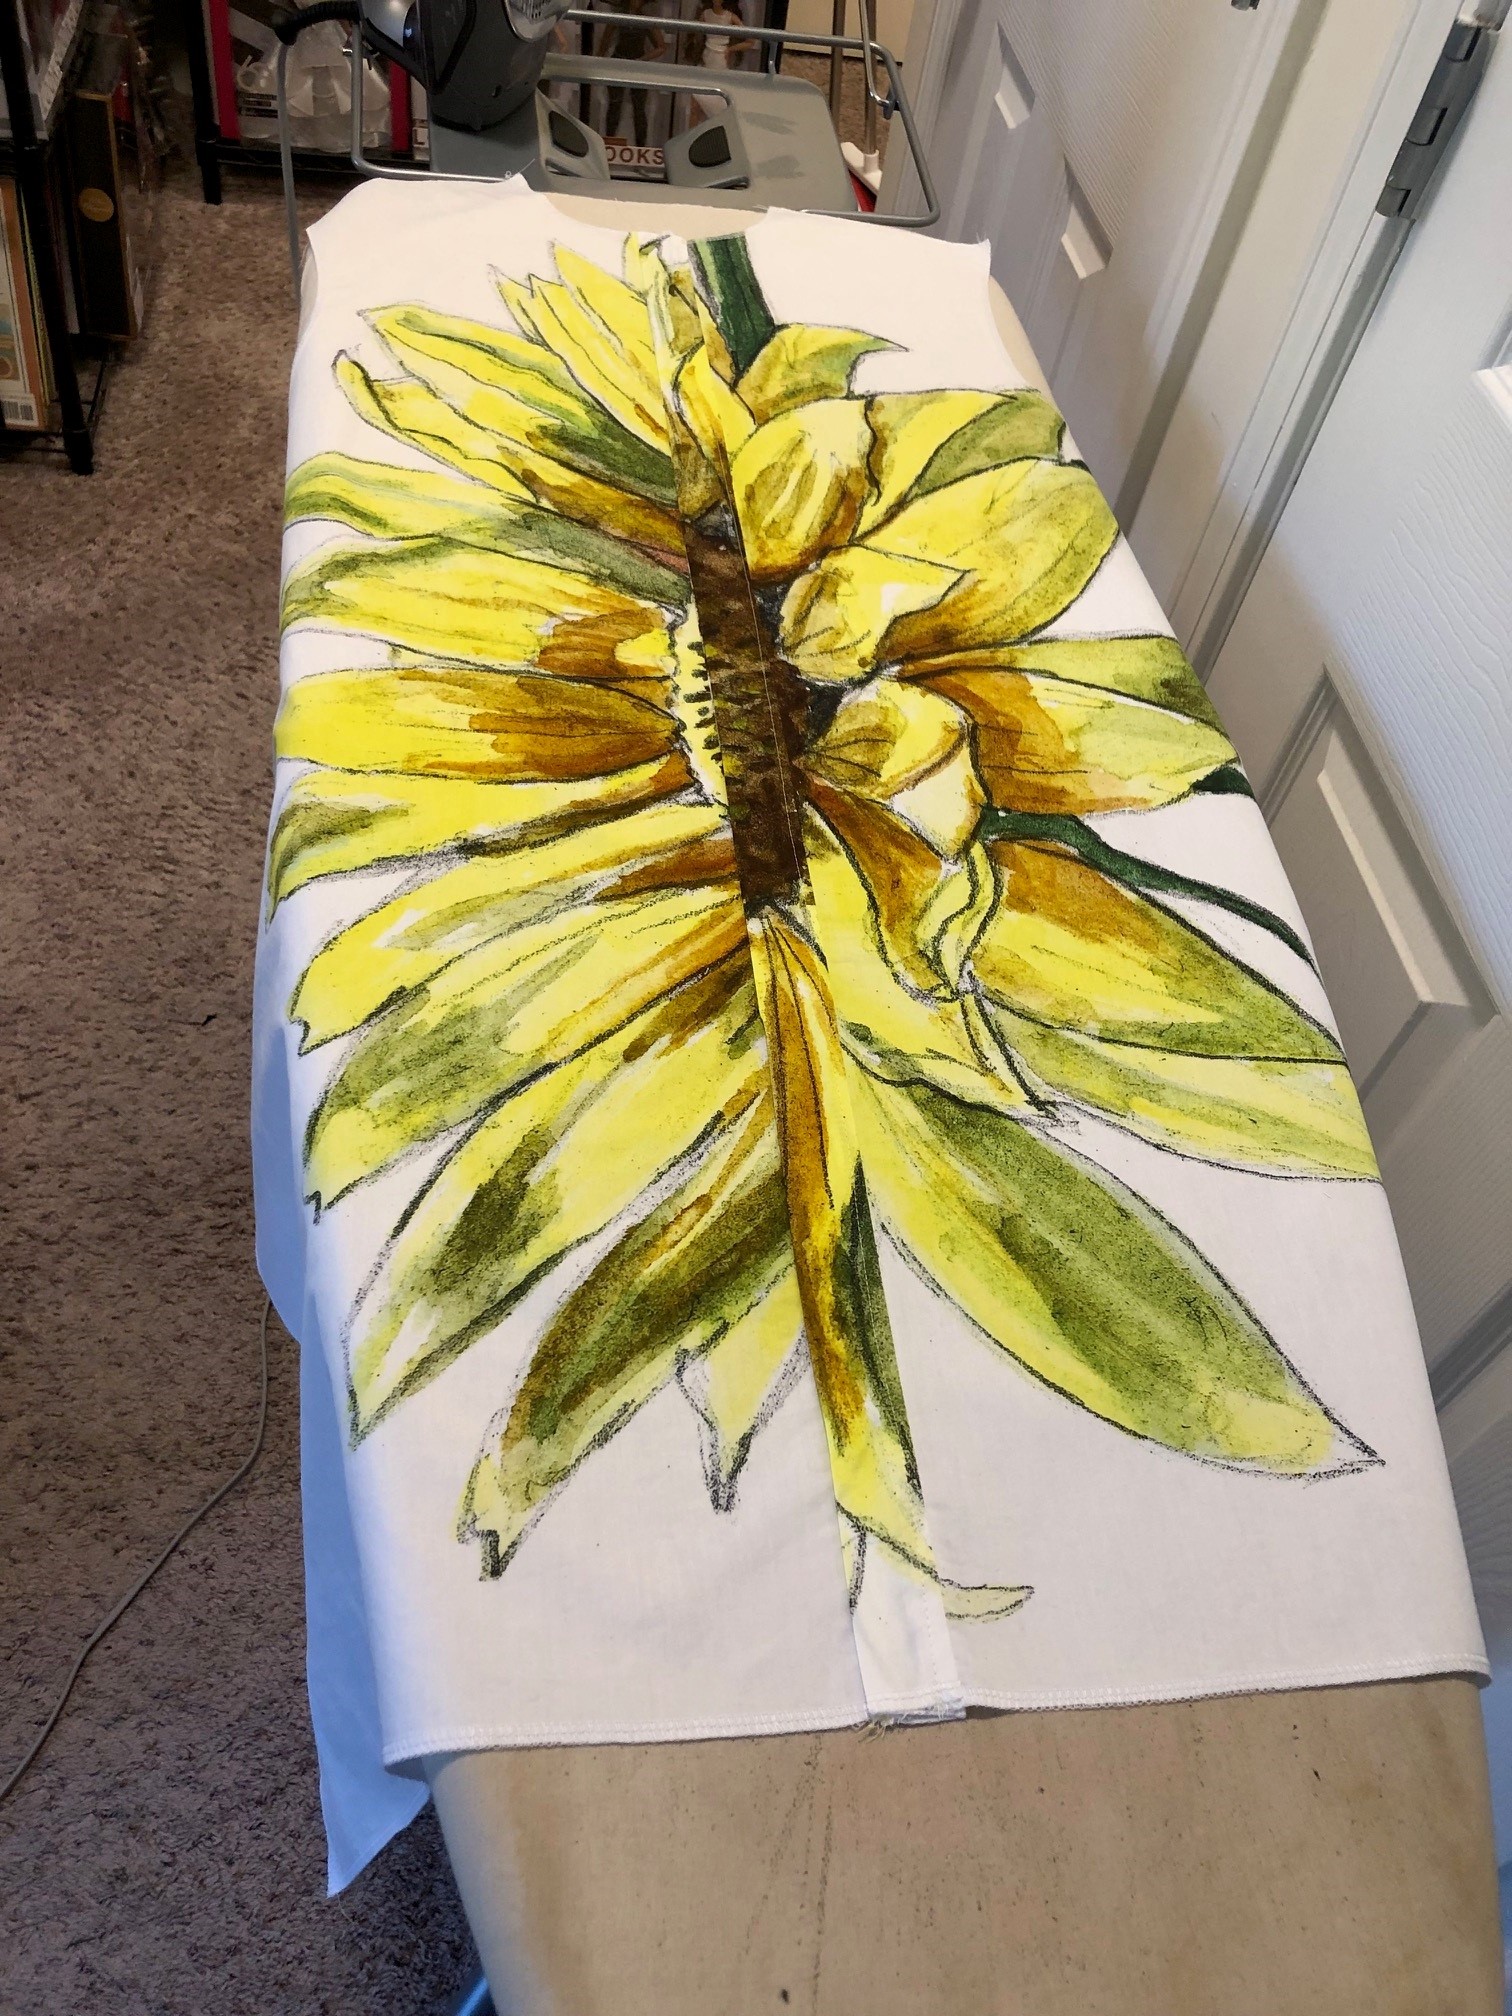
The collar was cut from leftover stem pieces because I wanted the print to play well together.  A white collar would look disjointed with the sunflower print button fronts. I ended up having to piece the fabric together to get a full collar.  It works because you don't notice the seaming on the collar piece.

The collar band was cut from a yellow gingham that's been in the fabric collection for years but originally purchased from Fabric Mart. I was going to use this gingham for the collar band, the hem facings and the pockets. BUT the gingham was too bright underneath the white fabric.  

I pivoted by using it only on the collar band. I used a lighter yellow gingham bias binding that I bought during my last Carriage Corner Sew Camp weekend for the hem facing. I love how its barely noticeable on the hemline.

Other Supplies:

I chose a button with a transparent greenish cast because it worked with the variety of colors on the front band.

Construction:

This is a simple sew. Probably why I make it again and again.  The only changes I made was to omit the pockets. I know but I'm just not a pocket girl. Also I used the bias binding mentioned above instead of the hem facings.

One thing to note - I did change the thread to sew the buttonholes on so they would merge into the background instead of stand out.  I wanted nothing to diminish this fabrics beauty.

A Few Pictures:


I referenced this garment in my Threads Interview.  

Where they asked what I was currently working on.  A link to the article is here.  

I have a few more Katie's planned using some very distinctive prints. Sooner or later they will make an appearance here. This make falls into my taking my time, using an amazing fabric to make a distinctive, totally me garment.


...as always more later!

Saturday, July 17, 2021

Circling my Shirt

I'm always inspired by external things.  Nature, people watching, RTW, designer gear, etc.  I see something and it triggers my creative process.  That's what this white shirt from Lafayette 148 did...

Now it's an inspired by shirt because the idea of decoration on the white shirt intrigued me.  In my mind, I began to consider how I could create that affect on my own.  That's when I turned to the Circular Attachment that's a common attachment on most high end sewing machines.  I, however, love the simplicity of working with it on my Janome 9450QCP.

The Shirt Construction

Supply List ~

Pattern:  MimiG Katie Top

3 yards white cotton/poly broadcloth purchased from Metro Textiles years ago 

10 7/8" flat 2-hole blue buttons from the button stash

Amann Group Isacord 100% polyester ombre thread or a rayon thread of your choice

There are no new garment construction techniques to share about this shirt. It's the same as all of the other Katie's I've made. However, the instructions on how to make the circle design for the shirt are here on the Janome blog. This shirt is one of my Janome Makes as a Janome Maker/Brand Ambassador.


To highlight the blue threads used for the circular decorations, I added blue topstitching to the collar and sleeve hems.  And of course, the blue buttons down the front emphasizes the blue theme - cause you know I do trim in threes!

A few pictures of the finished garment ~


It was interesting to use some of the decorative stitches and the circular attachment to "interpret" a RTW design. It's one of the things I love about top of the line sewing machines, the extra features allow you to easily create any flights of fancy you may have.

One other thing to note - we took these pictures in 100 degree weather and the poly in the shirt was stifling. This is very much an early spring or fall shirt...not the summer shirt I was envisioning. There are some sleeve issues that I believe are caused by my fabric because I didn't have this pulling in any of the other Katies I made.

I am slowly sewing...recently posted my cut pile to IG. I have a few more items to add to it but hopefully another make or two will make it to the blog before the month is over.


...as always more later!


Saturday, August 17, 2019

A Zooks Katie

This is my second Katie make of the summer. It is seriously one of my most comfortable summer garments. I wear this one all.the.time and everywhere! I wear it so much that I have to remind myself NOT to reach for it. So it became apparent that I needed another one like it because I love the combination of the tunic with a pair of knit capris.


The thing is that I wanted a lighter color version to wear with white capris or white jeans. Luckily I had 4 yards of this shirting cotton recently purchased from Zooks during Sew Camp.


Supply List ~
Blue & white quilting cotton from Zooks
White linen from the collection via Fabric Mart - this is stash fabric
10 5/8" white mother of pearl buttons
Interfacing from Steinlauf & Stoeller

Sewing Info ~
Since the fabric was only 45" wide I didn't cut the back piece on the fold because the pattern piece did not fit. This version now has a back seam as does the back facing. Although you can't tell its seamed because the print is so busy.

I imitated the black version by using white linen for the front bands, collar and under collar. My change to this top is the sleeves. It was a simple change to make.


1. The sleeve was folded in half, pressed and cut in half.
2. Both side seams were serged finished.
3. Then I sewed 4" from the cap down. 
4. The rest of the seam was pressed open and topstitched.
5. A band was cut 4" wide and 16" long from the white linen
6. The band was then sewn to the sleeve at the openings and pressed flat.
7. Next a 3/8" seam was pressed to the unsewn band side.
8. The band was pressed in half and topstitched down to the top of the seam - enclosing the band seam.
9. The entire band was topstitched, closing in the pressed 3/8" seam allowances.

There are no other changes made to this version of The Katie Dress.

A Few Pictures ~


This will be my last Katie for the summer. I still have a few other patterns I want to squeeze in and sew before the weather turns...and more garments in my cut pile that need to be completed.  So look for more garments coming to the blog soon!

...as always more later!


Sunday, July 28, 2019

Challenge - A Border Print Katie

One of the things that was different about Carriage Corner Sew Camp this time, was that we all received three yards of fabric from Fabric Mart for a sewing challenge. Prior to Camp, Gaylen presented the attendees with three choices and we voted on which fabric we liked.


The majority of us chose this Milly border print.  It was waiting for us with our other swag items from camp. We had 30 days (end of July) to come up with a garment using the challenge fabric. Honestly, the fabric was different than what I thought it would be and initially had a creative block on how I'd use it.


However, I did know I wanted to use as much of the daisy print as possible. So after thinking about it and seeing other sewing camper's garments, I went with the Katie top. Why? Because it allowed me to use most of the daisy print.

After all of the fussy cutting I ended up with just scraps of the fabric...


Supplies ~
3 yards of Milly border print from Fabric Mart
8 clear & black 5/8" buttons from Joyce Trimmings
black 'n white plaid bias binding from Home Sew
Interfacing from Steinlauf & Stoeller

Some Sewing Info ~
There are no new sewing techniques in this shirt. However, I want to emphasize the binding on the pockets. It came about because I was too lazy to change the serger thread. Seriously!  So I looked for something to bind the pockets and remembered that I'd bought hanks of bias binding back in April. It was perfect to add to the pockets and gave the innards some shuzz!


The fussy cutting of the border print added to some of the elements I like in this garment. Both the front and back facings were cut beneath the hemlines of the front and back pattern pieces.  That way the facings match the outside of the fabric perfectly ~ another aspect that thrills me. Okay I actually did the joy-joy dance when this worked out.

One more sewing thing...if you know me, you know I'm anal about changing my thread colors on my serger and during construction. I was just as deliberate about alternating the white and black threads on the sleeve as well as the facing hemlines. No one will probably even notice. That's because there's no white threads glaring against the black fade or black threads running through the white background.

I also love how the black fade plays on the sides of the top highlighting the border print. Honestly, that black fade was what stymied me when I first got the fabric, so I'm thrilled to have made it work.


This fabric plus this pattern made the perfect top! This is my fifth Katie and I'm thrilled that I've revisited this top with this fabric! 

So a few pictures ~


This was a fun challenge!  It made me think and stretched me creatively to make the best use of the fabric.  I hope you will follow my sewing sistahs to see what they did with their fabric, Gaylen, LaQuana, Cennetta, Bonnie, Andrea, Marji and Barbara. Hopefully, Gaylen will share all of the photos including the sewing sisters who don't have social media accounts. There is an amazingly creativite use of the fabric amongst my sewing sisters!

...as always more later!


Sunday, October 07, 2018

A Katie for Late Summer

Or as a subtext, "Its all about the fabric!"  Now I know...I know I'm running this pattern into the ground. Seriously though it is one of the most comfortable garments I've made this season. I love it's flexibility. How it can be a top, tunic or a dress. I LOVE how it wears. It's comfortable yet stylish. I can use a variety of fabrics to make it, as evidenced by the Telio pebble crepe for this version.

Here is the latest one...


...and there will be one more made from some denim I picked up at JoAnn's of all places. I will probably retire the pattern after the denim top. Though I'm sure I will bring it out next spring to make a few more!

So let's discuss this version...

Supply List ~
3 yards of pebble polyester crepe purchased earlier this summer from fabric.com
10 1/2" white/beige buttons from the collection
Ltwt fusible interfacing from Steinlauf & Stoeller

Pattern Alterations ~
I removed all of the additions I made to the pattern by folding them up and pinning them down. I wanted to keep them for future renditions of the pattern.

Construction Changes ~
1. The hemline:
For this version because the fabric is so lightweight, I didn't want the large hembands. So I sewed them onto the hemline and then cut them the facing in half. That was folded and machine stitched down. It did add to the weight of the hemline without overpowering it.

2. Long sleeves with cuffs:
I used the sleeves from this Katie and the cuffs from my TNT shirt pattern. However, when I finished the shirt and tried it on the cuffs were really large. So I put a pleat on the cuff and sewed a button on each one. This worked like a charm and my skinny wrists no longer float inside the cuffs.

Those are the only construction changes made to this version.

A few pictures ~


These were taken at my job because I broke my rule and wore it to work before photographing. But I wanted something new to wear to our company meetings! This was me talking when we had to introduce ourselves.


Conclusion ~
Making this from a drapier poly type fabric totally changed the look and hang of the tunic. I also added long sleeves making it a colorful piece for my fall wardrobe.

Next up on the blog is a new blouse pattern I'm trying out...well actually its a vintage pattern that I've had for awhile but I love the silhouette.

One More Thing ~
Since I haven't heard from CarlaF - I pulled another number for the winner of the $100 Smugglers Daughter gift card - #30 Whitney Luckenbill!  Please contact me by Wednesday, October 10th!


...as always more later!


Monday, August 13, 2018

Solid Colored & Sleeveless Katie

I think of projects in threes...so this is my third Katie Dress.  


The difference this time is that I sewed them one right after the other! I am done with this pattern for awhile because I have three amazing dresses/tunics in a sleeveless, short sleeve and sleeved version.  That's not to say another shirt probably won't make it into my wardrobe come fall. I still haven't made the shirting version of this pattern which started this journey...but for right now I am done.

Each version has presented a sewing challenge but in a good way.  Each one has allowed me to use a technique or to change a detail. They've given me design, pattern alterations, and construction challenges which I love. All of which makes a great sew for me.

I chose a solid color with colorful accents for this version because after working with the other very bright & colorful prints, I needed something a little toned down...so why did I choose a bright sky blue linen...*LOL*

Supply List ~
- Linen from Fabric Mart's couture line 
This has been in the collection for a couple of years. They put it on sale one year and I bought all the colors...don't judge! *LOL* However, there is still couture linen on sale at FM so I've linked to one that's similar in color to mine.
- printed cotton fabric from Zooks Fabric in Intercourse, PA
- shell buttons from the button stash
- Fusible Interfacing from Steinlauf & Stoller

Pattern Alterations ~
- I added three inches to lengthen both the front and back pieces. My original dress was just a tad too short showing my knees and I wanted a dress that fell in a spot that I liked.

- I also raised the underarm seam a 1/2" on both the front and back pieces. More on this further down in the blog post.

- The front facing also had 3" added to it to lengthen it.

That was all of the pattern alterations for this version.

Construction ~
There were no changes to the construction process...just omitting the sleeves and adding a bias binding to finish the armholes. However, I stretched the armholes out when I was applying the binding and they were too long, exposing my bra under my arm.

*Sigh* I also didn't take into account the linen's qualities when I was changing the underarm. I added a crescent piece of the cotton print to the underarm seams to cover the extra space.


When I first put the crescent in (made by taking the dress, putting a piece of tracing paper in the armhole and tracing the opening, then adding seam allowances all the way around) it didn't fit. It was wobbly and stuck out away from my body. My solution was to take a tuck in the center of the crescent and stitch it down. Now it works and I love that it's made from the accent fabric.

If I were to make another one (maybe next summer) I would make the armhole snugger so that it fit closer to my chest. I like the full shoulder coverage though others might make it a little more cut-in. 

Design Changes ~
I had fun adding details to this dress to make it mine. Of course the inner collar stand is cut from the printed fabric...


as is one of the front button bands...as well as the crescent underarm inserts.


The front and back hem facings were also cut from the printed fabric and where I started this journey. I had it in my head to add coordinating facings to a solid color fabric.


I used shell buttons for the front of the dress. I also left a small sliver of the printed fabric band by sewing the buttons over a 1/4" which exposed the print and added a slimming effect down the front of the dress.

The final addition to the dress front is a small breast pocket with a square of the printed fabric. I wanted to cut down on the wide expanses of blue fabric and all of these details assist with that.

A few pictures ~


Conclusion ~
This is my favorite of the three Katies. I love the flow of the dress. I love the pockets - who is dis woman?! *LOL* Cause I'm so not a pocket person. I love the length and the drama of it...and it was perfect when I wore it on a 90+ degree, hot and humid summer day. I was cool, comfortable and it was so humid that quite a few of the wrinkles fell out as I walked to the bus station to go home.

As I said earlier I'm retiring the pattern for a minute. Though I will admit that I almost went back and added short sleeves because of the underarm issues. I just love that I improvised all of those details. They weren't in my original plan for the dress but they made it perfect...adding drama and interest and elevating the look of it.

Next up on the blog is my denim chambray version of the Myosotis dress. Indie month continues.

...as always more later!


Saturday, August 11, 2018

The Dark Floral Katie Dress

This was my first version of the Katie Dress made straight from the download.

As originally sewn

Worn with black capri leggings

Supplies ~
The fabric is a cotton/linen print purchased from Fabric Mart last month. It was from a special offering to Premium Members and I bought several of these prints then. They are now online here but the print used in my dress has sold out. 

The black linen is from the collection probably from Ebad Fabrics in the garment district purchased years ago...back when I kept black yardage on hand for basics.

Finally the buttons are from M&J Trimmings.  I bought them after I placed some stash buttons on the dress and posted it to Instagram. Some of the comments made me think, so I went shopping and found some different buttons to use.

A little backstory ~
Before I headed to banking land and an entirely corporate wardrobe, I use to sew ALOT of prints. So much so that my sister, who was a recruiter for a major corporation at the time, told me when I went to her for advice on getting a new job, to lose the bold prints. This was about 20-25 years ago. I was coming out of garment district jobs where I could basically wear what I wanted...trying to move into a corporate job with some serious benefits. 

So I toned down some of my wilder prints. Then I moved into a banking job where I had to tone them wayyyyyy down! Now that I've finally dislodged all of that corporate noise from my creative brain, I'm wading back into the deep with deliciously loud prints. See I'm actually a bold color and print sewist who likes simple shapes. I hate ruffles and ditsy little prints. I love a bold primary color and I also love a great menswear influenced garment. A little contradiction for sure.

Construction Info ~
So this dress...like I said earlier its made straight from the pattern and it worked. One of the things I love the most is the faced hemline. By adding the facing, you give the hem weight so that the fabric hangs the way it's supposed to and doesn't rise up or float around.

The changes I made were creative and not structural.  The front buttonband, collar and sleeve hems were all cut from the black linen. It was to give your eyes a place to rest. It also makes the floral print POP! 


The banded sleeve is a technique I've used over and over again but if you want a step by step tutorial, check out this blog post. Disregard the piping info or hold onto it for a future make! And I omitted the sleeve ruffle because seriously I'm tired of this trend. Can it go away already in sewingland? Cause I hardly ever see it on the streets of NYC anymore and I work in the heart of the garment district!

For the next dress, I'm lengthening the front and back by two inches so the dress front will cover my knees and the back dip will have more drama. You know I LOVE a dramatic high/low hemline!

A few pictures ~

The first photos are of the dress as is...it's a little short and shows my knees...and I'm just not comfortable showing my knees at my age.  Now this is me and says nothing about other women my age...just MY preference.


The next set of photos are of the dress worn with black capri leggings under it...like a tunic...and how I will wear the outfit! 


Y'all Imma be honest, I hate my arm fat pads in this picture...but a friend of mine said I was making my sleeves too long. So I'm including it so she can see why I make them longer. I was doing it to cover these fat pads & Imma go back to making my short sleeves longer to cover that area because I have to be happy with wearing the garment. Sorry...not sorry! *LOL*


This was the first of the Katie dresses but I'm posting it out of order because of the EB post...one more version to come to the blog!

Parting Shot ~
This was my daughter's favorite shot...so I'm including it because she's so patient and giving of her time to take these pics for me. We did these late one evening because with four kids, a full time job, and a partner, I take her when she has time!


...as always more later!


LinkWithin

Related Posts with Thumbnails