Showing posts with label Vogue 8799. Show all posts

Sunday, September 09, 2012

Redemption - The Vogue 8799 Dress is Done!

Here is the finished dress...


I'm starting with a picture first because I can't believe the danged thing is done and wearable.  Seriously, it was touch and go there for more than a few minutes but once I start hand stitching piping in, I've got to make it work.  So first some stats...

Fabric ~
100% linen from Mood.com

Notions ~
22" invisible zipper
navy blue piping purchased from Daytona Trimmings
navy blue rayon hem tape

Construction ~
First there is ALOT of hand-stitching in this dress.  When I started the dress my first thought was that it was a great project for my sewcation because to make it right, I needed time.  Now I realize that it's great that I made it that week because otherwise it would have never been finished! *LOL*

Let's start with the piping...first the way I apply piping can be found in my posts here and here.  Originally I was only going to add piping to the side inserts but after I enlarged the center front panel, there seemed to be an expanse of  fabric stretching across the front of me...so I took the time and hand basted more piping into the center front panel's side seams before sewing the panel back into the dress.


Now we know I had some serious fit difficulties because I can't keep ish to myself and I had to share my discouragement.  I'm sure that a muslin would have highlighted the issues I had before I laid the scissors to my fabric.  However, I can assure you that if I had to make a muslin first, I wouldn't have a finished dress now.  I'm just not that girl.  BUT, I won't discount the value of a muslin especially if you have several fit issues.  

Second, some of my fit issues were definitely operator error.  I probably should have added 5/8" allowances to more than just the side pieces.  I may have inadvertently taken away some space by just laying the pieces on top of each other and assuming that they would work.

After removing and re-cutting the center front and center back pieces, then reinserting the invisible zipper, I was too through.  So the thought of trying to come up with a lining for this dress was just more than I could handle especially since I'd changed the dress pieces so much.  Talk about killing my mojo...I just wasn't going to allow that to happen!  I will wear a slip with it and deal with the wrinkling!

Adding width to the center back piece

A few additional notes...
  • I was definitely free styling because I never pulled the entire dress apart.  I only pulled out the problem areas and reworked them.
  • I ended up taking in the side seams several times.  5/8" the first time and then an additional inch when I realized that the dress' skirt had more of an a-line shape than I wanted.
  • To make the neckline fit, I cheated. At the seam lines on both sides of the neckline, I placed the piping over an additional 5/8" and sewed a larger seam.  This eliminated the extra pucker in the front.  Now if I had made a muslin, I could have simply sliced and tucked that extra out of the center front piece.
  • I cut 2.5" from the hemline before I turned up a one inch hem allowance. I didn't need the two inches I added in at the beginning.
  • The sleeves were cut on the bias to give them even more stretch.  I'm always afraid that I'm going to end up with really tight fitting sleeves so this is my trick...to always cut the sleeves on the bias.
  • It is my least favorite of the three dresses I made during the sewcation.  It was a lot of work for so-so results in my opinion and this pattern won't be used again for the dress, though I do still want to try the jacket.

Okay, a few more pics...

Piping at the sleeve hem, neckline and side seams

Front view - showing piping detail

Back view - showing piping detail


I'm so thankful that the dress did work out in the end, even if it does have more flare in the skirt than the original dress.  I'm a little sad that I didn't have enough fabric for the jacket but after the drama of the dress, I know that I wouldn't have sewn it during the sewing vacay anyway. 

Also, I've been sick as a dog this past week...I even missed a day of work due to this horrible cold that I've managed to pick up from somewhere...so that's why it's taken a minute to get these pictures not only taken but blogged about.  The other two dresses will show up this week since I took pictures of all of them at once.

...as always more later!


Wednesday, August 29, 2012

Discouragement

Here is what the dress should look like...


This is why I'm discouraged....


The dress is way too tight...even after I've taken out every seam and sewn them with only 1/8" seams.

The neckline is too low unless I take up 2" from the shoulder which of course changes the armhole so that the sleeve won't go in it...and the square of the neckline is too wide.  Linda, now I understand why you had issues with the neckline on your dress.

All I can think is thank goodness I didn't add piping to all the seams or I would be ready to kill now.  So my choices are do I trash it and kiss two days worth of work goodbye?  Or do I find a way to make it work?  

My first thought was to cut a new center front piece which will give me some additional room. Then after further thought, I realized that if I give up the jacket idea...which doesn't feel like such a bad idea right now...I could not only recut the front piece but I also could recut the center back pieces. That's a lot of work especially since I've already cut out the lining pieces and the invisible zipper would have to be removed & reinserted!  Dayum, dayum, dayum!

Now I know why there are no reviews on this dress on PR because it is a beyotch to sew. I'm going to give the jacket up.  There is too much hand work from putting the piping in the dress for me to toss it...*sigh*  Now to see if this solution will work...but I'm only giving it the rest of this evening...if it doesn't shake out by then...I'm moving on.  

This is why I sew TNTs...

...as of 1:22am, I think I've resolved the issues...there will be no jacket.  The fabric for it went to saving the dress...which isn't done.  There are still several hours worth of work to be done to it before it will be finished but as Scarlett O'Hara said, "Tomorrow is another day!"

...as always, more later!


Monday, August 27, 2012

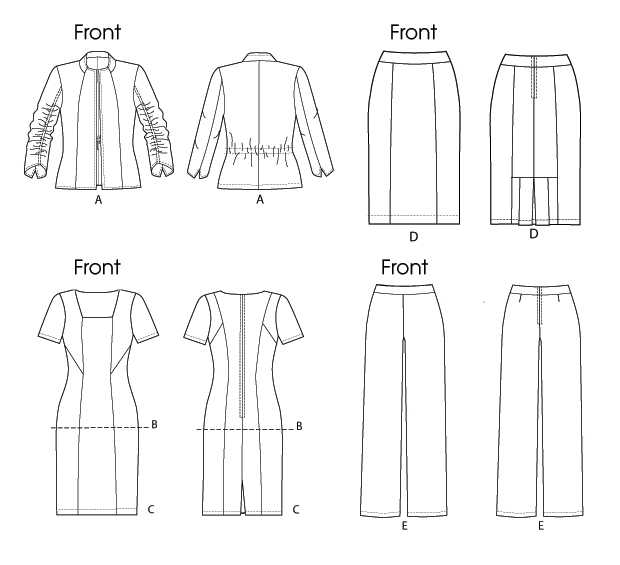
Vogue 8799 - Dress Pattern Alterations

Even though this pattern is graded up to a 22, I knew that I would have to do some alterations to the pattern to get it to fit me.  Because don't we all have to tweak patterns to get them to fit our bodies?  So I started with the dress front alterations.

Dress Front Alterations ~
First I placed the front dress piece of my TNT dress pattern on my cutting table.

Then I added the dress front pieces to one side of the full pattern pieces, pinning the center front of the V8799 center front piece to the center front of my TNT dress pattern. Making sure to match the pattern piece at the TNT dress pattern's neckline.  Next I added the side front top and bottom pieces, matching the notches and circles on the pattern pieces to get the right pattern placement.


After the pieces were added I realized that they were a few inches discrepancy at the waistline and hip areas. I simply drew in the additional space by following the cutting/sewing line on my TNT pattern.  I also added 2" to the hemline.  I'm not sure I will need it and it can always be removed later.


I added an extra line seam line in the top front piece by adding a line through the center of the mid-bustline notch to the end of the pattern piece...matching the seamline of the bottom dress front piece.  This seam line will be used to add additional piping to simulate the inspiration garment.


Original pattern piece 

Pattern piece with additional seam placed & cut

5/8" seam allowances added to new seam lines
to form two new pattern pieces


Dress Back Alterations ~
I followed the same process for the dress back as the front by laying the V8799 back pieces onto my TNT dress back piece.  I added additional inches to the side back piece to make the V8799 pattern pieces match my TNT dress back piece.


Center back piece pinned to dress back

All pieces pinned to the back with seams added


Sleeve Alterations ~
Of course it was necessary to alter the sleeve pattern to fit my bodacious biceps. This was accomplished by laying the TNT sleeve pattern down and then adding the V8799 sleeve pattern on top. I sliced the V8799 sleeve pattern from the center of the pattern bottom to within a 1/2 inch at the top of the sleeve cap. Then I spread the two sides of the pattern until they matched the sides of the TNT sleeve.  This will not change the width of the sleeve cap.  I added some pattern paper to the center and taped it flat. Finally I adjusted the hemline of the sleeve so that it would be similar to the TNT sleeve pattern.


Next up is cutting out the fabric and assembling the dress.  Unless something unusual and different comes up during the construction, the next post about this dress will be the reveal.

...as always more later!


Sunday, August 26, 2012

What's Next - Vogue 8799

Can I just say that I'm excited?!  O-M-G!  Nine, yes nine days of sewing fun begins now!  And my first project is the dress and jacket from Vogue 8799.


Using this purple/plum linen from Mood Fabrics which I actually purchased online because I was too overwhelmed at work before vacation to head to the garment district...


(plum linen on the left)

I've wanted to use this pattern since it showed up in the spring offerings.  There were several garments online and in-stores this spring/summer season which inspired me...


I will be adding navy blue piping to the dress in various places and a navy blue lining.  The good thing about this make is that except for the plum fabric, all of the other notions are from my stash.  So the linen is in the dryer, next up the ironing board and then alterations to the pattern.  Hopefully, I will be waist deep into this project today and tomorrow with some photos of the finished garment later this week.

...as always more later!


LinkWithin

Related Posts with Thumbnails