Showing posts with label Cardigans. Show all posts

Sunday, April 17, 2022

An Easter Fuller Cardigan

Easter is such a tricky day.  Some years it's warm and sunny so that spring dress you picked is perfect to wear.  Some years it's sunny but chilly so you need a little more coverage.  This year Easter was on the chilly side.  Sunny but definitely needing a little coverage to stay warm.

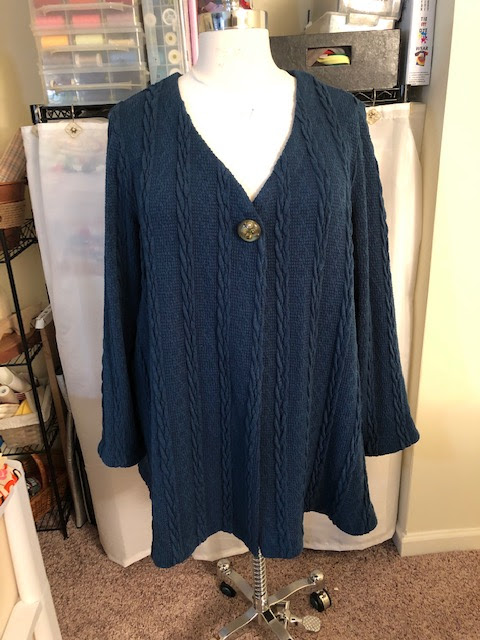
I've been working on this Fuller Cardigan since last year. I cut it out at the same time I cut out this shirtdress in February. Finally finished it last week...in perfect time for Easter.


Some background ~

This was one of those bonded cable knits that were everywhere in 2021. I bought my piece from Fabric Mart. There's still a couple of yards left in the fabric closet for another garment.  

The thing about this fabric is that it doesn't like topstitching or button holes. I learned that from making this cardigan. So when planning this sew, I decided no topstitching, no buttonholes/buttons and everything needed to be hand stitched. I'm happy with those design decisions.


Pattern Alteration & Construction ~

The Fuller Cardigan has two views.  A v-neck longer verson and a high u-neck shorter version. I combined the v-neck with the shorter version to get my cardigan. I wanted a neckline that would accent the neckline of the shirtdress.

I used 11/16" gold snaps instead of buttons on the cardigan front. The snaps were purchased online from Fabric Mart.

The facings were from a navy blue ltwt ponte from the scrap bin.

The sleeve hems were pressed up 5/8" instead of adding cuffs. Navy blue Hug Snug rayon tape was sewn to the hems and they were hand stitched. Chosen because I could hide the stitching in the busy knit.

A clean finish and allowing the fabric and design to shine were what this make was all about.

A Few Photos ~


Conclusion ~

This concludes my winter sewing. I know I still have a dress hanging out waiting for buttons/buttonholes and a hem.  However, I've decided to push it until fall. Spring is here with warmer weather and long sunny days. So I'm looking forward to making & wearing all the spring dresses and tops.


...as always more later!


Saturday, November 20, 2021

Another Cardigan + A Swingy Tee

Prior to Covid, cardigans played a huge part in my wardrobe.  I threw a cardigan over a shirt, tee or turtleneck and wore those layers over skirts and pants.  I even wore a lot of cardigans, aka Michelle Obama, over a dress in my Corporate Days.  Add a pair of pearls and pumps, you were professional and ready to go! 

While I was home for 18 months, I only wore the old junky cardis which were also worn as a layering piece.  I haven't actually thought about making more even though I own several TNT cardigan patterns, because they used to be an essential part of my wardrobe.  

So of course in the unsewn cut pile I moved last year, there was one last cardigan cut out. Since it's in my blue color scheme and perfect for back to work wear this spring, I started working on it Mother's Day weekend.

The cardigan was cut from Simplicity 8059.  I've made 8 versions from the pattern.  All but one of them remain in my wardrobe.  The vanilla cable version pilled so badly that I let it go. I love this cardigan because it's a simple throw on, easy wear cardigan that can be made from any kind of knit fabric. I have used ponte, wool jersey, velvet, sweater knit and even made a border print ponte version.

It's everything I like in a pattern. Easy to wear, made for simple variations (changed up the closures) and can be sewn in a variety of fabrics. It's been sitting for a few months, waiting for the temps to cool down so I could photograph it. Like with everything else I've sewn lately, this has already been worn out and about.

Supplies ~

Pattern: Simplicity 8059 which is out of print

Crochet knit fabric purchased from Fabric Mart

Black Silk organza from Thai Silks

Black fusible stay tape from Design Plus

Construction ~

For this cardigan I sewed the sleeves in using the flat application.  My favorite method. It's so much easier to get a knit sleeve in without puckers if you use the flat sleeve sew-in method...well to me!

Also because it was a knit, I used the silk organza facings that I'd use in my last version.  However, I did not add the fusible interfacing. Sewing wrong sides together, flipped in, pressed flat and then the fusible bias tape was added to insure the neckline did not grow...


I also used the fusible stay tape to stabilize the neckline of the cardigan...


Since this is a special knit it needed more techniques to insure that I did not stretch out the neckline or mishandle the application of the sleeves. So I added Seams Great to the neckline to stop the stretch.

Honestly, I have a few challenges with the finished cardigan - I've gained a few pounds since it was cut so it doesn't really close well.  Then I added the ties up too high on the v-neckline.  I've worn it and it didn't really bother me but aesthetically it's annoying.  However, not annoying enough to go in and fix it! *LOL*

A Few Pictures ~


A Swingy Tee ~

This is my Pembroke pattern that I added a couple of inches from the waist to the hemline on the front and back pieces by using the pivot and slide method. When I cut this out, I really wanted an easy slip on top to wear over jeans or leggings while working from home.

However, it pairs so well with the cardigan I've worn it to work this way. Though to be honest I've worn the top more than the cardigan. It's such a great layering piece and I definitely want to make more of them, possibly with a cowl neckline.

Supplies ~

Pattern:  Cashmerette's Pembroke Top

Fabric:  100% cotton knit from Organic Cotton - this has been in the collection for a few years and deserved to be sewn.

Construction ~

o The thing I like about Cashmerette Patterns is that the construction is done with a flat application.

o As always, I add some stay tape to the shoulder seams to stabilize them.

o I omitted the cowl AND the neckband facing.  Instead I turned the neckline down 1/2", pressed and used a twin needle to hem it.

o To make the swing, I did a pivot and slide from the neckline on both the front  and back pieces.  I slide it about 2-3 inches from the fold to gain the swing through the waist and hip area. 

o The sleeves are perfect for pushing up when wearing alone or wearing a little longer under the cardigan.

A Few Photos ~


This is another one of those outfits it's taken me forever to photograph so I've worn this top a few times already. But I love the extra swing in it because it's comfortable...and honestly comfort is more important to me than almost anything else these days!  Comfort with a little style are my guiding sewing lights now.

Finally, thank goodness this outfit has been blogged!


...as always more later!


Saturday, February 06, 2021

The Cardigan - Simplicity 8992 - UPDATE!

This cardigan was started in December 2019 when I also began writing this blog post. I write them as I sew so I don't have to remember details which is lucky in this case since I finished the garment a year later!

Today I finally got my act together and took a bunch of pictures of garments made in the last couple of months. I decided to shoot this sweater with me wearing it...so I've updated this post to include those pictures...


I think these photos are closer to the actual fabric color than the pictures below. BTW, this fabric is still available from Stylemaker Fabrics in a variety of colors where I purchased it in 2019. It was also available from Melanated Fabrics and a few other fabric sites. 

When I moved, I threw some unfinished garments out and brought a few with me. This is one of the ones that came along and is now finished.


So here is the original blog post with some updates to it...

I bought this Simplicity Pattern in August 2019 because my favorite cardigan pattern (also by Simplicity) only has a tie closure and I want a button front closure option. I love the cardigans I made using that pattern but 9 times out of 10, the cardigan unties beneath my coat. I'm sure a button front cardigan won't have the same challenges. 


Then I saw this cable fabric on StyleMaker Fabrics and I bought a couple of yards of it. It seemed perfect to make my first version of this cardigan. 

Materials ~
3 yards ocean knit fabric from StyleMaker Fabrics
Navy blue ponte scraps for facings
1 large button from the stash by way of Fabric Mart Fabrics
1 large gold snap from Pacific Trimmings

I need to talk a little about this fabric. I loved this fabric and bought it as soon as Michelle posted it. However, I didn't think about what it would take to work with the fabric. I can honestly say that if you're a newer, beginner, returning to sewing or advanced beginner, I wouldn't purchase this fabric. This fabric is challenging to work with and while it gives a good result, it took some extra to make it work.  

Pattern Alterations ~
While this pattern goes up to a size 22/24 (XXL), it's close-fitting. My other cardigan pattern has a looser fit and I wanted to combine the fit of the two patterns to add the button front closure.  To make that happen, I used my pattern sandwich method. Where I lay the TNT pattern piece down first, then the new pattern piece and finally a fresh piece of tracing paper.  This allows me to create a new pattern piece that fits me. 

An example below of how the new cardigan front was made. Also when I altered them, I did add a little of the waistline curve in the Simplicity 8992 pattern instead of the boxy shape of the original pattern.


All of the accompanying pattern pieces were also altered for a looser but shaped fit.

Construction ~ 
This fabric needed some special handling. It was heavy. When you sewed into the cables it pulled out of shape and hung funny. 

1. The facings were cut out of a dark royal blue ponte to add some structure to the cardigan so I did not need to add interfacing to the facings. 


2. I added fusible twill tape to the shoulder seams and to the back neckline so it would retain it's shape.


3. I made a hem facing for the sleeve hemlines because the cables were stretching them out. Adding the hem facing gives the sleeve hemline some structure which this cardigan needs.

4. The cardigan hemline also had hem facings added to them. However, I did this after I moved and couldn't find the royal blue ponte scraps so I used black ponte scraps instead.

5. All facings and hems were hand stitched down. It made it easier to control the fabric and to avoid wavy hems.  

6. Even though I wanted buttons and buttonholes, I realized that my home machine would never make buttonholes in this fabric. My original plan was to take it to NYC and have professional buttonholes made. But I dragged my feet and Covid happened so that plan went out the window.

7. To make this work now, I added a large snap and a large button to hold the cardigan together.  Since I'm working from home, I have no worries about wearing it under a coat for the foreseeable future.


Conclusion ~
I have a several more garments that need finishing touches. To ease back into sewing, I'm finishing them up before starting a "from scratch" sewing project. So my next project is another unfinished garment. BTW, I'm only spending a couple of hours a day sewing and still don't feel like posing in garments yet. Hopefully that will be back soon too.  However, I thought a garment post would be a better update on my progress than anything else.

...as always more later!


Friday, February 07, 2020

Cashmerette Fuller Cardigan

I was really excited when Jenny asked for testers for the Fuller Cardigan. It had two things I really wanted in a cardigan - a button front and raglan sleeve. Also with Cashmerette patterns I have to make minimal fit changes and I can just sew...which is the part I like best.


As I said, I made the tester version and the subsequent pattern has a few changes made to it. So I made one using the new pattern (which I got as soon as it became available) because I wanted to see the changes especially since I basically liked my tester version. 

I sewed this right out of the envelope using my normal size 24, C/D cup. The same size I made in the tester version. I tried it on to figure out button placement and it didn't close across the front! Dayum, dayum, dayum!!! I checked my pattern pieces. They were the same as the tester front. Then and only then did I check my ponte's stretch - ummmmm not enough. Dayum, dayum, dayum.

My challenge was I already had an outfit in mind.  The Fuller Cardigan plus a sleeveless Pembroke cowl neck tunic (info on this in a future post) and I didn't want to donate this cardigan.  So see my solution below...


Yes a chain finish! I have several of these collected from eBay when Glee was huge and Emma Pillsbury, the teacher who wore the cardigans with the chains, was big. This is why you shouldn't Marie Kondo everything!

I also added an inch to the hemline and can honestly say I forgot to lengthen the front facing too. So I didn't get to use the amazing mitered corner finishing in the pattern instructions. But since I will be making another one, you can bet I will rectify my bad cutting to get that corner finish.


For the sleeves, I used the fuller bicep sleeve pattern. Thanks for that Jenny! Because it means I don't have to worry about having enough space in my biceps or make alterations to the pattern. My design touch was to two tone the sleeves - black ponte sleeves (with enough stretch btw) and the cuff is cut from the base fabric.

Supply List ~
2 yards printed ponte from Fabric Mart - collection fabric
1 yard of black ponte from Fabric Mart - collection fabric
Interfacing from Steinlauf & Stoeller

A Few Pictures ~


Fuller Cardigan worn with a Pembroke Sleeveless Tunic


For reference I'm adding a picture of the tester version. I took these at work and posted them to Instagram yesterday.  


To me the hip band was a little off-putting on the tester version so I'm glad it was omitted from the final version, even though it doesn't look bad on this cardi.  I also added a button onto the bottom band of my tester version. Honestly I may or may not use that band in a future version of this cardigan because I see more Fullers in my future!

I hope if you're a plus size sewist looking for a great basic cardigan, you will purchase a copy of The Fuller Cardigan...cause really can you have too many cardigans?! 

...as always more later!


Sunday, October 27, 2019

Style Sew Me Madison Cardigan

In my continuing quest to have different cardigans and toppers, I've wanted a Madison Cardigan (Style Sew Me Patterns) by Eryn since it first came out.  But y'all know my rules, no PDF Patterns and no patterns that aren't graded up to my size.  While Eryn originally offered this cardigan as a PDF pattern with larger sizes, the minute she started to sell them as paper patterns, I was on that!

...then the pattern sat. Cause with all things, I can buy it faster than I can make it! However, now that the temps are changing, this will be a great sweater jacket for this season.

Supplies ~
3 yards of polyester open weave knit from Fabric Mart
1 yard of black pleather from the collection via Emmaonesock
5 yards of black pleather binding from Pacific Trimmings

Pattern Alterations ~
Sleeves:
I heard on the interwebs the sleeves are a little tight which was posted by someone slightly smaller than me. Ok alot smaller than me *LOL* but I always check sleeve width because of my bodacious biceps. 

I knew I wanted to change them up a little to make them work better for me. The cardigan has a two piece sleeve which makes it special but I will admit that at 16" wide at the biceps it was too small for my arms. Also I'm lazy and didn't want to figure out how to alter both pieces so I taped them together and made one sleeve piece.
  • I proceeded to make alterations to the one sleeve piece by slashing and spreading up the center of the sleeve.  
  • That gave me some more space but I wanted several more inches than that provided. 
  • Then I added a 1/2 inch to either side of the sleeves body which will make the sleeve wide enough to wear a full sleeved shirt under it. 

This was my final sleeve piece ~


While it keeps the original sleeve cap shape, I've widened it to encase my arms. Now I'm not a pattern drafter and this may not be the correct way to add width to the sleeve...actually I would bet that it's better to adjust each sleeve pattern piece...but I wanted this finished sleeve...


Back Body:
I did a pivot and slide on the back piece which is supposed to be on the fold to add additional inches to my abdomen and butt area. Again while the largest size will "fit" around my body I wanted a little ease so that it would move with me.

Construction ~
This is an easy pattern to sew.  There are no funky instructions and the instruction booklet is clear cut. I LOVE that the seam allowance is printed clearly on the first sheet. It was easy to highlight so I wouldn't forget that I wasn't sewing with 5/8" seam allowances.

I changed up the order of construction where the sleeves where concerned. I sewed them in flat to insure that I hadn't altered the sleeve cap too much when making my alterations. I also added some seam tape to the shoulder seams to stabilize them - this isn't mentioned in the instructions either. Otherwise, I followed them as written.

Working with Pleather ~
My challenge came because I added pleather bias binding and used pleather for the sleeves.  This caused me to sew slower, use different feet and pressing. I don't follow "the rules" when working with pleather.

1. I pin it - making sure to pin within the the stitching line
2. Use a silk organza pressing cloth folded several times to press open seams
3. Press it with steam just on the lowest setting possible.

Two things I DO NOT do ~
   - I don't press directly on the pleather, sure way to ruin it
   - I don't remove stitching - those holes remain - so stitch purposefully.

Adding the Binding ~
I really had to think about how to add the binding without totally making it look wonky and handsewn.  After thinking it through, it became a multi-step process to add it to the cardigan. The thing I need to stress is this is a SLOW technique. If you rush this stitching it will show.

     * I added binding to the neckline area first. Making adding the binding a 2-step process.
     * First I added the binding to the back of the neckline, pinning it to the mid-point of the binding.
     * Stitched it down the center of the pleather binding.
     * Then folded the binding over and pressed it close to the edge, using a teflon foot.
     * Stitch setting was on 4 to give a looser stitch look.
     * Pressed it down using my clapper to make it as flat as possible.
     * Repeated the same process for the side and back of the cardigan.

This was not a fly by the seat of my pants sew. I thought everything out carefully before I started working on it. There were quite a few things that could have gone wrong to send this project south. The sleeves and the bias binding were the most complicated portions of this make...and I need to say this again...it was a very SLOW sewing process. Oh and I left the sleeves unhemmed.

Finally that question everyone asks when I sew with pleather.  How do you launder it?  With this one it will be washed on delicate in cold water on a very short cycle then laid out to dry.

A Few Pictures ~


I could see adding another one of these to my wardrobe in a really interesting sweater fabric.  Otherwise, I probably won't make this again - more because I own a lot of cardigans and this one is very distinctive. I got a compliment from one of the neighbors on it as we were taking pictures so I think one is enough for now. 

Would I recommend you purchasing this pattern?  
Yes definitely. I think it's important to support indie pattern designers of color especially when they make patterns in my size and PAPER patterns.  Grab a copy of yours here.  You won't be disappointed with your finished garment! Oh and this isn't a sponsored post, just a happy customer posting about a great new piece.


...as always more later!


Sunday, April 07, 2019

Simplicity 8059 - An Eyelet Cardigan

I've made this cardigan several times over the last couple of years and it's become my go to pattern.


It was made to go with the latest Pembroke tunic recently completed. An early spring outfit to wear with leggings and/or white jeans.


Supplies ~
*Cotton Eyelet w/o stretch purchased from Fashionista Fabrics in 2007 
  (12 years old) so it's deep stash from the collection 
  (I blogged about the fabric here - and Fashionista Fabrics no longer exists)
*Silk Organza
*Ltwt fusible interfacing
*1" curtain matte gold grommets from Amazon
*1.5 yds beige ribbon from Joyce Trimmings from NYC Garment District

Design Decisions ~
I've made this cardigan a bunch of times, what makes this version interesting is the closure on the cardi front. I was inspired by this design I saw online. 


When I pulled the eyelet and the rayon knit from deep stash, I thought the closing would work on a cardigan with a little engineering.

The second decision was to cut the eyelet off the selvedge and add it to the cardigan hemline, as well as make it part of the ribbon tie that holds the cardigan together.

Construction Information ~
To make the grommets work without tearing the eyelet, I had to put some thought into making them work.

First I decided to beef up the front and facing because this eyelet is quite holey. To give the facing some strength I cut the facings from the fashion fabric, silk organza, and a fusible interfacing. The fusible interfacing was adherred to the silk organza which was then sewn to the facing on the edges. This not only beefed up the facing but it clean finished the facings.


After I attached the facing, I made a sample of the grommet before placing it on my cardigan.


Then I held my breathe, followed the video instructions, cut a 1" hole in my garment, then placed the grommet in...and it worked! Y'all I seriously did the joy joy dance in the Sewing Cave and I may have shed a tear or two of relief!


The second design challenge was adding the selvedge to the hemline. In an unusual move I decided to add it only to the body and not the facing bands.


The last thing was making the ribbon to close the cardigan fronts. It's made from a purchased beige ribbon with a piece of the selvedge lace sewn to it. I purchased a bunch of ribbons hoping one would work with the cardigan but none did. So I made my own.


I wrapped one piece of the selvedge edge around the ribbon and stitched it down. One row on each edge and then two down the center to insure that the ribbon and fabric wouldn't pull apart. Even though I really wanted a contrast ribbon for the cardigan, I'm happy with this solution.

A few pictures of the cardigan ~


Conclusion ~
This was a fun piece to make. I liked the challenge of adding the grommets to the cardigan and figuring out how to use the selvedge as lace. It was a great detail to add to my TNT pattern.  

The sleeves weren't hemmed in these pictures because I couldn't decide how to hem them. After seeing these pictures, I'm going to add a hem to them before wearing it out.  Otherwise, I really love this new version.

Parting Shot ~

Walking with the grandbabies to take pictures

That was the last piece from my Sew Camp weekend finished at home. I had planned to sew something for the granddaughters but that got cancelled so I have no idea what's up next. I'm floundering a little on what to sew because the weather is changing so do I sew for now or do I sew for summer? 

...as always more later!


LinkWithin

Related Posts with Thumbnails