Showing posts with label Kids sewing. Show all posts

Tuesday, June 11, 2019

McCalls 7858 - Aleena's Version

I made Aleena's dress after Samantha's. I thought since I'd already made one I would better understood how the sewing order should go. However, since I was using an embroidered mesh with a scalloped edge, I started with the skirt portion of her dress...and therein laid my problem.


The darker fabric was purchased because it had the scalloped pink border. That would give the two dresses, two separate looks, from the same pattern. As I laid out the skirt pattern pieces, I realized that the embroidered mesh was only 45" wide and that my pattern pieces wouldn't fit.

Y'all this threw me into a true tizzy. It didn't help that it occurred in the middle of the night. I melted down...truly.  The fact that I have a dress made and that Aleena loves it is more a tribute to my daughter and Aleena than me! *LOL*

Anyway after they came by and we did a fitting with a bad hooped petticoat, I got back on track.

Let's start with the supply list ~
3 yards pink silk shantung from Chic Fabrics
3 yards of blk/pink/turquoise embroidered mesh from Chic Fabrics
1 12" pink zipper
1/2 yard white bemberg lining from the collection
1 yard of pink piping from the collection
7 yards lt. pink bias binding

Construction Changes ~
- I ended up piping Aleena's bodice with the same pink piping I used on Sammy's.
- Again the mesh was carefully chosen and placed on the front and back bodice before they were sewn together.


- Then I played around with the sleeve. My first choice was sleeves made from just the embroidered mesh.


- Then I added the pink shantung under the mesh and sewed it into the bodice for the try-on


- I had the two pieces finished and I stopped there for the night before the task of adding the bias binding to the hemline of the mesh.

It wasn't my intent to have the hemlines finished the same on both dresses. My original intent was to use the scalloped edge for the hemline. The fabric was just not wide enough to manipulate. I'm glad that I finished the hemlines the same though. It made both dresses look similar but not exactly the same and both dresses reflected the girls personality.

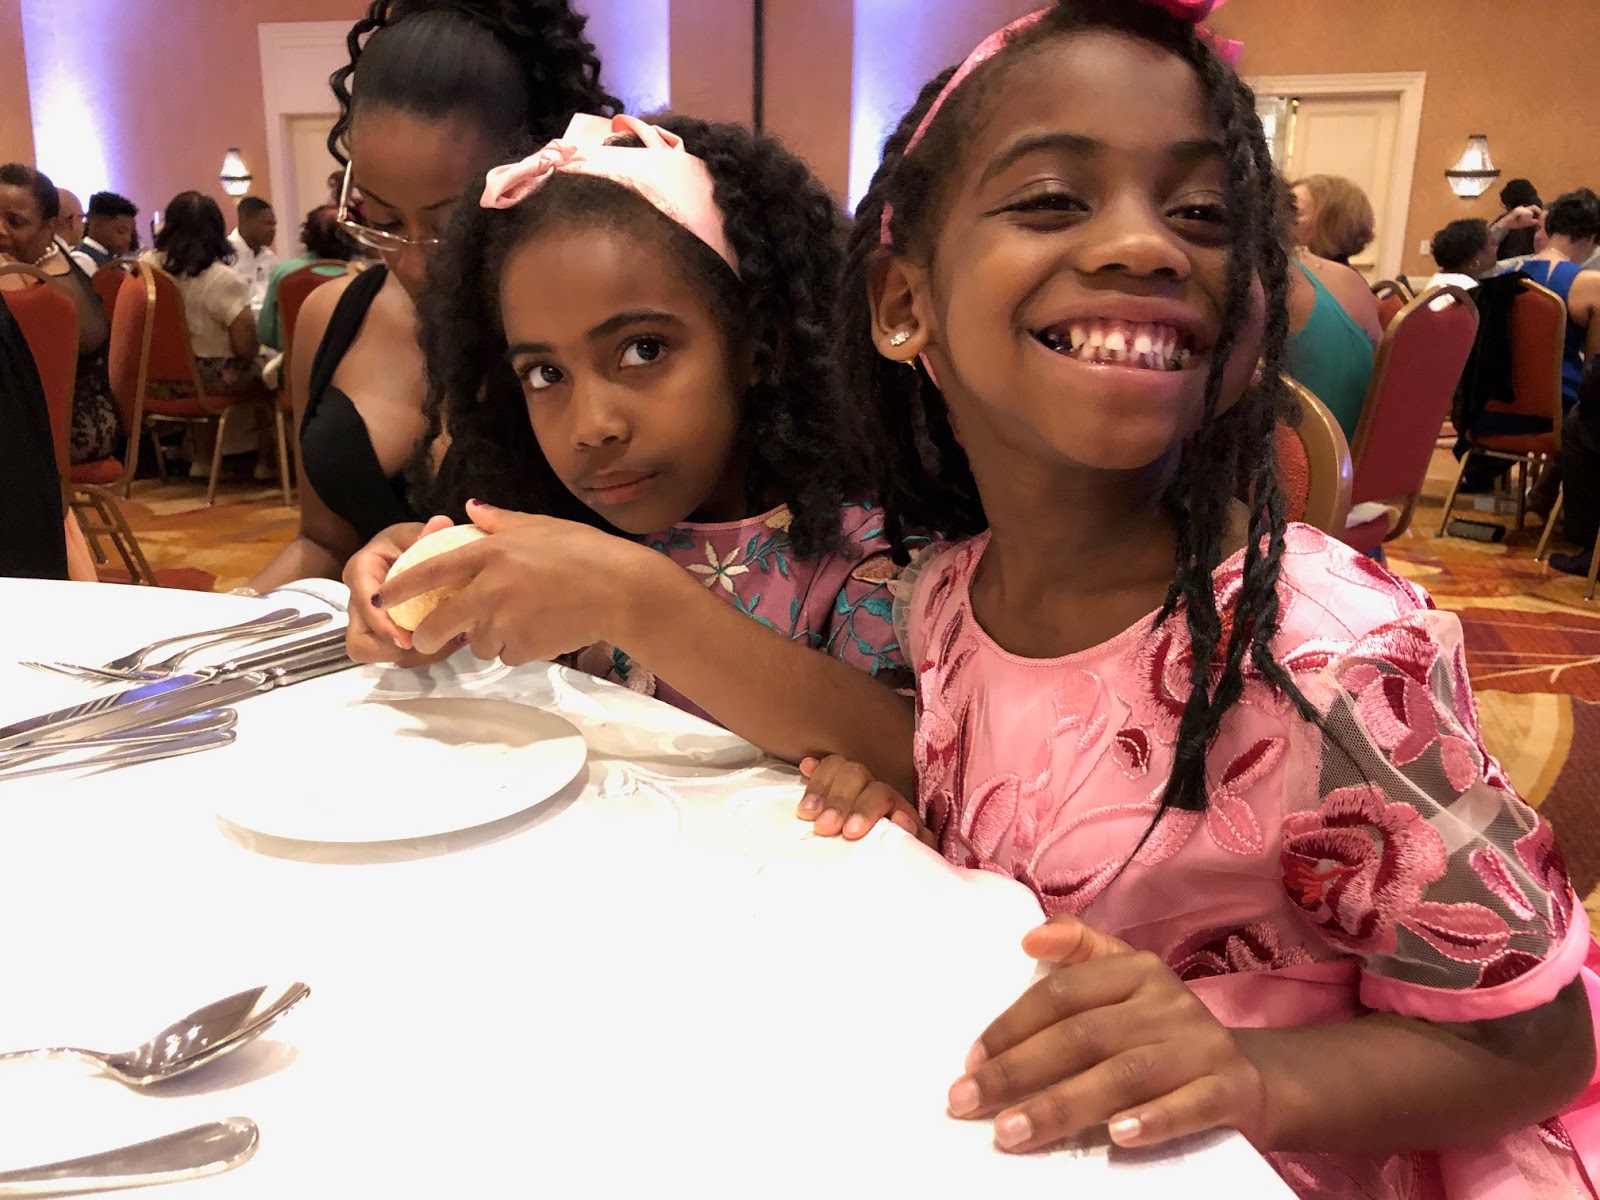
A few pictures of Aleena in the dress ~


I was thrilled when I finished both of these in plenty of time. The girls were thrilled with the dresses and so was I. This is the last post of the event dresses. I hope I've shared enough information about the dresses construction in case anyone else is interested in using the pattern.

As I said previously, I have a backlog of garments that will be shared in upcoming blog posts. Also, I'm headed to the Five Day Sew Camp at Carriage Corner B&B next week, so there will be much fabric shopping, laughing, talking and sewing with friends.

One Final Picture of the Girls ~


...as always more later!


Saturday, June 08, 2019

McCalls 7858 - Samantha's Version

Originally I was going to put all this information in one blog post! Then the long post started to get really long. I realized it was too much to read. If I wouldn't read something with that much information, why would I expect someone else too? So this will be two separate posts ~ one for each granddaughter's dress. 

I'm starting with Samantha's first because it was the easiest of the two dresses to make. 


First I need to say that it took me a minute to get started making these dresses. I bought the fabric from Chic Fabrics and posted a picture to Instagram...then the fabric sat. I had the same feeling I had when I made their mother's prom dress years ago.

I've made a few more prom dresses since then but the nervousness and importance of these dresses makes me pause...not because I question my abilities but because of the specialness of the ocassion! I really wanted the girls first "important and formal" dresses to be extra special!


I started with McCalls 7858 - a David Tutera special event dress for little girls. I cut out the dresses from the pink silk shantung and basted the shells together - to try on for fit. 

During the construction of the dress shells, I realized I was going to need to add several techniques to the dresses for them to be what I wanted. None of those details were included in the pattern instructions. I will detail all of it in the construction section below.


Let's start with the supply list ~
3 yards pink silk shantung from Chic Fabrics
3 yards of pink embroidered mesh from Chic Fabrics
1 12" pink zipper
1/2 yard pink bemberg lining from the collection
1 yard of pink piping from the collection
7 yards pink bias binding
2 yards of twill tape

This is a simple dress to make. I complicated it by the materials I choose and because of that I needed extra steps to insure the fabric worked well with the design.  Sammy's dress was first because I needed to make the most alterations/fitting changes to her's.

Fitting Changes ~
- Sammy's dress bodice needed to be given a closer fit after the first fitting.
- I removed 5/8" from the bottom of the bodice

Construction Information ~
- The motifs were added to the front and back bodices


- To get them to look like this I had to choose a specific piece of the embroidered mesh. I also added some additional motifs onto the bodice front and back bodice to fill in some of the empty spaces.


- The pattern instructions tell you to bind the neck with bias binding. Ahhhh no. Not with my fabric choices. So I cut and sewed linings for the bodice from a pink bemberg rayon. Sammy's choice.


- I added a pink piping to the neckline and inserted it between the lining and the bodice. I wanted a better neckline finish than the pattern offered.

- Bias binding was made from the satin blanket binding that I purchased. It was the only thing that I found locally that matched/coordinated the fabric.


- The bias binding was added to the sleeve edge and the skirt hemline.


- The twill tape was added to the crinoline, like suspenders to insure it hung well underneath Samantha's dress. Now while the crinoline had a waist tie, it just wasn't snug enough on her.

I don't consider myself a slow sewist. NOT.AT.ALL! But all of my sewing lately has been that. Slow, careful sewing with quite a bit of seam ripping so I can get things just right. And I've been fine with that...some because I have a wardrobe of garments and don't feel the need to bang out things to wear. Some because I want to take my time and make more sew challenging garments.  These dresses fall into the more complicated garments category.

A few pictures of Samantha wearing her dress ~


Samantha was funny. She ate everything that was served. Pasta starter, salad from her plate and her sister's plate especially after she realized the salad dressing was good! The roast chicken breast, mashed potatoes and veggies. She ate her cheesecake and fruit for dessert. Ten minutes into the program, she laid her head in her Mother's lap and slept for the next two hours. LOL! A five year old with a full belly!!!

Conclusion ~
A few things I learned not from the making but the wearing of the dresses. We never thought about how the crinoline would work with the dresses, when they sat or more importantly when they needed to go to the bathroom. She needed assistance with lifting the dress to clear the toilet - true talk. AND little girls go to the bathroom ALOT so it was several trips between the two of them with my daughter and I splitting the trips.

- I should have made belt loops for the ribbon belts. 
- They slipped up and down all evening and by the time we left, they had removed them. 
- I bought cheap hooped petticoats to go under the dresses which was okay for this instance. 
- But I'm using this pattern again for flower girl dresses for them. I'm going to buy the more expensive layered tulle slips for those dresses.

I'm glad I purchased the expensive fabric to make these special dresses for the girls. Their reactions to having them, the compliments they received and their smiles made it all worth it.  Aleena's dress is up next!


...as always more later!


Thursday, May 30, 2019

The Making of the Granddaughter Ball Gowns

I've been so involved in making the dresses for the granddaughters that the dresses' construction has consumed the last 10 days of my life!  

First fitting of the dresses

There will be separate posts for both dresses, detailing all of the sewing information, after the event.  But five days in one dress done and one almost completed and I decided that I needed to do a Intro Post because there is sooooooo much information regarding the construction of both dresses.

Here are a few pictures that I shared on Instagram of the dresses construction.

Samantha's ~


Aleena's ~


I finished Aleena's late yesterday evening.  During the day, I hand stitched the zipper in, added the hook and eye to Sammy's, so they're both hanging & ready to be picked up. 

One quick note ~ this is an easy pattern to sew. As usual I complicated the dresses by my fabric choices and choosing to use the best sewing techniques I know. I wanted the girls dresses to not look homemade and thrown together. I wanted them to be as special as the event calls for.

I will have a lot more to say about each dress in the next couple of posts...as well as my own dress...which I've finally decided upon AND decided that I need another trip to the garment district for fabric. The drama never ends! *LOL*

...as always more later!

Saturday, June 09, 2018

Little Girl Dresses from Hobby Lobby Fabric

Even though Hobby Lobby is about 20 mins from me, I rarely go to the store. Working in the middle of the Garment District in NYC and online pattern sales allow me to purchase what I need without going to the brick 'n mortar stores.   

Last weekend I was out with my Mom, Daughter and the grandbabies for some birthday/late Mother's Day shopping and we found ourselves on that side of town. So we made a trip to the store. Of course I made a beeline to the fabric section, while everyone else checked out the other merchandise. And of course I found fabric to buy...


I also found elasticized yardage that I thought would make excellent dresses for the girls in pink and blue cotton with embroidered edges. 


Because Saturday was "Picture Day" for all of my Sewcation makes, I sewed the dresses up so the girls could have their pictures taken too.

The Supply List ~
1. One yard of the elasticized cotton embroidered lawn
2. Floral Organza Trim appliques purchased from the notions stash by way of Pacific Trimmings
3. 1 - 1" gold snap from M&J Trims

Construction ~
A simple seam up the back finished the body of the dress. I pinned the fabric onto the girls with the wrong side out. Then stitched it closed. I had to go in again and take deeper seams on both girls to make sure it was tight in the bodice.

With the leftover fabric, I cut straps for both girls.  I had enough to make Samantha single straps that met near the center back. For her straps, I folded the edges over and stitched down, then stitched them to the dress front and back.


For Aleena I had to make a halter strap with a snap closure because the remaining fabric wasn't long enough to make straps for her.


To finish the strap on Aleena's dress, I didn't want to fold over the edges and lose length, so I stitched a piece of white organza ribbon onto the edge to finish and strengthen the fabric for the snap. The snap was then stitched onto the straps. The weight of the snap actually worked as a stabilizer and helped hold the dress onto Aleena better.

The organza floral ribbon applique was stitched to the center of each dress to give them a little something extra and each dress was done since I didn't need to hem them.

Pictures of the girls in the dresses ~


Aleena's Pink Dress ~


Samantha's Dress ~


...and the thrill was gone...


Conclusion ~
I bought 10 yards of fabric (5 pieces) from Hobby Lobby because most of the things I liked were 50% off. At least these 2 pieces are no longer on my cutting table but headed home with the girls. 

Hopefully you can see from the pics that they really liked their dresses! Since it will be hot this week (temps in the 80s), these dresses will get worn to school. They were happy. My daughter was happy and so was I!

p.s. ~ 
Both girls and their little brother were here, so of course he had to get in on the picture taking!


...as always more later!


Sunday, October 09, 2016

A Girls Cardigan from FreeFleece.com

I found this free little girls cardigan somewhere on my internet travels and I decided I'd give it a try. I'm building a wardrobe for the granddaughters and wanted to add several different types of garments to it. Believe it or not, it's hard to find a basic cardigan in the Big 4 pattern catalogs...probably why I went looking for one.


This one works well for late summer/early fall but will need some updating to go into winter because I believe in long sleeves for winter. Also, I chose to make this version from ponte fabric. I wanted something to go over t-shirts and long sleeve t-shirt tops but will be current and a little funky!

One of the goals of sewing for my granddaughters is to give them not only a new wardrobe but to make it a little fashion forward. So I'm making fabric choices for them like I'd make for myself. That's why this cardigan was made with a solid navy ponte and a coordinating navy/white print. It's a little funky and fun and will work with most of the leggings and jeans that I made.

This pattern was easy to use and even though it's a pdf pattern, taping it together was quick. Little people mean little pieces meaning a small amount of paper needed to tape it together. I traced the pattern pieces off in a size 3 for Miss Lena, however, after trying it on her, I'm going up 2 sizes. This one will go to Sammy.


Originally I was going to only use this pattern for Lena because I thought it was a little too much for a 2.5 year old who is still rolling around the floor in temper tantrums. But Sammy tried it on during the fashion shoot and loved it. So this one and the other version I've cut out in chocolate ponte but haven't sewn yet will become Sammy's. I've also figured out how to lengthen the sleeves on the pattern so Lena's ponte versions will have long sleeves.  Now while Sammy loved it, I only photographed it on Lena.

Here are the pics ~


Lena is wearing the cardi with a white t-shirt and blue jeans   
made from a Kwik Sew pattern that's up next on the blog.


If you have a little girl that you sew for, I would recommend downloading the pattern and giving it a try. I really like this pattern and it's versatility!

...as always more later!


LinkWithin

Related Posts with Thumbnails