Showing posts with label Fun in the Sun Summertime Dressing. Show all posts

Monday, September 14, 2015

A Vogue 9048 & TNT Pattern Mashup

I started this top prior to leaving on vacation but after making so many maxidresses so quickly I was sewed out.  I left it to finish up when I returned from vacation.  Well we all know that I had a really eventful vacation and two weeks after, so I'd just started thinking about it again.


After looking at it with fresh eyes, I realized there wasn't much left to do to finish it up.  Also, I've been seeing a lot of this type of look on the streets of NYC and I realized that I could wear this style now...


I started this top by using Vogue 9048 and my TNT dress pattern. Originally I wanted the neckline and collar from the Vogue pattern. To alter the pattern, I used my pattern sandwich trick, layering the new pattern piece, the TNT dress pattern piece and a fresh piece of pattern paper to make up new pattern pieces.

I lengthened the pattern pieces by 15" and cut it out from a black and white cotton voile from the collection.  Originally, I cut out short sleeves and I went back and forth over whether to add them or not. Finally, I decided not to use them. Why? Because I'm still living in manufactured air everywhere and I always wear a cardigan against the cold.

  • There is an 18" zipper in the center back.
  • I omitted the collar - decided it would be too hot.
  • I scooped the center front neckline out another inch at the center decreasing on the sides until it met the original seam.
  • Turned the neckline and armholes down 1/2" pressed and stitched flat.
  • I secured the side seams against tearing by pressing some Design Plus Fusible Stay Tape at the end of each side seam. Then stitched it flat.
  • Cut 3" off the bottom then turned up 1/2" pressed and stitched flat.


Voila! It was done!  As you can see I'm wearing it over my leggings. It's a cool outfit for these last hot summer days especially since I no longer have a dress code.

Wearability Factor ~
I wore this on one of the hottest days during the past week and going out the front door I knew the leggings were going to be hot. I really don't like pants or anything on my legs during the heat so wearing this outfit was tricky, but I like it so much and wanted to wear it.

I also realized that I'm most comfortable wearing a boatneck and since this one is closer fitting, it bothered me all day. I kept having to tug at it because either my handbag pulled it tight up against my neck, sitting down without adjusting it also pulled it up against my neck. Even moving around in it caused me to tug at it.

My side slits are too high. When the wind blew the cotton voile flew in the wind and you could see my leggings clearly. Now while I was fully clothed, I'm still getting used to this whole close-fitting situation and I was definitely uncomfortable...especially after I caught a dude staring at my ass-ets.

Now would I make this again...yes! If I change the neckline, maybe to a v-neck and add some short sleeves using a little heavier fabric, this would be even better. This version was sooooo comfortable to wear and I felt very trendy and cool in it. Also, it was a head turner and I got quite a few compliments...so you might see a fall version of this one sooner rather than later.

In Conclusion ~
This was fun to wear. I would have never been able to wear this to my former job and it was freeing to be able to do so now. It also works as part of me trying to find my new style. I like how it's funky, cool and even a little sexy...

....always more later!


Wednesday, May 08, 2013

A Digital Ponte Print Dress

I'm on a print run.  I wanted to get two quick spring dresses made from some trendy prints purchased for that purpose, and I didn't want them to linger in the fabric collection. This is the second of the two dresses...

This was the inspiration dress...


...which prompted this fabric purchase from Tessuti Fabrics.


I bought two digital pontes from Tessuti because I hadn't seen them anywhere else.  I was thrilled with how fast they appeared at my home since they were coming from Australia.

A simple straight dress to highlight the fabric's print was what I wanted so of course I started with my TNT dress pattern. I guess I could have started with another dress pattern but honestly I want the dress more than I want the fitting challenge of a new pattern.


After pre-washing the fabric, there was quite a bit of shrinkage and my two yards went from a full two yards to 1 3/4 yards...not enough for a dress...at least for my body. I had to come up with a new plan.  

There is a lot of ponte in all colors and weights in my fabric collection.  Hey, I like ponte! *smile*  You all know that I'm a huge fan of print-blocking so I thought why not have a solid red ponte back?  But after combing through my fabric collection, the only red I found was a wool ponte that just didn't work with the Tessuti one.  After fishing through the collection again, I found a blue ponte that did coordinate with the print...


...adding the blue back takes the dress from normal or expected to unexpected and isn't that what the Cavelli inspiration dress is all about?!

Some stats ~

Fabric:
Digitally printed ponte knit from Tessuti Fabrics
Blue ponte from Fabric Mart

Notions:
22" blue invisible zipper
a little stay tape
strips of ltwt. fusible interfacing

Construction ~
  • The dress is unlined.
  • I cut 2" off the sleeve at the hemline.
  • Then I cut a 3" band from the blue ponte and added it to the bottom of the sleeve.
  • Lightweight fusible interfacing strips were added to the center back seams before inserting the invisible zipper to prevent the zipper from rippling.
  • Turned down a half inch on the neckline, pressed flat and stitched it down.
  • All hems were pressed flat and stitched down.
  • I stitched the back seam closed.  It's a knit dress and there is enough width at the hemline for walking ease.
It was a simple sew.  What makes the dress distinctive is the fabric choices I made and making sure that I cut the fabric to best highlight the print.  Also choosing the right solid ponte to back the dress with was just as important to me.

Some more pics of the dress...


I wasn't sure if the dress would work but after completing it, I'm thrilled with the finished dress because it makes me feel happy wearing it.  This has already been worn to work and it passed the wearability test with flying colors. Not only did it garner quite a few compliments for its color but it also felt like I was wearing an upscale t-shirt dress.  T-H-E perfect work dress for me!

Next up is a simple black ponte suit.  I need another one to add to my serious work wardrobe especially after making all of these fun, colorfully printed dresses.  I've already started construction on it, so look for it soon.

...as always more later!


Monday, May 06, 2013

A Print and Lace Dress

This dress is all about the fabric!  Seriously I bought this fabric because of the lace and floral print ~ it encompasses two of this spring's trends.  Florals and lace...then combine it with the inspiration picture...


I'm so trendy that I'm setting off the trendy-ness alarm! *LOL*  Both this print and the lace were on hand, so I'm making good use of that enormous fabric collection I own.


It's a pretty dress to usher in spring. I will wear it with either my purple Butterick 5760 cardigan or any of the black cardis that are already in my closet.  Love when sewn pieces from the collection work with newly created pieces.

Some stats ~
Pattern:
TNT sheath dress pattern

Fabric:
Rayon challis print from Fabric Mart
Black lace from Fabric.com

Notions:
Black Rayon bemberg lining
22" black invisible zipper
1" black lace for lining hem
Black rayon seam binding for dress hem

Construction ~
There are a few details that I added to my TNT dress to get this new version of my TNT dress.

Lace at the neckline...
This fabric has a very busy pattern so I wanted something to "fence in" the print and give it definition.  So I made a lace flat binding to add to the neckline. The strip is made from the black lace layered over a piece of black cotton bias binding, pressed in half and sewn into the neckline between the fashion fabric and the lining.


I think it adds a nice touch to the neckline.

The Sleeves...
I cut the sleeve on the crosswise grain using my 3/4 length sleeve pattern.  The selvage edge of the lace made a great finish to the sleeve hem instead of adding one. 


A little gathering at the sleeve cap helped to ease the cap into the dress perfectly.


The lace sleeve is what drew me to the dress and I love how it gives that unexpected lift to the dress.


Lining...
Originally I was going to use a white lining in the dress.  I liked how the white made the fabric's print look lighter.  But after holding the lace up to the dress, I realized that the white lining would work against the black lace sleeves.  So I went with a black bemberg rayon lining which, of course, made the fashion fabric shade a little darker.  I'm okay with that because I want everything to play nice on the inside of the dress. 


Naturally I added a 1" black lace to the hemline of the lining...why not finish the dress innards as nicely as I finish the exterior of the dress.

A few more photos ~


Conclusion ~
I make a lot of dresses. If you've noticed, lately they have been a little more fashionable and fashion forward, because really how many solid black, gray and navy dresses can you own?  Even in the conservative environment that I work in.

This is the first of the easy summer dresses I plan to make this spring & summer. It's part of my "Fun in the Sun Summertime Dressing" collection.

...as always more later!


Friday, April 26, 2013

"You Look Like Spring!"

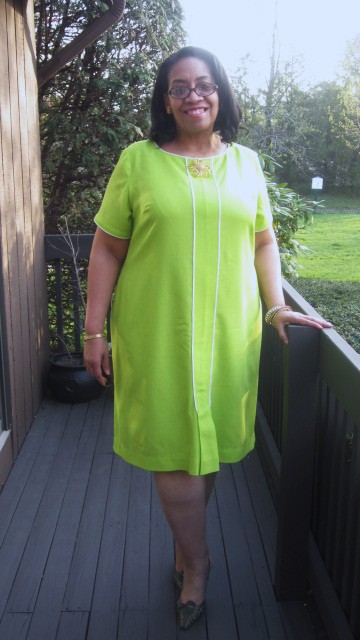
That was the comment I heard most when I wore the dress to work on Monday. It was T-H-E perfect dress to wear on the first day of a workweek!  Here is how I photographed the dress Sunday afternoon...


Here are the pieces I wore to work...
(I did, however, wear the pin in the above pic!)


...sorry it's on Lulu but my work photographer is a little/lotta pregnant right now so I feel bad asking her to climb the stairs to take some pics...

Some stats:
Pattern ~
TNT dress pattern

Fabric ~
Lightweight wool crepe from Mood NYC

Notions ~
lime green rayon lining
22" lime green invisible zipper
2" white lace
white seam tape
white pre-made rayon piping

All of the construction information is contained in this post.  One more thought on construction - I'm normally a color match fiend.  Thread, rayon seam binding, zipper, etc. all must be the same color but this time I went with the white and green theme throughout.  I really liked adding the white lace and seam tape to the lime green fabric and lining. 

Wearability ~
Usually I sew a dress and then wear it days after I've posted it to my blog.  Since this was my April Mood Project, it appeared on the Mood Sewing Network blog first and since I knew it would be a few days before it appeared here, I wore it to work. So how did it wear?

  • First it wrinkled badly. I had huge wrinkles in the dress front where I sat and also in the back of the skirt where I sat on it.  Not only the fashion fabric but the lining fabric wrinkled too!  Will this cause me not to wear the dress again?  Heck no! *LOL* Because I love the way the dress makes me feel.
  • Next it grew from my body heat.  Now I know that wool crepe grows and yet I sewed it normal size instead of a little closer to my body.  Y'all know I like the image of close-fitting without the dress actually being close-fitted because no one should be subjected to my lumps and bumps.  I'm thinking of taking in the sides a smidge to help with this because the dress was loose in the back by the end of the day.  The cardigan helped disguise it but I knew.
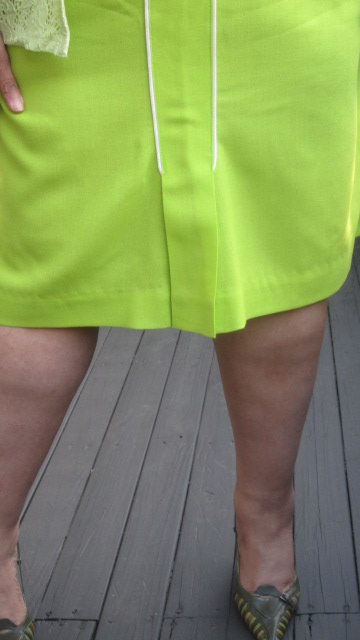
  • I should have run the piping all the way to the hem. I don't know why I thought it would be cool to have it stop at the top of the pleat?!  Stopping the piping there causes the pleat to poof out when I walk. Now I asked two co-workers what they thought and they couldn't see anything wrong with it...but if I were to make this dress again, I would extend the piping all the way to the hemline.


Questions ~
There were a few questions related to the making of this dress that I'd like to answer.

Scenic Route asked:
"On a recent post you mentioned the need to use light interfacing on the neck, sleeves, etc that are to be piped.  However, I didn't see that step on this dress, is it not always necessary?"

The short answer is no.  The more involved answer is, it depends.  Why does it depend?  In this case, it's because the fabric is a wool which means that with a little steam, I can mold and shape it, manipulating the fabric to match the lining fabric.  The fabric in the Butterick 5147 dress was stretched out of shape due to the handling of it.  I should have noticed it sooner and added the interfacing instead of just plunging ahead.

Malady asked:
"I've never stabilized a neckline. Can you explain how?"
I've posted about this before complete with pictures.  This post details how to add the interfacing to the piece.  If you have any more questions, leave them and I'll answer them.

splainer asked:
"What do you like to use for piping on your wool crepe dresses?"
Honestly I'm lucky since I have such great resources in NYC.  At Daytona Trims, they sell rayon piping in a million colors.  Since I like piping so much I stock/stash it in several colors (black, brown, red, navy, white & creme). I've also picked up a few special combos to stash.  I've also made my own piping especially when I wanted a special look or for it to coordinate with my fabric.  There are a lot of great tutorials out there on how to make piping so I guess I would google it and figure out which one made sense to you. 

You can purchase piping at Mood.com.  Daytona doesn't have an online presence but they have an awesome amount of piping in their store.  Pacific Trimming also has piping in their online shop, although I've never purchased from them online. If you want something, I would call them with any questions.

A few more pictures ~


Conclusion ~
It's my TNT (tried 'n true) dress so of course it was a great place to start.  It was easy to wear and the fabric was a dream to sew.  It's the perfect dress for my Fun in the Sun Summertime Dressing Collection.

...as always more later!


Sunday, April 21, 2013

Construction Details for a Spring Wool Crepe Dress

The cold and the dark are gone.  The mornings get brighter earlier.  The days are not only light longer but they're getting warmer too and I feel like the bears that have come out of hibernation...this is MY time of year.  I love spring!  I love warm breezes and sunny days.  I may not be an outdoors kinda girl but I love this time of year especially because it means that I can wear skirts and dresses ALL.THE.TIME!

So of course my next project is a dress.  Hey, you knew that before I typed it! *LOL*  AND of course it's from my tried 'n true (TNT) dress pattern.  I made this dress back in 2008.


Lace was used to emphasize the pleat on the front of that version but this time I went with my next favoritest embellishment, piping, since I've sewn a lot of lace lately.  Yes, I know I've been piping everything in sight too but I need just a touch of white for this dress and I can add it best with some piping.  

I'm starting with a lime green lightweight wool crepe from Mood Fabrics... 


This will be my Mood Garment for the month and the first dress in my, "Fun in the Sun Summertime Dressing" Collection.  So besides discussing what I'm making, I wanted to share some of the construction details...

First up was making the pleat. I've done a pictorial version of the instructions this time but the original dress post contains concise directions also.

Added 3" to the dress center front

Full length view of the 3" added to the dress front

Marking the cutting line for the neckline

To sew the pleat, I sewed a line of stitching where the original "place on fold line" was then I pressed it down and flat.


The next sequence of pictures is how the dress was assembled.


Piping added to the neckline

White 2" lace added to the lining hemline

Close up view of the lace

Lace seam tape was added to the dress hem so it
would match the lining lace

The neckline and pleated front with white piping

Sleeve with piping detail at the hemline

Sleeve inserted into the dress

The dress took about 10 hours to make between Saturday and Sunday.  I know  because I clocked the time.  See after watching The Great British Sewing Bee, I wanted to know how long it takes me to complete a dress with a lining.  Yes, I did add a degree of difficulty by using so much piping on the dress but you know I wasn't going to have an unembellished dress.  Just wasn't going to happen. *LOL*

The most time-consuming parts of the dress were the piping (of course) because I hand stitch all of the piping down before sewing it into a seam.  Also, the sleeve hems needed to be faced and the hems (both dress & sleeves) were hand stitched.  

I did figure out that I can cut out and sew my dress shell together in two hours ~ that's including sewing in the invisible zipper.  It's adding all of that extra stuff that takes so much time...but it's all of the extra stuff that I really like and what makes the dress so special to me!

The dress featured above has been retired.  I loved wearing it and it's why I wanted another one.  The lime green & white shout spring to me and I'm loving the combo...so here is an outtake from the photos taken earlier this afternoon...


The dress will appear on the Mood Sewing Network on Tuesday.

...as always more later!


Friday, April 19, 2013

I'm a Talbots Woman - Part Two

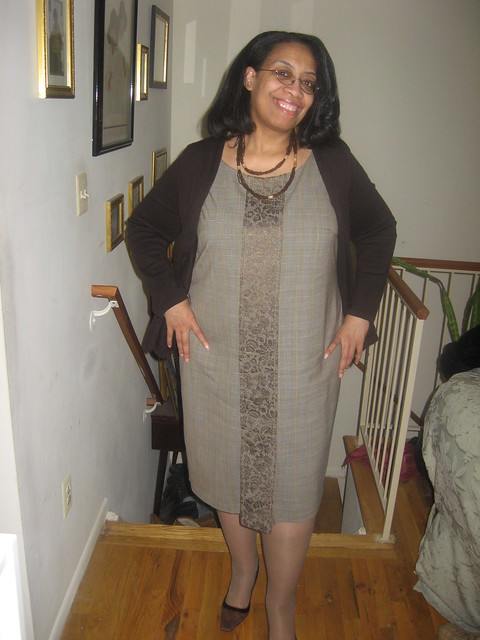
I love dresses.  I'm sure everyone knows this because if you've read my blog for any length of time, you see more dresses here than anything else.  The other day at work I was wearing this version of Butterick 5147 and I realized that I'm most comfortable and look most professional in this combination.  Because of that I will continue to make more of these outfits especially since its now spring.


This email showed up in my mailbox the other day and of course I went to Talbot's site to wallow in the goodness.  Three of my favorite dresses from last summer are "The Peyton Dresses" which were inspired by a dress from Talbot's.

Now I'm intrigued by the ponte short sleeve sheath dress pictured below.  I know I'm not a pocket girl but this is such a cute, practical dress that I'm thinking I need a couple. I have quite a bit of ponte on hand in several colors ~ including yellow ~ and this would make a great work dress.


The dress appears to be simple but it has such interesting details.  The v-neck with the neckline detailing, the pockets with the slot seams, the bold buttons and the cute short sleeves all make it a versatile dress ~ great for work and church.  Of course, I will start with my TNT dress pattern, with a few pattern pieces from other garments to get my own version of this dress.

I don't even have to pull fabric from the shelves for this...it's all laying around the sewing cave just waiting to be made into new spring dresses.  So when I finish up my Mood garment, I'm going to make a couple of these.


Yellow, emerald, burgundy and pink ponte knits

I've decided to call this summer's sewing "Fun In The Sun Summertime Dressing." I can't wait to add several of these dresses to the collection!

...as always more later!


Thursday, April 18, 2013

Inspiration from a New to me Designer...

I see inspiration everywhere.  And after not much sewing for the last couple of weeks I was thrilled to be inspired by something again.  I found this dress in the April 2013 issue of Bazaar magazine...


I'd never heard of this line before so I hopped on over to the Saks Fifth Avenue site to check out the designer and their line.  I'm not sure if this line is designed by a woman, a man, or a corporation because everything I google comes up with the line but nothing about the designer.  However, can I say that if you like bold colored prints, you will love this line.  You can see it here at Saks Fifth Avenue in regular and plus sizes (love that!), at Bergdorf Goodman and at Farfetch.


This is the fabric I want to use...to which I will add black lace sleeves...


My TNT dress pattern will, of course, be the basis of this new dress.  I know it's loud and colorful, incorporating two of this summer's trends (bold colors/prints and lace), but I love the fact that I can get a two-fer in one garment.  So I'm pretty excited about making this one...look for it soon after I finish up my Mood garment!

...as always more later!


LinkWithin

Related Posts with Thumbnails