Showing posts with label Butterick 5678. Show all posts

Saturday, September 21, 2019

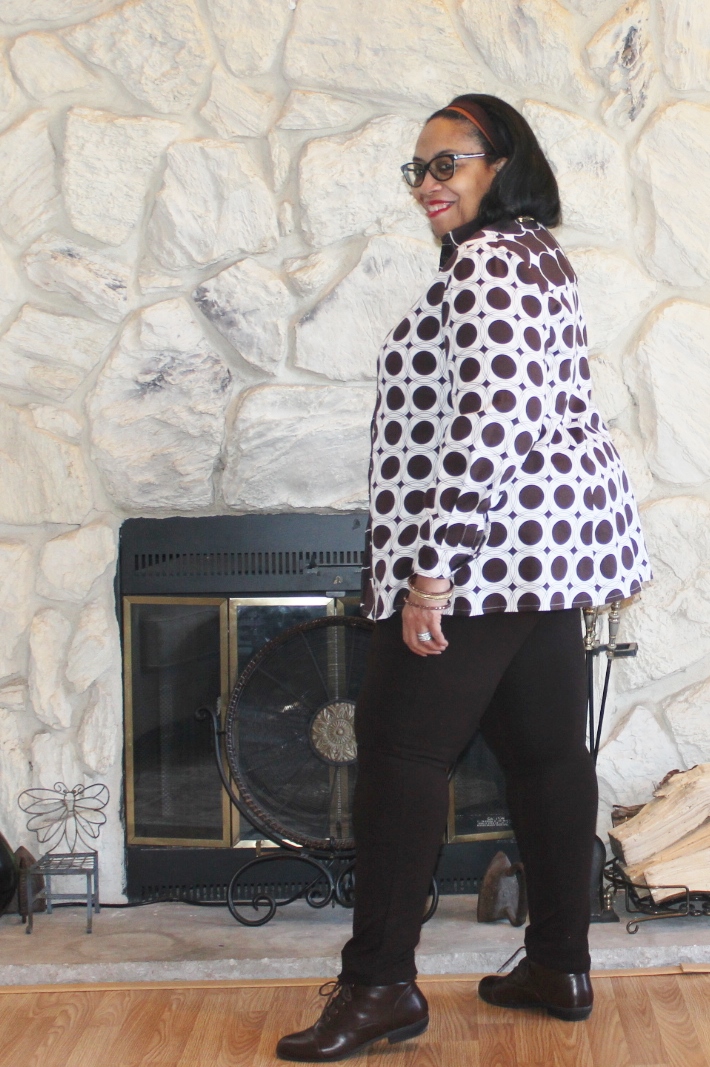
Mod 60's Purple Shirt

Once again fabric is the driving force behind this shirt. I wanted something original, funky and fun. I believe this print checks all of those boxes.


However, unlike the Hydrangea Panel Print shirt, this one has a closer fit. Same TNT shirt pattern just different back pieces...or the same dayum button up shirt I've been sewing for the last two years. See it's like this...these two shirts fit my lifestyle...so why am I changing it up?  I guess I could try another shirt pattern but my thought again is why when this works?

I love finding interesting fabrics to use to make these button up shirts. They work so well with my fall/winter wardrobe of jeans or leggings with a cardigan or a topper. To throw a monkey wrench into this thinking, I do have another shirt/blouse pattern that I used a couple of years ago. It will be making an appearance on the blog soon - Vogue 8772.

Supply List ~
100% cotton fabric from Zooks Fabrics in Lancaster, PA
White shirting from Metro Textiles
Buttons from Nancy's Notions in Lancaster, PA
Interfacing from Steinlauf & Stoeller

Again no new construction techniques. I chose to use white shirting for the collar, undercollar, front band and cuffs. When I chose this print fabric, I knew I was going to add the white to it...to emphasize the print...yet close in the print and give your eyes a place to rest.

A Few Pictures ~


(I loved this shirt when we took the pictures and amazingly 
this was the only one of the back we took! Why?)

I love the bold print of this fabric especially with my white denim jeans that I'm still wearing...cause it's summer until September 23rd! BTW, can I talk about these jeans for a minute. 

They're RTW denim jeans from QVC from the Women with Control Line. They have tummy control (cause my tummy has none! LOL!) and I buy them in tall so I have extra length. Most importantly though they fit over my bodacious bottom which is a challenge I have with a lot of RTW jeans. I own these in white, black, a muddy brown called chocolate and a midwash denim. Yes, I'm one of those people that when I like something I buy it in all the colors!

So out of the three pieces of fabric purchased from my last trip to Zooks, I've sewn two. The third is going on the fabric shelves because frankly it's a little too summery to sew now. I've been sewing so more is coming to the blog.

Parting Shot ~
My granddaughter, Samantha, always throws up these two v's when she takes pictures...so much so that we have to tell her to stop.


I was starting to get goofy.  We take photos of 3 or more garments when my daughter comes, to maximize her time and my sewing time, I start to get pretty silly after "posing" for awhile. Here I am imitating Samantha.


...as always more later!


Wednesday, September 18, 2019

Hydrangea Panel Print Shirt

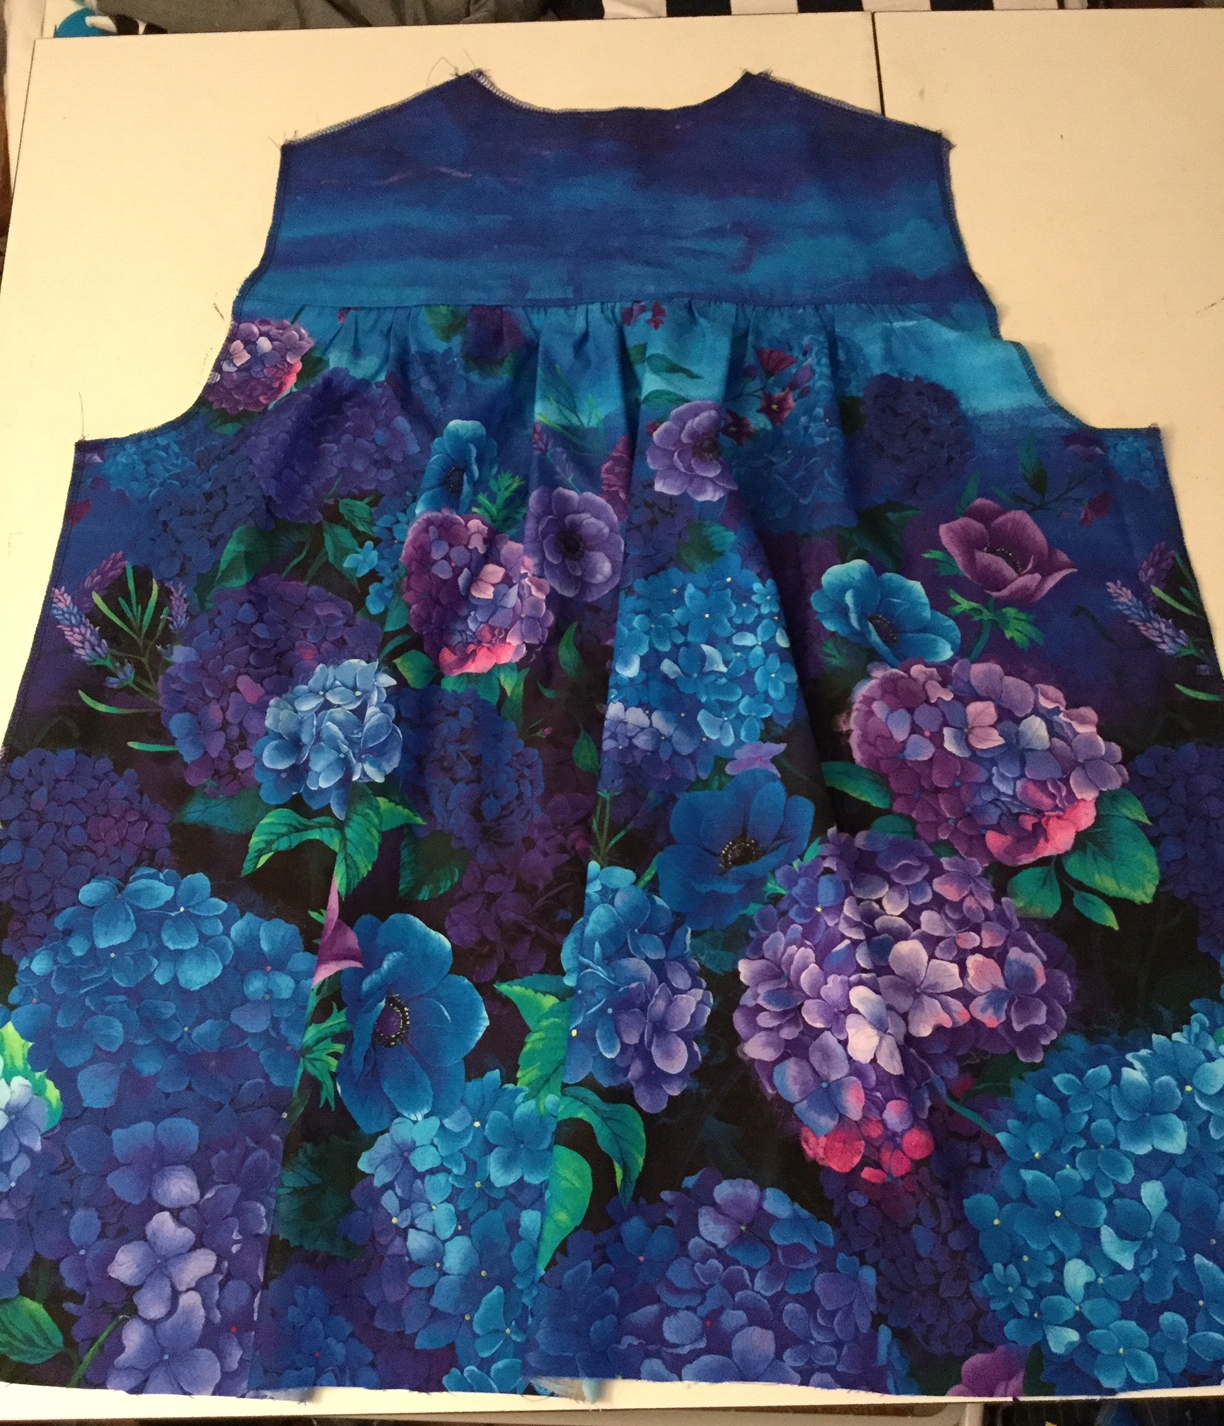
When I purchased this fabric I knew I wanted to make a shirt from it using my TNT shirt pattern. I wanted the full back so I could layer camis or turtlenecks under it in the winter. As well as, show as much of the panel's print as possible. This is a mash-up of two OOP shirt patterns (Vogue 7700 & Butterick 5678) but these patterns work for me. One of the two TNT versions I use to continue making a wardrobe of button up shirts.


This shirt is all about the fabric choice and my chance to fussy cut it to make what I envisioned.

Spreading out the panels at Zooks to see all of it

Supply List ~
3 100% cotton panels purchased from Zooks Fabrics in Lancaster, PA
Blue buttons from Nancy's Notions in Lancaster, PA
Interfacing from Steinlauf & Stoellers

I laid out the shirt pattern pieces on the crossgrain to insure the print would go in order around my body. Making sure that the tops of the pattern pieces showed the sky as well as the hydrangea print.


Then I used the the sky portion of the border print to cut out the collar, undercollar, front button bands and the sleeve cuffs. Using all the pieces of the panel to tell this shirt's story.


There are no new construction techniques in this make. However, I did add a little more to the body of the sleeve, about a 1/2" on either side. I wanted a big full sleeve for this shirt which I gathered into the cuffs. The cuffs are slightly smaller than my normal cuff which I think I will use in more makes going forward.

So a few pictures ~


Sorry, okay not sorry for the number of photos. My daughter outdid herself shooting this one.  I'm also so thrilled with how this shirt turned out. I've always loved "Art to Wear" garments and this shirt feels like a walking picture. I will definitely be on the lookout for more panels like this to make more shirts!  

Next on the blog is another shirt in the other piece of cotton I bought from Zooks when I purchased this one.  


...as always more later!

Thursday, April 25, 2019

A Pink Linen Bow Tie Shirt

...or my first shirt of the season.  I started with my TNT shirt pattern and added the bow tie from Vogue 8772.


Y'all know that I love shirts and added quite a few of them to my wardrobe last year. I've bought loads of fabric to make more and now that it's spring, I've been doing so.

This one was made to go with a couple of gray vests in my wardrobe.


Supplies ~
Pink Linen from Fabric Mart 
(this was purchased last year so I'm counting it as a new fabric purchase)
11 - 5/8" buttons from the notions collection 
(they have been in the collection for at least 18 years, from when I worked at the button company)
A 1/4 yd of pink gingham bias binding from Home Sew

Construction ~
There are no new construction techniques for the body of the shirt. Though to add the bow tie to the shirt neckline, I used the pattern pieces to cut it out and instructions from V8772 pattern to attach it.

However, I missed a step in the construction of the neckline and had to improvise. To right this wrong, I added some bias binding to the neckline and then had that caught up into the bow tie.


I also added topstitching to all the body seams. I did this in my sleeveless white shirt and liked the effect so thought it would work well for this one too. That's it for construction information on this one. Just another shirt to add to the rotation. 

A few photos ~


Even though it's starting to warm up and I'm thinking about dresses, there will still be a few chillier days and this will work great then. Also fall will be here before you know it as much as I hate to think about it. Anyway this is finally off the dress form...


and into my closet.  Next up on the blog is the vest from Simplicity 8265.


...as always more later!


Thursday, April 04, 2019

Silk Twill Printed TNT Shirt

Originally when I purchased this fabric I wanted to make a dress for work from it. At that time I lived in corporate workwear and while it was a little bright for that world, I bought the fabric anyway because I loved it.


This is another one of those #deepstash makes that I'm thrilled to have used the fabric in a different way. When I was shuffling through the shelf and picked it up, it said it wanted to be a shirt. I decided to feature the fabric and went with my gathered back TNT shirt.

Supplies ~
- Printed floral silk twill from the garment district years ago - this is deepstash fabric
- Buttons from the button stash - again aged well since they're from when I worked at the button company and that's almost 20 years ago now
- Fusible interfacing from Steinlauf & Stoeller

I made this one exactly like my white shirt so there are no new design or construction changes in this version. I loved the fabric and wanted to emphasize it. I've been wearing my other shirts with the gathered backs alot this winter and love the ease of wear. That's why I chose that silhouette for this shirt.

Photos of the shirt ~


I started the shirt at Sew Camp and everyone loved the texture of the fabric. Silk twill is not a popular fabric now but at the time I bought it there were quite a few pieces in stores. I do buy this fabrication whenever I find it especially if it doesn't have an exhorbitant price tag. Lately I've found it in solids rather than prints, so if you find a print silk twill grab it! Okay fabric enabling public service announcement done! *LOL*

A couple of the photos shows it with some tan knit pants. I thought they would match/coordinate with the shirt when I was sewing it. However, I'm liking the darker ponte jeans match better. BTW, this is pretty much my outfit these days with and without a cardigan at least until the weather gets warmer.

This was the first piece I made at Sew Camp and the one I spent the most time on. It's also the garment that everyone stroked because that silk is EVERYTHING!

The weekend weather is supposed to be lousy meaning there might be more fireplace photos in my future. I guess April showers really do bring May flowers. The Pembrokes and the Cardigan will be on the blog shortly.

...as always more later! 


Sunday, February 03, 2019

Stripes can be border prints too!

Well at least in the Fabric Mart universe they can be!


I bought this fabric from FM after #carriagecornersewcamp last March. It wasn't on the site when we were there but it caught the eagle eye of Nakisha from Dressmaking Debacles at the time and she let us know when it appeared on the site. She made an amazing shirt from it.  I bought some too but it sat during the summer while I made other things.

For some reason I didn't take a picture of this fabric before I washed or cut it apart to make my shirt. Though Nakisha's version is a true representation of how the fabric is made and shows the stripes much better than my pics do.  As I said my fabric was cut apart to work with the border print. This is the most conservative version of my Border Print shirts.

Supply List ~
3 yards of cotton shirting from Fabric Mart
12 2-hole 1/2" pink buttons from Pacific Trimmings
Interfacing from Steinlauf & Stoeller


Notes on Construction ~
  • There are no real construction changes to this shirt. 
  • I used the straight hem version of my TNT pattern.
  • Cutting apart the border and using it to cut out the buttonbands, cuffs, collar and collarband is what makes this shirt work.
  • I added a strip of the pink stripes to carry the border print throughout the garment since I didn't have enough fabric to cut the cuffs out of it.

I included a few construction photos so you could see the stripes and how the border print was used. Especially since the stripes seem to be washed out in my final pictures. I know I probably should have retaken them but honestly this was garment number six that I'd photographed and at that point I was done. I'm sure y'all will get the gist of my shirt.


A Few Pictures ~


(This was the last garment of six I photographed 
and I was getting really silly by this time)


Conclusion ~
This was a unique piece of shirting and the striped border was very small compared to the rest of the fabric. However, there was enough to add contrast to the shirt, so that's how I used it. This is the last shirt in "The Border Print Series" and I'm glad I concluded it by using a more classic-type shirt fabric. 

It was shirt Number 16 for 2018 and my last garment for the year. This also catches me up on blogging about last years garments.  I have a few remaining pieces from January that will also show up in February.


...as always more later!


Monday, January 28, 2019

A Circle Border Print Shirt

Back in December, I wanted to use an older piece of fabric for my next shirt in The Border Print Series. I've been collecting border prints for years and knew there were some buried deep in the collection. I just needed to dig them out. After rummaging around in it I touched this piece...


...which was purchased in 2010. Yes, I'm taking it way back. At that time I blogged every fabric purchase, so here's the post regarding the border print. However, this fabric doesn't count towards my 2019 #deepstash garments. I made this in 2018, and I'm just sharing it to the blog.

Supply List ~
- 3 yards of cotton border print fabric from the collection
   (long time residence - 9 years)
- 5/8" coconut buttons from the notions stash 
   (from the days I worked at a button company)
- Interfacing from Steinlauf & Stoeller


Construction ~
Since I was starting with my TNT pattern for this shirt, the challenge was how to use the border print since it only runs down one side of the fabric. It's the side pictured in the photo above. It was wide enough to cut out shirt fronts, the collar & undercollar and the back yoke. Originally I wanted it for cuffs too but didn't have enough. In the end I'm glad I didn't cut the cuffs from the border. I like that the larger circles just runs down the front of the shirt.

This is a lightweight shirting fabric. I bought it to make a summer dress and now I know why it sat in the collection. It's way too lightweight for a dress ~ even a summer dress ~ but it's perfect for a shirt. Especially if I wear it under a cardigan for the winter.
  • The construction was similar to every other shirt I've made, the only difference being the way it was cut out. 
  • It has a straight hemline, I didn't want a curved one for this version. 
  • I used the fold over center front piece because I didn't want to sew on a button band. 
  • When I went to fold the button band - the front band was flimsy even when folded 3x. So I added a strip of interfacing to the front to stabilize it. 
  • I don't usually do this because the fold of fabric typically is stable enough.
Everything is topstitched in white. I made samples using brown and white thread for the topstitching and the white sample won. Also took pictures of buttons for the front...the brown coconut or a simple 4-hole white one. I went with the brown coconut since I wasn't trying to make a statement with the buttons.  Those are the only construction points worth mentioning for this make. 

So some pictures of the shirt in action ~


I made this cardigan in November 2012. When I was doing the great closet clean-out after changing jobs, I just couldn't let this go. There was so much work associated with it and I loved the pleather accents. I've worn it occasionally when hanging out with friends because it's a great throw on when headed out to dinner. I thought of it when I needed a cardigan to go over this shirt. This is how I will be wearing it to work now...


Conclusion ~
This is the next to last shirt in "The Border Print" series AND it's the 15th shirt I made in 2018. For the last shirt in the series, I had another border print fabric in mind. However, the pattern tetris wasn't working with the fabric. Sometimes what I see in my mind doesn't work well with the actual fabric so I put it back on the shelf. However, I really wanted one more shirt in the series so I pulled a rather conservative shirting purchased from Fabric Mart after the last Sew Camp.

The last shirt in the "Border Print Series" will show up in February. I know this seems to be stretching them out but blogging all of my makes goes with my 2019 goals. Plus, I like having them here on my blog. The next post is my end of the month round-up.

...as always more later!


Sunday, November 04, 2018

A Talbots Influenced Shirt

This is the third shirt in the "Border Print Series." I added it to the series because of the mix of gingham fabrics and the fussy cutting needed to make the shirt work...


Let's start with the Inspiration photo that jumped this shirt off for me...


I've held onto this photo since spring because I love the play of the larger versus smaller gingham. I'm grouping it with the other border print shirts because of the fabric manipulation required to make the shirt work. To get the look there were bias pieces cut out as well as the front and backs being singly cut in the same manner I cut a border print. That's how this shirt gained a place in this series.


Here is my supply list ~

Fabric:
Both gingham fabrics are from StyleMaker Fabrics. I chose to make mine from navy & white but other color combinations are available here.

Notions:
1/2" 2-hole white buttons from Pacific Trimmings
Interfacing from Steinlauf & Stoeller

Construction ~
As I mentioned above, cutting out was the most important part of making the shirt work, especially since this version of my TNT pattern has princess seams.  For this shirt, I went back to the straight hem of previous shirts. I know my inspiration pic shows the curved sides but I was ready for something else.


I also omitted the bands with buttonholes and buttons on the sleeves. My sleeves have a sewn on cuff.

Using the straight hem made it easier to match the plaid across the seams of the shirt.

For the back yoke, I cut the fabric on the bias and added a seam to get the chevroned pattern. I like the detail but honestly I did it so I wouldn't have to match the plaid of the back yoke to the shirt back bottom.

Buttons on the front are white 2-hole shirt buttons which are smaller than buttons I normally use. Because of that I added more of them down the front of the shirt. When stitching them to the button band, I had to use tape to hold them down so they wouldn't move around. So thank you to whomever left that tip in the comments.

A Few Pictures ~


Conclusion ~
I took a couple of months to acquire the fabric I needed to make this shirt. I'm glad I was able to get a combo I liked. It was the challenge of manipulating the fabric and making the plaid match all the way around the shirt that was the intriguing part for me. So while this is not "technically" a border print, the extra work to make it happen is why it's in the series.

...always more later!


LinkWithin

Related Posts with Thumbnails