Showing posts with label Vests. Show all posts

Friday, February 13, 2026

If Fuzzy Wuzzy was a Bear

I saw this fabric on StyleMaker's site and all I could think was what a fun and cozy vest this would be over a turtleneck.

Supplies ~

OOP pattern McCalls 7481 - I've used this pattern several times over the years with each make being very different from the others.

1.5 yards of Checkered Cozy Teddy Sherpa Fleece (also in another color)

2 yards of polyester printed lining from Fabric Mart (deep stash)

Snaps purchased from SIL Threads (yet to be sewn on the vest)


I named this the Fuzzy Wuzzy Bear Vest because I knew it would not be a slim look on me. But I wasn't going for slim. I was going for warm and comfortable and this vest fits the bill.

A couple of things:

As expected this was a "bear" to cut out.  I had to make sure that all the pattern pieces were laying in the same direction.  I didn't want the checkers to have a variation of color in different sections of the vest.

Then there were all of the fleece cuttings flying around as I cut the pieces out. I ended up serging the edges of the pieces, even though I lined the vest, to prevent the cuttings from being everywhere.  I also had to clean my serger as I serged each piece because the cuttings were everyplace.  It was a flurry of blue sherpa fleece in every crevice.

I chose a pattern that had some interest to it but not a lot of pieces.  I'd altered this pattern back in February 2019 to include in-seam pockets in a vest. That vest inspired this one...and that's where this project went left!

There were no instructions for this vest so I went with what I remembered.  Constructing the shell wasn't a project.  I made the lining from the pattern pieces without the pockets.  Then I sewed the lining to the vest. I clipped the curves and the armholes. Went to turn the vest and it wouldn't turn. Y'all I thought I would lose my mind because no matter what I did, it wouldn't turn.  

Lining sewn to the vest

Inside shell of the vest

I had to unpick the hem and the armholes sleeves to flip the lining in.  Then because I couldn't figure out how to machine sew it together (even after consulting my internet friend, Google) I ended up handstitching the lining in.  Yes, I handstitched the hemline, and each armhole.  Luckily the furry sherpa hid my hand stitching. Then since I didn't edge stitch the lining to the sherpa fabric, I use long stitches to tuck the lining into the vest. That took 4.5 hours of watching Bridgerton Season 3, to rip and then hand stitch the vest back together.  BUT, it worked!

...and that's why the snaps purchased for the vest weren't sewn on the vest before I wore it out in public...because traumatized from all that handstitching! 😉

So here is the vest in all it's glory...

Vest worn with vintage Sarah Coventry broach


My friend makes me laugh every time she takes pics


The inside of the vest

The finished vest looks just how I imagined it would when I saw the fabric on StyleMaker's website. It's been really cold here lately, like colder than Alaska cold, so this was perfect the day I wore it to work since it was 22 degrees outside!  

This isn't the only garment I made during my holiday break, there's more coming!  Honestly it's been so dayum cold and windy, acting like we live in Antarctica, that I haven't been pressed about pictures.  Also, after these garments, I stopped sewing for a minute. I was living in cashmere sweaters and sweatshirt layers...not much me made to keep me warm against the artic temps.

So, I still have more share.  We did take more photos on another day of another pair of pants I made.  Will share that soon.  The temperatures have finally normalized and I have a few days off so maybe I will get some more sewing in.

...as always more later!


*I know Blogger has made it more challenging to sign in but would you kindly sign your name if you use anonymous.  It makes it easier to talk back to you.  Thanks so much!

Sunday, October 19, 2025

A Vest

I started this vest in May 2019, y'know in the before times. It began life as a jacket. Then it sat because I had a challenge with the sleeves. I did move this unfinished project with me in 2020 and for the last five years it's been hanging in the sewing loft.


Honestly, it hung there until earlier this spring when I realized that with the weight I've lost it would fit again. By then the sleeves had gone missing and when reassessing, I thought it would make a great vest. Also, the amount of work I had already put into this piece made it hard to let go. 

It's made from a navy linen I bought from Fabric Mart's brick 'n mortar store during a Sew Camp. I added some navy/white gingham scraps to the pocket flaps and back neck facing. I also added navy gingham bias binding to the front facings.

Some of the construction was blogged about back in May 2019.  I'm not gonna send you back there, I'm just gonna share it here. 

First here is a construction picture...


I removed one breast pocket. They just weren't laying right. I did the same thing when I first made jacket so maybe these breast pockets don't play well with my body...or I'm just not skilled enough to get two pockets to lay right on a jacket...whatever! Three works.

When I picked it back up it looked like this...


I did so much work with the topstitching and lining the pocket flaps in navy gingham...


There wasn't much left to complete it. I added bias binding to the armholes to finish them.  Then I added bias binding to the hemline before hand stitching it down.  

Made buttonholes and buttons...then stitched the buttons on.  Finally gave it a good press.

Here are some photos of the finished garment...


It's a great transition piece so glad I added it to my vest collection. I have several more I want to make for fall/winter using actual vest patterns so stay tuned!


*I know Blogger has made it more challenging to sign in but would you kindly sign your name if you use anonymous.  It makes it easier to talk back to you.  Thanks so much!


Saturday, March 14, 2020

An Oldie but Goodie

I own a lot of sewing books.  I started collecting pre-Internet, when books were the way to learn new sewing techniques. Because I'm preconditioned to look for an answer in a book first, I've kept every one I've bought.


Grace (wzrdreams on IG) was sharing in her stories on IG, some of the patterns she picked up at the Pattern Swap during MPD on March 7th. One of the patterns she showed, a Vogue Wardrobe Pattern from the early 2000's, I knew I owned. So I went scrambling through all the patterns to see if I could find it.

Then I found this...


...and I went looking for the book that accompanied these patterns. Sandra Betzina's, "No Time to Sew" published by Rodale Press in 1997.  


See I was looking for a simple vest pattern and it was in the book/patterns. Sometimes you have to kick it back to the oldie but goodie patterns. BTW, I didn't find the pattern I was originally looking for! *LOL*
Supplies ~
2 yards of a cable knit purchased from Jomars in Philadelphia
6 yards of black satin bias binding
A remnant of black faux leather
One 1" button

Pattern Alterations ~
I made a few alterations to make this more wearable for me.
- I lengthened the front and back pieces by 4" - 2" right under the arm and 2" in front of the
  second set of notches


- I added 1" to the side seam of the back piece and straightened out the curve


- I wanted a more boxy looking vest
- I added a 1/2" to the side seam of the front vest piece
- The pivot and slide technique was done to the back piece to give me an extra 4" at the hipline.


Design Alterations ~
I omitted the lining and the pockets suggested for the vest. There was also a batting suggestion where it was quilted between the fashion fabric and the lining. Not what I was looking for in this vest. I wanted a simple layering piece that was warm enough to work for winter and early spring. 


After cutting the pieces out and constructing them, I added bias binding to all the seams.

The next thing was whether to add a button and buttonhole to the front. I didn't want a conventional buttonhole and I used to put Faced Buttonholes on garments a lot back in the 90s.  Since this was a 90s pattern I decided to use a technique from the same time. I haven't made one in years, so I reviewed the process using my Lois Ericson book...


I made a sample first...


After I got a reasonable sample, I decided to go for it.

Mark the back of the vest and then add
basting around the markings

Cut a hole in the center and then trim around 
the edges, finally cut into each corner

Next I add Steam-A-Seam 2 to the back


o  The next step was to add the pleather pieces.
o  I cut 2-4" by 3" wide pieces of the pleather then pressed each one flat.
o  I placed both pieces on the back and pressed it down so the Steam-A-Seam would hold.
o  Flipped it over and made an adjustment to the lips of the faced buttonhole.
o  Added some pins to the surrounding area before stitching it down


This is the buttonhole after it was completed and it's just okay. I removed some of the extra stitching around it and left it. I use to make so many of these and realize I will need a little more practice to gain the finer points of the skill back.  It will do. It's not perfect and once buttoned you will never notice.

I decided to take a picture of the vest on the dress form and call it. I have a cut pile and moved on. I'm in the mood to sew and pictures take so much time. I will wear it with my black shirt, a pair of black jeans, and my black high top sneakers. 

Conclusion ~
Sometimes an oldie but goodie really works! Sometimes you need to throw it back - even if it is 23 years - to get the look you want. This is the first finished garment from my cut pile. The next post is about some wardrobe sewing I want to do for spring with garments from the cut pile. After that there will be more sewing from my cut pile.

Due to the Corvid-19 outbreak and how many people are infected in the NYC area, along with the request by the Governor and Mayor of NYC for companies to have employees work from home...I'm now working from home. I'm home until March 30th. The company is re-assessing then...so I'm working and I'm sewing while I'm practicing social distance. 

I may even start sewing some in the evenings since I've gained back three commuting hours. Because of that I just want to sew...not take pictures...crop pictures...edit pictures and download them to blog posts. Just sew. So hopefully there will be more blog posts in the future.

...as always more later!


Monday, December 23, 2019

Sienna Maker Jacket/Vest

A Little Backstory First ~
I really liked this jacket pattern when it debuted. I was thrilled to see it in expanded sizes but not so thrilled that the expanded sizes were available in PDF Patterns only. Cause y'all know I just can NOT deal with PDF Patterns. So I pouted and whined about it to a friend. A very kind and generous friend who gifted me the pdf pattern printed from PDF Plotting.  Did I mention she's a very kind and generous friend!


Now, I really don't need the expanded sizing because my measurements fit into a size 20 with a minimal amount of alterations for my hips. But it was really nice to have all the sizes AND the bust dart because I love me some bust darts!

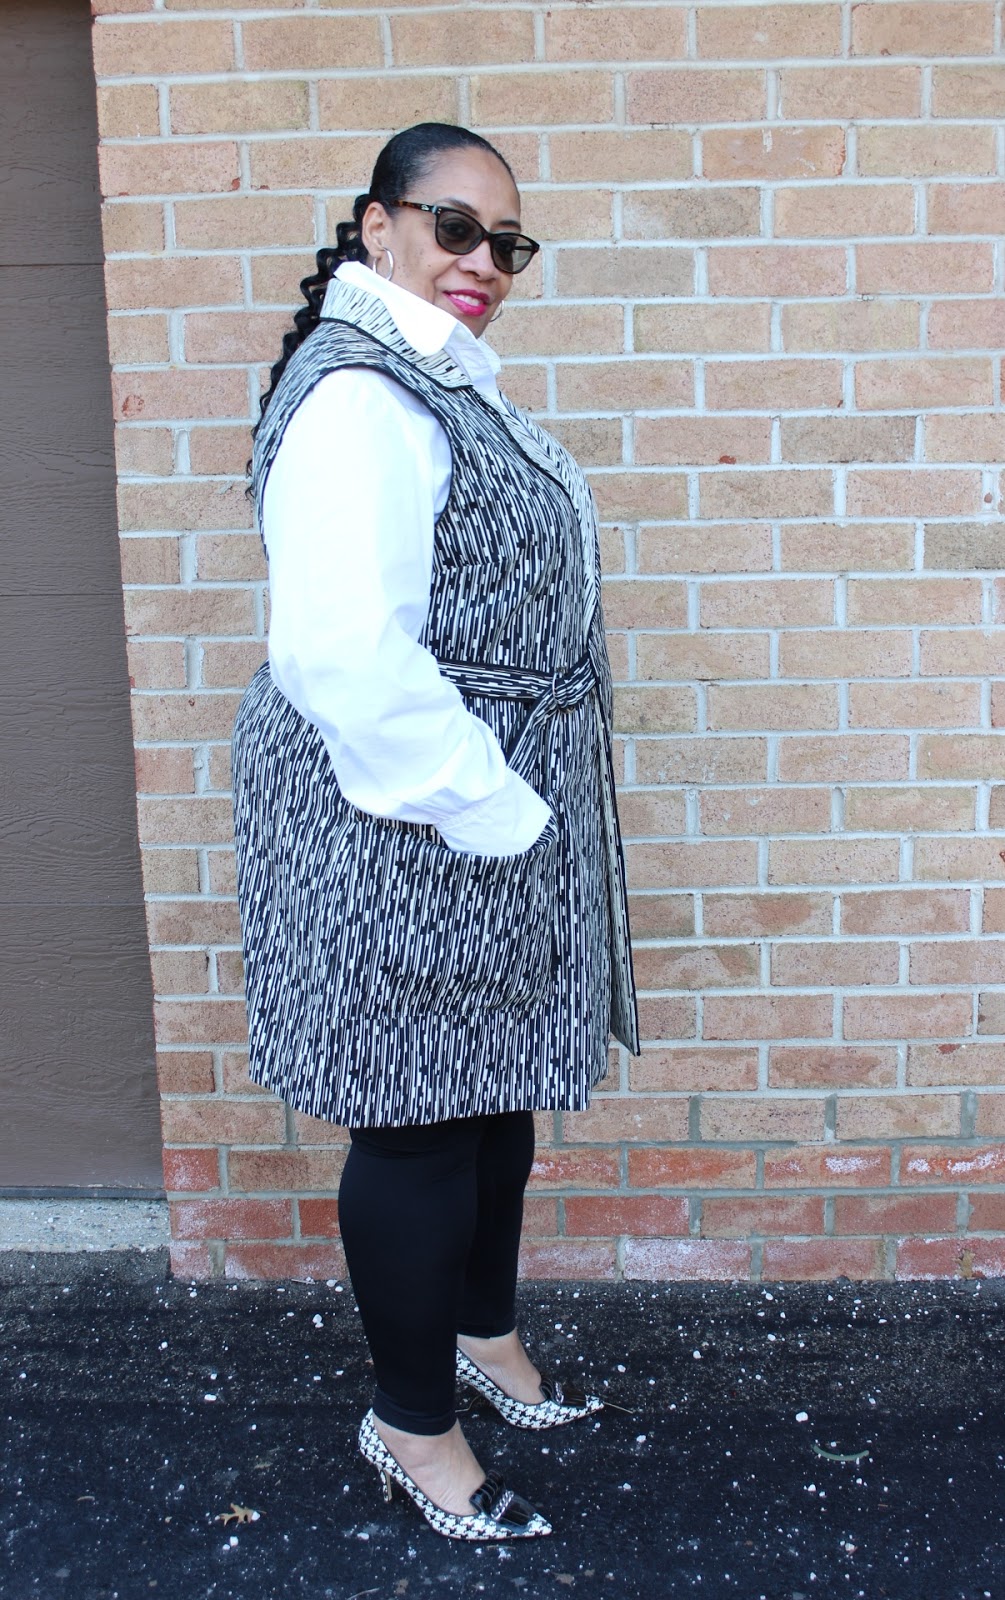
My version...


Inspiration ~
As I stated I really like the jacket, however, when Heather posted a couple of vests made from the pattern, my creative nerve endings stood to attention! 

from Closet Case Patterns IG account


This look is what I need in my life! Seriously this worn over a shirt or a cashmere turtleneck will be perfect this winter! Then I found this Jason Wu dress on Net-A-Porter and knew that I needed to sew this up right away.


Well right away took a minute because at the same time my Sewjo decided that it needed a vacation...so it took some time to get this made and into my closet.

The Pattern and Instructions ~
Y'all I love, love, love the pattern instructions. They are full of helpful information in an easy to read format.  I especially loved the full page of finished garment measurements that give you measurements for everything. This was so helpful when picking which size to trace and cut out.

Using those measurements, I went with size 20 shoulders, size 22 bust/waist and size 24 hips. I chose these sizes because I wanted a loosely fitted vest that would let me put a blouse or a lightweight sweater under it.

...a few fit pictures...
Back view - first fitting

Side view - first fitting
(Yes I look a hot mess sewing. Don't you?!)

What I didn't like - was the collar instructions. They are a little difficult to follow. So I went my own way and that's what's different between my collar and the ones in the inspiration pictures.  See comments below in the construction section and my neglect in continuing to read those wonderful pattern instructions!!!

Also, I know Heather said the Sienna is a chic utility jacket inspired by vintage French workwear. However, I never saw anything utilitarian about this pattern so I kinda went for it to make it more upscale...more like me.

Materials Used ~
I bought a border print denim from Chic Fabrics in late September that I thought would make an amazing vest. After prewashing it, it was really stretchy with all of the finishing removed...like 10-12% spandex added. Not what I wanted for this vest.  So I had to ponder where to go next.

I found a black & white reversible rayon/poly print amongst the fabric piles and I went with that.  Why?  Because the finished vest I saw in my head was black & white with my favorite white shirt underneath it.

Other supplies ~
1.5" D-rings from Pacific Trimmings
Interfacing from Steinlauf & Stoeller
6 yards black piping from Daytona Trimmings

Construction ~
First can I say MARK EVERYTHING! I'm guilty of not marking notches or sometimes eyeballing pocket placement.  This pattern has so much going on that I marked everything. Seriously!

I followed the instructions for applying the pockets and making the slit that the belt goes through. Honestly I wasn't worried at all about cutting a hole in my vest front. I knew it was going to work. That there wouldn't be a problem because everything is properly marked and the instructions are excellent for how to make it work.

Now I will be honest that I did go my own way a few times:
1. When I sewed up the back seam. I read the instructions and ignored them and went with what I knew would work for me.  Which was sewing the seam, topstitching the seam on either side and then adding the bar tack.

2. I ignored the collar instructions totally.  Partly because I'd read some reviews that were critical of the application and when I read them I thought they were making the process unnecessarily difficult. So I used my own method that I've used for years.

3. Which resulted in me making the collar TOTALLY wrong!  I skipped/ignored that part of the instructions and inserted the collar like I normally do. By doing that, I missed a couple of vital pieces of information. I ended up having to rip out what I'd done and remaking the collar as well as reinserting it. Going my own way also ended up with my lapels not meeting correctly. It's not great but I'm going to wear it anyway because of all of the work I put into making this. 

Junky sewing room background

4. I omitted the inside pocket. I think this is wonderful for the jacket but it just seemed too much for a vest. I have 2 huge pockets on the front besides the breast pocket so just didn't see a need for it.

A couple of additions ~
o  My shoulder seams were a little stretchy because my fabric is spongy. So I added some seam tape in the seams to get them stability.

o  I added bias binding to the facing edge to finish it. 


o  I'm beginning to believe that piping is my fall back. I piped the collar, the lapels & vest front, the armholes and the belt. Although it really did give definition to the very busy print I used.


o  Rayon hem tape was added to the vest hemline and I hand stitched it down instead of machine stitching the hem.

Some photos of the finished vest ~


Conclusions ~
This turned out to be a very involved sew. Some because I made some errors and some because I added techniques that lengthened the sewing time. I like the uniqueness of this design. It's what drew me to the pattern. And I like my finished piece. While it has it's imperfections, it still works for me. Since I aim for doing the best I can and not being perfect, I'm good with this. 

One more thing, since I omitted the sleeves, I have no comment on the sleeve/underarm conversation. However, the underarm is quite high on this to me. Again since I chose to make the vest it doesn't affect it's wear.

Finally, I don't think I will be making this again. It's too distinctive. Also it just didn't talk to me when I was sewing it. Usually a pattern has a full on discussion with me during pattern alterations and construction...pointing out fabrics in the collection that it will work with along with trim variations. None of that happened this time. So it's a one and done for now.

I have a pile of shirting fabrics sitting on the cutting table waiting to be cut out. I also have a few cardigan ideas floating around in my head I want to explore. So I will be working on one or two of those during my Holiday Break since I'm off after today and go back to work on Monday, January 6th 2020. 

...as always more later!


LinkWithin

Related Posts with Thumbnails