Showing posts with label Vogue 8764. Show all posts

Saturday, October 15, 2011

Vogue 8764 in photos


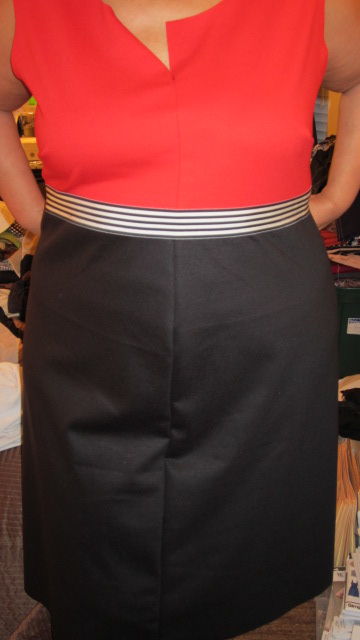
Yes, it's finished and I'm kinda liking it!  It will be great for work and it's comfortable...so lets go to the stats:


Pattern:
Vogue 8764 from Vogue's recent Winter/Holiday release.


Fabric:
Red ponte knit from Fabric Mart
Black doubleknit from Metro Textiles


Notions:
22" red invisible zipper
black/white striped ribbon


Construction:
One of the best things about this pattern is the A,B,C,D cup custom fit sizing.  I used the D cup bodice in a size 24 and had no problems with the fit...well I think my side dart can be a smidge higher...but that's probably my fault.  I'm sure it was higher but when I removed the basting, my markings disappeared too, so I think I sewed it a smidge lower.  Definitely won't happen next time!


To make the skirt portion fit my abdomen, I did a proper pivot and slide technique making another pattern piece instead of the quickie I usually do on the fabric.  But even with this I feel the dress is still a little too close-fitting in that area...so I've already altered my pattern piece to give me a little more room without changing the empire waistline seam...to use in the next version.  Believe me there will be a next one...I've already picked out the fabric...a tweedy wool crepe.


This dress is unlined.  The pattern tells you to line it.  I pretty much thought that I wouldn't line it right from the first fitting because the fabric doesn't need it.  I am, however, wearing a half slip in the pics and will in real life.  To finish off the neckline since I didn't line it, I just serge finished my pieces and turned under a 1/2" and stitched flat using a lot of steam and my clapper.


Only the neckline is top-stitched although the pattern tells you to topstitch all  the seams.  By not adding the lining, I did have some looseness in the back neckline, I solved this by adding two shallow darts.  I'm not sure if the looseness was caused by my handling of the fabric because it was more stretchy than the bottom piece, or if the back piece just was a little looser on me.  Whatever the darts solved the problem...


I'm still using Summerset's method (her November 2nd, 2009 blog post) to set in an invisible zipper when you have a band in the back and it works like a charm.  I got a really good match this time...even though I sewed the ribbon to the dress prior to adding the zipper. 


Adding the ribbon trim was a little challenging, but Steam A Seam 2 in the 1/2" size made the job so much easier.  By applying it to the back of the ribbon and then lightly pressing the ribbon to the fabric I got a great hold before I took the dress to the sewing machine and added two rows of stitching to the ribbon.  Then after I pressed the ribbon area, the Steam A Seam added some additional hold to insure the ribbon was firmly attached to the dress.


The sleeve hems and the hem of the dress both have a twin needle hem.


When I was putting the dress on the hanger, I knew that I wanted to wear the pearl brooch that was my Mom's.  She wore it in the 70s, I actually remember her wearing it when I was in high school.  I retrieved it from a garage sale basket she was putting together a couple of years ago and I've been wearing it ever since.  However, when I pinned it to the knit top, it made the dress front sag.  To solve this I was originally going to put a piece of the black/white ribbon on the back of the dress so the brooch would be stabilized. As I was cutting the fabric it hit me that the ribbon on the front of the dress with the brooch would look cute.  That's how that look came to be...


Finally a few more shots of me wearing the dress...


I've already pulled the fabric for my next dress...yes, I know another dress but  my dress wearing time is starting to get short...it's starting to get chilly here...I'm watching the wind blow outside my kitchen window as I type this.  And I know that I'm going to need to make a couple of pairs of pants this winter since I've recently retired several pairs.


....as always, more later!


Tuesday, October 11, 2011

Vogue 8764

I fell hard for this pattern when I first saw it in the Vogue winter new patterns section.  I HAD TO HAVE IT!  So I was really thrilled when Vogue put the new patterns on sale so quickly...and as tired as I was last Friday I was even more excited when I opened the mailbox and found it there.


I really wanted to make this dress this past weekend.  I was even willing to throw over my other obsession (the SF Designer Interpretation) for my very own copy of this dress.  But I was tired, really tired and all I managed was to find the fabric in the collection and cut the dress out.  Wait, wait, I need to back up a minute and talk about my fabric selection - because what I ultimately used was not my first choice.  


I knew I wanted to make the dress from a ponte knit because ponte knits are my new favorite fabric to sew with...so it was a matter of finding two coordinating colors in my collection. (Yes, I have amassed a collection of ponte knits but shhhhh that's not what this post is about!)  From the very first sighting I knew that I wanted this as a two tone dress...so it was a matter of choosing.  


My first thought was to mix a solid and a print but I couldn't decide on what print and solid and how to situate them.  Print on top/solid on the bottom or the reverse...no matter how I placed them I just wasn't happy with the combinations.  So I fell back and used a bright tomato red and black combo.  I cut them out Sunday afternoon but I just wasn't feeling them, so they sat.


Then there were the pattern alterations which really weren't extensive because this is a custom fit ABCD cup bodice.  Seriously, if you haven't used one of these patterns you are really missing out!  There is a chart on the first page of the instructions that tell you where to measure to figure out what size cup bodice part you should use.


I used a smaller size bodice than skirt bottom.  I altered the skirt bottom pieces to include enough space for my abdomen which hasn't seen a flat day for the last 22 years!  However, I'm finally embracing the fact that I'm a true pear and I think that when I acknowledge that fact and incorporate it into my sewing that my dresses fit better.  With much trepidation, I cut the bodice one size smaller and as I said before the pieces sat on the sewing table while I watched Sunday night television.


Yesterday was a holiday...well for some people...not for me but I did manage to leave time on work and since the traffic was very light, I made it home in record time.  With all of that extra time and some renewed energy, I decided to baste the dress together to see how my alterations worked...I know, I know, the muslin camp is thinking, "if you had just made a dayum muslin, you would know how it fit"  yeah you're right but since that ain't happening, I basted the dayum thing together! *LOL*


Here's the result...


...pretty good, huh?  I'm thrilled!  I made one simple alteration to the skirt bottom and transferred it to the pattern piece...and then I added this ribbon trim...


Now I can't wait for the weekend to finish this up!  I did take the basting out, serged the edges of the fabric pieces and then pinned it back together...I will definitely finish this up this weekend...so stay tuned!


...as always, more later!

LinkWithin

Related Posts with Thumbnails