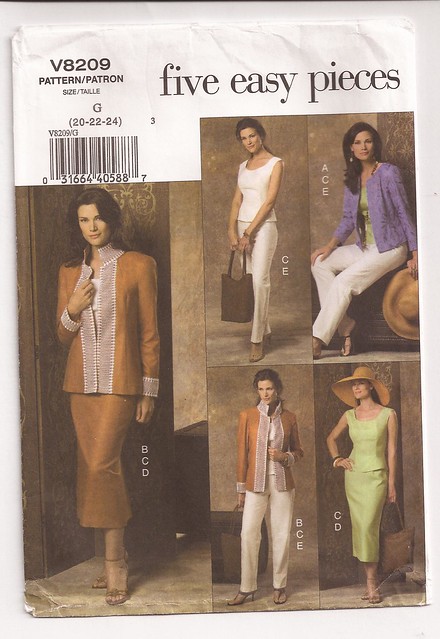
Showing posts with label Vogue 8209. Show all posts

Sunday, May 31, 2015

Interview Blues

So this is the interview suit that I never wore...


I made my first suit from a glen plaid fabric using Vogue 8209. That jacket/suit worked really well and I got the job. But before I knew that, I started another interview outfit. I added a dress instead of a skirt to this suit combo because it's more comfortable to wear.

Some stats ~
Patterns:
Reworked TNT dress pattern
Vogue 8209 Jacket

Fabric:
Textured Rayon Suiting purchased from Vogue Fashion Fabrics

Notions:
Navy Blue Bemberg Rayon Lining purchased from Low Price Fabrics
Black silk organza from the collection
Navy Blue Rayon Seam Tape
Black fusible interfacing from Fashion Sewing Supply
7 - 1" enameled plastic buttons purchased from Fabric Mart
1" shoulder pads from the collection
22" navy invisible zipper
bias binding

There are no new sewing techniques in this outfit. It's basic construction with a lot of steps...a lot of steps!  The first post on how this jacket was constructed is here.  However, sewing an outfit without pressure means that I sew better.  The sleeves are inserted well. No puckers in the sleeve caps especially after I reduced the excess space on the pattern pieces. I also added space to the front so the jacket can close better. 


The dress is a basic sleeveless version of my TNT pattern. I wanted it "plain" so that it would work with anything...the jacket, a cardigan or alone...with or without jewelry. A good workhorse piece that can even be worn at my new job.

In my original post, I included a cotton houndstooth fabric that I was going to make a skirt to coordinate with the jacket. After realizing that I've recently made a navy/white gingham skirt that will go with the jacket, I decided not to sew it any time soon. 

A few more pictures ~


I start my new job on Monday. I'm pretty excited about this new adventure especially since I will be in a different industry, working less hours with a different dress code. So my sewing is definitely going to change now...which is great since most of my "professional" wardrobe no longer fits. 

However, if I ever need an interview outfit again, I'm all set!

...as always more later!


Tuesday, May 19, 2015

Let's Do it Again!

When I was at the Vogue Fashion Fabrics booth at The Expo in Pullayap, I was deliberately looking for fabrics to make a couple of spring suits.


I bought this midweight textured rayon suiting and the coordinating navy/white cotton houndstooth to make a jacket/dress/skirt combo. Since the Vogue 8209 pattern was still laying on the cutting table, I decided to use it again, especially since I knew how I wanted to improve the sleeves.

However, the rayon suiting while textured did need some stability to help it keep from stretching out. I decided to add a layer of black silk organza to the pieces to provide the needed support. So the body pieces were constructed of three layers...

The fashion fabric and silk organza was marked and the darts stitched through both pieces ~


Then the bemberg lining was basted to that piece and serged together.


The rayon fashion fabric was very ravelly and needed the clean finishing. Lastly the rayon seam binding was stitched to the edges.


Front Pattern Alteration and Construction:
For this version I decided to copy the jacket front pattern onto pattern paper, separating the facing from the jacket front and adding a 1/2 inch to the center front prior to adding the 5/8 inch seam allowance.

Why did I do this? Because the jacket fronts needed an additional inch so that the fronts would close better. Now the original jacket pattern doesn't call for button closures - it's a hook and eye closing. And when I originally made this pattern, there were no closures, but there is enough space in the abdomen area now to close the jacket. So I'm taking advantage of this extra space to add buttons & buttonholes.


Other than the techniques mentioned above, the jacket construction will be the same as the last jacket. I'm knee deep into construction and will have photography shots when all three pieces have been completed.

Conclusion:
May I take a moment here to say that I'm going to spend the next 11 days sewing for me. There may be an alteration or two of a "reclaimed" dress from the closet. That will probably happen during the end of the time because it's a sewcation designed to add some variety to my wardrobe. I just can't stand it anymore ~ I'm going to start sewing new things and donate the rest.

When I look back at some of the garments I've sewn, I want that feeling of creative freedom that I once had. It's missing now. I've become a captive of my weight loss and not in a good way. So there will be some new patterns and some of my revised TNT patterns sewn. I'm going in and I'm not coming out until I have new garments to wear and of course share here with you!  

...as always more later!


Monday, May 11, 2015

Vogue 8209 in Glen Plaid

Here are the pics of the suit in action. Again, I see things to improve upon for next time. I've already cut out the fabric for another jacket/dress combo in navy blue...


I really don't like me in a suit or a jacket with a collar. However, some situations just call for one and there is no way around it. In this instance, I used a collarless jacket with a matching straight skirt. For these pictures, I wanted to share movement shots rather than "glamour or posed" shots of the suit so these are atypical on purpose. 

Some Stats ~
Fabrics:
4 yards of a wool/poly glen plaid from Fabric Mart
2 yards of white bemberg rayon lining from Low Price Fabrics

Notions:
yards and yards of white rayon seam tape
(that was folded & pressed before being sewn to the seams)
1/2" shoulder pads
1 - 1" button from the button collection
1 yard 1" non-roll elastic
Steam-A-Seam 2 - 1/4" wide

The Jacket ~


Taking the jacket off so you can see the innards


The Skirt ~
The skirt is simple. An elastic waist unlined straight skirt. The hem has Steam-A-Seam 2 in the hemline. It's the fabric wrapped around my body with the selvedges serged off and sewn closed. Then I added a 1.5" casing and stitched the top and bottom of the casing to enclose the elastic. I've included a front and back shot of me in the skirt.


I hope I didn't overwhelm you with pics, just wanted to show all the details of the suit. If you have any questions regarding the construction of the suit, please see the last blog post. Like I said above, I've already begun working on the next version.

...as always more later!


Thursday, May 07, 2015

Vogue 8209 ~ One more time!

I have some important meetings to attend and I needed a new suit to wear. My present summer suits are all too big. Gawd I promise to stop typing that sometime soon! It's starting to annoy me too.  Of course, I didn't have loads of time ~ about five days ~ but I managed to get it sewn in time.


The main reason why is Vogue 8209. This is the fourth time I've used this pattern to make a jacket.  


You can see my favorite seersucker version here and here and the Chado Ralph Rucci jacket that failed here. The very first version was part of a pantsuit sewn in 2008 here. See this pattern rarely fails me!

I started with a lightweight poly/wool glen plaid from Fabric Mart. The most important part of making this suit work was to match that glen plaid all the way around the jacket, as well as, where the sleeves join the jacket. 

Plaid Matching Tips ~
1. I pin all of the main plaid lines in the selvedges all the way down the fabric. This allows me to make sure that the fabric matches and won't slip during the layout and cutting process.

leftover fabric remnant

2. Most times I cut pieces singly - making a right and left copy of each pattern piece making it easier to match the plaids during layout. I didn't use that technique for this jacket. Instead I cut the front pieces and then used them to cut the back pieces insuring the plaid matched all the way around the body of the jacket.


3. Sometimes when there are two pieces like the sleeves ~ I lay them next to each other, then pin and cut.


4. When laying out I try to align the pattern pieces at specific points on the glen plaid so I can use it as a reference point when laying out other pattern pieces ~ for example, the hemline is placed along a prominent section of the plaid. This insures that the plaid will match at every hemline.

5. To stitch the pieces together, I pin the points of the plaid together at every spot before stitching. I also tend to stitch from the hem up. I've found that sewing that way insures that the plaid doesn't shift. Quite a few times when I've sewn from the top down, I've had a slight difference in the plaid match.

6. When I'm really concerned, I will hand baste the two pieces together. If you have a walking foot, that will help with insuring that the two pieces don't shift during sewing.

Finally, plaid matching is not hard to do. It takes some time and consideration when cutting out then care when sewing the garment together. However, the time spent is worth it.

The Other Changes ~
I underlined this one with bemberg rayon lining. When I first started working with the fabric, I realized that it was too light to sit well on my body without a lining. 

I had always planned on binding the seams because I think this is a better finishing on a jacket than serged seams.


The back neck facing was enlarged. I hated the way the smaller facing flopped around in my other jackets. By enlarging the facing, it allowed me to add my label to the back of the jacket and I did a stitch in the ditch to hold it down.


The sleeves are lined using the Nancy Zieman method.

I used 1/2" shoulder pads in the jacket and only serged the edges because I was pushing it to get the jacket finished in time. It would have been nicer if I had bound those edges too.


One single button was used on the front of the jacket. I thought this one worked well with the fabric and I wanted a closure on the jacket unlike the previous incarnations.


Final thoughts ~
I ran through this jacket. It was made in 2.5 days and I had some challenges with the underlining and the front facing. Let's just say that I didn't think it through and had to rip it apart in sections to finish the neckline.

After I wore the jacket I noticed a lot of wrinkling. In hindsight I probably should have added an organza layer before underlining with the lining fabric. Since my garments will get a lot more wear now that I'm rebuilding my wardrobe, I need to think of things like this earlier in the sewing process.

I also wasn't thrilled with my sleeve insertion. At the end of the day, I kept thinking that I would take them out when I got home and reinsert them. But I'm gonna leave them alone and move on. I'm doing this for two reasons. One, the plaid match is so amazing that I'm not sure I could repeat it. Two, I got so many compliments on the suit that no one noticed the sleeve caps but me. Definite signs of overthinking...so this isn't a great insertion but it's okay and I will fix the pattern for future makes.

Removing some of the excess from the sleeve cap on the pattern pieces will make them work better since I'm going to use this pattern again. Hey I need clothes and this pattern works! I've even got the next set of fabrics picked out. Ah the joys of a well stocked fabric collection!

Pics of me wearing the suit will be up soon.  My photographer is working again so I have to schedule photo shoots. I also made a couple of dresses for my daughter ~ which will also be up on the blog shortly. Those dresses pushed Miss Lena's summer things back a little.

I have a full plate of sewing on my list so I hope you'll hang around for my next sewing adventure!

...as always more later!


Tuesday, March 31, 2015

A Vogue Five Pak

I know the posts were light last week but that's because working on the jacket took longer than I expected. However, the jacket spawned a few additional pieces, most of which have already been discussed on the blog. So my apologies but this post is a little heavy on the pictures.

The Pantsuit ~
This is comprised of the Vogue 9095 jacket (pattern alterations post here & construction post here) and the pants from this outfit. The pants were loose on me when I was heavier so you know they're swimming on me now. I removed 2" from each outer leg and 1" from each inner leg to slim them down. In total honesty, I'm wearing them with the waistband turned down once. I still need to refit my pants pattern but for now this will work.

Also even though the jacket works with the pants, and this is how I will wear it, I'm not really thrilled with the jacket. The lapels are thinner than I thought they would be. I'm also not that happy with the bands at the jacket hemline & sleeves. Finally my sleeve insertion sucks...but after taking them out twice...I decided this was good enough. I won't be making this jacket again. I'm on to the next jacket pattern adventure.

The top is Vogue 8209 blogged about here.


Black Jacket & The Brocade Pieces ~
The Vogue 7632 skirt + the Vogue top 8209 + the Vogue jacket = a dressy suit.  I think of this more as a church outfit rather than a work outfit.


...and the top and skirt without the jacket...


...the original white ponte top...


Finally, I've decided to add a "casual look" to my blog posts since last year there were quite a few comments asking what I wear during my downtime. I mix and match my work pieces with jeans, maxi skirts and maxi dresses. Here's how I would wear the jacket and top with a pair of bell bottom jeans...


Next...
I'm reworking my TNT dress pattern because I want to work on a dress with a more fitted bodice after that...and you know how much I love my TNTs. I hate that my pattern isn't working for me now. So I've got to get that straightened out especially since spring and summer will eventually show up...

...as always more later!


Saturday, March 28, 2015

A Couple of Tops - Vogue 8209

I've used this out of print pattern before but for the jacket.  This time though I was looking for a princess seamed tank top to wear with the Vogue black jacket and the accompanying pieces.


Version One:
Choosing a white ponte from the collection to make the wearable muslin resulted in this...which is nuthin' like the pattern envelope. I started out on the right track...making pattern alterations to the pattern pieces...


- added an inch to the lengthen/shorten lines
- split and spread from the hemline to add an inch at the hemline
- did a pivot and slide on the center front piece adding another inch at the hemline.
- used an invisible zipper instead of the separating zipper the pattern recommends
- added an inch to the center back so that I didn't lose the darts in the back

Then when I tried the top on after basting the sides and the shoulders together...I ended up with a top that fit at the hemline, slid off my shoulders, gaped a lot at the back neckline and the neckline princess seams needed to be sewn a little closer to my body.

Now when I started this journey, I fully expected to make some changes to the pattern. Since I'm now making closer fitting garments it means that I spend a lot of quality time in front of the mirror assessing where to tighten up and where to add space to give me THAT closer fitting garment. (Do you know that I cringe every time I type that?! *LOL*)

Anyways, I took some in...added darts to the back neckline...and then when I determined that I didn't like how the cap sleeves fell down my arms, I did a tuck in the mirror to determine how to make the change. I decided I kinda liked the tucks so I pinned them and sewed them down.


From there the changes took on a life of their own and I ended up with this kinda funky top which was sooooo fun and fast to make! A great wearable muslin...


These are my regular glasses they've just changed to sunglasses
because we were taking some pics outside too. 

Version Two:
Now this version looks more like the pattern envelope because I incorporated all of the pattern alterations from the first one. Although after constructing it, I did have to go in and make a few more changes. Primarily because the brocade is a woven and the original is a ponte.


This is super tight on Lulu! It's really shown me how much weight I've lost because Lulu needs to be restuffed or I need to just break down and purchase another dressform...

The changes I made for this top ~
- sewed all of the seams 1/2" instead of 5/8" wide from the waist down
- sewed the neckline seams at 3/4" instead of 5/8" wide to the bustline curve
- added darts to the back neckline - even after the alterations I made to the pattern
- removed the flare at the front - I didn't really like the peplumy look of the white one
- I finished the neckline with black bias binding but I turned down and stitched the armholes and hemline down

I really wanted a tank from the red & black brocade fabric to match the skirt that's how this second version came to be. Here it is with the matching skirt.


I like this top. With a few more alterations it will be an even better fitting top. I've made the changes to the pattern pieces and stuffed them back into the folder. Don't be surprised if you see another top or two showing up before the summer is over!

Lastly, these pictures of me were taken by my daughter.  Josh is just 3 weeks old but she came over, did my hair, styled me and took pictures just to get a day out of her apartment.  Thank goodness for OnDemand. She watched movies while the baby slept and I finished up some sewing. Best daughter EVAH!

...as always more later!


Thursday, September 19, 2013

A Win and a Fail

You know that old adage, "Do you want the good news or the bad news first?" I always go with the bad news first because if someone is asking that question, the good news is never really good news...at least in my experience. So this post is about the final two Chado Ralph Rucci pieces...and I'm going to start with the "Fail" of the title first or the bad news...

First though let's recap ~
I purchased three panels of the Chado Ralph Rucci Wool Doubleknit fabric from Moods NYC store after seeing it on Moods' Instagram feed. Initially I had no idea what I would make with it.  After deciding upon the dress, I still had quite a bit of yardage left.  So I thought a jacket and skirt combo would allow me to play with the purple stripe that's a main feature of this fabric.  My last post was about the dress so this one is all about the suit.

The Fail...


I chose a jacket pattern that I'd used before - Vogue 8209 which is out of print - because the lines worked well with the fabric.  All of the construction details for the jacket are in this post.  This jacket is unlined without any closures. The fabric doesn't really need a lining and that works well with my pattern choice.

Just like the dress, pattern placement was the key to using the fabric effectively. For the jacket I ran the purple stripes down the front and then used the leftover pieces of fabric to cut the sleeves. I thought it would add some interest to the jacket.


However, after taking these photos, I realized that I would NEVAH EVAH wear these two pieces together, they really are "too artsy" for my workplace.  But I did realize that I could separate the pieces and wear them with other garments from my wardrobe.

The jacket pictured with a black ponte dress from my closet...


The Win...
I went with my TNT straight skirt pattern for the second piece.  This allowed me to come up with a suit, a suit that I now know I'm not going to wear. However, this piece will work with a black twinset that is presently in my closet and this is how I would wear it...


Honestly after allowing the jacket and skirt to sit, I will be removing the sleeves from the jacket.  Even though I got the sleeves out of the remaining scraps of fabric, and it seemed like a good idea at the time, I now know it's not.  One of my thoughts is to add some of the black pleather in the collection to the sleeves...it's a thought...but if I do the jacket will forever be relocated to a weekend look...so I'll see.

I love the skirt and will wear it with a black twinset because this look works for me and my lifestyle.  I also have a purple twinset that will go with this skirt so with some tights and my black wedge booties it will be a great Friday look.  

Either way the jacket needs to be revamped, so that it can become a viable member of my wardrobe or dissembled to see if there is another option for it.

In conclusion...
The dress and the skirt were the best items made from the Chado Ralph Rucci wool doubleknit fabric.  The jacket is still up in the air. But I thought it was important to document my failures as well as my successes...because even though I have good intentions, not everything works! Sometimes the fabric/pattern combo trips you up...sometimes the fabric/fit combo doesn't work...I'm sure you know what I mean! *smile*

Anyway, I'm onto my next project so stay tuned...

...as always more later!

LinkWithin

Related Posts with Thumbnails