Showing posts with label Vogue 7700. Show all posts

Thursday, October 31, 2019

How Many Sizes of Gingham Can There be in One Shirt?

I had a bunch of red gingham fabrics in different sizes that I was holding onto to make a summer dress. Maybe a Myosotis or another maxi dress but nothing was working fabric & pattern wise so the fabric sat.


Then I saw this shirt online at Soft Surroundings. This isn't a trendy or fashionable site. It has comfortable clothing for women my age who want to look stylish yet comfort is a huge factor in deciding what to wear.


Since I've been on a shirt making tear and am currently looking for different versions to make, this look caught my eye. I could purchase this shirt because the site does offer plus size garments. However, why would I when I own plenty of fabric to duplicate it?

Since I'm taking creative journeys now the challenge of duplicating it really appealed to me. Working out all of the details, choosing fabrics, buttons, making decisions about the construction and fabric layout is way more enticing to me than loading it into a cart and purchasing it.

Supply List ~
1 yard of 1" red/white gingham fabric from StyleMaker Fabrics
1.5 yards of 1/4" red/white gingham fabric from Fabric Mart
1.5 yards of 2" red/white gingham fabric from fabric.com
13 - 5/8" white buttons from the button collection

Pattern ~
I combined a couple of patterns to start this shirt's journey.  Vogue 8772's front pattern piece was used for the front. OOP Vogue 7700 yoke and back pattern pieces were used for the back piece. The sleeves and cuffs are from my TNT shirt pattern especially since I chose to make them longer without the roll up cuffs.

Cutting and Construction ~
Choosing how to place the fabrics and cut them out are what determines how and if this shirt works. While the inspiration shirt only uses two different types of plaids, I decided I wanted all of the red/white gingham fabrics I had to work in this garment. That meant taking my time to work out placement.

My first thought was to make it exactly like the shirt. So one front and back each of the larger and medium sized gingham. Sleeves from the larger sized gingham and collar, undercollar, front band and cuff from the smaller gingham cut on the bias.

Here are photos from the first arrangements...

Just ignore the junky sewing cave in the background
I was too lazy to stage this shot...

The back as I originally envisioned it...didn't work for me

After this I got discouraged. But isn't that the way it always is in the middle of a challenging project?  Whenever you're stepping out and going your own way...you do start to wonder what the heck? Changing out that back piece and making a couple other changes, got me to the finished shirt. 

BTW, I wasted quite a bit of fabric making this shirt. I cut the sleeves twice...once from the largest gingham and again from the smaller gingham. It wasn't my intent but as I worked with the elements of the shirt, I kept changing things until they worked to me...so fabric waste.

A Few Photos ~


I honestly went back and forth a couple of times on whether I liked this shirt while I was making it. But it is me...definitely me and by the time I was done I knew it would work for me.

This is one of those I had some fabric, I choose some patterns (not worried about whether they were current or not) and made a shirt that I wanted to make. This is my sewing now because this is how I dress daily. A shirt, a pair of jeans and when it's colder a cardigan, sweatshirt or hoodie to go over everything. I'm finally content with my wardrobe.


...as always more later!


Saturday, September 21, 2019

Mod 60's Purple Shirt

Once again fabric is the driving force behind this shirt. I wanted something original, funky and fun. I believe this print checks all of those boxes.


However, unlike the Hydrangea Panel Print shirt, this one has a closer fit. Same TNT shirt pattern just different back pieces...or the same dayum button up shirt I've been sewing for the last two years. See it's like this...these two shirts fit my lifestyle...so why am I changing it up?  I guess I could try another shirt pattern but my thought again is why when this works?

I love finding interesting fabrics to use to make these button up shirts. They work so well with my fall/winter wardrobe of jeans or leggings with a cardigan or a topper. To throw a monkey wrench into this thinking, I do have another shirt/blouse pattern that I used a couple of years ago. It will be making an appearance on the blog soon - Vogue 8772.

Supply List ~
100% cotton fabric from Zooks Fabrics in Lancaster, PA
White shirting from Metro Textiles
Buttons from Nancy's Notions in Lancaster, PA
Interfacing from Steinlauf & Stoeller

Again no new construction techniques. I chose to use white shirting for the collar, undercollar, front band and cuffs. When I chose this print fabric, I knew I was going to add the white to it...to emphasize the print...yet close in the print and give your eyes a place to rest.

A Few Pictures ~


(I loved this shirt when we took the pictures and amazingly 
this was the only one of the back we took! Why?)

I love the bold print of this fabric especially with my white denim jeans that I'm still wearing...cause it's summer until September 23rd! BTW, can I talk about these jeans for a minute. 

They're RTW denim jeans from QVC from the Women with Control Line. They have tummy control (cause my tummy has none! LOL!) and I buy them in tall so I have extra length. Most importantly though they fit over my bodacious bottom which is a challenge I have with a lot of RTW jeans. I own these in white, black, a muddy brown called chocolate and a midwash denim. Yes, I'm one of those people that when I like something I buy it in all the colors!

So out of the three pieces of fabric purchased from my last trip to Zooks, I've sewn two. The third is going on the fabric shelves because frankly it's a little too summery to sew now. I've been sewing so more is coming to the blog.

Parting Shot ~
My granddaughter, Samantha, always throws up these two v's when she takes pictures...so much so that we have to tell her to stop.


I was starting to get goofy.  We take photos of 3 or more garments when my daughter comes, to maximize her time and my sewing time, I start to get pretty silly after "posing" for awhile. Here I am imitating Samantha.


...as always more later!


Wednesday, September 18, 2019

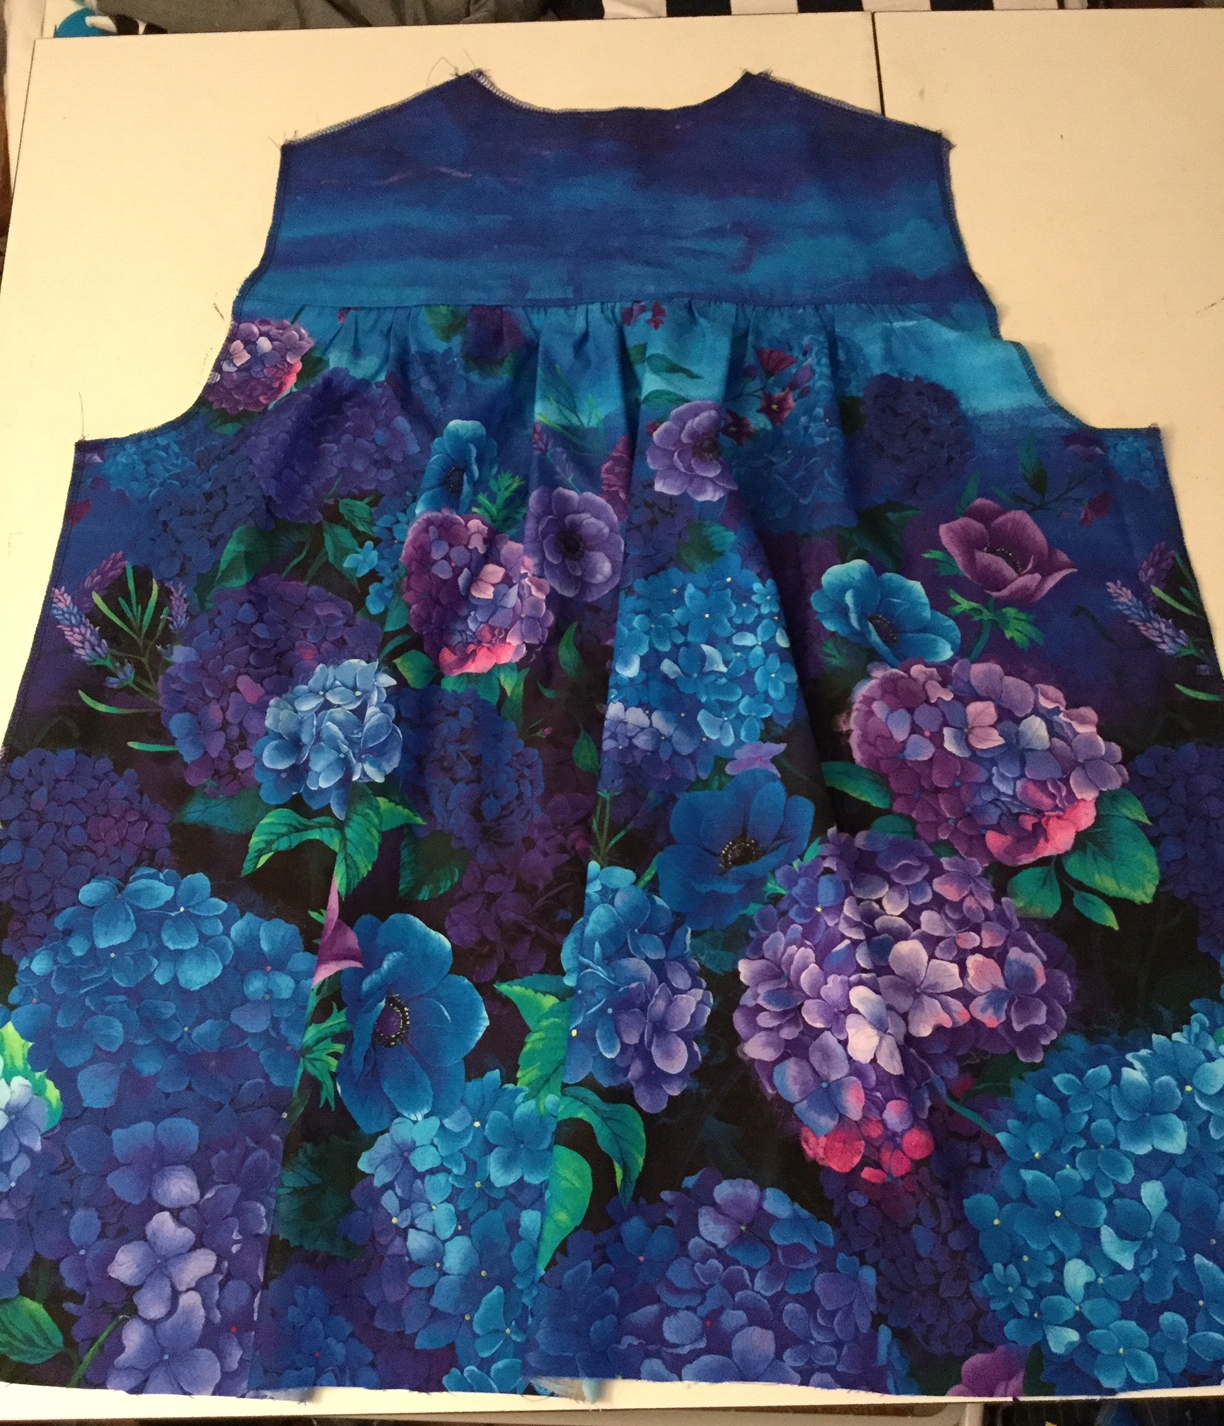
Hydrangea Panel Print Shirt

When I purchased this fabric I knew I wanted to make a shirt from it using my TNT shirt pattern. I wanted the full back so I could layer camis or turtlenecks under it in the winter. As well as, show as much of the panel's print as possible. This is a mash-up of two OOP shirt patterns (Vogue 7700 & Butterick 5678) but these patterns work for me. One of the two TNT versions I use to continue making a wardrobe of button up shirts.


This shirt is all about the fabric choice and my chance to fussy cut it to make what I envisioned.

Spreading out the panels at Zooks to see all of it

Supply List ~
3 100% cotton panels purchased from Zooks Fabrics in Lancaster, PA
Blue buttons from Nancy's Notions in Lancaster, PA
Interfacing from Steinlauf & Stoellers

I laid out the shirt pattern pieces on the crossgrain to insure the print would go in order around my body. Making sure that the tops of the pattern pieces showed the sky as well as the hydrangea print.


Then I used the the sky portion of the border print to cut out the collar, undercollar, front button bands and the sleeve cuffs. Using all the pieces of the panel to tell this shirt's story.


There are no new construction techniques in this make. However, I did add a little more to the body of the sleeve, about a 1/2" on either side. I wanted a big full sleeve for this shirt which I gathered into the cuffs. The cuffs are slightly smaller than my normal cuff which I think I will use in more makes going forward.

So a few pictures ~


Sorry, okay not sorry for the number of photos. My daughter outdid herself shooting this one.  I'm also so thrilled with how this shirt turned out. I've always loved "Art to Wear" garments and this shirt feels like a walking picture. I will definitely be on the lookout for more panels like this to make more shirts!  

Next on the blog is another shirt in the other piece of cotton I bought from Zooks when I purchased this one.  


...as always more later!
Thursday, April 04, 2019

Silk Twill Printed TNT Shirt

Originally when I purchased this fabric I wanted to make a dress for work from it. At that time I lived in corporate workwear and while it was a little bright for that world, I bought the fabric anyway because I loved it.


This is another one of those #deepstash makes that I'm thrilled to have used the fabric in a different way. When I was shuffling through the shelf and picked it up, it said it wanted to be a shirt. I decided to feature the fabric and went with my gathered back TNT shirt.

Supplies ~
- Printed floral silk twill from the garment district years ago - this is deepstash fabric
- Buttons from the button stash - again aged well since they're from when I worked at the button company and that's almost 20 years ago now
- Fusible interfacing from Steinlauf & Stoeller

I made this one exactly like my white shirt so there are no new design or construction changes in this version. I loved the fabric and wanted to emphasize it. I've been wearing my other shirts with the gathered backs alot this winter and love the ease of wear. That's why I chose that silhouette for this shirt.

Photos of the shirt ~


I started the shirt at Sew Camp and everyone loved the texture of the fabric. Silk twill is not a popular fabric now but at the time I bought it there were quite a few pieces in stores. I do buy this fabrication whenever I find it especially if it doesn't have an exhorbitant price tag. Lately I've found it in solids rather than prints, so if you find a print silk twill grab it! Okay fabric enabling public service announcement done! *LOL*

A couple of the photos shows it with some tan knit pants. I thought they would match/coordinate with the shirt when I was sewing it. However, I'm liking the darker ponte jeans match better. BTW, this is pretty much my outfit these days with and without a cardigan at least until the weather gets warmer.

This was the first piece I made at Sew Camp and the one I spent the most time on. It's also the garment that everyone stroked because that silk is EVERYTHING!

The weekend weather is supposed to be lousy meaning there might be more fireplace photos in my future. I guess April showers really do bring May flowers. The Pembrokes and the Cardigan will be on the blog shortly.

...as always more later! 


Sunday, November 04, 2018

A Talbots Influenced Shirt

This is the third shirt in the "Border Print Series." I added it to the series because of the mix of gingham fabrics and the fussy cutting needed to make the shirt work...


Let's start with the Inspiration photo that jumped this shirt off for me...


I've held onto this photo since spring because I love the play of the larger versus smaller gingham. I'm grouping it with the other border print shirts because of the fabric manipulation required to make the shirt work. To get the look there were bias pieces cut out as well as the front and backs being singly cut in the same manner I cut a border print. That's how this shirt gained a place in this series.


Here is my supply list ~

Fabric:
Both gingham fabrics are from StyleMaker Fabrics. I chose to make mine from navy & white but other color combinations are available here.

Notions:
1/2" 2-hole white buttons from Pacific Trimmings
Interfacing from Steinlauf & Stoeller

Construction ~
As I mentioned above, cutting out was the most important part of making the shirt work, especially since this version of my TNT pattern has princess seams.  For this shirt, I went back to the straight hem of previous shirts. I know my inspiration pic shows the curved sides but I was ready for something else.


I also omitted the bands with buttonholes and buttons on the sleeves. My sleeves have a sewn on cuff.

Using the straight hem made it easier to match the plaid across the seams of the shirt.

For the back yoke, I cut the fabric on the bias and added a seam to get the chevroned pattern. I like the detail but honestly I did it so I wouldn't have to match the plaid of the back yoke to the shirt back bottom.

Buttons on the front are white 2-hole shirt buttons which are smaller than buttons I normally use. Because of that I added more of them down the front of the shirt. When stitching them to the button band, I had to use tape to hold them down so they wouldn't move around. So thank you to whomever left that tip in the comments.

A Few Pictures ~


Conclusion ~
I took a couple of months to acquire the fabric I needed to make this shirt. I'm glad I was able to get a combo I liked. It was the challenge of manipulating the fabric and making the plaid match all the way around the shirt that was the intriguing part for me. So while this is not "technically" a border print, the extra work to make it happen is why it's in the series.

...always more later!


Monday, April 02, 2018

April is Shirt Month

I was discussing my sewing with a dear friend and lamented that you, my blog readers, were going to be tired of shirt post after shirt post appearing here.  See I've been on a serious shirt sewing tear.  I'd originally thought that I would make a couple of shirts every month and mix them in with the other tops and vests that I was also sewing.

Well due to illness and a host of other life things, including my photographer going on vacation, I'm just getting around to scheduling time to photograph my new makes.  There are presently 5 shirts sewn with another 5 waiting to be cut and sewn. This dear friend suggested that I have a "Shirt Month" on the blog.


So April will be dedicated to my new found love of making shirts.  All of these shirts are made from my TNT pattern which is a mash-up of Butterick 5678 and Vogue 7700 - both of which are out of print.  Now that I've got all of the fitting issues worked out with the pattern, my shirt making is all about fabric choices and design details.


My new shirts are chock full of fun and flights of fancy.  98% of the fabric is from the collection - which thrills me to no end!  I've mixed prints.  I've played with sleeve widths.  I've let interesting fabrics take center front and buttons were chosen to add drama to the shirts.  I've thoroughly enjoyed making each and every one of them. I love the construction process and how each individual shirt has it's own design story.


I've sewn so many shirts in the last two years, that when these latest versions are done, I will have made a total of  17 shirts...


I hope you enjoy "Shirt Month". If you get bored halfway through the month, tune back in during the month of May, where there will be new sewing adventures! However, I can't promise that there won't be more shirts or shirtdresses cause I really want to make my own version of Carolyn's Perth Dress!

...as always more later! 

Monday, June 05, 2017

The Making of a TNT Button Down Shirt

I'm in love with button down shirts probably because I've finally truly shed my professional skin and have embraced the lifestyle of casual living. I've amassed a collection of RTW jeans, leggings, and skinny jeans that I combine with my me-mades tops, button down shirts and toppers.

Collection of button downs made this year

My Button Down Journey ~
I started this button down journey in September 2015 with Butterick 5678 and some chambray fabric. I picked this pattern because it had princess seams in the front and back giving me a fitted look but allowing me to make easy alterations because of those seams.


I made two versions of that button down but really wasn't happy with it. They fit tightly through my abdomen and bottom so that I never wore them buttoned up. Which kinda defeats the purpose of a button down, right? So I put the pattern on the back burner while I worked on some other things to beef up my wardrobe.

Late last year/early this year, I got the idea to merge Butterick 5678 with Vogue 7700. I was thinking that I could get a fitted front (from the princess seams) with a smock type back that would give me the ease I wanted and allow me to button up the shirt.

Working that pattern combo, I've made four versions. The first one was made using a Cotton & Steel fabric that at first I thought was a little too loose.


So I made some changes to the front pattern pieces to get a better fit in the front for subsequent renditions. I also chose a drapier fabric to change the way the button down hung. That resulted in one from a polyester crepe (my favorite

and a rayon version (my least favorite).

I also changed the cuffs from button up ones, to cuffs that I slip my hands through. Piping and lace became embellishments that I explored (version #4) in an attempt to find my perfect buttondown. Even after these four amazing versions I still wasn't satisfied.


Latest Version ~


I kept thinking that if I removed some of the fullness in the back but kept the yoke, I would have what I wanted. So that's what I did with this version. I also added some bias binding and buttons with history to this one because all of that print needed something to reign it in.

Construction ~
The only difference in construction was how I applied the cuffs. These were added to the sleeve, then the binding sewn to the bottom of the cuff and the side seam of the sleeve and cuff sewn together. I couldn't figure out a way to hide the bias binding in a seam, so I just sewed the side seam. Then added some stitch witchery to the seam to hold them flat against the seam. Not a pretty inside finish but it works.


A Little History of these Buttons ~
These buttons are from when I worked at Rochester Button Company, now defunct. One of the things that I was responsible for was designing the button cards that the sales people showed to prospective customers.  If we could dye a button, I started with the original and then showed dyed versions on the card. There were two great things about that - one, I used fabric swatches from my own collection to pick colors and two, I got to go to the dye places in the garment district.


It was fascinating to see the buttons dyed. Because I dyed a gross at a time, I always ended up with a couple dozen of my own. I don't believe any of those dye/warehouse places still exist in the garment district. Since all of the space that was located by 9th and 10th Avenues has been turned into either apartment buildings or hotels. However, if I'm wrong and someone knows if some of them survived, please leave a comment below. It would be interesting to hear about them!

A Few Pictures of This One ~
The skirt worn with this buttondown is a 
ponte skirt I made a few years ago.


...and worn with my Clarks black suede & leather sneakers

Conclusion ~
Honestly this will not be the last one of these and I will probably continue to mess around with the pattern pieces, as well as the embellishments. There is one more on my summer sewing list but I can guarantee you that some combination of this pattern & fabric will appear this fall. I love the way these make me feel, yet will fit into with my work environment. Maybe a little more dressed than the employees in shorts and flip flops but that's not a look I can really pull off anymore! *LOL*


Finally, I think one of my last posts said that I was going to work on another Lenox Shirtdress after this shirt was finished. However, after moving my spring/summer wardrobe to the front of the closet, I have a hankering to make a few Concord Tees. So that's what's up next on the blog!

...as always more later!

LinkWithin

Related Posts with Thumbnails