Showing posts with label The Ten Yard Adventure. Show all posts

Saturday, June 09, 2012

The Wrap Up and Moving On...

I know that I've bombarded you with posts about the wardrobe, as well as, a ton of pictures...but hey we took over 150 of them and I edited down the final selection alot before sharing with y'all...so a few notes and yes, more pictures before I move on...


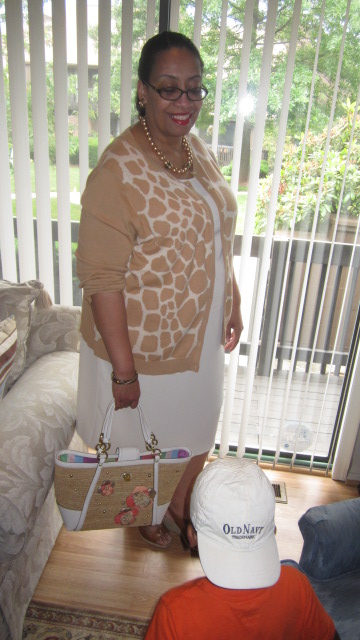
One of my favorite pictures from the day...
The Little Prince kept getting in the shots!


Wearability Factor ~
I've worn the straight skirt and the dress from the wardrobe to work this week. They both performed well and I even managed to make it through the day without staining them...a major concern when wearing such a light color!  I received compliments all week long because the light color really stood out in the dreary weather we've been having here on the East Coast.  Along with the rain and drizzle, it's also been quite cool so these pieces were perfect for the spring-like temperatures.  I won't be wearing them when the temperatures start to soar again but for now they work really well.


I also finally wore the light green plaid dress this week.  It too performed well and will be worn again.  However, most people did not see the waist definition because I wore a ltwt. white sweater with it due to the cooler temps.  


And if I looked a little trimmer and well endowed it's due to the new foundation garments that I recently purchased.  I highly recommend this piece because you can wear it with the bras you already own:


Maidenform Shapewear


Sadly, they only show them on slimmer women but I can verify that after wearing this shapewear all week, it was very comfortable, it did slim me down a few inches and it helped lift my sagging bosom to where it should be!  *LOL*  I also developed a bathroom routine after the first day so that I wasn't doing gyrations in the bathroom stall...oops, was that an overshare!  Well if so, put on your big girl panties and deal with it!  *LOL* 


There were a couple of questions~
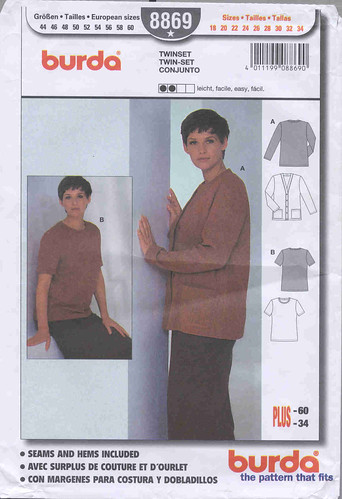
1.  Gaylen asked for more information on the ribbon band that was part of the Burda 8869 cardigan.
*First the ribbon was 1.5" wide.  
*Next the neckline and jacket front was serge finished. 
*I just placed the ribbon next to the right side of the jacket and stitched it down using a 1/2" seam allowance.  
*The seam was pressed against the jacket front.
*The last step was to take the two tucks in the front of the jacket and stitch them flat.


2. There were several questions about my closet and storage methods.
Let me assure you that I have a regular sized closet - actually smaller in this home than in my previous apartment.  However, I do have a lot more drawer space so all of the cardigans, tops, etc. are stored there.   


But mostly I'm a huge purger.  Things that haven't been worn lately, have gone out of favor or are stained/ruined in some way get donated and/or tossed.  I think if you have a consistent in & out system in place, you won't be overwhelmed by the amount of clothing that you have.  


Finally I try to wear everything I have...if I don't there is a problem with it and I will have to decide if it needs to be purged.  Right now I have a shopping bag full of clothing sitting in a corner of my bedroom waiting to be donated.


Here's a shot from my bedroom floor...
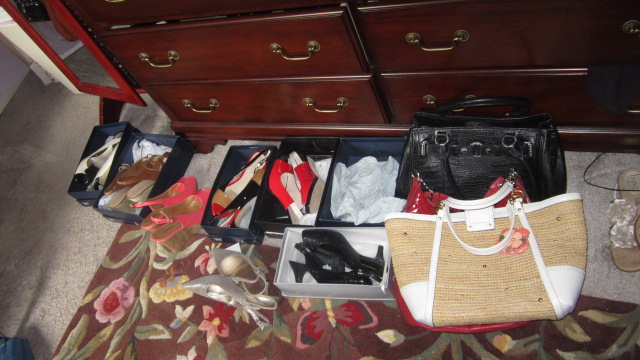


I pulled out quite a few pairs of shoes, purses and jewelry to use during the photo shoot.  My daughter laughed when she walked in saying that it looked like the set-ups she saw when she did hair (yes, she's a hairdresser) at video shoots.


Finally, all the photos of the wardrobe can be found in my Flickr album.


What's Next...
Dresses, dresses and more dresses!  ...and quite a few of them...
I ended up digging around in the collection and finding an orangy fabric to use for the base of the Vogue 8805 dress.  


Thanks to everyone who left a comment and shared your opinions, they were appreciated. However, I've decided that I'm going to "copy" the designer dress just as it's sold.  I will be working on that this weekend, hopefully I'll reveal the finished dress soon.


After that I'll be starting a series called, "Ye Olde Familiar" which will feature dresses made from my TNT dress pattern.  The hook will be the fabric choices.   I've been collecting some amazing fabrics and pulling some from the collection to make several beautiful summer dresses - if I say so myself!  *LOL*  Hopefully you will agree with me!


Well there's sewing to be done and I hope that you get the opportunity to sew a little something this weekend too!


...as always, more later!


Friday, June 08, 2012

Burda 8869 Again

I love cardigans and I love this cardigan pattern.  I hate that it's out of print because it would be awesome if other sewists could own this pattern too!  There are three made by me cardigans included in The Ten Yard Adventure wardrobe.  Two were previous makes and the final woven version is the new one.


Construction ~
I've made this before using a woven fabric so I knew the cutting and sewing changes to make for this new version.  The difference in this one, however, is that I used ribbon for the front band instead of a self fabric band. I used six 1/2" buttons for the front when normally I use five. I also put 1/2" shoulder pads in since I'm using it as a jacket instead of a cardigan. Finally, the ribbon band stands straight up at the back of the neckline, so I sewed a small dart on either side of the band to allow it to lay flat against my neckline.


Six buttons on the front band

Close up of the ribbon & the buttons


The stitching in the neckband


Notions~
Six 1/2" buttons
A pair of 1/2" shoulder pads
3 yards of 1 1/2" wide ribbon
(all ribbons and pipings used in these garments are from Daytona Trimmings)


Here are a few looks with the woven version of Burda 8869...


The other previous makes are The Flower Power Twinset and the gray/black/white knit cardigan ~ both work really well with these wardrobe pieces.


I hope you haven't minded me stretching out these posts. I do have just one more follow-up post with a few last thoughts on creating this wardrobe...


...as always, more later!


Wednesday, June 06, 2012

The Bottoms of the 10 Yard Wardrobe

There are three bottom pieces in this wardrobe...

  • Elastic Waist Lined Straight Skirt
  • Elastic Waist Four Gore Lined Skirt (blogged about here)
  • Wide legged pants
All are made from TNT patterns.  As I previously stated, this journey is about adding pieces in a color that's missing from my closet more than about reinventing the wheel.  So I wanted pieces that I knew fit and that I liked wearing for my bottoms.  All of the pieces are lined and since I've already blogged about the four gore skirt, this post is about the straight skirt and the wide legged pants.


The Wide Legged Pants
Pattern Alterations ~
I used my TNT pants pattern but I added additional width to the side seams of the front and back pieces.  I wanted pants that were looser and free flowing to match the drapey fabric.


Construction ~
The fabric is lightweight so I knew I wanted to line them.  I did go back and forth regarding my lining options and finally decided to underline the fabric.  I simply cut lining and fabric from the same pattern pieces and then pinned wrong sides together and serged them. The pants were assembled as I normally do. I did add two inches to the hem because I've bought these amazing new red shoes that are 3" high (they have a 1/2" platform) to wear with them...


AK Anne Klein shoes & Tignanello handbag


Notions ~
Ivory bemberg rayon lining
Ivory rayon seam binding
1" soft and easy stretch elastic


Pictures ~
Since this is a bottom piece, of course it's been photographed with most of the tops pictured in the first wardrobe post so here are a few more...


Worn with RTW black tank & accessories

Pants with RTW twinset

The Flower Power Twinset
with wide legged pants

Back view of the outfit


The Elastic Waist Straight Skirt
I know there are those who hate elastic waist skirts.  Truthfully I didn't like them much either when I was younger with a smaller waistline.  But now in my well lived body, I do have quite a bit of a tummy...quite a bit! *LOL* So these work well for me.  I've been using my TNT pattern for at least the last decade and it is a staple of my spring/summer wardrobe.


Construction ~
I cut the front piece on the fold and the back piece into two pieces. These piece are underlined with the bemberg rayon lining in the same manner I used for the pants. I topstitched the back seam so that I would know where the back is without having to add a marker to designate it.  


A waistline casing of 1.5" was pressed flat and the elastic inserted.  Rayon seam binding was added to the hem and the best thing about hemming this skirt is that the hand stitching was sewn to the lining fabric.


Notions ~
1" stretch non-roll elastic
rayon seam binding
rayon bemberg lining


Pictures ~
Besides the dress, this is my most favorite piece of the collection...I will get lots of wear out of it and here's why!


RTW cardigan & tank
with elastic waist skirt

RTW twinset with straight skirt

Back view

Burda 8869 grey/black/white knit cardigan
w/RTW tank top & straight skirt 

Burda 8869 cardigan with RTW black 
tank top and straight skirt

There is only one piece left - the Burda 8869 Cardigan which you've seen pictures of in several of the other blog posts.  However, I did something different with its construction so I will share that with you in the next post!


...as always, more later!


Tuesday, June 05, 2012

Butterick 6002:The Jacket for the 10 yd wardrobe

I used this jacket pattern in the Lavender and Gray wardrobe.  I've never worn that jacket.  I had an idea for a jacket for that wardrobe and the execution of it didn't work.  So I wanted to make it again. Mainly because I believe the jacket failed due to the felted fabric I used instead of a drapier one.


So for the Ten Yard Adventure, I decided to make two jackets.  One from Butterick 6002 and the other from my Burda 8869 out-of-print cardigan.  To start I did something I hardly ever do, I came home one Friday evening and sewed. It was easy since I'd cut several of the pieces (B6002 Jacket and TNT Dress) out the previous Monday evening. 


I've been totally intrigued by this jacket. However, once I picked the correct fabric, I realized that this jacket has no front darts. What the h*ll was I thinking? Seriously?  I have a pretty nice sized bosom, why did I think I didn't need darts?  And what is this preoccupation of mine with jackets without any allowance for my bustline? *sigh*


I got the jacket shell sewn up and of course it was too big.  Again, another one of my common mistakes, making a garment too big because I'm so concerned about having enough space in the abdomen and hip area, that I don't properly check the ease in the neckline and upper chest area. Because I overlooked this, I ended up making a ton of alterations to the pattern. So, of course, my jacket doesn't look like the original...but after letting it sit for a couple of weeks, the changes are growing on me.


Here's the alterations I made:
1.  Added darts to the neckline on the jacket front to remove the excess space in the neckline area of the jacket.


2.  Altered the side seams by removing 4" of excess space.  Two inches on each side tapering into the original sides 5/8" side seam.


3.  Because I altered the sleeve opening, I flattened out the sleeve cap to remove the excess fabric.  The first sleeve installation was nasty because I forgot to do this...


4.  The sleeves were cut on the bias to add a little stretch for my bodacious biceps.


5.  Omitted the side & back facing on the jacket.


6.  Topstitched the jacket everywhere...darts, entire jacket front and sleeve hems.


7.  For a simple unlined jacket there was quite a bit of hand-stitching in it! 


A few photos of the jacket in action...
Butterick Jacket with RTW
black tank & wide legged pants

Butterick jacket with RTW
black tank & elastic waist straight skirt


Some stats:
Pattern:  
Butterick 6002 - out of print


Notions:
5 - 1" buttons
1 pair of 1/2" shoulder pads

The rest of the pieces are finished, so I will be sharing them in the next couple of days...


...as always, more later!


Sunday, June 03, 2012

TNT Dress ala Chanel - Final

...or the third piece of the Ten Yard Adventure Wardrobe.  I know this is out of order but I wanted to share the dress first.  The Butterick 6002 jacket will be blogged about next.  Some pics...


Outside in the patio garden

By the fireplace in the house


Fabric:
100% ivory polyester crepe from Fabric Mart


Notions:
3 yards lt. yellow chiffon ribbon
5 yards lt. brown chiffon ribbon
22" ivory invisible zipper
ivory bemberg lining
rayon seam binding
taupe piping
lt. yellow piping


The jumping off point:
Inspiration for the dress is from this Chanel look...


Construction Details:
Construction details are in this post. After posting about the neckline embellishment, chiffon ribbon vs. piping I decided to go with the piping.  Then when I pulled both yellow and beige piping from the notions stash and couldn't decide which one looked better, I decided to double the piping and add it to the neckline...


Sewing the two piping pieces together
using my piping foot.

The two double rows of piping before insertion


Conclusion:
This wardrobe has only one dress in it and even though I originally planned for this dress to be plain, I realized that I do have another ivory dress in my closet (see it here) so when I saw the Chanel dress, I knew the embellishment would set it apart yet still allow it to work in this grouping.


May I also add that many times the details of a designer garment can be added to your pieces by taking the obvious embellishment and transferring it.  That's what I did with this dress and that's what makes it look similar to the original.


A few more pics...okay we took alot of pictures today so I'm sharing them with you!  *LOL*


Back view showing the embellishment


Dress with RTW pale yellow cardigan

Dress with Burda 8869 cardigan

Reaching for the Little Prince

Dress worn with Butterick 6002 jacket


Accessories in these pics:
Hamptons Weekend Straw Coach Bag and AK Anne Klein tie-up wedges, jewelry - Heidi Daus and Joan Rivers.


...as always, more later!

The 10 Yard Adventure is finished...

During the six weeks that I've been sewing the garments for the 10 Yard Adventure Wardrobe and at various points through the planning, cutting and stitching, I've contemplated the accompanying pieces. Do I sew additional tops? Do I use what I have? Do I purchase from RTW?  Those considerations along with accessories started to preoccupy my thoughts as I got closer to finishing these garments.


One night after searching through the blog for something else, I stumbled onto a post about a twinset I made two years ago.  It made me realize that I already have quite a few pieces in my wardrobe that would work with these basics...and really wasn't that one of the points of this exercise...to add some basic garments that would extend the life of some pre-existing ones, as well as, add a new color.


So I went through the closet and my drawers and pulled several made by me, as well as RTW purchases, to add to the six pieces that I ended up sewing.  I wanted an array of looks.  Looks that would be on trend, yet still work in my daily environment. I auditioned several pieces and these are what I ended up with...


The Finished Wardrobe:


There were several vignettes that I wanted ~ a black/creme classic one...


A little bit of color...


The pieces that were previously made by me are The Flower Power Twinset, The black/white/grey cardigan, and the black/white sewing workshop tie top.  The links are provided for each make in the previous sentence.


The pieces that I ended up making:

  • TNT dress ala Chanel
  • TNT 4 gore flare skirt
  • Burda 8869 cardigan 
  • Butterick 6002 jacket
  • TNT wide legged lined pants
  • TNT straight skirt with elastic waist

Wardrobe Planning Tips:
You're looking for tips right?  Tips on how to plan a wardrobe...how to sew one...how to get to the finished line, maybe?  First I have to say that wardrobe sewing isn't for everyone because it's a loooong process!  I've been working on these pieces since the end of April and I have to admit that several times along the way I've wanted to bug out and sew something else.  But every time I'd get to the sewing cave, the pieces sang their siren song to me so I just kept sewing.


Two, having a plan is important...you'll get lost and lose interest if you don't have one.  However, the plan should not be rigid.  It should be flexible so that it can flow with your creative desires, that way you won't feel restricted by it and want to throw it by the wayside to sew something else.


Third, don't feel like you have to sew each and every piece in the wardrobe.  You will never finish that way because you may feel constrained by the process.  That is definitely not the point of this exercise!


Fourth, use a hardy dose of TNT patterns for the wardrobe.  Adding new patterns to the mix will definitely add some spice to the wardrobe but for me, it was about getting a series of basics.  My TNT patterns provide those already fitted basics so why reinvent the wheel? 


Conclusions:
Finally, I had two main reasons for constructing these garments...  
A - I wanted to see how many garments I could actually get out of 10 yards of fabric.  I thought five and was actually thrilled to get six.  I probably could have gotten a seventh piece by mixing some of the scraps with other pieces of fabric from the collection but honestly I'm tired of this exercise and ready to move onto some other pieces.  I mean I do have a sewing list that must be worked on! *smile*  


B - I wanted to introduce this cream color into my wardrobe.  In April when I was still waiting for spring to come, this color just screamed spring/summer to me.  Now that's it's June, I just want to wear them...


So there will be a lot of dresses coming out of the sewing machine next.  Like I said previously I have a sewing list with quite a few dresses on it.  I have the fabrics pulled for the next five or six and I can't wait to get started on them because before you know it June will be over and it'll be July when I'll need to start sewing vacation gear.


The next couple of posts will showcase the individual wardrobe pieces, give construction details and, of course, be modeled by me... 


...as always, more later!


Sunday, May 20, 2012

My Tried 'n True Dress ala Chanel

Okay I've gone off the ranch on this one...and I'm not sure if it's a good thing or not yet! *sigh*  Here is the inspiration picture...


June 2012 InStyle Magazine


I found this picture in this month's InStyle magazine.  This of course led to a round of internet spying...first on Style.com then on Chanel's site.  Watching the dress walk, trying my best to get a glimpse of the back, cause I just don't want to end up with coffin clothes so aptly named by Kathleen Fasanella...especially if I'm going to put all that work into the front of the dress.


Let's start at the inspiration picture...this dress is made from a supple ivory leather and InStyle says that the rippling iridescent chiffon ribbons are embroidered on.  However, when you go to Chanel's site, you can see that yes these are iridescent chiffon ribbons but they are stitched to the leather.


www.style.com


Well I had some iridescent chiffon ribbons in my notions stash and I thought that this application would be a great way to jazz up my TNT dress pattern for the 10 yard Adventure Wardrobe.  I thought it would add some interest to these basics and it would make sewing this more fun.  Me thinks I bit off more than I can chew.


The dress is almost finished and maybe I'll lose my trepidations once I've gotten it on my body with hair and make-up and I see a picture or two.  Maybe I'm just experiencing that space I seem to occupy whenever I make a complicated dress ~ and I know y'all are tired of me talking (moaning) about these challenges! *LOL*  


Of course, the most sewing intensive part is the ribbons...placing them, applying them, ironing them down and cursing at them!  I chose to go with the beige and light yellow ribbons that I had in the notions stash instead of heading out to Daytona and purchasing blue and yellow ones.  This is one decision that I am happy with...


maybe I should have chosen a darker background


So to apply the ribbons, I played with placement, then pinned everything down. Next I hand-basted the ribbons to the dress before machine stitching them onto the dress.  Then using a stitch that was 2.3 length, I stitched the ribbons down making sure that I used thread that matched exactly, stitching as close to the edge of the ribbon as possible.  Here is what the front looks like with the ribbons stitched on...


...and the back...


The dress will be lined and I'm playing with adding ivory piping to the neckline and armholes because I'm NOT adding the sheer ribbon...that won't last through a full day of work and it's the part I liked least about the original dress.


A few more construction pics...


pinning the ribbons down

sewing the ribbons on using my zipper foot


Since I used my TNT dress pattern for this, all the other construction details are pretty straightforward even though this has consumed my entire weekend. The next time you see this it will be on my body. Hopefully the finished garment will be what I see in my mind's eye.


...as always, more later!

LinkWithin

Related Posts with Thumbnails