

I've made a few in the last couple of years that I've enjoyed wearing. So when I saw this Simplicity pattern...

I knew I wanted to add it to my collection. But me being me, I was going all in to get the look I saw in my head. There are loads of photos and information in this post. So if you're not interested in the design and construction information, skip down to the photos and conclusion to see the finished jacket.
Supply List ~
1. Medium weight star denim fabric from the collection by way of Fabric Mart
2. Black 'n white stripe remnant - used in this shirt
3. 7 - 7/8" buttons from the button collection
4. 2 - 1/2" buttons from the button collection
5. 1 - 1" O ring from Lauren Trimmings
6. 2 - 2" O rings from Lauren Trimmings
7. Pieces of 1" black twill tape from the notions stash
8. 7 yds of smoky black bias binding from Pacific Trimmings
9. Black topstitching thread from SIL Thread
Pattern Alterations ~
Let me state that this pattern only goes up to an XL with a bust measurement of 46" and waist of 48". There's no hip measurement on the outside of the pattern envelope...but when I measured the pattern pieces it was 58" before the seam allowances were taken off. I knew I would have to alter the main pattern pieces to fit around my hips.
I made my alterations to the front and back piece...in the sides between the large and extra large cutting lines...slashing and spreading so that I ended up with 1.5" at the hemline on each side.

Besides the side alterations for the back piece, I also did a pivot and slide of 2" on the fabric prior to cutting it out.

There was no need to make an adjustment to the sleeve pattern because it was wide enough. It means that my version won't have the loose sleeve look of the pattern envelope but I'm good with that.
The final pattern alteration was regarding the front facing piece. Brittany mentioned it in her review so I knew to look out for the issue. To solve the problem, I drafted a back neck facing. so that the collar would be enclosed in facings which means I did NOT apply it as the pattern states.
I made a back neck facing by using the back yoke piece. I measured the width of the facing piece. Then I used my curved ruler to make the facing bottom deeper. Here is a pic of it before I traced it off onto pattern paper...

Then I omitted the back yoke. Yeap, went my own way. It's a stretch denim jacket and I thought it just didn't need it. One of my reasons was the weight of the denim and some of it was the look I wanted. This is what my collar looks like with the front facing.

I acknowledge that I went overboard with my design changes. I threw everything into this jacket except for the kitchen sink. I may not have hacked the pattern much but I did hack the design!

My first thought when I saw the pattern was to add some O rings to the flaps. I saw this on a dress on Monica's Instagram account and I really liked the look. I'd been waiting for a garment to add that O ring accent to. I thought this jacket was perfect for it. So I added the rings to all of the pockets.


As pocket linings

For the tabs

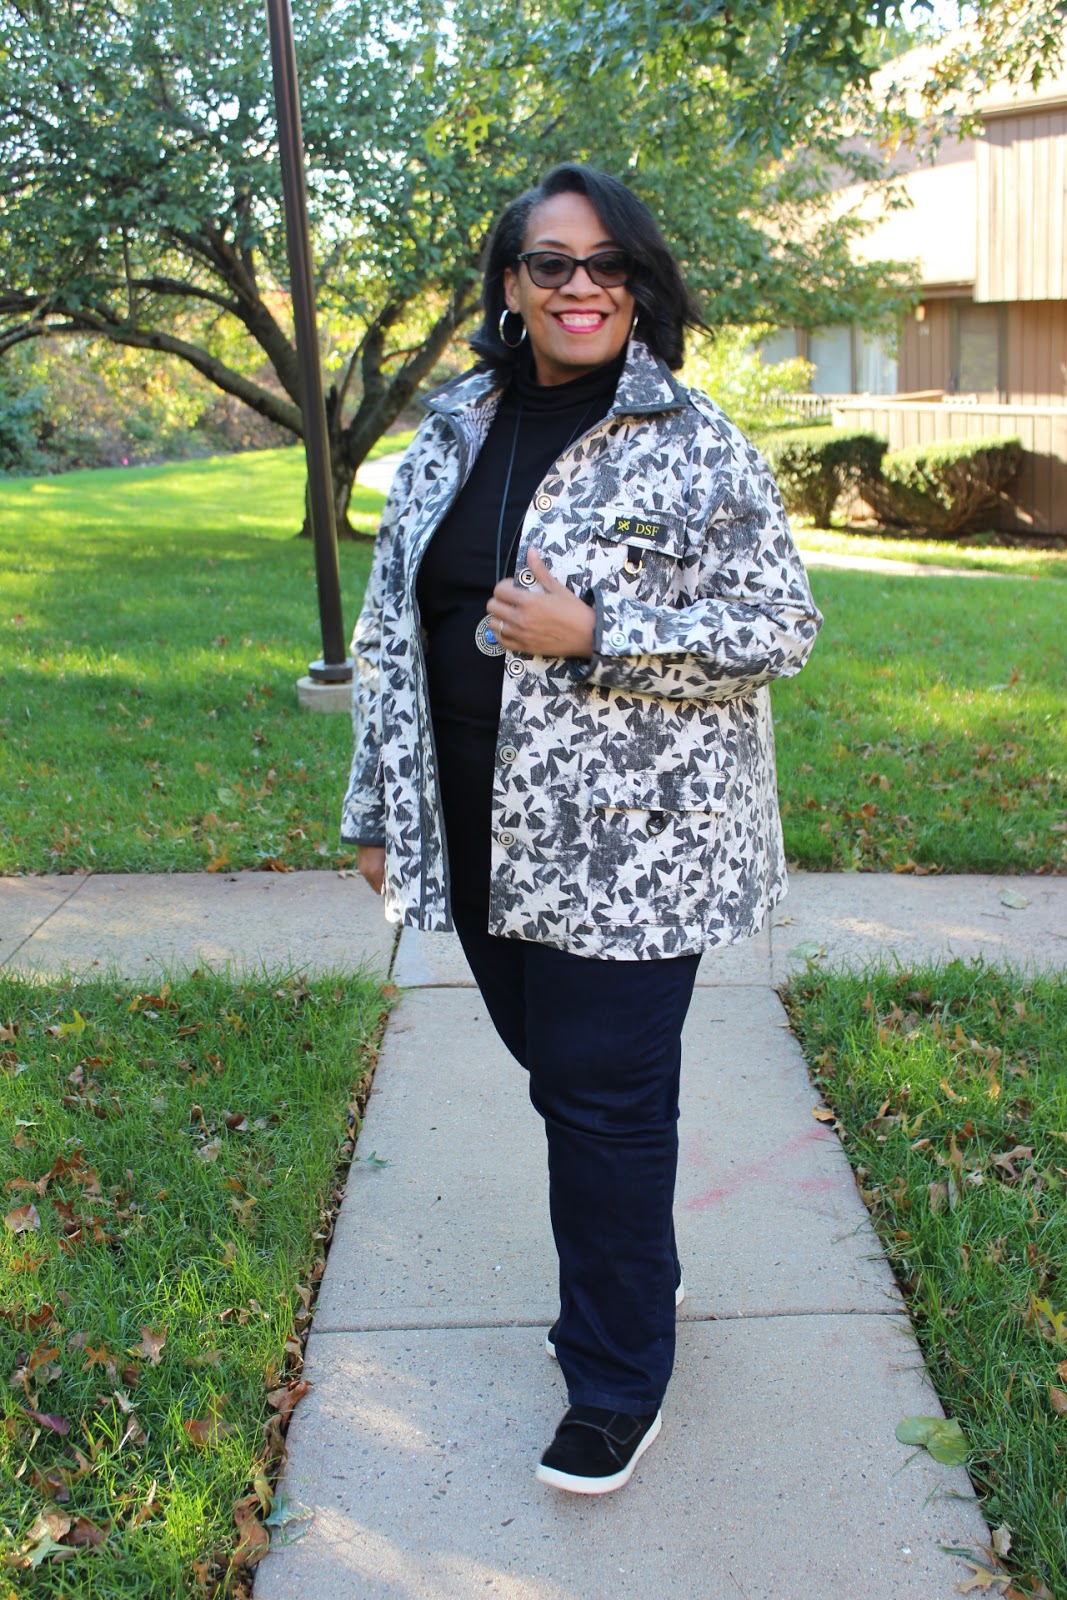
The third change was to add binding everywhere to give this very busy print boundaries. So it was added to the collar, inserted into the sleeve band hems and down the front of the jacket. I also used it to bind the seams and hemline of the jacket.


The last thing was a "by chance" thing. I ordered some new labels from Dutch Label Shop. I wanted a label that better reflected where I am now in my creative journey. This label is designed to look like my blog header. After I sewed it onto the upper pocket flap, I thought it was perfect.
While I really like my design changes, they added considerable sewing time to this make...considerable time!
Construction Information ~
I read the pattern instructions and then proceeded to sew the jacket in the order I wanted after the basic assembly was done. Most of my construction changes were sewn with the pieces flat.
A few things I want to note:
- I basted the sides together to check fit ~ once I realized the fit was okay ~ took it apart and added the pocket flaps. I didn't want to do all of the extra work for the pockets if the jacket didn't fit.
- One of the suggestions that the pattern makes is adding twill tabs to the pocket flaps. The O rings were my design decision although I don't think they stand out as much as I thought they would.
- Binding isn't suggested in the pattern instructions. That was all me trying to contain the fabric print a little. I'm glad I added it and used a hong kong type of finishing to attach it. However, adding it to the front really defined the button area and gave more definition to the jacket front.
- There's a lot of topstitching on ERRYTHING! From the tabs on the shoulders to the sleeves and hems. Everything is topstitched.
- The cuffs were way too large on my jacket. So I did my normal trick of making a pleat and adding a button.

Original cuff - topstitched with bias binding

Cuff with pleat added
A few pictures ~



Conclusion ~
This is one of Simplicity's "Pattern Hacking" patterns so it comes with several options to make the jacket. You can make it as simple as possible or you can go full in and add everything the pattern suggests and then a few of your own designs. As explained above, I went all in. LOL!
You would have thought that I'd have been realistic about the amount of time it would take to sew this jacket especially since I put every design detail into it. But no...about halfway through the construction I got annoyed! *LOL* When I finally thought about it I realized that it takes time to get a more detailed garment made. I needed the time to bring to fruition all the things I saw in my head. When I understood that the sewing became more enjoyable. Does this happen to anyone else? Just wondering if I'm standing on this creative cliff alone?
I will be using this pattern again. I can see it in different fabrics with less of the details I used in this one. Hopefully I will get more of them made before spring shows up because I always think I have more time to sew than I actually do! *LOL*
One other thing happened after I took the photos. My Mother saw me standing in the kitchen with the jacket on and asked where I bought it. I think that's the ultimate sewists compliment!
The first shirt from the border print series is up next on the blog.
...as always more later!

