
Anyway, I touched this fabric and knew it had to come home with me especially since it was similar to a voile embroidered piece I purchased from Stylemaker Fabrics earlier in the summer.

It's that time of year here on the East Coast where the mornings start out chilly so you need a jacket/sweater/topper which you remove around the middle of the day. I've found I like nice tops to go over straight leg jeans or leggings, now that the weather is cooling down.
Enter Butterick 6486...

The pattern combined with the black rayon is the perfect fall top!
Pattern Alterations ~
This is a loose-fitting top so I didn't need to make a lot of changes to the pattern pieces except for the sleeves. I added a wedge to the sleeve pattern with it being 2.25" wide at the largest portion.

I made the same alteration to the sleeve ruffle. It wasn't necessary since you gather the sleeve ruffle onto the sleeve but I wanted to keep the original sleeve design.

Design/Construction Info. ~
I sewed the entire top together and it was huge. I started with an XXL based upon the measurements. I should have gone down one or two sizes because this is a really loose fitting top.
1. That was just the start of the problems.
2. The neckline was too large.
3. The sleeves hung way too long.
4. The top had too much space and I kept longing for a dart in it.
So I started with the sleeves. After ripping them apart I took 2" off the bottom of the sleeve and removed 1" from the hemline of the lower sleeve. Then sewed them back together. The sleeves were still long but I added an extra deep hem to get them to the length I wanted.
One more thing, the pattern tells you to use french seams to construct the sleeve. I understand why they do...because if you hold your hands up you want a clean finish on the inside of the sleeve. However, I skipped this step and was so glad I did when I had to make alterations to my sleeves.
To remove the excess space from the sides of the top, I ripped it apart. Do you sense a theme here?! I then sewed 1" seams on either side of the top and on both sides of the bottom. The top and bottom were then sewn back together.

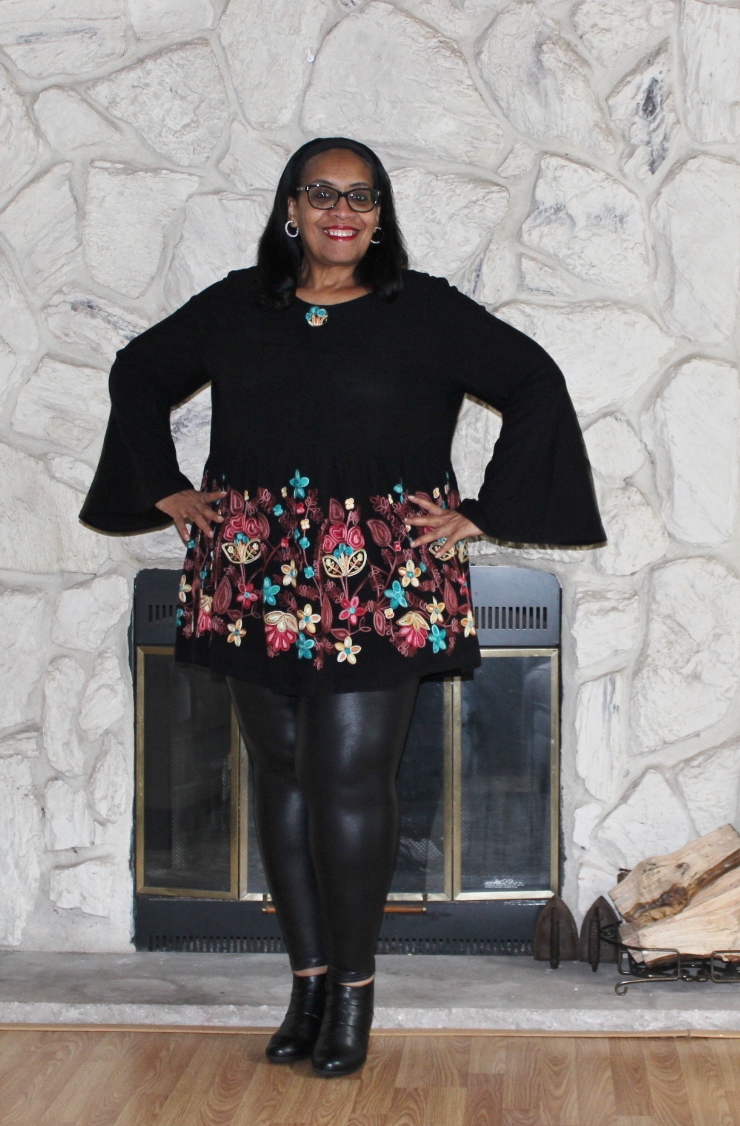
Solving the too large neckline meant making a pleat in the front. Then adding a covered button from the embroidered fabric to make it a design decision rather than a fix of the loosey goosey neckline.
Pictures of the top ~


Conclusion ~
To me, it was a lot of work for a fast and easy pattern. I ended up with a wearable top but not without a lot of work. Also, it is a little difficult to get out of. If you already own the pattern and want to make it, I have a couple of words of caution.
1. Measure the pattern carefully and pick the smaller size. This is a very loose-fitting top.
2. Check the neckline. I was so worried about the shoulder seam, which works by the way, that I overlooked the width of the neckline.
3. Make sure the seam for the upper and lower sleeve hits you in the appropriate place. When I made it using the pattern & instructions, the sleeve hem was so far down my arm that it looked weird. Shortening the upper sleeve by 2" put the seam back in the right place.
4. My version is longer than the pattern because I wanted to include all of the embroidered edge in the bottom. So I added 3 inches to the bottom and then hemmed it using a one inch hem.


BTW, I'm wearing the top with a pair of Spanx leggings. I love these and bought three pairs of them because not only are they comfortable but they suppress. You will see them again with more me made tops. I will wear this top because it's cute and it works but this pattern is a one and done. I have loads of top patterns and am moving on to the next one.
...as always more later!


