Showing posts with label The Pleather Collection. Show all posts

Sunday, September 22, 2013

The First of the Five in Five Dresses

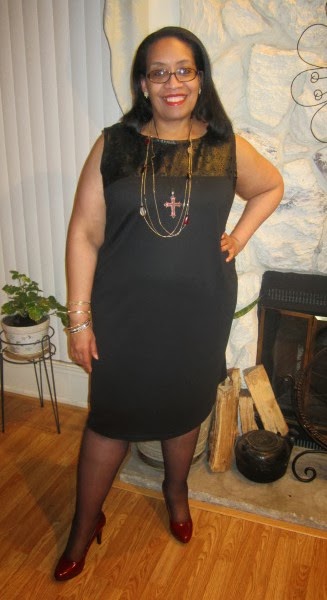
The first of the Five in Five outfits was inspired by this dress from The Avenue...


...and after a quick trip to Mood Fabrics one Friday evening to pick up a couple of yards of black ponte...along with another quick stop at Pacific Trimmings to get a zipper...this is the combo I started with to make my version of the dress and my first Five in Five piece.


Pattern ~
Dress from my TNT pattern

Fabric ~
Midweight cotton/lycra ponte from Mood
Leftover scrap of lacy pleather from Mood

Notions ~
20" black invisible zipper
black bemberg lining
ltwt. fusible knit interfacing strips
Seams great tape
Seam tape
Stitch witchery
Black cotton bias binding

Pattern Alterations ~
Naturally I started with my TNT dress pattern but I needed to make just one alteration to the dress front to achieve the high bodice look on the inspiration dress.


I measured down a few inches and made a line straight across the dress front and added a 5/8" seam allowance.  The dress bottom was cut with the dart remaining in the dress front because I like darts on my dresses. A 5/8" seam allowance was added to that piece also.  Now the inspiration dress has princess seams in the dress front.  I could have gone that way but I was inspired by the dress. I didn't want to make an exact copy of it.

Pattern Alterations

Close up of dress front on Lulu

Construction ~
The back of the inspiration dress also has a yoke and princess seams. Again, not something I was inspired by but I did want the princess seams. So I used the pattern pieces from the back of the CK Dress to get a closer fit in the back of the dress.


Now I'd originally planned to add a slotted seam and the metal zipper to the back seams. But somewhere in putting the dress back together, I was on autopilot and just added an invisible zipper. I stitched the dress front and back together and when I was pressing the seams open noticed that I did not add the metal zipper. I guess I could have unpicked the zipper but honestly it just wasn't that big of a deal. I left the invisible zipper in. I'll add the metal zipper to another dress in the future.

I added a lining to the dress because my preference is lined dresses. The inspiration dress is not lined which is common in RTW ponte dresses. Also if I hadn't lined the entire dress, I would have had to line the pleather piece so it just made sense to line the entire dress.

A few more construction points...
  • I added seam tape to the shoulder seams to insure that the pleather and ponte wouldn't stretch out.
  • The center front seam on the dress where the ponte and pleather are joined, as well as, the shoulder seams were pressed back onto the ponte side of the seam and then topstitched flat.


  • Since the pleather had quite a few holes at the neckline, I added a strip of black Seams Great to the back of it while sewing the lining to the dress. I thought it would help hold the stitches in.
  • I used a cotton black bias binding to enclose the armholes by stitching it on using a 3/8" seam.  After pressing it flat, I topstitched it down.
  • Topstitching was also added to the neckline.
  • The hem was turned up 1.25" and pressed flat.  I added a strip of stitch witchery to the hemline.  Using a twin needle, I stitched it flat.

A few pictures of the dress...


Worn with the Lacy Pleather Jacket

Back view of both pieces

Do you want to make your own?
I know I adjusted my TNT pattern to make this dress but if you wanted a pattern to start with to make your own, you could use Vogue 8786.


This pattern even has the princess seams below the front and back yokes. You can easily change the back neck slit into a zipper closure.  Wow!  Now that I'm looking at this pattern, I guess I should have just used it, right?! *LOL*

The dress goes perfectly with the pleather lacy jacket.  It wasn't my intent when I made the jacket but that's how it ended up.  At first I wasn't sure the two pieces wouldn't be too trendy for my workplace. Now though I really like them together and believe that I can wear them with no issues.


Finally even Bill Cunningham of The New York Times Style Section has observed women's return to dresses.


...as always more later!


Tuesday, September 17, 2013

The Pleather Cardigan and Herringbone Skirt

Let's recap...

I'm on Mood's Instagram account and I see this fabric...


from Mood's Instagram account

...Mood calls it black vinyl...me I call it kewl, unbelievably kewl lacey pleather. I bought 1/2 yard from the NYC store.  I thought that I would use it for a peplum on a jacket but then I got another idea. See I had some black ponte from Mood that I'd been hoarding. Yeah I'll admit it, I have ponte issues, okay?! And when I put the two pieces together ~ the earth moved.  Seriously registered on the Richter Scale...didn't you feel it?


Then I added my TNT jacket pattern to it ~ Butterick 6002. 


I've made this jacket successfully two times before ~ here and here. All of the trials and tribulations for constructing this particular jacket are in this post.

The jacket over my cranberry Michael Kors interpretation dress...


I have to tell you that I'm in awe of how amazing this little jacket looks...over everything. It is so dayum cool, I am beside myself. Yeah it's a little edgy for my corporate day job but so what!  I won't wear it on days that we have very corporate meetings.  I'll wear it on the days that I need to feel corporate-ish yet stylish...and I do meet friends for movies and dinner dates...it would be great then too!

Here it is with two of fall's trends together...


Pleather Jacket and a Black & White Herringbone Skirt

A little info about the skirt...
This version was definitely influenced by the Pinstripe Skirt from last week's Throwback Thursday post.  Originally I was going to make a straight skirt with the black & white herringbone but when I laid the fabric on the table all I could see was the chevron pattern above.  So I knew it needed to become the four gore skirt ~ cut on the bias.

Fabric...
2 yards of a black & white wool herringbone purchased from Mood last year and originally used in this Erdem dress.

Notions...
1" non-roll elastic
black bemberg lining
black rayon seam tape

Construction Information...
I emulated all of the sewing techniques that I highlighted in the Throwback Thursday post, except I did not fold the rayon seam tape in half before stitching it to the skirt.

There are quite a few of these skirts in my wardrobe.  It's comfortable to wear and just works for my lifestyle.

A few more pics of the outfit...


Please note that I'm wearing tights and suede booties with this outfit...indoors...cause I was so hot that I was melting in the house in the air conditioning!  There was no way I was going outside to take photos!!!


Yes, I've used this pattern before.  Yes, I'm using pleather again but it's so hot for fall.  It's everywhere ~ dresses, jackets, shoes & handbags.  I can promise that you'll see more pleather accents on my garments for fall/winter. I've got at least three more items on my sewing list that I'd like to sew.  I'd just like to encourage you to use some (a little or a lot) for one of your own fall garments!  If you've never sewn pleather, come on over to the dark side (dark side get it! hahaha!) and try it out.

Parting Shot ~
I bought these wedge booties and love them!  Just bought another pair in gray...


...as always more later!


Saturday, September 07, 2013

Butterick 6002 ~ A Pleather & Ponte Sweater Cardigan

I thought about making a dress next, honestly I did.  I have two pieces of fabric pretreated and set aside and a pattern that's been screaming my name for the last two weeks.  Funny how it's stopped yelling "Look at me, Pick me!" since I've been home...*sigh*  Anyway after finishing up the last of the Chado Ralph Rucci pieces, I couldn't wrap my mind around the necessary pattern alterations for one dress or the pattern instructions for the new pattern. So much for "pick me!" *LOL*


I'd put these two pieces of fabric together weeks ago.  I thought I would have gotten to them sooner but I got sidetracked by the Burda Dress (which I am getting back to) and then the Chado Ralph Rucci fabric. 

The first piece is a lacy pleather that I bought from Mood after seeing it on Instagram - seriously I need to stop being enticed by those pieces!  


The second piece is a black cotton sweater weight ponte from Mood that I've been holding onto waiting for the perfect garment.  I've wanted a version of this topper from Lafayette 148 since I saw it online.  Honestly, I want about half of the Lafayette 148 company's fall offerings...so expect to see more interpretations from this line.


Although the fabric in the inspiration jacket is actually lace, I thought the lacy pleather would work just as well.  So I pulled out my trusty Butterick 6002 jacket pattern to use with these fabrics. 

Construction ~
The jacket shell sewed up quickly since I only used three of the pattern pieces. There were some things that I wanted to share with you about the construction.  

One, the only way that I could sew the pleather fabric to the cotton ponte was with my Teflon foot.  Once I put it on my sewing machine, it just glided over the fabric.


...and yes I used pins to hold the pleather to the cotton ponte.  The fabric is full of holes so who would notice a few pin holes, if you could even see them. Because believe me I pinned the hell outta this piece and you can't see a pin mark in the finished jacket! *LOL*

Two, pressing was challenging. I really didn't want to burn or scorch this fabric so I took a lot of care pressing the pieces...ALOT of care!  It took two days to complete this jacket and pressing or the need to press the pleather very lightly & carefully was a major reason why.  Let's just say that the sleeve board and my clapper got a heavy work out.


I'm loving this sleeve board more with each garment I sew!

Three, to get a flat appearance on the seams of the body of the jacket, I resorted to stitching them flat.  I knew I wouldn't get a good press with steam where the ponte and pleather intersected so stitching them flat worked best.


Four, usually when inserting sleeves, I pin, then baste, then machine stitch. The pleather because of the holes was fragile and I knew it couldn't handle all of that work.  A lot of pins and some careful stitching then alot of steam on only the ponte part got the sleeves in. Though to be honest, I ended up taking the sleeves out (very, very carefully) and making some alterations to the jacket fronts because pleather doesn't lay as flat as drapier fabrics do.  I would have rather put the sleeves in with a flat application but again I was worried about the pleather to ponte seams.

Finishing the Jacket ~
The hardest part, however, was finishing the jacket neckline, front edges and hemline.  The pattern comes with facing pieces but I didn't want to add them because I wanted the jacket to resemble the inspiration piece. So I added a leather binding that I had on hand.


I thought the application would be simple but seriously I wanted to kill myself by the time I got it on. The first step was to serge off 5/8" around the jacket so that I would lose most of the jacket's overlap because I wasn't adding buttons to the front.


Then when I started to pin the leather binding onto the front of the jacket about every yard I noticed that there was a sticky substance for a few inches. I even went back to Simplicity's site where I purchased the binding to see if they said that it was glued together...nuthin'.  

I tried to machine stitch the binding down and the Janome hated it.  The teflon foot got gooey.  The feed dogs wouldn't push it through...it got ugly quickly!  So I decided that I would hand sew it down. Why didn't I just stop then and come up with an alternate?  Because half of the binding had been sewn down by me coaxing the machine, promising it goodies, anything to get it to sew before I gave up...and I realized that I had to find a solution or remove the binding and that just wasn't happening!

So at 2 am, I sat down and hand stitched the binding to the jacket...slowly and constantly removing the gook from my needle by using an alcohol swab to keep it clean.  I then pinned the binding to the wrong side of the garment and went to bed.

The next morning I sat down and using a small amount of steam, my silk organza press cloth folded into fourths, I pressed a section and then added the clapper to hold it down.  To press the entire neckline, front edges and hemline flat took two hours.  After that I applied my teflon foot to my sewing machine and with a little push & pull stitched the binding down.  


I tried the jacket on and the pleather fronts buckled funnily around the armholes....ummm fabric doesn't drape. I resorted to cutting the offending fabric out of the jacket fronts and pulled all of the gathering out of the armholes so that the sleeves would fit.  I'm sure that there is some prooo-fessional way to accomplish this and I'm sure the muslin-ites would say a muslin would have solved this but this time I beg to disagree.  I've made this jacket successfully two other times and never had this issue.  This was a fabric issue that maybe I should have realized would happen when working with it but the fabric whisperer missed that one ~ SERIOUSLY!

The sleeve hems ~
By the time I got to the sleeve hems, I felt like I was in the home stretch.  I turned them under when I tried the jacket on to make sure that I'd gotten most of the offending & misbehaving fabric out of the jacket. 

  • Pressed the hems flat then cut about an inch off the fabric.  
  • Serged stitch witchery to the wrong sides of the new sleeve hems.
  • Pressed it flat.
  • Then I added a twin needle hem.


Now I know quite a few people complain of the tunneling that occurs when using a twin needle on hems.  I've been thinking about this wondering why it doesn't occur on my hems and I realized it's because I use stitch witchery in the hems prior to stitching them.  I'm sure that a light fusible knit interfacing would work the same way.

Button & Snap Closure ~
I put the jacket on...snapped a couple of terrible selfies (no you won't see them! *LOL*) and realized that the inspiration garment has a hook and eye closure. Now I know that I had some furrier hook & eyes around but I couldn't find the suckers even though I tore the sewing room apart. Guess I'll be picking some up the next time I'm at Pacific Trimmings.


Instead I went with a snap with a vintage glass button over it as the closure. The button is a little heavy but it works and at this time it's staying.

Are you still here cause this is a long behind post...if so, here are pictures of the jacket on Lulu...


(gonna press that back seam again - it's looking kinda hinky!)

The jacket is done and hanging waiting for modeled pictures, which will happen later. 

So I'm back to my original challenge...what dress next? I thought the jacket would be a quick, easy and relaxing sew while I figured out what to make next.  Instead I need a large cold Mountain Dew to rest my furrowed sewing brow.  Stay tuned because I've gained my Monday vacation day back...I don't need to go into work after all.  However, I swear something quick and easy to sew would be appreciated right now! *LOL*


...as always more later! 

LinkWithin

Related Posts with Thumbnails