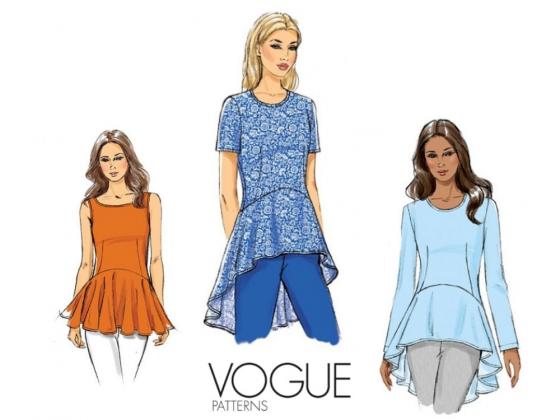
Showing posts with label Vogue 9084. Show all posts

Sunday, November 29, 2015

Vogue 9084 Finished

This was the third top that I made during the sewing vacay but it was the most involved sew.  So let's start with a picture of the Vogue 9084 top finished ~


For all the trials and tribulations to get this top finished, I'm glad I made it. I know it looks nothing like the pattern envelope but I like the use of the suiting fabric with the faux leather to give it a funkysexycool vibe. See I told you, I'm a wanna be biker chick! *LOL*

Materials Used to make the Top~
Glen Plaid Wool Blend Suiting purchased from Fabric Mart years ago
Black faux leather from Sawyer Brook
Rayon Bemberg Lining from lowpricefabrics.com
20" invisible zipper

A little more sewing information ~
I detailed all of the pattern alterations and construction challenges in the previous post. Though this top took way longer to make than I thought it would. My choice of fabrics, alterations made to the pattern and the use of the faux leather all elevated the construction level of this pattern.

I was really concerned that I would have a problem getting the sleeves into the top.  Faux leather doesn't really gather well and the sleeve cap on this pattern needs a little gathering to make it fit. However, adding just a small amount of gathering at the top of the sleeve cap worked. I was really thrilled with how easily the sleeves went into the top, especially since it was the last element added before the top was finished. Even the pressing went without a hitch, probably because I used my shoulder stand and an organza pressing cloth folded into fourths to get a good press.

If I were to make any change to the top, it would be to line the peplum...and I even thought about it.  But removing all of the stitching in the hemline was overwhelming...so the peplum remains unlined. However, that is the only regret I have about making this top.  Everything else worked so well and it's casual enough for my workplace and yet dressy enough for me...so a win-win.

All of the pattern pieces are altered and stored away.  I don't know if I will make this again. It's such a distinctive pattern. Maybe a spring version out of a lightweight ponte...we will see.

A few more pictures ~ 

Adding the extra flare and lowering the back hem by 2" prevented
the flounce from landing in the middle of my backside.

A peak of the faux leather insert on the side

Worn with a pair of RTW ponte leggings and a wedge shoe bootie

Conclusion ~
I am a dress snob. I love sewing and wearing them. I thought that sewing tops would be easy, too easy after the complicated sews I've had making dresses. Boy did this top pattern prove me wrong! *LOL* Yet I'm so glad that it did! It means that I can take all of my advanced sewing techniques and apply them to some of the tops I make to satisfy my creative needs.


I've primarily sewn tops on this vacay.  Since my company closes Christmas Week and I will be on vacation for 11 days with probably 8 or 9 to just sew, I plan on concentrating on a pants pattern then. I'm so excited and so thrilled with this new top!

...as always more later!


Thursday, November 26, 2015

A Hi-Low Top - Vogue 9084 - Part One

This vacation seems to have been all about the Top!  This is the third one I've made but the first one I'm blogging about.  It's another pattern that I bought thinking it would look great over leggings or skinny knit pants. 

I originally wrote this as one post but it was so long that I'm cutting it into two! This post talks about the drama of the make and the second one will have pics of me wearing the finished top.

Introduction ~
As with any new pattern, I'm checking the internet to see what other sewists have to say about construction, how it looks on them, etc.  However there were only 2 reviews. I must be the Queen of picking unsewn top patterns! Or I have no experience at all at what looks good as a top. *sigh*


Let's start with why I like this pattern. I don't know about anyone else but I'm a true pear shaped plus size woman. As such, I'm always looking for a fashionable way to cover my ass-ets! Something that's not loose, ill-fitting, or tent-like really appeals to me. Since I've made peace with the size of my thighs, I've found that I really like high low tops.  So whether they're still on trend or not, I'm gonna sew and wear them.

I chose to use the suiting fabric with this pattern because I really did have an epiphany when I saw the Rachel Roy collection at Macy's. It's then that the thought circling in the back of my mind coalesced. I could use my fabric collection in different ways than it was intended for when purchased.  Of course when I started to work with the fabric, it talked to me and told me a different way to go.

Pattern Alterations ~
I lengthened the front and back bodice pieces two inches because the flounce would land on my bodacious booty and stick out the comb (crown) on the top of a rooster's head. Not a good look or the one I was going for!


Added a 4" wedge to the back flounce because I wanted extra flounce. In the two pattern reviews I read the flounce was just so-so and I wanted much more. Interesting from a woman who hates ruffles right?  But trust me the added extra fabric makes the back look more like the illustration on the pattern envelope.


Widened the dart legs on the shoulder back pattern piece to make the dart a full inch wide. This allowed me to remove the excess to make the shoulder seams fit my own.  Because I narrowed the back shoulder seam, I did the same to the front shoulder seam by slicing, overlapping and taping it down.


Added a 1/2 to each side seam in the bicep area because I wanted to insure that I had enough space.  Especially since I was using the faux leather and adding a lining to the sleeve because I find faux leather sleeves clammy.

Cutting and Construction of the Top ~
Matching the glen plaid was easy since it's not a predominant plaid.  Also, the fact that the fabric was 61" wide made it easy to lay the pieces side by side to get a better match.  That was the easy part.


In my infinite wisdom (not!) I decided that lining the top would be better than adding binding to the neckline. In truth it is, in application it was good until I realized my top was too small in the butt area. Why do you ask was it to small there?  Because when you lower a pattern two inches it would be good to remeasure and make sure it fits around your bodacious booty. Ummmm, I neglected to do that!  So let the sewing drama begin...

After I thought about it I had two choices:
  • One to remove the two inches I added because when I pinned it out, everything fit like it should.  
  • Or two find a way to add more inches to it. Of course I chose the more difficult option of adding more inches.
Hey every eff up is an opportunity for a new design decision right? So I went with a godet/wedge because they have worked for me in the past.  Think of my Olivia Pope top (which btw I didn't have the heart to donate so it's still in the back of the closet) I just had to decide if I wanted the wedge to match the fabric or to use a contrasting fabric. 

Up to this point I was wavering about what to do with the sleeves - match or contrast - drama or no drama. I even considered adding ponte as the contrast and sleeves but decided that the faux leather would add an edge to the suiting fabric. So I went with the faux leather.


I added contrast to the side seams (which I increased by 7" and took it from a too tight to a looser fit) by cutting a triangle from faux leather scraps. BTW, I keep a bag of the scraps because who knows when I will need them!


Unpicked the side seams on both the lining and the fashion fabric and inserted the faux leather triangle. Because the seam is a little bulky, I decided to press the seams down first...and then this happened!


Yeah I had the iron up way too high!  Unpicked it one more time and successfully got the triangles added to get the extra width. At the same time I re-evaluated the peplum. The front piece is a lot straighter than I saw it in my head. Now let's make it clear, the pattern envelope has a very straight front but of course I missed that!


So when I added the needed 7" to the front peplum piece, I also added a 6" wedge to give a little more drape to the front of the piece.  Then the peplum was sewn back onto the top. Oh and one more consequence of adding all of that extra fabric - that long-*ss peplum needed to be hemmed. 


After getting the top hemmed - all eighty million inches of it - I made one lined faux leather sleeve pinned it to the top and called it a night.


Post 2 will have finished pictures and more sewing drama! *LOL*

...as always more later! 


LinkWithin

Related Posts with Thumbnails