Wednesday, March 31, 2021

What I sewed in March 2021

I started March out like gangbusters.  My sewjo was firing on all cyclinders...

  1. Pembroke Tops
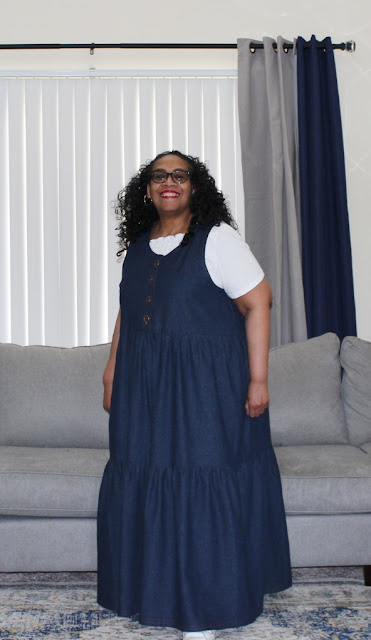
  2. Verona Maxidress
  3. Vogue 9299 Tunic

...and then nuthin'. Absolutely nuthin... So March came in like a lion and definitely went out like a lamb for my sewjo.

I can attribute this to several factors ~

1. Work - I got new responsibilities so I was hyper focused on work

2. My cut pile - has two pieces in it.  I want to sew both but am not inspired to sew either without adding more to the cut pile.

3. I haven't felt like cutting out anything.

4. Taking pictures - truly the bane of my existence this year is taking pictures. I discussed this some in my last post. To make picture taking easier, i.e., by myself, I need to make changes to several things and purchase some more equipment. I've been dragging my feet on buying more stuff. 

Fabric ~

As you know I'm the owner of my own personal fabric collection and am loathe to add more tenants to the co-op.  However, Mood Fabrics is stalking me on IG. I succumbed to temptation and purchased the following:


Now this purchase has done wonders for the sewjo so I want to spend a day cutting - both old and new fabric! BTW, both of these fabrics are AH-MAZ-ING! You should check them out.

Sewn but not Shared Garments ~

I really wanted to do a series of fall/winter/early spring Myosotis dresses so I cut out three.  Two of the three have been completed.  Instead of waiting for the third one, which was my original intent, I'm sharing the first two soon just in case I move the third one to fall sewing.

Again, sharing depends upon picture taking...*sigh*

Moving forward ~

My sewing list is still working for me...I just need to cut some things out so when I feel like sewing, everything will be there waiting. Oh and I want like four more Vogue 9299 tunics. I must wear this tunic once a week since it's been finished. So more of these will be coming to the blog this summer.

I'm looking forward to April because warmer weather, longer days and more sewing.

...as always more later!

Saturday, March 20, 2021

Midway though March

I've been sewing. A LOT! I'm turning things out faster than I can take pictures of them because the sewing/creating is the most important thing to me. Yeah I've got a groove going. The days are getting longer...it's starting to feel like spring...and my sewjo is hopping! 

A picture of my sewing rack as it appears now.

So a few things...

o I've been using a lot of new patterns.

I made a promise to myself that I would try harder to sew some of the many patterns I've purchased over the years. I've reverted to my TNT patterns so much that the other patterns have been pushed aside. New patterns take time and since I'm home every day with no wearing deadlines, I've decided to take the time and enjoy these new journeys.  So there will be more new patterns used and shared.

o Using fabric and notions stash

While I did feed the sewjo beast last month with new fabric purchases, this month I've been pulling fabrics from the collection to sew. All buttons and bindings have come from stash. I have an amazing collection of buttons and I've been trying to use something from it for every button project.

o Learning new places to take pictures

My picture taking had become rote because my last place had a perfect white wall and was lushly landscaped outside. Somehow I've managed to put furniture or stuff on all the walls here! LOL! It may be because it's a smaller space or it may be I was thinking more design than photography. Anyway, learning what's the best time to shoot inside and where has been challenging. It has also added to my back up of sewn garments making it to the blog. Once spring arrives and the trees bloom, there are loads of places in my new complex that will work and I hope to use.

o Learning new techniques

Due to my partnership with Janome, I feel like I should use the new features that Instagram offers, as well as learning to videotape some of the things I do at the sewing machine. I've purchased a ring light and I'm still working on making videos but sooner or later links will show up to online video shorts. No I'm not starting a YouTube channel. Maintaining a blog and an Instagram feed are about all I can handle and still sew.

o Burda Pattern Magazine Inspiration 

Along with using more of my fabric, notions and pattern stash, I took the time to review some of the Burda Pattern Magazines I have stored. I found so much inspiration in those magazines, that I've added a few patterns to my spring/summer sewing. Because at this point what's the difference between tracing a pattern and altering it to downloading, printing, taping, tracing and then altering a pattern. Especially since I'm not finding much inspiration in the Big4 patterns.

Here is some of the Burda goodness...


o Repurposing my sewing loft

I really like sewing in the winter sewing room probably because I just cut and sew there. The way the room is set up you can't see a lot of the sewing paraphernalia when you enter my space. So I have plans to put some shelves on the walls and lift everything off the floor. Add some pretty baskets to use on the shelving, curtains and putting the Mixtiles I purchased on the main wall.

The Sewing Loft will become a resource center. All of my fabric, patterns and sewing extras like buttons, zippers, bindings etc. will continue to be stored there. It allows the winter sewing room to be used for sewing and cutting and the loft to be a center for everything else. Nothing will be cramped or overcrowded and both spaces will allow me to breathe creatively.

Now I have a plan I need to execute it. When its done I will share pictures of it here.

That's my mid-March update! There are more garments to come since I have been sewing.


...as always more later!


Tuesday, March 16, 2021

Paneled Pembrokes

I love this pattern.  I've made six of them because they work for me and because they're so good at highlighting fabric and you know how much I love fabric! I've sewn this top in solids and prints. Using thick and thin knit fabrics. I started wearing my versions earlier in the fall and realized I needed to add a few more to my wardrobe.

I saw these panel prints on Marcy's site in early January. When I found them, I knew that they would either be a Pembroke or a Concord Tee. I went with Pembrokes because I need long sleeve tops and a little warmth now. Also since I'm still working from home they will make great zoom tops. 

These particular Pembrokes are all about the fabric. The way the panels are printed afforded me the opportunity to use them creatively which was my challenge. Here's a little video I shot when I finished the first one.

Jubilee Cotton/Lycra French Knit Panel ~ Pembroke Panel One

I purchased two of these panels and only used one to make my Pembroke.  Will probably make a Concord Tee with the remaining panel. I color blocked this one with some black jersey knit I had from Fabric Mart. I wanted to make the print on the panel pop. Other than the color blocking there are no new construction techniques.


Temple Garden Cotton/Lycra French Knit Panel ~ Pembroke Panel 2

I was drawn to this panel first because I loved the look of the temples. This panel is also slightly longer than the abstract panel above. Again I purchased 2 panels. Because of this I was able to get all of the Pembroke tunic pattern pieces cut from the panels. The only change was that I had to shorten the length of the cowl by 1.5". I think it's barely noticeable.

By placing the design squarely in the center front and back, I ended up with a temple right between my breasts which adds to the optical illusion. An illusion that the black sides and sleeves also give to the top.


Worn with my black hoodie

These were quick sews, made by the fabric and totally perfect for my wardrobe. While they don't fit into my blue themed wardrobe, they do work for my lifestyle. Honestly I have another one on the cutting table in a solid white knit which will work with my blue themed wardrobe.  That will show up here sooner or later!


...as always more later!


Thursday, March 11, 2021

Verano in Denim

I love big, flowing, long dresses for summer and at home.  Since I'm home a lot these days (I wonder what this will look like to re-read in 5 years!) I thought a denim version of this pattern would be excellent to swan about in. When we're allowed to go back to work in an office (I have hope that it will happen in 2021) I will be able to swan about the streets of NYC in it.


Last year I purchased several patterns with this silhouette. My goal is to try them all out this year and then remake the heck out of the ones I love wearing! This is a style and silhouette that I really enjoy wearing. In changing up my home and work wardrobe, I'm going with the flowy and loose fitting especially for spring/summer wear.

As I said in a previous post, I'm sewing more indie patterns now. I've always wanted to make a Christine Haynes pattern but her designs didn't really fit my vision of my lifestyle. This one is absolutely perfect for who I am now AND it came in a paper pattern. Woo hoo for paper patterns! *LOL*

(photo credit: Fancy Tiger Craft Fabrics)

Supplies ~

Indigo blue denim purchased from Stylemaker Fabrics last month - it's available here

4 - 1" buttons from #deepstash in the button collection

blue/white floral bias binding from Bessie Pearl - previously used on the Simplicity denim jacket

Construction ~

I resisted my tendency to change the pattern prior to sewing it. Learning from the challenges of my jumpsuit pattern, I took my measurements and cut out a size 3x.  However, as originally designed, the bottom tier grazes the ankles and I wanted long, flowy and sweeping so I added 5 inches to the bottom tier.

Otherwise this was easy to sew. I did however, make a change to my darts.  They were a little low when I tried the top on. It was an easy fix, I just angled them differently.  Will make the change to my paper pattern.

Also, the armholes are very low. Way too low for me to wear without a top underneath it. Thankfully that was the plan for this version. Again I will make a change to the paper pattern to rectify this for my next version.

I cut the pockets out and went back and forth about adding them.  Finally putting  them in at the last minute probably because they were so easy to add to the second tier.

Now this dress is all about the gathered tiers. I know some sewists hate the gathering process but it doesn't bother me. I find it kind of meditative usually doing it while I watch a TV show. 

Gathering Tips ~

Here are a few tips I use when gathering huge swaths of fabric.

1. I don't use the gathering foot for large amounts of gathering because I can't control the gathering.

2. For really long pieces of gathering I don't use the two row method. I use the zig zag over dental floss method.  The dental floss is coated, glides through easier and is thicker than thread.  So there's no breakage.

3. I use a lot of pins and take the time to walk through the gathered tier to insure the gathers are equal all the way around.

4. After it's gathered, I stitch it down. Sometimes removing the pins and readjusting the gathers at the machine.

5. I take my time. I want the gathers to look even all the way around.

6. The gathered seams are pressed flat.  

7. Then I serge the seam close to the seamline and press again.

A Few Pictures ~


I LOVE this dress! It is everything I want in a dress. Comfortable, full and flowing. I wore it all day and will probably make only one more change. I think I'm going to shorten the middle tier 2 inches so that last tier's seam hits a little higher on my leg.  Otherwise this is how I feel about it...

I will definitely be making another one and I highly recommend that if you're looking for an easy to sew, easy to wear spring/summer dress that you get this pattern too!


...as always more later!


Monday, March 08, 2021

Inspired by...

I love JJill, Chicos and Talbots garments. The silhouettes work for me, they're comfortable, and I like the way they use colors and patterns in their garments. So I get excited when a new collection drops online. What colors are they using?  What silhouettes are they remaking? What appeals to me and makes me want to reproduce it?

I'm an old school sewist. Design and fabric drive my makes. When I was in the corporate world I followed a lot of designers and incorporated their ideals into my work wardrobe. Now that my life is more casual, I tend to look to RTW vendors more. While I'm sewing casual, I'm still drawn to classic styling.

The early spring collection on JJill REALLY inspired me. We know I'm already sewing blue garments because of them. I saved a few images of tops that supercharged my sewjo. This is one of them...

...and here is my version.

I started with Vogue 9299 because it has all of the elements of my Inspiration Garment.

Supplies ~

Lightweight blue denim from Stylemaker Fabrics - this was recently purchased and is available here.

9 - 13/16" brass buttons from deep in the button collection

9" of 3/4" elastic for each sleeve hem

Pattern Alterations ~

I altered the body of the tunic to give me a little more room yet retain the close-fitting look. The finished hip measurement is 59.5" on the pattern and I'm more comfortable with 65" for sitting and standing ease. This alteration accomplished that.

To alter the front by I added space to the side seam so that it covered me and allowed the front .

Since the tunic has a yoke in the back. I altered the back bottom pattern piece by using the pivot and slide method. Simple yet effective changes that made the pattern pieces work for my body.

I also changed the sleeve pattern. While the different sleeve options are what makes this Vogue pattern I wanted a simple longer sleeve similar to my Inspiration Garment. Originally I was going to add the cuff but changed my mind as I was constructing the tunic.

To make the wider sleeve, I just slashed and spread the top sleeve piece. Then lengthened it and redrew the sleeve cap. After the changes I traced them onto a new piece of tracing paper to get a clean sleeve pattern.


If I make this again, I would flatten the sleeve cap a little. The elasticized hem is made from a 1" casing. It was topstitched on the top and bottom of the casing to give it a little more ummph. Simple steps that gave the tunic flare.

The Inspiration Garment has pockets. I'm not really a pocket woman. So I omitted them.

Construction ~

Sewing the pattern together was really easy. It's not a hard pattern to put together. The changes I made were:

- Add topstitching in a solid color

- Make the sleeves with an elasticized hem

- Add stay tape pieces to the side seams to strengthen them where they curve/end.

A Few Photos ~


I really like this tunic because it's perfect for working from home and for zoom meetings because of its' front. It will even be great for wearing outside! There's a little pulling at the bustline but that's due to it being dart-less. It's something I can live with and IF I make it again, I would address it.

This was also a pleasant sew. It didn't make me doubt my skills or want to throw it across the room. In these pandemic times, that's truly a win-win! LOL!


...as always more later!


Thursday, March 04, 2021

A Plaid Applique Shirt

I chose to make a shirt as my first Janome project because I started 2020 sewing shirts. Sewing shirts gave me joy and creative freedom, things I wanted to bring into my sewing in 2021.  Well we all know how 2020 evolved! Even though it was an incredibly challenging year, I want to bring that same hope and creative energy into my sewing in 2021.  

Now I can make a shirt in my sleep I've made so many! The challenge was how to choose a fabric and style that best showcased the functions of my Janome 9450QCP.  While this machine is typically used by Quilters, I think it's a dream sewing machine for Fashion Sewists too.  Probably for the same reasons that Quilters love it.  A spacious sewing bed of 15.5" so that any garment can be sewn easily without having to bunch it up or push it through the opening.  All of the extra lighting.  The feet that are included with the machine to help make any sewing job easier. Plus all of the additional features built in to assist with creating an amazing garment.

I chose to use my tried 'n true (TNT) princess seamed, back yoke shirt pattern and a plaid fabric from my fabric collection.  I added some appliques to the shirt from my notions collection.  As I started working on the project, I began calling the shirt, "The Plaid Peacock Wonder!" Y'all know I tend to name all of my shirts based on either the fabric or a technique used during construction. This one is of course named after the fabric and the applique.

Supplies ~

3 yards of a cotton print purchased from Chic Fabrics

Appliques purchased from Amazon (just type in appliques and a bunch will come up!)

10 - 5/8" red buttons purchased from Pacific Trimmings

Midweight fusible interfacing from Steinlauf & Stoeller

Some Construction Details ~

The first thing you need to know about working with plaids is that you need to take your time.  Matching is not something you can rush through if you want to get a good match on your finished garment!

The second is carefully cutting the pattern out.  I use the single method - not folding the fabric in half but placing it as one layer on my cutting table. Placing the pattern pieces on singly to match the plaid at key points.  After making sure each pattern piece is placed next to each other so that the plaid matches across all of the seams (matching notches on your pattern if they have it) I carefully cut out the pattern pieces.  

I also add some bias elements to a make. I think it adds visual interest. For this shirt, I cut the shirt front bands and the sleeves on the bias.  The collar and collar stand were cut to emphasis the red stripe of the plaid.

Each piece is carefully pinned matching the plaids before taking it to the sewing machine. During this process, I sew the shirt in sections usually starting with the back and moving towards the front.

For this project, I used several different feet and plates on my 9450 sewing machine.  I used the AccuFeed Dual Feed Foot, my straight stitch plate and the straight stitch foot that I borrowed from my Janome 8900QCP. I'm sure you're wondering why I borrowed the foot? Well, I've made special markings on the foot that I didn't want to duplicate. I love that the feet are interchangeable between the two machines! 

I use my straight stitch foot and the plate whenever I make a shirt. I like the smaller opening on the plate so fabric doesn't slip into the bobbin area AND the control I have when stitching seams. Of course the amazing buttonhole foot with the stabilizer attached was used to make the 12 buttonholes down the front of the shirt. I thought the ease of use for the buttonhole foot on the 8900 was great but on the 9450 it's even easier and simpler to follow!

However, the appliques I applied required the most time and effort. First placement was important. This was accomplished by adding a bit of stitch witchery to the back of the appliques when placing them on the shirt front and back. A good press and then the shirt front and shirt back were taken to the sewing machine for the appliques to be sewn down.


Using the normal plate and foot A, I slowly applied the appliques using a small stitch of 2.6 on my machine. I was grateful for the needle up & down button, as well as, the button that raises and lowers the foot. The fact that the machine is so precise when it stops was vital to getting the appliques on perfectly.


After sewing the appliques on, the rest of the shirt came together easily. As I machine stitched the hem, I was thrilled with the speed of the machine!

So a few more photos of the shirt ~


Finally, making the shirt on the Janome 9450 was easy to accomplish due to the extra feet and sewing plates. I'm looking forward to all of the other garments I'm going to create with this machine.

Note ~

As I stated earlier, this was my first Janome make for the Janome blog.  Thus all of the references to my Janome 9450's capabilities and links to the feet I used to make this garment. This was my first and last make of 2021 in the sewing loft! Everything else that's been shared this year was sewn or completed after this make.

These posts are part of the requirements for being a Janome Maker.  I'm unapologetically happy about repping this machine because I've been sewing on a Janome machine for at least two decades!


...as always more later!


LinkWithin

Related Posts with Thumbnails