Sunday, February 24, 2019

And The Winner Is...


First ~
I will be watching the Red Carpet Arrivals for the Oscars tonight.  I love awards season just for the beautiful gowns & dresses the actresses wear. So I will be planted in front of my TV watching the parade.  I'm also kinda invested in some of the award categories and will be waiting to hear..."and the winner is?"

Second ~
Seguing into the winners of the two pdf patterns for the Dover Jacket..."AND THE WINNER IS!"

Diane who owns the blogs SewInspirational and Quilt by Design

and

Mary Jackson

Please send me an email at cnorman underscore 98 at yahoo dot com. I will forward your information to Diane at Blue Dot Patterns who will work with you to get your patterns.

Third ~
I have been crocheting way more than I've been sewing. But I do have this cut out waiting to be sewn...


...and this on my dressform waiting to be finished

(a little sewing cave realness in the background)

I don't know how much sewing I will be doing today because Academy Awards! *LOL* Will you be watching?

...as always more later!

Wednesday, February 20, 2019

Reflections late in February...

These are just a few thoughts that have been rambling through my mind. There's nothing that's enough for a blog post, so I'm putting them all together here.

First Fabric ~
I bought fabric. Well of course I did! *LOL* But continuing with my goals of 2019, I'm documenting all of my purchases here.

This first one was the deal of the day at Fabric Mart. It was $1.99 per yard and I bought it to see if it would make a pair of PJs. While I love the piece that showed up it is a little too sheer for pjs. I'm sure I have something else on the shelves that will work instead. I think I will use this for a summer dress/shirtdress.


The next three were Premium Member offers - linen/cotton blends for $5.99 per yard. I might not buy a lot of the regular deals but send me a Premium Member deal and I'm all over that! I used this type of fabric in my first Katie dress last summer. So when the email came through announcing the fabric sale, I showed some restraint and only added three pieces to the collection. The pieces currently aren't on the site but I will let you know when they show up.


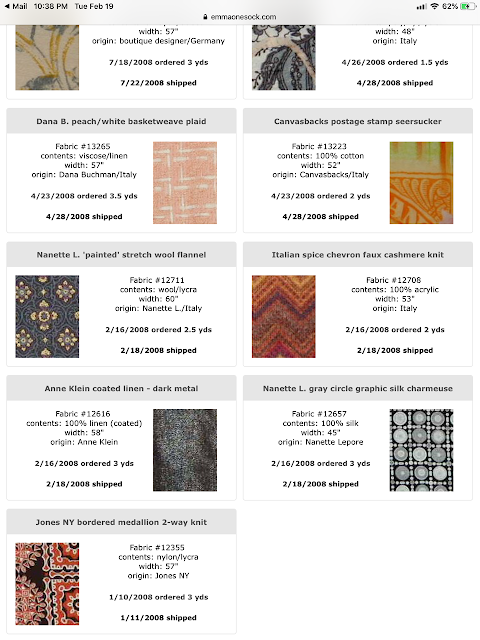
Then there's this piece from Emmaonesock that I just had to have...


...and do you know that EOS has your entire buying history online? I found out tonight that I've been buying from them since 2005! And they have a listing by year of each piece of fabric I purchased from them.


That's how I found out that my Isaac Mizrahi shirt fabric was NOT from Fabric.com but from EOS. I've updated my blog post to reflect that fact. Also three of the pieces pictured above are still on my shelves...*sigh* And there are two twinsets made from Burda 8869 using fabric purchased from EOS that are still in my closet.  The knit at the top (partially cut off) was made into this twinset and another twinset using the Jones NY bordered medallion print. I made a dozen of these twinsets in a variety of fabrics. I've sewn ALOT of garments!!! Thank goodness most of them have been memorialized here on the blog because they're no longer in my wardrobe.

Vogue Pattern Magazine ~
I'm sure all of us know that the McCalls Pattern Company and Simplicity Patterns was bought by CSS Industries a couple of years ago. Well besides good friends losing their jobs, now CSS Industries has decided to stop publishing the magazine. I found out on Ann's (Gorgeous Fabrics) Instagram post.


There was no notification given to subscribers. If you have a subscription and want your money refunded, you will have to contact them. I spent 20 minutes on the phone today, waiting for someone from Customer Service to speak to me and refund me my $25. One more thing, the refund is by check and the very curt rep could not tell me when the check would be cut and mailed. 

If you want to contact customer service, here's the number 833.260.3378. Call and take the time to get your refund. BTW, I'm a little perturbed with this company right now and will be a lot more discriminating on sharing my dollars with them. Thanks Ann & tcsewhat for the information about this! 

When did we stop using buttons and buttonholes?
I'm starting to think there's something wrong with me that I want a cardigan to close over me and to be secured with some buttons and buttonholes. I hate putting a heavier coat over one of these type cardis because it slides around and gets caught up in the layers.

This isn't just happening with sewing patterns. I've noticed it in RTW too!  I mean the way the garment is photographed makes it look all cool and sexy...but am I the only person that has difficulty wearing them? So am I missing something? Can someone explain this look?

BTW, this isn't a condemnation of any pattern or RTW line. I'm just wondering why this is a popular look!

Pattern Giveaway ~
Finally, don't forget to enter the giveaway to win one of two pdf copies of the Dover Jacket from Blue Dot Patterns. Leave a comment on the last blog post. You have until Friday, February 22nd at 11:59pm EST.

I haven't been sewing much lately because I'm trying to finish up the last of the crocheted blankets for the grandkids. Three down and one more to go!  That's what's been going on in my world...

...as always more later!


Sunday, February 17, 2019

Dover Jacket ~ The Third Version in Embroidered Denim

This is my last and most elaborate version of the Dover Jacket.


Supplies ~
- Embroidered Denim from Mood Fabric - purchased at the NYC store late last year 
- (5) 7/8" flower buttons from the button stash
- Flat Bronze Piping from Joyce Trimmings
- Navy blue snug hug rayon seam binding
- Interfacing from Steinlauf & Stoeller

Things to note ~
1. There are no new construction techniques in this version because it's the third time I've made this jacket.


2. The distinguishing factor of this make is the flat piping I added to it. 


3. This version doesn't have pockets either.  I cut some out and was going to do a funky little pocket but after wearing my first jacket, I realized that I don't need them.

4. I omitted the topstitching for this jacket due to the elaborate embroidery on the fabric. I think the topstitching would take away from the embroidery so I hand tacked the facing down in key points.

5. Rayon seam binding was added to the hemlines and I hand stitched the hemlines down. Again to avoid stitching through the embroidered fabric.

6. I made corded buttonholes using embroidery floss as my filler for the jacket front. I needed bold buttonholes because in several places I had to sew through the embroidery. I wrote a "how to make corded buttonholes" in 2012.  Here is the link to that post.

7. My jacket front buttons left to right instead of right to left because I liked the way the pattern on the jacket flowed better. 

A Few Pictures of the Jacket ~


A Special Offer ~
I love this pattern! While I'm not a pdf pattern fan, this one was so easy to assemble and used very few pages. While it's not a plus size pattern it was easy for me to alter to fit my body. Now if you've a bodacious bustline, you will probably need to make an FBA to make it work for you, but I believe it can be done. Me being more modestly busted for a plus size woman, I only made a few alterations - see the first jacket post.

All this to say that Diane of Blue Dot Patterns has graciously offered not ONE but TWO pdf patterns to the readers of my blog! So if you'd like to make one of these amazing jackets too, please leave a comment below telling me what fabric you'd use to make your version AND of course how much you like mine! *LOL* You have until Friday night 2.22.18 at 11:59pm EST to leave a comment. The winners will be announced on Sunday, 2.24.18.  Good luck!

ONLY COMMENTS LEFT ON MY BLOG POST ON BLOGSPOT.COM WILL BE ELIGIBLE FOR THE DRAWING!

Conclusion ~
I've given this jacket pattern a work out. I have three wonderful versions to use as layering pieces for the winter. It gives me a refined look but works for my lifestyle. I won't be making another jacket this season. However, you may see it as a dress with 3/4 length sleeves come spring/summer.

This is a simple silhouette. I loved working with the pattern because it allowed me use fabric and embellishments to make the silhouette sing. It's the kind of sewing that I love best and it's the essence of the sewist I am. Taking something and adding my stamp/personality to it to make it my own. And isn't that why we all sew?!

So don't forget to leave a comment below to win your own pdf jacket pattern!

BTW, I have two more outfits left in the last batch of garments I cut out. Look for those and some crocheting that I've been doing for the grandchildren to come to the blog sooner or later!

...as always more later!


Wednesday, February 13, 2019

McCalls 7481 ~ An Embroidered Denim Vest Hack

I decided that I wanted a couple of casual unlined jackets to wear this winter. I started with the ponte and lace version using McCalls 7481 and moved onto the Dover Jackets. I wanted to make another M7481 because I like the silhouette of this pattern and it's very hackable. 

So for this hack I've added the inseam pockets to the front. In my mind I call them the Rachel Comey pockets which makes it reminiscent of this Jacquard & Ponte Jacket. The thing that challenged me about that jacket was it didn't close and it fit closer in my upper body and looser in the bottom. That's because I basically used the dress pattern for my topper pattern.

For this version I added the pockets to the front which is easy because this pattern already has separate pattern pieces for the top and bottom.  So here is a picture of the completed garment...


This started as a jacket but now it's a vest. I got the jacket cut out and started to assemble it - went to add the sleeves and no bueno. The suckers just don't fit my arms...and I have no idea why. I measured them before cutting them out but they're just not working in this fabric.

At first I thought I would recut them from the fabric scraps and even came up with a plan to do so...but I kept dragging my feet. That's a sure sign this garment was done. So I finished it up and moved on. I'm wearing it above with one of the white shirts I made last spring.

Listed below is the supply list and techniques I added to make the inside as pretty as the outside.  

Supply List ~
- Embroidered Denim purchased from Metro Textiles (from the collection)
- White Piping from Daytona Trimmings
- White bias binding from the collection
- Black fusible interfacing from Steinlauf & Stoeller
- (3) 1" white buttons from the notions collection

Construction Techniques ~
I chose a very busy fabric so there were a few techniques added to it to make it work...


1. I hong kong finished the side seams, the facings and the hem.
2. The facings were cut from leftover regular denim scraps to make the fronts less bulky.
3. I added white piping to the front to give the eye a place to land and enclose the design.
4. The back was cut into three sections to break up the pattern a little but it's only noticeable at the first seam.
5. After I omitted the sleeves, I used a smaller white bias binding to bind the armholes.
6.  I decided to only add two buttons at the top because after all that work, the vest barely closes around my hips. The two top buttons allow me to close the vest without straining it over my bottom.
7.  Because of the dense embroidery design on the denim, I had to sew over the buttonholes twice to make them visible. The stitching was getting lost in the embroidery.

Otherwise, y'all this is a really simple silhouette that I changed the pockets on and then bound the heck out of the interior.


My other concern is that even though everything was pretreated, you know denim can still sweat dye in the wash. So will all my pretty white bias binding be a muddy blue after a wash? Who knows...and of course I thought of that as I pressed the last of the bias binding into place.  I think I just got excited about how great the bias binding looked on the insides without thinking about the care of the jacket until it was done.

A Few Pictures ~


Conclusion ~
This was the second garment I started during the Winter Holiday sewing bust. I did like taking my time and adding in the extra elements. As each technique was added to the vest, I got happier and happier because I'm no longer sewing to have something to wear. I'm now sewing because I like creating beautiful clothing...but it did take me until last week to make the final changes, finish it and get it ready to be worn.

It's a great vest. I love it paired with the white shirt or when worn with one of my cashmere turtlenecks on a cold winter day (not these minus days we've experienced lately). While the jacket idea didn't work out, the vest has more than surpassed my original idea. I really love this piece. It has an art teacher chic vibe. I'm thrilled I worked through the garment's challenges to add it to my wardrobe! 


...as always more later!


Sunday, February 10, 2019

The Dover Jacket in Flocked Glen Plaid

I knew right after I'd finished my first Dover Jacket that I would be adding more of them to my wardrobe. It's exactly the type of topper that I need and want as a layering piece. All I had to do was figure out what the next fabric should be. I settled on a flocked glen plaid suiting and an embroidered denim. One piece is deep stash and the other is new to the collection. 

At first I was going to put both jackets in the same post but there is so much detail to each one they deserved separate blog posts. 


Flocked Glen Plaid Version ~


This version was inspired by a picture I saw on Marcy Tilton's site. Yes, I get her emails. Yes, I cruise her site 2-3 times a week. No, I rarely buy anything but her fabric selections are so inspiring. The picture above inspired me to look in my fabric collection, because I KNEW I had a flocked glen plaid on the shelves. I know Marcy's picture is about denims (and boy do I want the one on the far right!) but it did strike a memory.

Upon finding the fabric on the shelves, I was thrilled to realize it's the right weight to make the Dover Jacket. Since it's such a distinctive fabric, I knew it would make an interesting topper. A note...when choosing fabric for this jacket...make sure it's a fabric that gathers easily since the gathering is an integral part of the design.

Supply List ~
- 3 yards flocked glen plaid from deep stash
- (3) 1.25" buttons from notions collection
- leather binding from the notions collection
- Black fusible interfacing from Steinlauf & Stoeller

Pattern Alterations ~
This is the only additional alteration I did to the pattern for future makes ~
  1. I added 1/2" to the front and back of each sleeve from the shoulder curve down. 
  2. This enlarged the hemline considerably. 
  3. At 4.5" from the hemline, I sewed on an incline decreasing the hemline by 1.5" on each side.
  4. I also lengthened the sleeve by one inch.
  5. This allowed made sleeve hems circumference smaller and stopped my very small wrists from looking like they were floating in a too big sleeve.
Construction ~
Because the fabric is very busy, I added some accents to make the design work. I chose a very large button from the collection to add to the jacket front. I have no idea how long I've had these buttons or where they came from in the garment district. Just know that my button collection is as extensive as my fabric collection.


Due to the size of the buttons, my automatic buttonholer wouldn't make buttonholes. Honestly, I haven't made a 3-step buttonhole in about 20 years. I went to my copy of the Vogue Sewing Book to figure out how to make them again.


A few samples later and I had buttonholes large enough for my buttons. Though I'm glad I only had to make three of them.

I also added some leather binding leftover from other projects to the front edge of the jacket. That wasn't planned. I was looking for some buttons and found the leather binding in a plastic bag with the buttons I chose. I'd probably planned on using them together for another project that didn't happen. They were, however, perfect for this one.

Lastly, I omitted the front pockets from this version too. After wearing the original jacket, I didn't miss the pockets so left them off.

Some Pictures ~  


Conclusion ~
I'm glad that I used this fabric from the collection to make my second version. While it's not a heavy fabric it will be a good layer over a cashmere top for the coldest days or a cotton jersey turtleneck. It's casual enough for the office but funky enough to satisfy my creative needs.

This is the second jacket from the Dover Pattern.  My final version is coming soon!

...as always more later!


Wednesday, February 06, 2019

Sewing while black, plus size and over 50

There have been quite a few conversations in Instagram land and social media regarding inclusivity in our sewing community.  Conversations regarding POC (People of Color), Plus size sewists and #sewover50. For many sewists, they hit one maybe two of these categories.  I, however, find myself in the unenviable position of falling into all three categories.  

I am a Black American, who is 60 years old, and plus size.  Personally I don't see any of these as negatives.  They are just my life story.  However, when mixed all together I'm basically invisible to the sewing advertisers, retailers and pattern companies.  This is really interesting because right now I have the largest disposable income that I've ever had during my entire sewing career which has spanned the last 49 years of my life and very few companies target me.

So yet again I'm writing another post on my invisibility in the sewing world. *sigh*  However, the ultimate post on sewing over 50 was written by Susan Young where she's listed out by pattern company, the representation of older sewists pictured either on the pattern envelope or website. The initial list was very brief.  The revised list is better but its still not that great.  Oh to be young, white and thin in the sewing world! Girl you've got it going on!  Let's not add male sewists into the mix because they are probably the only group more discriminated against than fat, old, black women.

All this to say that I am participating in the #So50Visible challenge.


The list of patterns was even smaller as an older, plus size, sewist. I'm not including POC on that list because I just don't want do the legwork on it. However, here is where I need to give a huge shout out to Cashmerette Patterns. Jenny is definitely hitting all of the boxes and showing her patterns are wearable dispite your age, girth, or color. She's just happy to be providing patterns for sewists - any female sewist.  Sorry guys! 

I also need to note here that her patterns are available in paper and pdf patterns. I know there is a section of sewists out there who love pdf patterns. I am not one of them. So the fact that I'm given the choice without being made to feel bad for "not moving with the times" also earns Jenny high marks from me!

For the #So50Visible challenge, you can post a new or previously made garment. From Jenny's line I've made two versions of her Rivermont top.  Here is the picture from Jenny's website ~


This is my first Rivermont Top made in November 2017 ~


I made my second Rivermont top in December 2019 ~


I also made the Rivermont Dress in November 2017 ~


While the dress is NOT my favorite, I do love both tops! And after looking at these pics, I realize I need to try that dress pattern again. Anyway, all of this is to say that patternmakers can be more inclusive in their advertising. You can show POC, older and plus size sewists on your website and pattern covers - look at Jenny's site, she does it easily and WELL!  You just need to put in the effort.  Step out of your comfort zone and represent the entire amazingly, wonderful, beautiful sewing community as it is.

...as always more later!


Sunday, February 03, 2019

Stripes can be border prints too!

Well at least in the Fabric Mart universe they can be!


I bought this fabric from FM after #carriagecornersewcamp last March. It wasn't on the site when we were there but it caught the eagle eye of Nakisha from Dressmaking Debacles at the time and she let us know when it appeared on the site. She made an amazing shirt from it.  I bought some too but it sat during the summer while I made other things.

For some reason I didn't take a picture of this fabric before I washed or cut it apart to make my shirt. Though Nakisha's version is a true representation of how the fabric is made and shows the stripes much better than my pics do.  As I said my fabric was cut apart to work with the border print. This is the most conservative version of my Border Print shirts.

Supply List ~
3 yards of cotton shirting from Fabric Mart
12 2-hole 1/2" pink buttons from Pacific Trimmings
Interfacing from Steinlauf & Stoeller


Notes on Construction ~
  • There are no real construction changes to this shirt. 
  • I used the straight hem version of my TNT pattern.
  • Cutting apart the border and using it to cut out the buttonbands, cuffs, collar and collarband is what makes this shirt work.
  • I added a strip of the pink stripes to carry the border print throughout the garment since I didn't have enough fabric to cut the cuffs out of it.

I included a few construction photos so you could see the stripes and how the border print was used. Especially since the stripes seem to be washed out in my final pictures. I know I probably should have retaken them but honestly this was garment number six that I'd photographed and at that point I was done. I'm sure y'all will get the gist of my shirt.


A Few Pictures ~


(This was the last garment of six I photographed 
and I was getting really silly by this time)


Conclusion ~
This was a unique piece of shirting and the striped border was very small compared to the rest of the fabric. However, there was enough to add contrast to the shirt, so that's how I used it. This is the last shirt in "The Border Print Series" and I'm glad I concluded it by using a more classic-type shirt fabric. 

It was shirt Number 16 for 2018 and my last garment for the year. This also catches me up on blogging about last years garments.  I have a few remaining pieces from January that will also show up in February.


...as always more later!


LinkWithin

Related Posts with Thumbnails