Showing posts with label Rivermont Top. Show all posts

Wednesday, February 06, 2019

Sewing while black, plus size and over 50

There have been quite a few conversations in Instagram land and social media regarding inclusivity in our sewing community.  Conversations regarding POC (People of Color), Plus size sewists and #sewover50. For many sewists, they hit one maybe two of these categories.  I, however, find myself in the unenviable position of falling into all three categories.  

I am a Black American, who is 60 years old, and plus size.  Personally I don't see any of these as negatives.  They are just my life story.  However, when mixed all together I'm basically invisible to the sewing advertisers, retailers and pattern companies.  This is really interesting because right now I have the largest disposable income that I've ever had during my entire sewing career which has spanned the last 49 years of my life and very few companies target me.

So yet again I'm writing another post on my invisibility in the sewing world. *sigh*  However, the ultimate post on sewing over 50 was written by Susan Young where she's listed out by pattern company, the representation of older sewists pictured either on the pattern envelope or website. The initial list was very brief.  The revised list is better but its still not that great.  Oh to be young, white and thin in the sewing world! Girl you've got it going on!  Let's not add male sewists into the mix because they are probably the only group more discriminated against than fat, old, black women.

All this to say that I am participating in the #So50Visible challenge.


The list of patterns was even smaller as an older, plus size, sewist. I'm not including POC on that list because I just don't want do the legwork on it. However, here is where I need to give a huge shout out to Cashmerette Patterns. Jenny is definitely hitting all of the boxes and showing her patterns are wearable dispite your age, girth, or color. She's just happy to be providing patterns for sewists - any female sewist.  Sorry guys! 

I also need to note here that her patterns are available in paper and pdf patterns. I know there is a section of sewists out there who love pdf patterns. I am not one of them. So the fact that I'm given the choice without being made to feel bad for "not moving with the times" also earns Jenny high marks from me!

For the #So50Visible challenge, you can post a new or previously made garment. From Jenny's line I've made two versions of her Rivermont top.  Here is the picture from Jenny's website ~


This is my first Rivermont Top made in November 2017 ~


I made my second Rivermont top in December 2019 ~


I also made the Rivermont Dress in November 2017 ~


While the dress is NOT my favorite, I do love both tops! And after looking at these pics, I realize I need to try that dress pattern again. Anyway, all of this is to say that patternmakers can be more inclusive in their advertising. You can show POC, older and plus size sewists on your website and pattern covers - look at Jenny's site, she does it easily and WELL!  You just need to put in the effort.  Step out of your comfort zone and represent the entire amazingly, wonderful, beautiful sewing community as it is.

...as always more later!


Saturday, December 08, 2018

Cashmerette's Rivermont Top - Second Version

Last year when I made the Rivermont Top I said that I would make it again.  As usual it took me a minute to get back to it...well actually it took me an entire year! *LOL* 


I also said that I would make my next version just like the pattern...mmmmmm I lied. This one is basically made like my first version. I love high/low hemlines and really wanted another version like that. The difference in this one is that the high/low peplum is made from a polyester chiffon.

Some stats ~
Fabric:
Navy rayon/lycra ponte purchased from Mood Fabrics for this project
Polyester floral chiffon purchased from Fabric Mart

Notions:
9" navy invisible zipper
Seam tape

Construction ~
This is a simple sew. I made it exactly like I did the first one. Of course, I complicated it by using the chiffon as the high/low peplum. There were two things that changed with this make. One, I added two layers of the peplum to the front to give a little more length to the front.


The second thing is that to insure the chiffon doesn't pull from the ponte (one fabric being heavier than the other) I stitched seam tape into the waistline seam to stabilize it.  Since I used chiffon for the peplum, its unlined...another difference from my original version.

That's it. There are no other changes to the construction of the top.

Then I took pictures of the top and decided that I didn't like it with the second layer. The pictures made it look like I was wearing a tutu over a onesie. Those knit pants just weren't working for me.  So I removed that layer by just cutting it out of the seams and retook the pictures with some jeans.  That's what's pictured below.

A few pictures ~


I wanted something a little casual and funky, out of my wheelhouse. I think I accomplished that with this make. I like it better with just one layer of chiffon as the peplum and I like the swish in the back. Maybe some day I will make the top as it appears on the pattern envelope. Since this is a great pattern hopefully some day soon I will make another maximized version of the dress with a flared skirt. Something else I've been thinking about for a minute!


...as always more later!


Wednesday, November 22, 2017

The Rivermont Top


The Rivermont Pattern by Cashmerette has a top and a dress in it. 


After I started working on the dress, I got this great idea for a top and went off on a lark. See I've been inspired by a number of peplum tops that I've been saving from the Internet and Instagram. I thought this was the perfect pattern to make my creative imaginings come to fruition.

Let's start at the beginning with some inspiration photos ~


As you know, I made a test version of the dress. When I first thought of making a top, I considered tearing my tester version apart and trying to make it work. I checked but I didn't have enough of the original fabric left over to make the peplum probably because I'd fussy cut it to get the border to fit the dress.

So my next thought was to use the original top with an insert on the sides and use a black ponte for the peplum.  After picking up some black ponte, I changed directions again. 

A Supply List ~
Black Ponte from Metro Textiles
Black 'n White Houndstooth Poly by Maggie London from Fabric Mart (via the collection)
9" black invisible zipper
Rose applique from Joyce Trimmings

Pattern Alterations ~
These are the alterations I made to the pattern to make it mine.

Peplum Alterations first:
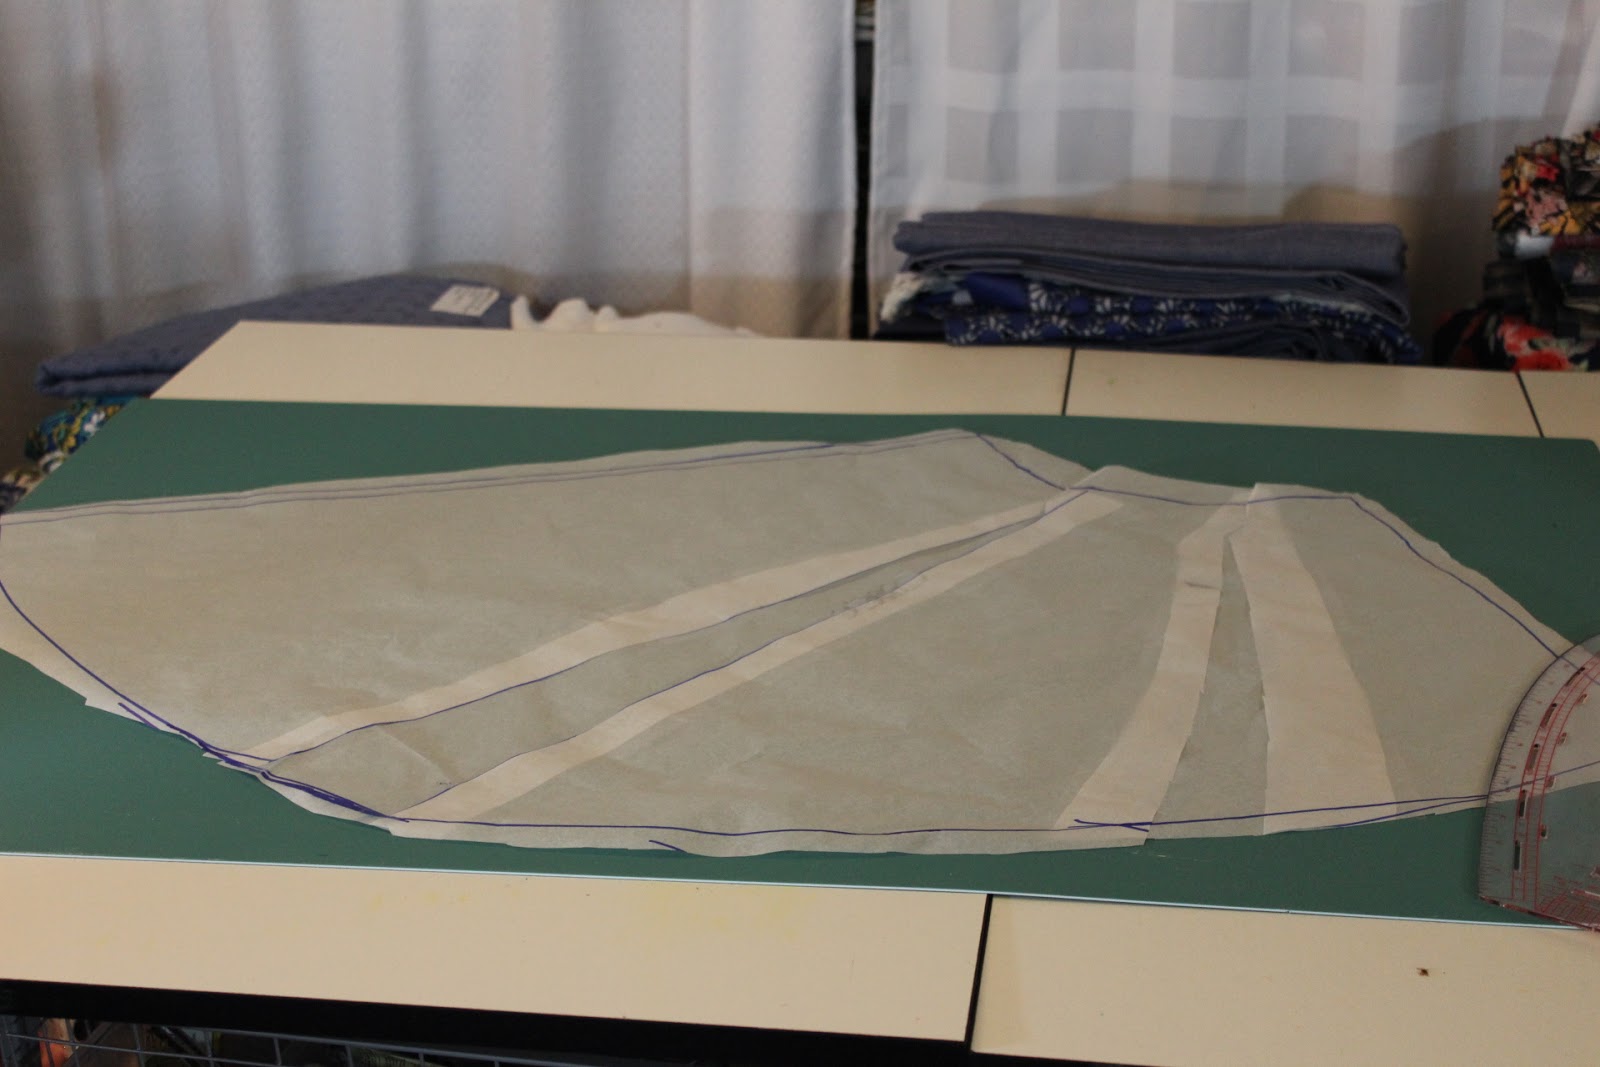
I lengthened and expanded the peplum to give it some flare. Since the peplum piece is used for the front and the back piece, I had to make two separate pieces to get the look I wanted.

1. I cut and spread the pattern so that hemline was widened by 2.5" next the front piece was lengthened by 3".  


2. The back piece was copied from the front piece.

3. Then it was lengthened 10" at the back hemline.

4. Using my curved ruler I curved the hemline up to meet the side seam.


5. Next I cut two inserts into the peplum pattern. I picked an area near the back and one closer to the side seam. There was no formula for this. I eyeballed it thinking about how I wanted the peplum to hang over my behind.

6. Spreading the inserts, the one closest to the back fold was widened to 3.5" at the hemline.


7. The second insert closest to the side seam was widened to 2" at the hemline.

Final back pattern piece made from the cut & marked up original piece

Additional alterations made to the top ~
I raised the neckline by 1/2". I did this based upon my test dress version. It had a higher neckline than my pattern. I liked the original neckline better for me so I altered my front pattern also making sure to alter the front facing pattern piece too.

Construction Information ~
It's important to note that I got another idea as I was cutting the pattern out.  One of the things that is challenging to me about my Rivermont Dress is that I have to pull it over my head. People I'm an older woman who hates to exercise so my dexterity isn't as good as it was when I was a younger woman who didn't exercise. So I love a zipper!  And I realized that in a stable knit like a ponte that a zipper is a good thing, so I added a 9" invisible to the back seam.

This meant that the back neck facing had to be changed too. So instead of placing it on the fold I added a 3/8" seam allowance and cut it out as 2 separate pieces.

I added a lining to the peplum by cutting a second set of the peplum pieces from the silky poly fabric. First I stitched the silky lining to the ponte at the hemline. After the two pieces were sewn together, the seams were pressed open and flat. I added a line of stitching to the hemline of the peplum. The two pieces of fabric were then basted together at the waistline. I clipped it to a pants hanger and let the lined peplum hang for a day so I could see if the two fabrics worked against each other.  

Because I chose to add a lining to the peplum and a zipper to the back of the top, I changed the way I constructed the garment. As stated above the peplum was made first. The bodice was made second and I sewed it together as a single piece ~ however I did sew the sleeves into the bodice and then sewed the side seams together. The last step was to sew the bodice to the waistline and hem the sleeves.


Design Change ~
Besides giving the top's peplum more space and lengthening it in the back, I also appliqued a rose to the shoulder area. In the center of the rose, I placed a covered button made from some of the poly herringbone fabric. I thought it was a cute touch to draw all of the elements of the top together.

A few pictures of the Top ~


Giving the top a little twirl

Conclusion ~
This top first appeared on the Curvy Sewing Collective about a week ago. However, I didn't include the instructions on how to lengthen and enlarge the peplum...that information is included in this blog post. Also, this top pattern was included in the free pattern that I received from Cashmerette - yet again all opinions are mine.

Honestly between the dress and the top, I prefer the top. I will definitely make the top again using the regular peplum pieces instead of my altered pattern pieces. It's a great top that's very versatile, open to design inspiration, and will function well in my casual work wardrobe. 

This is an easy to sew and great wardrobe builder pattern. May I also say that I love that the pattern pieces all go together without any challenges adding to the ease of sewability for this pattern.  If you're looking for a great top pattern as a plus-size, curvy woman, definitely purchase the Rivermont pattern!

...as always more later!


LinkWithin

Related Posts with Thumbnails