Wednesday, February 26, 2020

Sunflowers & Stripes in Simplicity 8687

I was really attracted to this pattern when it was released in Fall 2018.  I purchased it shortly thereafter and it's sat in my pattern collection waiting it's turn to be used. I always saw it as a longer blouse, tunic or topper. Of course I searched the internet to find other versions but it hasn't been a very popular sew...only five reviews on PatternReview and because of that it's now on clearance on Simplicity's site.


Supplies ~
I bought two of these panels from Marcy Tilton's booth at Sew Expo in March 2016. I'm finally using this collection fabric - you know my new fabric usage designations. 


As an aside, I bought a lot of fabric that trip and this is the fifth piece I've used of the dozen pieces I purchased. Slowly but surely working through that fabric...*LOL*

7 - 1" yellow buttons from Pacific Trimmings
Black 'n White piping from the trim stash
Floral bias binding made from a quilting cotton purchased from Zooks, Lancaster, PA
Interfacing from Steinlauf & Stoeller

Pattern Alterations ~
Since I'm making View C, I started with a size 28 because I wanted an unfitted topper that a turtleneck or sweater could go under easily. Even starting with a 28, I needed to add ease to the hip area. I added an inch to each side seam from the bust area down starting with a quarter inch to a full inch at the hemline. 

Sleeves ~
o  The sleeves were already oversized so I didn't need to make an alteration to the body of them. 
o  Although I did make a shoulder alteration to make the sleeves more set in than the slightly dropped shoulder the pattern suggests. 
o  I did a slash and overlap of 7/8" at the shoulder on the front and back pieces to remove the excess. 
o  I should have removed some of the excess from the sleeve cap but didn't realize this until I started to construct the topper. Will remove it for the next version.

Finally, I did shorten it from dress length to tunic length by removing 10" from the hemline. Here is the first fitting done at the sew-in.


Construction ~
The cutting was creative on this one. I really wanted to have the sunflowers run down the fronts of the topper. Once I got the front and back cut out, I then cut the sleeves. However, before I cut them out, I did a sketch in my Cashmerette Sketchbook to see if I'd like the way the stripes worked.


All of the other pieces were cut out of the remaining fabric remnants, however, there wasn't enough for the side seam pockets. I honestly didn't care about including them. I can always put pockets in the next version. That was the only thing I omitted.   

As I mentioned above, since I neglected to alter the sleeve pattern there was way more gathering than I would have liked in the sleeve cap. I made it work. It's not perfect but it's wearable.


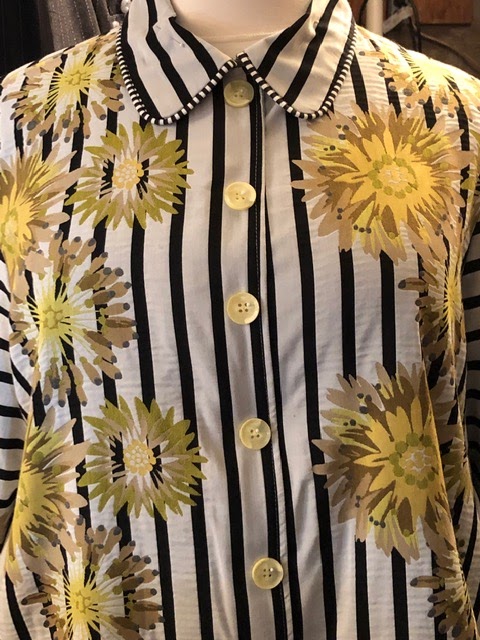
The last construction challenge was the buttons. I found some buttons at Pacific Trimmings that I thought would be perfect for the topper ~ right color, right size but I was wrong. When I laid them on the topper even using all 10 of them, they were just too small.  So back to Pacific Trimmings where I purchased three different larger sized yellow buttons, finally settling on these. They're lighter in hue but coordinate nicely with the sunflowers.


One more thing ~
I left my back facing piece at home. Left it on the ironing board and I just didn't want to wait until the next day to work on the topper. So I bought some black quilting cotton from the Urban Sewciety's store and used that instead. If I was going to wash the topper I would be concerned but since I will probably have to dry clean it, I will wait to see how that decision turns out.

A Few Pictures ~
When I took these pictures it was a warm Sunday in February. In the Northeast this has been a pretty mild winter.  No heavy snows, no days of chilly/freezing temps and bitterly cold winds so I am seriously starting to think about spring. So I styled this topper how I would wear it now and how I will wear it in a few months...

Winterized...


For Spring...


Conclusion ~
I will make this again both as a topper and a longer blouse/tunic.  In this version the sleeves turned out to be 3/4 length due to my alterations, so I will need to fix my pattern for future makes. I also had a few ideas of alternative hem closures. Maybe a buckle, large snap or button instead of the ties to give the sleeve hem a cleaner finish. I'm already working on my next version so it should show up sooner or later.

...as always more later!


Sunday, February 23, 2020

A Guipure Lace Shirt

I had an image in my head on how I wanted to look for a family party. I wanted a funkysexycool look where I was totally covered but gave the illusion of skin. A look that if I'm honest is buried way down in my soul but what my heart looks like! *LOL* 

I styled it with a spanx camisole on the dressform and I wanted to add my spanx leggings to wear with the shirt.


I spent the day cooking for the party and then decorating. 


Some of the guests had started to arrive by the time we were finished setting up and I still had to go home and dress. When I got home, I saw my Velvet Myosotis hanging and almost wore it. But I'd made the top especially for the party, so I womaned up and wore it. I have no pictures of me in the outfit because I was uncomfortable all night long. Tugging on the camisole, pulling on the spanx, shirt flopping around because no buttonholes, just buttons...basically a disaster.

So the pictures in this post are styled as I will wear it to work or out with friends...cause my funkysexycool look was a bust.


Supplies ~
Fabric - 
Cotton guipure lace from Fabric Mart's online store
Sparkly pleather type knit from the collection for the collar, cuffs & buttons

Buttons -
8 - 5/8" covered buttons

Interfacing- 
Black silk organza from Thai Silks for the front facing

Pattern Alterations ~
I wanted a longer shirt with a high/low hemline. My first thought was to use my Katie back pattern along with my TNT shirt pattern to get the high/low hemline. I was stopped by two things - one, my fabric wasn't very wide and two, I only had 3.5 yards when I thought I'd purchased five.


I ended up using the tunic length version of my back pieces and rounding them off to create the high/low hemline. Then I added a little to the front side seam so the front & back pieces matched at the side seam. These were the only pattern alterations I made to get the look I wanted.

Construction Info. ~
This is a TNT shirt so the construction information is particular to this shirt and fabric.  I used a Schmetz Universal Needle size 80 and a small stitch length (2.4) on my Janome. Because of the lace, I wanted to make sure that I put as much thread as possible in the seams.

1.  I used 3/8" seams for the construction of the body of the shirt
2.  For the front to make the facing, I normally press and fold over twice.
3.  If I did that the front facings would be too thick.  So I pressed it over once and then serged the first foldover off.
4.  Then I stitched a piece of organza onto the front seam and pressed it into foldover piece.
5.  I wanted a stabilizing piece in the facing to make the buttonholes and to help secure the buttons. Though in the end I opted out of making buttonholes.
6.  Finally this was hand-stitched down instead of machine stitched due to the thickness of the fabric.

I left the back facing off and serge finished all of the seams.  Even though it's not a very open lace there is enough space for skin to show through so I wanted the seam finishes to be simple.

A couple of other things to note:
o  Stitching through this was slow because the cotton guipure was thick. I also ended up breaking one of my serger needles and I haven't done that in years.
o  This was not a great fabric to add gathering to...don't know why I didn't think that through before I put the sleeves in!
o  The fabric had a scalloped edge. I carefully cut the pattern pieces out to avoid cutting into that edge. Then I could cut the scalloped edge from the fabric in one piece and sewed it to the hemline of the shirt. It's one of my favorite features of the shirt.
o  The collar was hand stitched down because of the finicky nature of the pleathery fabric. I also omitted the topstitching I normally do on the collar and undercollar.
o  I made two sets of buttons. One set of 1/2" covered buttons. Then another set of 5/8" covered buttons. Both were a challenge to make and I made the 1/2" buttons before determining they were a little smaller than I wanted.
o  The shirt doesn't have buttonholes due to the thickness of the fabric.

A Few Pictures ~


Because my look came from an idea, I used my TNT pattern to make it work. If you're interested in reproducing it, I would suggest Vogue 9360. All of the work has been done for you patternwise...you would just need to fit it.


I guess I could have looked for a pattern first. But I knew I could make my TNT pattern work and liked the idea of doing that.  This was an involved sew due to the fabric's nature so keeping the construction simple was necessary to showcase the fabric.  Adding the pleathery knit as the collar and cuffs finished off the look I was going for and gave the shirt a little ooomph!

This was a fun sew. I truly enjoyed the problem solving and bringing my idea to fruition. I'm slowly getting over the fact that my original idea didn't work with the RTW pieces...

...as always more later!


Saturday, February 15, 2020

A Week in Review - Week Four

I didn't do a week in review last week so I have a lot to share! Settle in because there are quite a few pictures too...

Sew In at UrbanSewciety ~
I was really excited to attend the Sew In at UrbanSewciety last weekend and I was NOT disappointed. UrbanSewciety hosted a two day sew-in. Saturday from 9am to 7pm with breakfast, lunch and dinner served and Sunday from 9am to 5pm with breakfast and lunch served.  We only needed to bring the projects we wanted to work on and our enthusiasm. You could sign up for the entire weekend or for either Saturday or Sunday.  My friend Melanie and I signed up for the entire weekend.  I met so many local sewists and quilters and had a wonderful time sewing at their amazing studio.

I took two pre-cut projects to work on - Simplicity 8687 and a sleeveless shirt pattern. I spent my entire weekend working on S8687 because I added so many design elements to it.


A Few Photos from the weekend:


My sewing companion for the weekend. UrbanSewciety uses these sewing machines because they work for all of the classes they teach as well as the classes and summer camps for kids. By the end of the weekend she'd become my best friend!


One of the best things about the sewing studio is that it was well stocked with pressing, cutting and marking tools. Each table had a set of prewound bobbins in a multitude of colors that you could use and if a specific foot wasn't in your machine it was in a nearby machine.

The studio is well lit and each sewing table has enough space to work at. It is the perfect set up and if you forgot anything or need something, there's always the store in the front where you can purchase things.

Working on Simplicity 8687

My table at the end of the first evening

The goodie bag was loaded with treats!

Old & New Sewing Friends ~

Me and Melanie - met at Sew Camp been hanging ever since!

Betty & Margaret
Margaret drove all the way from Massachusetts to participate!
It was so cool to meet you both!!!

Meg
One of the owners of SewCiety with a project for the kid's sewing classes

...and a fabric purchase...well I also won a gift certificate so that helped facilitate the buy!

4 yards of a rayon knit and 4 yards of a rayon from Ruby Star Society

BTW, did you know that the designers from Cotton & Steel moved to the Ruby Star Society team? Meg told me when I asked why she was carrying that line instead of Cotton & Steel.

I will definitely do this again and will probably attend one of their Friday night sew-ins as well. It's a wonderful local resource that I hope all NJ sewists will visit - for the classes and the fabric.

Updating my Dressform ~ 
I've been meaning to pad my dressform out since I got it in December 2018. But me being who I am, the sewing takes precedence over everything...even though this is technically sewing, right!  

The Roxy Display Company made my dressform. I was on their Amazon site looking for a stand to add to my older dressform when I stumbled upon this "dressform fitting system."  I wanted a Fabulous Fit Padding Kit but every time I was ready to buy it, the extra large padding set was sold out. So I went with this one.

It was easy to pad my dressform especially since my shoulders and bustline are exactly the same. I just needed help from the underbust down.  So I pinned the pads on and added a layer of batting to the front and back enclosing the pads.


Then I forced the cover down the dressform.  At first I was kinda upset that it wasn't smooth...but in reality I'm not smooth either so I went with it. I will use it this way for awhile and see how I like it. To me it was an excellent purchase for $39.95 and helped change my dressform to look more like me.


Seeing Dapper Dan at FIT ~
Not only does FIT have the amazing museum with it's revolving displays but they also have monthly talks hosted by Valerie Steele.  If you want to know what the talks are get on FIT's email list. I've never been to one of the talks, signed up for one years ago but had a family emergency and was unable to attend.


This time Wanett asked if I wanted to go and it was an automatic yes! Dapper Dan's new book was on my to buy list so I really wanted to hear him speak. He did not disappoint! Found out that Syreeta was attending too so the three of us teamed up to attend.


It was a great evening! Thank you both for going with me!

Simplicity 8687 ~


I spent all of last weekend working on the topper. It needs buttonholes, buttons, to be hemmed and it will be done. Will definitely finish it off this weekend. I'm also working on a party outfit for a family event next weekend since it's a 3 day weekend. We're celebrating President's Day here in the US.

Hope you made it all the way to the end. I know this was a long one but I did combine two weeks worth of sewing events in one.

...as always more later!


Thursday, February 13, 2020

More Shirtmaking Info.

I've been sewing shirts consistently for three years now.  The one thing about making a garment over and over again is you refine your techniques. Your collar edges get sharper, the way you apply the overlap for the cuff goes on quicker & easier and you know how it fits.

Tools I use when making buttonholes and sewing buttons on

My shirt journey has become about the fabric choices, the buttons and any embellishments. Y'know the fun stuff! Lately I've changed up the way I sew buttons on my shirts. After doing it a certain way for awhile, listening to other sewists and just repeating the process, I knew I needed to change it up.

I've never been a precise marker. I have to work at that because so much of what I do is instinctive or learned response. However, I'm changing up the way I'm sewing buttons onto my shirts.

First I do machine sew buttons on when they're flat 2 or 4 hole buttons. As evidenced by this video I posted to Instagram.

o I always use a hat pin to create a shank so the machine sews the thread over it.

o I use to mark the opened buttonholes with a pin after slicing them open with my buttonhole cutter. Lately, I've been using my Frixon pen and marking the center of the buttonhole.


o It makes sewing the button on so much easier because I just place the button over the marking. I'm also more accurate with button placement now.


o My machine finishes sewing the buttons on with the needle in the up position. This allows me to cut a really long thread tail


o Then I use a regular needle, thread the tail through and pull it to the backside of the shirt


o The thread tails are tied off in the back 


o A drop of fray check is applied to the knot on the back to secure the button threads.

After talking with another sewist, I'm also going to buy some silimide to sew on shank buttons. I presently double thread a needle with coordinating thread which means that I'm using four threads. I then run it through some thread heaven and make 3-4 passes through the shank.  My sewing friend said that the silimide will allow me to make just three passes and it's just as strong. Anything that speeds up the button sewing process is something I want to pursue.

One additional thing to note - I use 11 buttons at least on my shirts. One for each cuff, one on the collar stand, nine down the front. I know I use more buttons than most pattern companies suggest but I like my shirts buttoned all the way down the front. Pattern companies leave a longer/larger amount of space on the front of the shirt. That front flaps open on me and I just don't like it which is why I change it.

Just wanted to update how I'm sewing buttons onto my shirts now.

...as always more later!


Friday, February 07, 2020

Cashmerette Fuller Cardigan

I was really excited when Jenny asked for testers for the Fuller Cardigan. It had two things I really wanted in a cardigan - a button front and raglan sleeve. Also with Cashmerette patterns I have to make minimal fit changes and I can just sew...which is the part I like best.


As I said, I made the tester version and the subsequent pattern has a few changes made to it. So I made one using the new pattern (which I got as soon as it became available) because I wanted to see the changes especially since I basically liked my tester version. 

I sewed this right out of the envelope using my normal size 24, C/D cup. The same size I made in the tester version. I tried it on to figure out button placement and it didn't close across the front! Dayum, dayum, dayum!!! I checked my pattern pieces. They were the same as the tester front. Then and only then did I check my ponte's stretch - ummmmm not enough. Dayum, dayum, dayum.

My challenge was I already had an outfit in mind.  The Fuller Cardigan plus a sleeveless Pembroke cowl neck tunic (info on this in a future post) and I didn't want to donate this cardigan.  So see my solution below...


Yes a chain finish! I have several of these collected from eBay when Glee was huge and Emma Pillsbury, the teacher who wore the cardigans with the chains, was big. This is why you shouldn't Marie Kondo everything!

I also added an inch to the hemline and can honestly say I forgot to lengthen the front facing too. So I didn't get to use the amazing mitered corner finishing in the pattern instructions. But since I will be making another one, you can bet I will rectify my bad cutting to get that corner finish.


For the sleeves, I used the fuller bicep sleeve pattern. Thanks for that Jenny! Because it means I don't have to worry about having enough space in my biceps or make alterations to the pattern. My design touch was to two tone the sleeves - black ponte sleeves (with enough stretch btw) and the cuff is cut from the base fabric.

Supply List ~
2 yards printed ponte from Fabric Mart - collection fabric
1 yard of black ponte from Fabric Mart - collection fabric
Interfacing from Steinlauf & Stoeller

A Few Pictures ~


Fuller Cardigan worn with a Pembroke Sleeveless Tunic


For reference I'm adding a picture of the tester version. I took these at work and posted them to Instagram yesterday.  


To me the hip band was a little off-putting on the tester version so I'm glad it was omitted from the final version, even though it doesn't look bad on this cardi.  I also added a button onto the bottom band of my tester version. Honestly I may or may not use that band in a future version of this cardigan because I see more Fullers in my future!

I hope if you're a plus size sewist looking for a great basic cardigan, you will purchase a copy of The Fuller Cardigan...cause really can you have too many cardigans?! 

...as always more later!


LinkWithin

Related Posts with Thumbnails