Showing posts with label The Rachel Dress. Show all posts

Monday, April 02, 2012

The Rachel Dress Deux IRL

I decided that for this version of the dress I would show it to you "In Real Life."  I mean I style these dresses at home with jewelry and shoes and then only take half of that styling to work with me.  Hey when I'm crawling under a desk to look for a cable cord, I don't exactly look as great as I do when I'm posing in front of the fireplace at home!  So the next couple of garments (except for my Easter Outfit) will be taken at work to provide IRL context to the garments.


Some stats:
Fabric:
Poly/wool herringbone applique fabric from the craft store


Notions:
Black bemberg lining
22" invisible black zipper
black gimp trim
black rayon seam binding
large black snaps


Construction:
Most of the details about the dress' construction can be found in this post.  


I hand stitched black gimp trim to the front of the dress to emphasize the pockets (ala Chanel's Couture Spring 2012 line, blogged about here) and to add some interest to the front.  That horizontal line adds a demarcation line to the front and stops the dress from becoming a muddle of appliques and herringbone.  


At one point I thought I would add the gimp to the neckline and the sleeve hems...but I decided that adding the trim to the sleeve's hemline would constrict the movement of my bodacious biceps...so that idea went out the window.  Once I decided not to add it to the sleeves, there didn't seem much point to add it to the neckline. 


As I mentioned, I added short sleeves to this version so that I could wear the dress alone or with a cardigan...


...and for this one I used snaps on the pockets to keep them from gapping instead of the button and buttonhole that I added to the first dress. That's basically all of the changes that I made to this second version.  


The dress wore well at work and received quite a few compliments.  It's been a few weeks since I've worn something new so it felt good to wear something fresh from the sewing machine.  Also, one of the best things about a TNT pattern is that it fits.  I tried this on for the first time this morning when I was getting ready for work...I love a dependable pattern!  *LOL*

A few more pics:

Hands on the hip shot, of course!

Close up of neckline and necklace.
The necklace is a strand of pearls w/a flower.

Back view and at least those
appliques aren't on the top of my behind!

Hands in pocket, so you can see the surprise!

...as always, more later! 


Sunday, April 01, 2012

A Quick Peek

The dress is finally finished...and since I'm still not thrilled about taking pictures of me on the timer...I know, I know, please don't tell me how easy it is...I guess I'll get there someday...but until then...here is the front and back view of the Rachel Dress Deux on Lulu...


Front view on Lulu

Back view on Lulu

...better pictures aka pictures on me and more details...soon! But this is finally done and I'm moving on...Easter outfit here I come!


...as always, more later!


Sunday, March 11, 2012

The Rachel Dress 2 - Construction Details

I found this fabric in the craft store that masquerades as a fabric store years and years ago...when I still deigned to cross it's threshold.  It was in the 50% off area and I loved the appliques on the fabric so I bought it and it's been in the collection ever since waiting it's turn to become something wonderful.


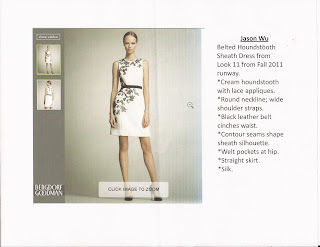
I pulled it out when I was inspired by this Jason Wu dress last fall:


It really called out to become my Fall/Winter version of The Rachel Dress. Then after looking at and blogging about the Chanel Spring Couture 2012 line with the emphasis on pockets, I knew I had to get this dress finished before it became too warm to wear it.


So here's some details:
Fabric Prep:
I steamed the heck out of the wool to pretreat it.


Pattern Prep:
Yes, I ironed the pattern pieces - *LOL*


Construction:
You would think that careful placement of the lace appliques would be a priority when laying out the pattern pieces. However, after examining the fabric I realized that except for not getting some right over my backside (which I managed to do anyway!) the randomness of the appliques meant that I had to have a "go with the flow" attitude about the applique placement. 


This was also one of the most ravelly fabrics that I've worked with in some time! It shed whenever it moved until I serged all of the edges and even then I had to constantly clean my serger blade and stitch area because the fabric made alot of fuzz!


Also because the fabric was so soft I had some challenges with the neckline stretching out during the serging process.  I thought I would be okay, but as I worked with the dress, the neckline became even more distorted.  I really should have dealt with this issue at the beginning of the construction process. However, I did manage to bring the neckline back under control.


*First I measured the wayward dress front against the front of my TNT dress pattern piece:


*Then I measured a piece of stay tape against the front of the pattern piece. *After cutting it exactly (which is important!) I pinned it to three crucial points on the dress' neckline.  
*At each corner of the shoulder and in the center point of the dress, the stay tape was pinned down.  
*Then using a larger stitch (stitch width 4) I slowly stitched the stay tape down, easing the excess fabric in.  
*Finally, I pressed the stay tape flat.


As you can see, this tamed the wayward neckline.  I then added stay tape to the back neckline and when I sewed the shoulder seams together it was sewn into those seams also.  I treated the fabric like a knit since it liked to grow at certain stress points.  And yes, I know I sewed the stay tape to the front of the garment instead of the back, but since I will be adding a lining to the garment, I don't think it makes much of a difference...unless of course I broke one of the major sewing rules! *wicked grin*


The center back seam was fused with a 1" strip of the baby interfacing from Farmhouse Fabrics, to stabilize it for the invisible zipper insertion.  This is a really old tip but just in case someone isn't aware of it ~ I cut about a quarter of a yard of fusible interfacing into one inch strips and save them in a ziplock bag for times like these.  That way I always have some on hand.


Finally a shot of the dress on the hanger sleeveless...


Front with the pockets

back view with those
appliques near my backside!


The dress will have short sleeves and I will add a lining.  I'm trying to decide if I will add some black rayon bias binding to the neckline and sleeve hems...ah decisions, decisions!


...as always, more later!


Monday, July 18, 2011

The Rachel Dress is Finished!

The dress is  lined, piped, buttonholed, buttoned and done!


As you can see, the dress is sleeveless.  When I was finishing it up, it just seemed the way to go and I'm happy with that choice...especially since it will make it easier to wear under cardigans.


Some stats:

Fabric:
100% couture linen from Fabric Mart
(these are still on their site)

Notions:
20" invisible zipper
2 yards rayon bemberg lining
2 yards black satin piping
1 yard black lace
rayon seam binding

Construction:
All of the pattern alterations are contained in this post.  However, I did use the skirt instructions to help construct the front of the dress.  After the front was made, I just sewed the dress up as I normally would.  As I stated in my last post, seam matching was very important to me and it does work all the way around the dress. 


And since I did not add the short sleeves to the dress, I piped the armholes instead.


The detail that really makes the dress for me is the pockets with the buttons & buttonholes.  I will definitely add this detail to another version of the Rachel Skirt for fall. 


...and I'm loving the the lining with the touch of lace at the hemline!

Thankfully this is one of those flights of fancy that worked.  I can't wait to wear this to work...preferably on one of those hot & humid days that's forecast for this week...that way some  of those linen wrinkles will fall out as I'm walking from the subway to work...cause this dress is gonna wrinkle like crazy.  But isn't that the reason we linen lovers like working with it anyway!?!

One last shot:


...and as always, more later!

Sunday, July 17, 2011

The Rachel Dress - Part 2 The Details

Besides the pockets, its the details that makes the dress for me.  Now these details weren't necessarily part of the PYT's dress that I'm copying.  However, they are features that I envisioned when I started to plan the making of this dress.

The Buttons & Buttonholes
I decided to add buttons and buttonholes to the pockets of the dress after wearing The Rachel Skirt.  Because of the way the pockets are inserted in the skirt, you can only see them when I stick my hands into them.  I wanted to feature them a little more in this dress.  I thought a button/buttonhole detail would bring them more into the limelight.

Choosing a button was a little involved because right from the beginning I knew I wanted black accents/embellishments on the dress to make it less of a blue blob.  I auditioned about a dozen buttons before I settled on this one.  I think the black/gold combination works well with the style of the dress as well as giving it a professional rather than just a pretty look.


It took some work to get the buttonholes on the dress.  Since I'm going my own way here without benefit of pattern instructions, I decided that I wanted to add the buttonholes after the pocket bags and the dress' bodice and skirt front were sewn together.  I thought that I would be able to determine where the buttons/buttonholes would go better on a fully constructed front...and this did work...however, making the buttonholes with a small window was a little more challenging than if I had sewn them before attaching the pocket bag and the dress bottom. 


They are on with a little help from my trusty seam ripper!  And they are where I want them to be and symmetrical on both sides of the dress front.

The seaming details
Even though I am not accentuating the seaming with any topstitching...one thought in my original planning...it is imperative that the seaming match.  Side seams...back seams...and center back seams are all lined up.  I'm not sure that anyone will even notice the matching of the seaming detail but it was important to me.


Piping
On the original PYT dress there were no embellishments except the belt.  I saw the dress a little differently in my mind's eye.  I thought the neckline and sleeve hems needed a little something, so I pulled out the black satin piping that I have yards of in my notions stash.  Here it is basted onto the neckline waiting to be machine stitched down before I add the lining.


Lining with lace hem
I have no idea whether or not the original dress is lined.  I'm much happier with a lined dress than fiddling with a half slip...which seems to be what I've been doing lately.  So this dress is lined with black lace added at the hemline.  This is my signature in a lining and I'm staying true to me!  *LOL* 

This is where I'm at now.  The dress shell is complete.  The lining is made.  And the piping needs to be machine stitched to the dress before the lining insertion.  I still have to make the sleeves, pipe the sleeve hems, insert them.  Stitch the lining down to the zipper tape and hem the dress.  I have several hours of work ahead of me and hopefully with no distractions, I will have a new dress to wear to work this week!

...as always more later!

Tuesday, July 12, 2011

The Rachel Dress - Part One

As I previously mentioned, I was standing on line at Chipolte and saw this PYT in line in front of me wearing a shift dress with in-seam pockets on the front.

Automatically my mind put my TNT dress pattern:

Butterick 5932 - out of print dress

+

"The Rachel Skirt" together

to make my own version of the dress.

I guess these days I'm not happy creatively unless there is a dress that I need to puzzle out the construction to and sew up.  I've worked through the challenge of a winter version so its time for a summer version.  Of course, the first step in this process would be to create new pattern pieces. 

So I used the Rachel skirt front pattern pieces alongwith my TNT dress front pieces to create a "pattern sandwich".  The bottom layer was my TNT dress pattern.  Then I laid the skirt yoke and the skirt bottom down.  Finally I added a clean sheet of pattern paper.  I traced the top of the dress and the skirt yoke with the pocket patches first.  This made the top of the dress.  I then used another piece of pattern paper and traced off the bottom of the skirt/dress combo to get the dress bottom piece.


The back pieces were actually the easiest part of this process because I just needed to separate the back top from the back bottom and insure that I had added 5/8" seam allowances.  But I have to tell you that whenever I get one of these deconstruct/reconstruct ideas in my head, I worry if they will actually work.  Or if I've just wasted an afternoon dreaming up a wadder.

Two weekends ago after doing all of the pattern work, I cut the pieces out and waited for this last weekend to arrive.  But I got sidetracked by Vogue 1179, so late Sunday evening, I serge finished all of the pieces and assembled the front.

The buttons are just placed on top
to see if they will work

There's still so much left to do to finish the dress but I'm encouraged that I am going to end up with what I envisioned.

...as always, more later!

LinkWithin

Related Posts with Thumbnails