Showing posts with label Dover Jacket. Show all posts

Wednesday, February 10, 2021

A Dover for Winter

When I was putting fabric away in September 2020, I touched this gray jacquard and thought it would be wonderful as a Myosotis maxi.  I mean I'm working from home this winter so I can pretty much wear whatever I want. I seem to reach for my maxi dresses the most.  They're comfortable, easy to wear and since I'm not really a pants girl, perfect for me and working from home.


However, when I went to prep it, it told me that it wanted to be something totally different. I thought a Dover Duster would be perfect and checked to make sure I had enough fabric. Luckily I did.

Materials ~
3 yards stretch jacquard from Fabric Mart via the collection
(Y'all better get used to me saying that because I'm committed to sewing from the collection more in 2021!)

11 3/4" black & clear buttons from the collection

7 yards black binding purchased from Bessie Pearl Textiles on IG for this project

Construction ~
There are no new construction techniques in this version. Although I feel like I didn't have enough fabric to lengthen this the additional 2" it needed for a hem. It's part of the reason I added the binding to the front and then decided to leave it off the hemline.  Though I think that was more from project fatigue!  I've used this pattern four times as a jacket and once as a maxidress. This version will work as a jacket and a maxidress.

A Few Photos ~

Worn with a turtleneck and black denim leggings...


...and then as a dress with a turtleneck under it


I will probably use this pattern for another maxidress in a softer fabric when spring arrives. I love the original one and would like a couple more to add to my maxi dress collection.

...as always more later!


Friday, June 28, 2019

A Spring Brocade Dover Jacket

I honestly thought I wouldn't be making another Dover Jacket until summer when I would be trying a Dover Dress.  However, this fabric I purchased from Metro Textiles had different ideas! I also thought that by June I wouldn't be able to wear it out and about but we shot these photos in mid-June on a 70 degree day. It was just fine.


Supplies ~
3 panels of border print brocade from Metro Textiles
Tie fabric for bias binding
Interfacing from Steinlauf & Stoeller
5 - 7/8" Covered buttons from stash for jacket buttons

Construction ~
The only difference between this jacket and all my others is that I decided to bind the jacket edges using a Hong Kong finish. I need to insert a why here?  Because I did not seriously consider how many seams there are in this jacket and how much time it would take if I was going to bind them all.


Of course once I started I HAD to bind all the seams. That decision added HOURS to the construction of the jacket...seriously HOURS! So between the pattern matching and the bias binding, I "coutured" a very easy jacket. 


Neck deep in I also decided to use covered buttons for the jacket. Which meant I didn't have to dig through the stash to find a button that coordinated or end up hitting the Garment District to find one that worked. Using the flip side of the brocade fabric meant I ended up with a covered button that matched my fabric. It was a good decision because I love how the buttons look when the jacket is closed.

(laying the covered buttons on the jacket front
color is off - picture below is so much better!)


A few photos of the jacket ~


Okay this isn't the most attractive shot but I loved
 how the wind caught the jacket and showed the fabric's pattern

This is a "fancy" jacket to wear over jeans but with our touch and go weather, I should get a few wears in before the hot weather comes. I will use this pattern again as a jacket come fall because I wear a lot of layers in the winter.

...as always more later!


Sunday, February 17, 2019

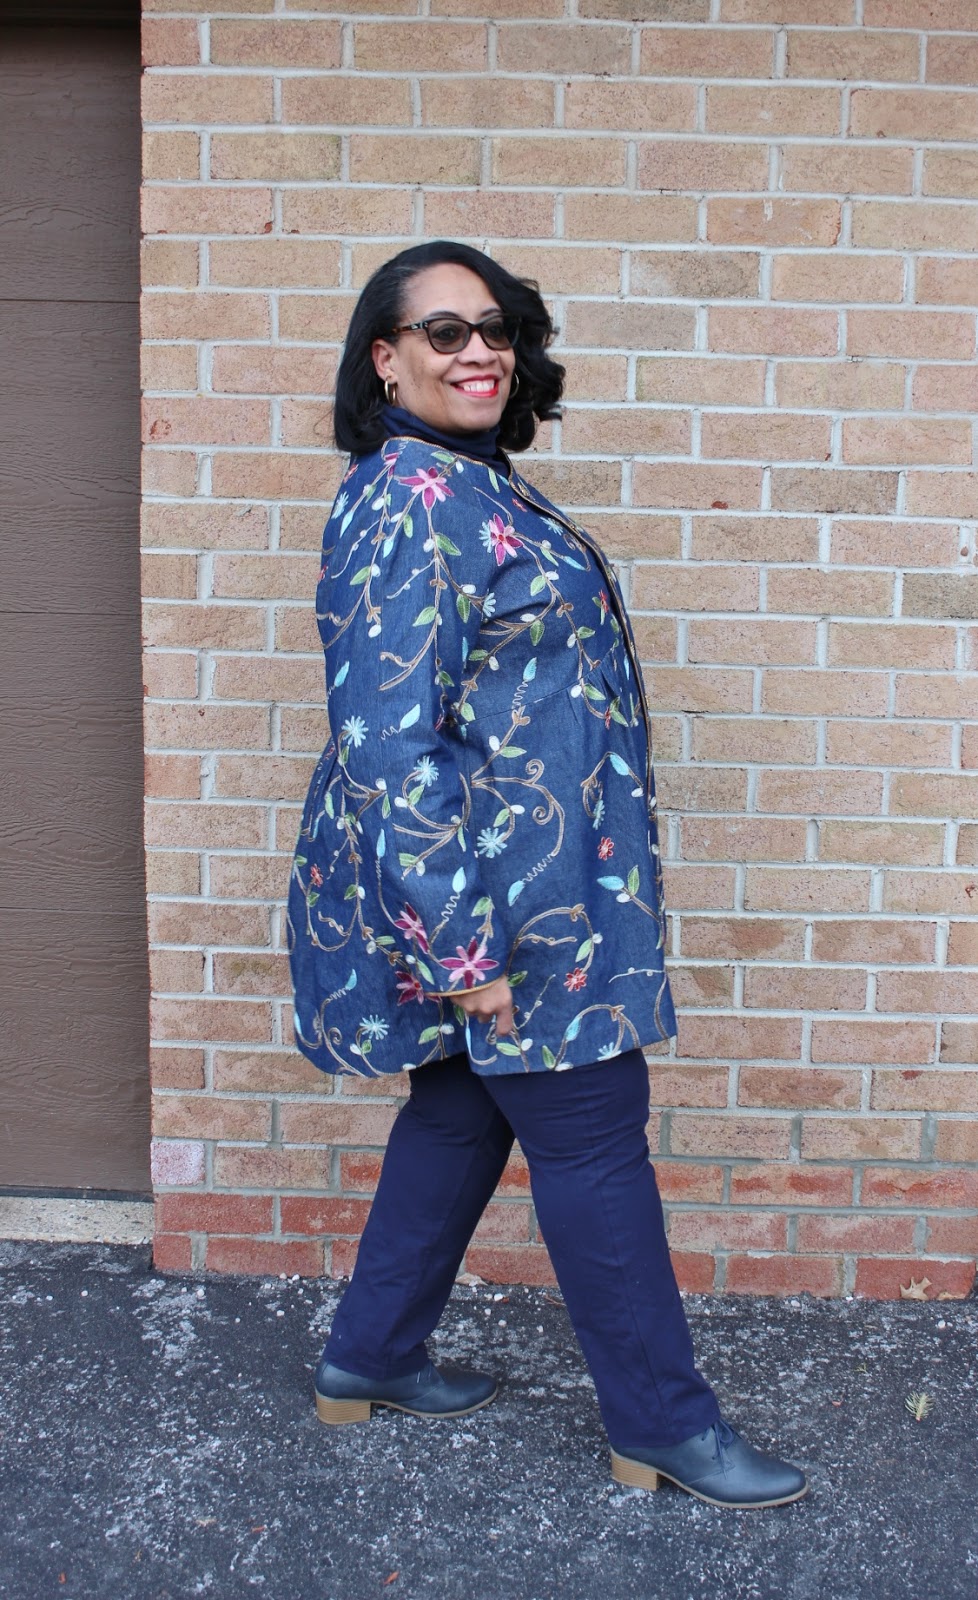
Dover Jacket ~ The Third Version in Embroidered Denim

This is my last and most elaborate version of the Dover Jacket.


Supplies ~
- Embroidered Denim from Mood Fabric - purchased at the NYC store late last year 
- (5) 7/8" flower buttons from the button stash
- Flat Bronze Piping from Joyce Trimmings
- Navy blue snug hug rayon seam binding
- Interfacing from Steinlauf & Stoeller

Things to note ~
1. There are no new construction techniques in this version because it's the third time I've made this jacket.


2. The distinguishing factor of this make is the flat piping I added to it. 


3. This version doesn't have pockets either.  I cut some out and was going to do a funky little pocket but after wearing my first jacket, I realized that I don't need them.

4. I omitted the topstitching for this jacket due to the elaborate embroidery on the fabric. I think the topstitching would take away from the embroidery so I hand tacked the facing down in key points.

5. Rayon seam binding was added to the hemlines and I hand stitched the hemlines down. Again to avoid stitching through the embroidered fabric.

6. I made corded buttonholes using embroidery floss as my filler for the jacket front. I needed bold buttonholes because in several places I had to sew through the embroidery. I wrote a "how to make corded buttonholes" in 2012.  Here is the link to that post.

7. My jacket front buttons left to right instead of right to left because I liked the way the pattern on the jacket flowed better. 

A Few Pictures of the Jacket ~


A Special Offer ~
I love this pattern! While I'm not a pdf pattern fan, this one was so easy to assemble and used very few pages. While it's not a plus size pattern it was easy for me to alter to fit my body. Now if you've a bodacious bustline, you will probably need to make an FBA to make it work for you, but I believe it can be done. Me being more modestly busted for a plus size woman, I only made a few alterations - see the first jacket post.

All this to say that Diane of Blue Dot Patterns has graciously offered not ONE but TWO pdf patterns to the readers of my blog! So if you'd like to make one of these amazing jackets too, please leave a comment below telling me what fabric you'd use to make your version AND of course how much you like mine! *LOL* You have until Friday night 2.22.18 at 11:59pm EST to leave a comment. The winners will be announced on Sunday, 2.24.18.  Good luck!

ONLY COMMENTS LEFT ON MY BLOG POST ON BLOGSPOT.COM WILL BE ELIGIBLE FOR THE DRAWING!

Conclusion ~
I've given this jacket pattern a work out. I have three wonderful versions to use as layering pieces for the winter. It gives me a refined look but works for my lifestyle. I won't be making another jacket this season. However, you may see it as a dress with 3/4 length sleeves come spring/summer.

This is a simple silhouette. I loved working with the pattern because it allowed me use fabric and embellishments to make the silhouette sing. It's the kind of sewing that I love best and it's the essence of the sewist I am. Taking something and adding my stamp/personality to it to make it my own. And isn't that why we all sew?!

So don't forget to leave a comment below to win your own pdf jacket pattern!

BTW, I have two more outfits left in the last batch of garments I cut out. Look for those and some crocheting that I've been doing for the grandchildren to come to the blog sooner or later!

...as always more later!


Sunday, February 10, 2019

The Dover Jacket in Flocked Glen Plaid

I knew right after I'd finished my first Dover Jacket that I would be adding more of them to my wardrobe. It's exactly the type of topper that I need and want as a layering piece. All I had to do was figure out what the next fabric should be. I settled on a flocked glen plaid suiting and an embroidered denim. One piece is deep stash and the other is new to the collection. 

At first I was going to put both jackets in the same post but there is so much detail to each one they deserved separate blog posts. 


Flocked Glen Plaid Version ~


This version was inspired by a picture I saw on Marcy Tilton's site. Yes, I get her emails. Yes, I cruise her site 2-3 times a week. No, I rarely buy anything but her fabric selections are so inspiring. The picture above inspired me to look in my fabric collection, because I KNEW I had a flocked glen plaid on the shelves. I know Marcy's picture is about denims (and boy do I want the one on the far right!) but it did strike a memory.

Upon finding the fabric on the shelves, I was thrilled to realize it's the right weight to make the Dover Jacket. Since it's such a distinctive fabric, I knew it would make an interesting topper. A note...when choosing fabric for this jacket...make sure it's a fabric that gathers easily since the gathering is an integral part of the design.

Supply List ~
- 3 yards flocked glen plaid from deep stash
- (3) 1.25" buttons from notions collection
- leather binding from the notions collection
- Black fusible interfacing from Steinlauf & Stoeller

Pattern Alterations ~
This is the only additional alteration I did to the pattern for future makes ~
  1. I added 1/2" to the front and back of each sleeve from the shoulder curve down. 
  2. This enlarged the hemline considerably. 
  3. At 4.5" from the hemline, I sewed on an incline decreasing the hemline by 1.5" on each side.
  4. I also lengthened the sleeve by one inch.
  5. This allowed made sleeve hems circumference smaller and stopped my very small wrists from looking like they were floating in a too big sleeve.
Construction ~
Because the fabric is very busy, I added some accents to make the design work. I chose a very large button from the collection to add to the jacket front. I have no idea how long I've had these buttons or where they came from in the garment district. Just know that my button collection is as extensive as my fabric collection.


Due to the size of the buttons, my automatic buttonholer wouldn't make buttonholes. Honestly, I haven't made a 3-step buttonhole in about 20 years. I went to my copy of the Vogue Sewing Book to figure out how to make them again.


A few samples later and I had buttonholes large enough for my buttons. Though I'm glad I only had to make three of them.

I also added some leather binding leftover from other projects to the front edge of the jacket. That wasn't planned. I was looking for some buttons and found the leather binding in a plastic bag with the buttons I chose. I'd probably planned on using them together for another project that didn't happen. They were, however, perfect for this one.

Lastly, I omitted the front pockets from this version too. After wearing the original jacket, I didn't miss the pockets so left them off.

Some Pictures ~  


Conclusion ~
I'm glad that I used this fabric from the collection to make my second version. While it's not a heavy fabric it will be a good layer over a cashmere top for the coldest days or a cotton jersey turtleneck. It's casual enough for the office but funky enough to satisfy my creative needs.

This is the second jacket from the Dover Pattern.  My final version is coming soon!

...as always more later!


Tuesday, January 22, 2019

Blue Dot Patterns ~ Dover Jacket (Wearable Muslin)

One of the garment types I really want to add to my fall/winter/early spring wardrobe is a loose fitting jacket. I want to wear them with the Pembroke turtleneck tunics I've made, as well as, my shirts and over jeans and leggings.


I saw the BlueDot Patterns - Dover Jacket and it really tickled my fancy.


However, there were a few challenges...
1. It's only graded up to a size 18 - no plus sizes at all!
2. It's a pdf ONLY pattern
3. The sleeves need to be lengthened

I hemmed and hawwed a few days before downloading the pattern because LOADS of pattern alterations PLUS taping the pattern together. But as I looked at the pattern drawings, I realized that a lot of the alterations would be very easy to make because it's a simple silhouette.


So my first challenge was to tape the pattern together. I managed to do that one evening after work while watching Bye Bye Birdie. Yes I LOVE corny old movie musicals! *LOL* It wasn't difficult to tape together because it doesn't have a lot of pages. The taped pattern easily fit on my sewing table.

Pattern Alterations ~
These are extensive. I altered almost all of the pattern pieces. So I traced the main body pieces and the alterations to them are listed below.

1. Front bodice bottom - added 1.5" to the piece from top to bottom by slicing it open and adding the extra space. This gave me an extra 3" in the front.

2. Back bottom piece - added 3" to the pattern. Sliced it from top to bottom and added the extra space.  This gives me an extra 6" to the back.

3. My finished hip measurement is 71" which will allow me to put a sweater or top under the jacket, as well as sit comfortably in the closed jacket.

4. I added a 1/2" to the front and back bodice pieces by slicing and spreading.


5. While the original finished bodice measurements fit, I wanted a little extra space for what I wore under the jacket.

6. Then I lowered the front and back pieces 2". If you look carefully at the picture of the jacket front - the seamline runs right across your bustline. This works if you're small busted but any amount of boobage and it will look a little wonky.


7. I checked where the seam would fall on my body and decided that I needed to lengthen it 2" for it to clear my bustline. That alteration was made to the front and back pieces.

8. The front facing piece had 2" added to match the jacket.

9. The sleeves were also altered. C'mon you know if I make them on regular patterns I would need to add to them here too. I added 1/2" to the front and back sleeve. 

10. For the next make I will need to add another 1/2" to both back and front sleeve piece. When sewn, these were still a little tight and pulled across the jacket front.

11. I also added length to the sleeves because the 3/4 length sleeve won't keep my arms warm. 

See extensive! I'm sure you're wondering why I didn't find a pattern in a size closer to my measurements. Honestly I don't know. I saw this, knew it was what I needed & wanted also that it would work with quite a bit of the suiting and jacket fabrics in the collection. Plus I was in the mood for the challenge of making it work.

Fabric Choice ~
I really wanted a denim jacket. I've got an entire section of denim fabric in all weights, colors and prints that I've amassed over the last couple of years. I didn't use as much denim as I thought I would last year, probably cause I went shirt crazy! Anyway, since I made so many alterations to the pattern, basically grading it up to a size 22-24, I wanted to try the pattern out first.  

If it worked well great! If it didn't, I would move on. I used a printed denim left over from making this wrap skirt last summer.  The first challenge: the fabric was shorter than I thought it was. I'd actually folded it in such a way that I couldn't see a huge piece was cut out ~ insert very loud groan here. I tried to move pattern pieces around so they would fit. The pattern tetris drove me back to working on one of the blankets I was crocheting for the grandchildren.  After a time out, I figured out how to get all the outer pieces cut out of the denim. 

Construction ~
This was easy to put together. I understand why Diane rated this a beginner to intermediate pattern. But me being me and no longer capable of just sewing a pattern as is, I made a few additions...

a. I didn't have enough of my fabric to cut facings or pockets.  So I omitted the pockets.

b. I cut facings from a blue/white gingham from my scrap pile.

d. After the sleeves were made, I realized you could see the white background of my printed denim.  So I cut blue/white gingham cuffs (15" x 3") to cover the sleeves undersides. Also to tie it to the facings on the inside.

e. I added 2 more buttons than the pattern calls for because I don't like flappy fronts.

f. To insure that everything in the inside of the jacket coordinated, I added a band of the blue & white gingham to the hemline.  I encased the hem for a bound look and I handstitched it down.


f. Last I topstitched close to the front edges and again at the edges of the facings like the pattern suggests. I used a triple stitch for the topstiching. 

(The color is off here but you can see the topstitching and basting lines)

To insure the topstitching was in the right place for the facing edges, I ran a line of basting stitches around the facing.

A few pictures of the finished jacket ~


Conclusion ~
I LOVE this pattern. I can see it in several different fabrications, even a ponte knit. I hope to make a couple more of these before the weather warms up. It's been especially cold this winter and I need ALL THE LAYERS!

I did add a lot of construction techniques to the jacket that are not included in the pattern. Some of it is because I wanted the insides of the jacket to look finished. Other techniques were done because I just like those sewing techniques better. All of these added more sewing time to a simple-to-sew jacket but it was worth the sewing journey...making it a very satisfying sew.

I would highly recommend purchasing this pattern if you're looking for a great casual jacket to add to your wardrobe. It has great bones and you can really have fun with design decisions for your garment.

...as always more later!


LinkWithin

Related Posts with Thumbnails