Saturday, July 25, 2020

An Embroidered Sleeve Shirt

I don't normally sew shirts in the summer because it's too dayum hot to be wearing a lot of layers.  But work from home Carolyn, sits in air conditioning every day...plus the sewing cave is extra cold what with air conditioning and being underground.


Some days I grab a shirt and a pair of leggings to work in. The other day I had to run an errand during the middle of the day, so I grabbed the QVC Denim Shirt and my white denim leggings to wear. When I got home I wore them for the rest of the day and they were perfect for the Zoom meeting I had later that afternoon.

So when I saw this tunic on JJill, I knew I owned a piece of embroidered shirting to reproduce it.


Actually I only used the sleeve idea from the tunic, matching it with the pattern pieces I used on the QVC denim shirt. I wanted more of a shirt than a loose tunic. There are no construction changes for this one. 

The challenge was to use my fabric to it's best advantage to make the shirt I saw in my head. I've had this piece from Chic Fabrics for a minute (longer than a year but not more than two). I've pulled it out multiple times to use but the fabric and idea never worked well together. So back in the fabric collection it would go. Pattern placement was the key to making this shirt work.


Supply List ~
3 yards of embroidered striped shirting from Chic Fabrics
10 white buttons from Nancy's Notions in PA
Interfacing from Steinlauf & Stoeller
20" of 1/4" elastic from the notions collection

The best thing about this supply list is that everything was already in the sewing cave. Yeah, I'm throwing in that justification for my overstuffed sewing cave every chance I can get! *LOL* Believe me I'm not complaining because all of this stuff was comforting and allowed me to sew when we were quarantined.
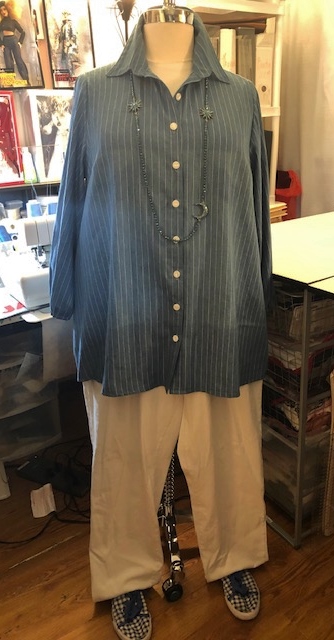
A Few Pictures ~


While this is a comfortable and easy shirt to wear, the polyester in it makes it more a three season shirt than four. I was definitely warm taking pictures outside today. However, it does fit perfectly in my shirt wardrobe and will be worn at home or when the weather cools a little.

I love how by just changing the pattern pieces from my TNT shirt pattern that I've got a really cute shirt to wear. This is how I like to sew. It's the perfect example of what I meant in my previous post.  Expect to see more of this type of sewing!


...as always more later!


Friday, July 24, 2020

So What's Next?

If you follow me over on Instagram, you know after the murder of George Floyd, I became active with the Black Makers Matter Group. I also wrote a blog post on the Sewcialist blog about how it feels to be a black maker in the sewing community. If you've followed me for any amount of time, you know I've been quite vocal over the years about how the pattern companies and sewing community treats black makers.

Along with BMM's boycott of JoAnn's, Hobby Lobby and Michaels, I'm also boycotting the Big 4 pattern companies. I've railed against them over the years for various reasons and after supporting them with my precious dollars for 50 years, I'm done. Don't worry, this isn't going to turn into another post railing against them. This is a post to say that I own hundreds of patterns from the 60s/70s through present day so I don't need to purchase another one. I'm no longer a customer.

I will use the patterns I already own because they're mine.  Also because the Big4 pattern companies don't celebrate you when you don't use the latest and greatest it's not like I'm encouraging you to spend money with them. Because of this my blog titles will no longer have pattern numbers in the titles. I know this will make them harder to search on Google but right now I don't care. I may change my mind on this later. I reserve the right to do so but for now no more pattern company names and numbers in the titles.

I will also no longer tag the Big 4 pattern company's name, numbers and/or names on my Instagram posts. Pattern numbers will be included in blog posts and even if they're still in the pattern catalog, I won't link to them.

My sewing going forward will emphasize what I already own. Fabric that is presently in the sewing cave, patterns that live here and the notions that I have. That's not to say I'm not going to add more notions or trim because sometimes I NEED something I don't have...can we say pink buttons! 


I will be sewing more interpretations or "inspired by" garments. I love making these garments, the challenge of figuring out how to use a pattern I presently own, matching it to a fabric in my collection and picking trims/notions to make the design work really ignites my passion to sew. I haven't done much of that recently because I was redetermining my style. However, I'm coming back around to that so there will be more garments like the QVC Denim Shirt and the Lafayette 148 Maxi Dress.


I have a notebook full of ideas and a ton of fabric (LOL!) so that's what's next in my sewing journey!


...as always more later!

Tuesday, July 21, 2020

A Stripey Linen Maxi Dress

I knew I was going to make a couple more versions of Simplicity 8888 when I made the first one.  However, I thought the next one would be a solid version but me being me I went with a stripe. Why? Because I wanted to manipulate the stripes on the bodice...


Fabric journeys enthrall me. I love how if you cut the fabric on the bias or the cross grain it gives the fabric and the final garment a totally different look. So I love taking those journeys...and that's what this dress is all about. I mean besides the comfort and ease of wearing factor the dress provides.

Supplies ~
o  3 yards of a striped linen purchased from Fabric Mart - from the collection purchased in the last five years

o  22" orange invisible zipper from the notions collection

o  Remnant of orange bias binding for the armholes

Construction Techniques ~
This dress is all about manipulating the stripes. I really wanted to make them meet at the center front and then chevron through the side front and back panels. Well it didn't exactly meet at the front seam but it does seem to work in a weird way.


I cut the center front, front and back sides on the bias.  The center back is cut on the straight grain. I didn't want to deal with putting a zipper into a wavy back.


However, in the pictures of the back of the dress, it seems as if those side back pieces are poufing out a bit as I move around. Honestly I don't care and no one but a sewist would probably notice but "truth in sewing" here, folks! *LOL* If I realized they hung that way I probably would have done something different during construction.

The other thing to note is because I used mostly bias pieces for the top and the waist seam is heavy (full of gathering) I added some twill tape to stabilize that seam. I didn't want it growing and causing the dress to hang funny.

The inseam pockets were omitted from this version, not enough fabric to cut them out. All of the fabric in the skirt seemed to make the side slits featured in the pattern unnecessary.


Otherwise the construction is the same as the original Simplicity dress.

A Few Pictures ~ 


This one seems fuller with the drapier fabric than the original one does. Even though I was contemplating a solid version, I'm packing this pattern away for now. Two journeys with this pattern seems enough. 

When I took these pictures this morning at 9:30am, it was already hot and humid outside. With the amount of fabric in this dress, as well as the weight of the fabric, this is NOT a hot & humid kinda day dress. But 100 degree days don't happen much in the spring or late summer so it will be perfect then. 

I made this dress back in late April/early May when I thought I would be going back to the office this summer. Because of that it hasn't been worn except for these pictures and it probably won't be until next spring. I'm wearing the throw on dresses, Katie tops, Myosotis dresses and wide legged pants that work with my stay at home style since I won't be going back to NYC until the fall.

I've been pulling fabric to match with maxi dress patterns. Although I'm falling back on a couple of TNT patterns for my next two maxi dresses. I finally broke down and bought a 6 yard piece of fabric and just like I thought, I'd moved on by the time it arrived. Since I'm home there hasn't been a lot of fabric purchasing going on BUT a lot of digging in the fabric collection.

My sewjo is back. I'm sewing so more garments soon!


...as always more later!


Friday, July 17, 2020

Long V-Neck Maxi Dress

I follow Lafayette 148 on Instagram and this picture appeared in their feed. It immediately checked off all of my new work from home wardrobe requirements. It's loose-fitting, flowy, easy to wear and maxi length...wfh gold! 

On the days when I don't have any Zoom meetings, I just want to throw on something long and flowy to work in while sitting in front of my computer.  


If we go back to our offices in NYC, it will be in the fall. I won't need summer clothing at all. So I'm adjusting what I'm sewing again. May I state one more time - I don't really like wearing pants. I wear jeans in the winter because I don't want to be cold but if I lived in a more temperate climate, I would wear dresses and skirts ALL.THE.TIME!


To get this look I started with New Look 6340 which I've made several times. One of the things I want to do during this season is reuse some of the patterns that have been successful for me. I know we tend to be one time pattern users in the sewing community but I love a good TNT pattern. I just won't discuss my thoughts on how the one-use practice is pushed upon us by the Big 4.

Now my previous versions all used a different neckline. But luckily for me, there is a v-neck option in the pattern...so the only pattern alterations I needed to make were for length.


Okay I added a little more space to the side seams for more drama...

This maxi is made using a piece of mid-weight polyester print purchased from Fabric Mart back in the 1990's for $1 a yard. It means that this deep stash piece is about 30 years old. Also, I bought this in three colors. I gave two pieces away and this is the only one that remained in the collection. Guess it was time for it to be used!

I added an invisible zipper to the back of the dress to make it easier to step into it instead of pulling it over my head. A strip of interfacing was added to the back seams to stabilize the fabric before inserting the zipper. There is also navy blue piping added to the neckline of the dress...needed to bind that busy print off a little. The side seam pockets were also omitted.

Since this is a wearable muslin, I pressed, turned under and stitched the underarms. For my next version I will use bias binding to finish the armholes. 

A Few Pictures ~


As I said this is a wearable muslin because I needed to work a few construction and pattern alterations out. 

For my next version ~
o  I will lower the underarm seam. I traced the wrong seam line when making this version.
o  Remove some of the width of the dress below the hipline to the hemline so the pattern pieces will fit easily onto a piece of fabric without having to do a wedge insert. What I did to make the hemline work on this version.
o  A 1/2" will be added to the upper center back to give it a little more room.
o  1/4" was added to the front below the v-neckline. The bodice while wearable is tight.
o  Also removed 2" from the hemline because it was way too long.  

I would like to make 2-3 more of these because I love the comfort factor. This dress will work well in my present work from home wardrobe. If you have a copy of this pattern in your stash, I highly encourage you to pull it out and use it! 

...as always more later


Tuesday, July 14, 2020

Pink Posey Maxi Dress

Originally I purchased this shirting fabric to make a shirt.  However, when moving fabric around earlier this spring, I touched it. It really felt like it would work for my new comfortable work from home maxis which is quickly morphing into the seems like I'm never going back to work maxis.  It's a Riley & Co print I purchased from from the alt-right supposedly Christian craft store, back in the days when I shopped there.


I knew I had three yards of it just didn't realize it was so narrow especially after it was washed and dried. Which meant that I had to jump through hoops to make this pattern work. 

Supplies ~
3 yards cotton shirting
1/2 yard white cotton batiste from the collection
12 3/4" pink buttons purchased from Amazon
Pink gingham bias binding


Construction ~
This maxi was made exactly like the blue & white rayon one I made last summer.  So there are no new construction techniques. Since I've made it eightyhundred times, it went together quickly. The only difference is that it's shorter than my normal maxi dresses and that's because I ran out of fabric. I thought I would hate it but it's been perfectly fine. I may remember the length for future versions.

Unbelievably I had no pink buttons in the button stash!  If I was working in NYC, it wouldn't have been a problem...but making this during the pandemic proved challenging. So I turned to Amazon because the other online button sources were giving ship times of 3-4 weeks. I'm patient but NOT that patient!

As an aside, I now have way tooo many pink buttons. Besides the assortments I purchased from Amazon, a friend came through and now I have a really DEEP assortment of pink shirt buttons.

A Few Pictures ~


I keep saying that I'm going to let the pattern rest and then I turn around and make another dress. So I'm not going to say it again. I'm sure I will stumble upon another piece of fabric begging to become one and I will oblige it. Especially since this dress has become my summer wardrobe staple!

One more thing ~ 
I took these pictures myself and they're just okay. I'm not taking "glamour" shots because that's not really my life right now and I can't muster up the energy. Also, my "no wear" rule before I take pictures has gone completely out the window. This dress has been worn several times and even outside of my house before I finally got around to taking pictures of it.

Everything seems so different now. What once was important seems to lack some of it's vitality. I did manage to take pictures of one other dress (though there are still two in the backlog) and my sewjo has returned. I'm trying to find some comfort in sewing while adjusting to my new normal. 


...as always more later!


Sunday, July 05, 2020

The QVC Denim Shirt

How about a project post. Before everything went to hell in a hand basket, I made three new maxi dress projects - a short sleeve t-shirt dress, another hacked Myosotis dress, and a linen striped maxi dress (Simplicity 8888). 


I've worn them but not photographed any of them because I just haven't felt like it...so they still have to come to the blog.  

However, I was watching QVC at the end of April and saw a really cute shirt. It looked so much like my TNT shirt pattern that I thought I can make that...so I did. I'm sharing it on my dress form, Daphne, as I would wear it, because I still don't feel like taking pictures. 


This post though is more about how I took pieces of my TNT shirt patterns to get the look of the inspiration photo.

Here is the Inspiration Photo ~


Supplies ~
3 meters lightweight pinstripe denim that was in the collection
8 - 5/8" white buttons from the notions collection
20" of 1/4" elastic cut into 2 pieces of 10" elastic
Scraps of interfacing from the collection

Construction ~ 
Using my TNT shirt pattern with the back yoke and gathering is how I started this shirt journey. I've used this combination on numerous shirts because it gives me a looser fit on the back of the shirt while maintaining a more fitted shirt front.

For the front, I used my altered Vogue 8772 pattern fronts. I've changed it to remove the body darts, kept the bust darts and added some space to the front side seams. This shirt best showcases those changes, although I've used portions of this pattern in three other shirts. 

The change that reflects the inspiration picture the most is the sleeves. I made this change to my pattern by cutting 3/4 length sleeves instead of long sleeves. 


  • Then I added 3/4" seam allowances to the hemline. 
  • Stitched them closed leaving an opening to insert the elastic.
  • Inserted the elastic and stitched the seam allowance closed
  • To finish the shirt - buttons and buttonholes were added to the front 
  • Then a small 1/2" hemline was machine stitched down.
My shirt is tunic length instead of the hip length of the original version. This is a personal preference. Y'all know I like the coverage so that's how I interpreted the look.

One more thing ~ 
This shirt has a huge faded area right on the front of the shirt which I noticed when the fronts were first sewn together. The faded spot appears no where else on the shirt so it won't be worn out of the house. I also have a bad collar insertion that normally would bother the heck out of me. In this instance however, I'm letting it go...since this is technically a wearable muslin.


...I just wanted to finish the shirt and see if the design changes would work.

A Few Pictures of the Tunic on Daphne ~


Maybe I will get around to photographing this on me later and if so I will drop those pictures in this post...but I wouldn't count on it since this really is a wearable muslin. I have a piece of medium weight denim set aside that I will use to make another one for fall/winter.

BTW, I have stirrings of my sewjo returning with a few ideas of things to make. One of my challenges has been now I'm working from home and don't feel the same way about dressing every day that I did when I went out to work. When I'm feeling that way I realize that I have loads of garments to choose from everyday.

But a wise friend of mine told me that I don't sew because I need to...I sew because I want to. I sew for the creativity and that's what fulfills me. So I may work on another "Inspired By" sew since I'm boycotting the sewing chain stores and not buying patterns.


...as always more later!


LinkWithin

Related Posts with Thumbnails