Showing posts with label Construction techniques. Show all posts

Thursday, February 13, 2020

More Shirtmaking Info.

I've been sewing shirts consistently for three years now.  The one thing about making a garment over and over again is you refine your techniques. Your collar edges get sharper, the way you apply the overlap for the cuff goes on quicker & easier and you know how it fits.

Tools I use when making buttonholes and sewing buttons on

My shirt journey has become about the fabric choices, the buttons and any embellishments. Y'know the fun stuff! Lately I've changed up the way I sew buttons on my shirts. After doing it a certain way for awhile, listening to other sewists and just repeating the process, I knew I needed to change it up.

I've never been a precise marker. I have to work at that because so much of what I do is instinctive or learned response. However, I'm changing up the way I'm sewing buttons onto my shirts.

First I do machine sew buttons on when they're flat 2 or 4 hole buttons. As evidenced by this video I posted to Instagram.

o I always use a hat pin to create a shank so the machine sews the thread over it.

o I use to mark the opened buttonholes with a pin after slicing them open with my buttonhole cutter. Lately, I've been using my Frixon pen and marking the center of the buttonhole.


o It makes sewing the button on so much easier because I just place the button over the marking. I'm also more accurate with button placement now.


o My machine finishes sewing the buttons on with the needle in the up position. This allows me to cut a really long thread tail


o Then I use a regular needle, thread the tail through and pull it to the backside of the shirt


o The thread tails are tied off in the back 


o A drop of fray check is applied to the knot on the back to secure the button threads.

After talking with another sewist, I'm also going to buy some silimide to sew on shank buttons. I presently double thread a needle with coordinating thread which means that I'm using four threads. I then run it through some thread heaven and make 3-4 passes through the shank.  My sewing friend said that the silimide will allow me to make just three passes and it's just as strong. Anything that speeds up the button sewing process is something I want to pursue.

One additional thing to note - I use 11 buttons at least on my shirts. One for each cuff, one on the collar stand, nine down the front. I know I use more buttons than most pattern companies suggest but I like my shirts buttoned all the way down the front. Pattern companies leave a longer/larger amount of space on the front of the shirt. That front flaps open on me and I just don't like it which is why I change it.

Just wanted to update how I'm sewing buttons onto my shirts now.

...as always more later!


Tuesday, February 28, 2017

Piped Cuffs

The piped cuffs on the button downs in the last post were not included in either pattern and came about because I didn't have enough buttons when I was making the first version. 

I really liked the green glass buttons that I used for the cotton version and didn't want to look for a substitute so I had to come up with a solution for the cuffs. Closing up the side seam and gathering the sleeves into the cuff seemed like a great solution and was easy to do.

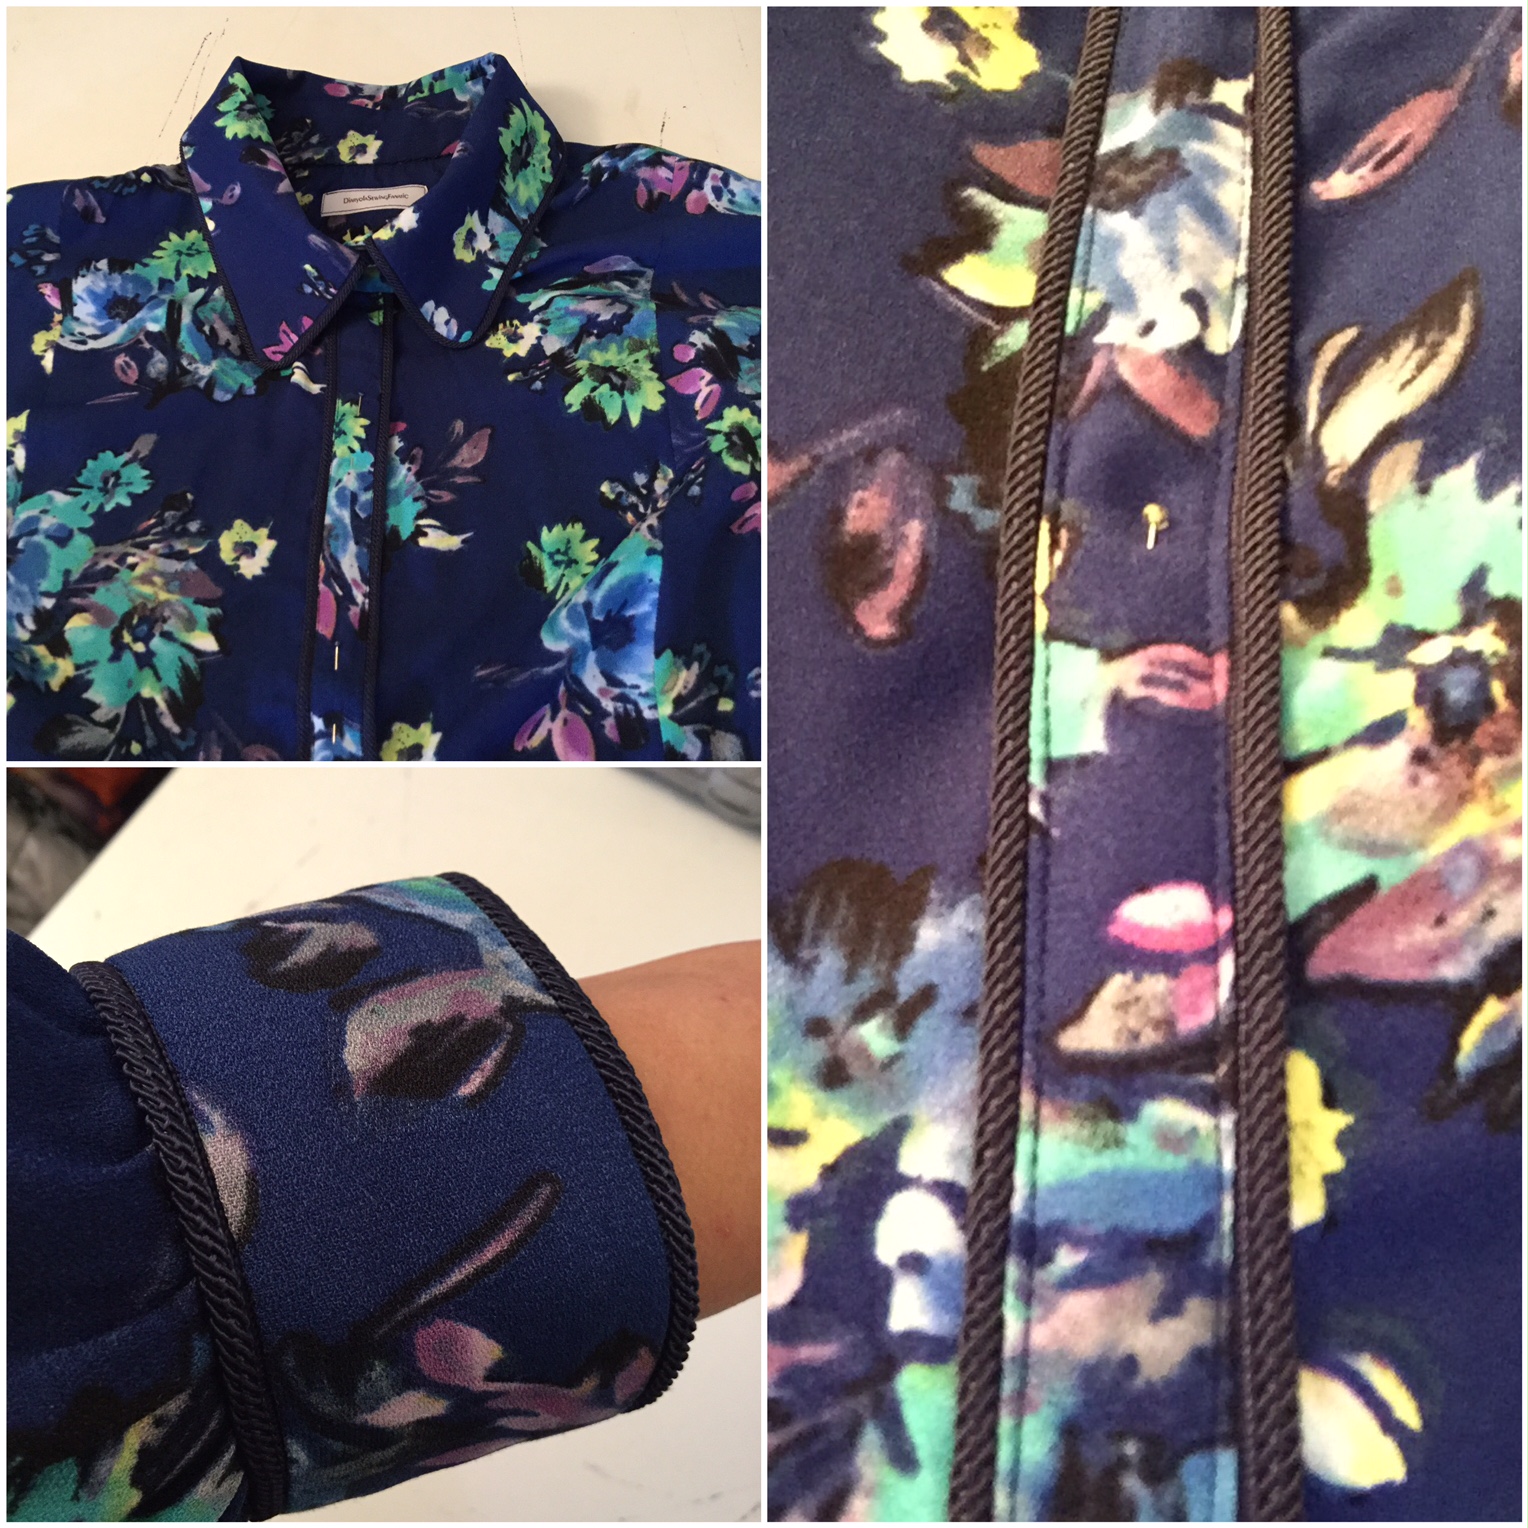
However, I kinda upped the ante for the blue & white version because I decided to add piping to the cuffs. 


Here's how I made the piped cuffs ~

First I cut four of the cuff pattern and interfaced just one side of each pair.


Then I basted piping 5/8" from the edge to both sides of one of the cuffs.


The second cuff was sewn to one edge of the piped cuffs.


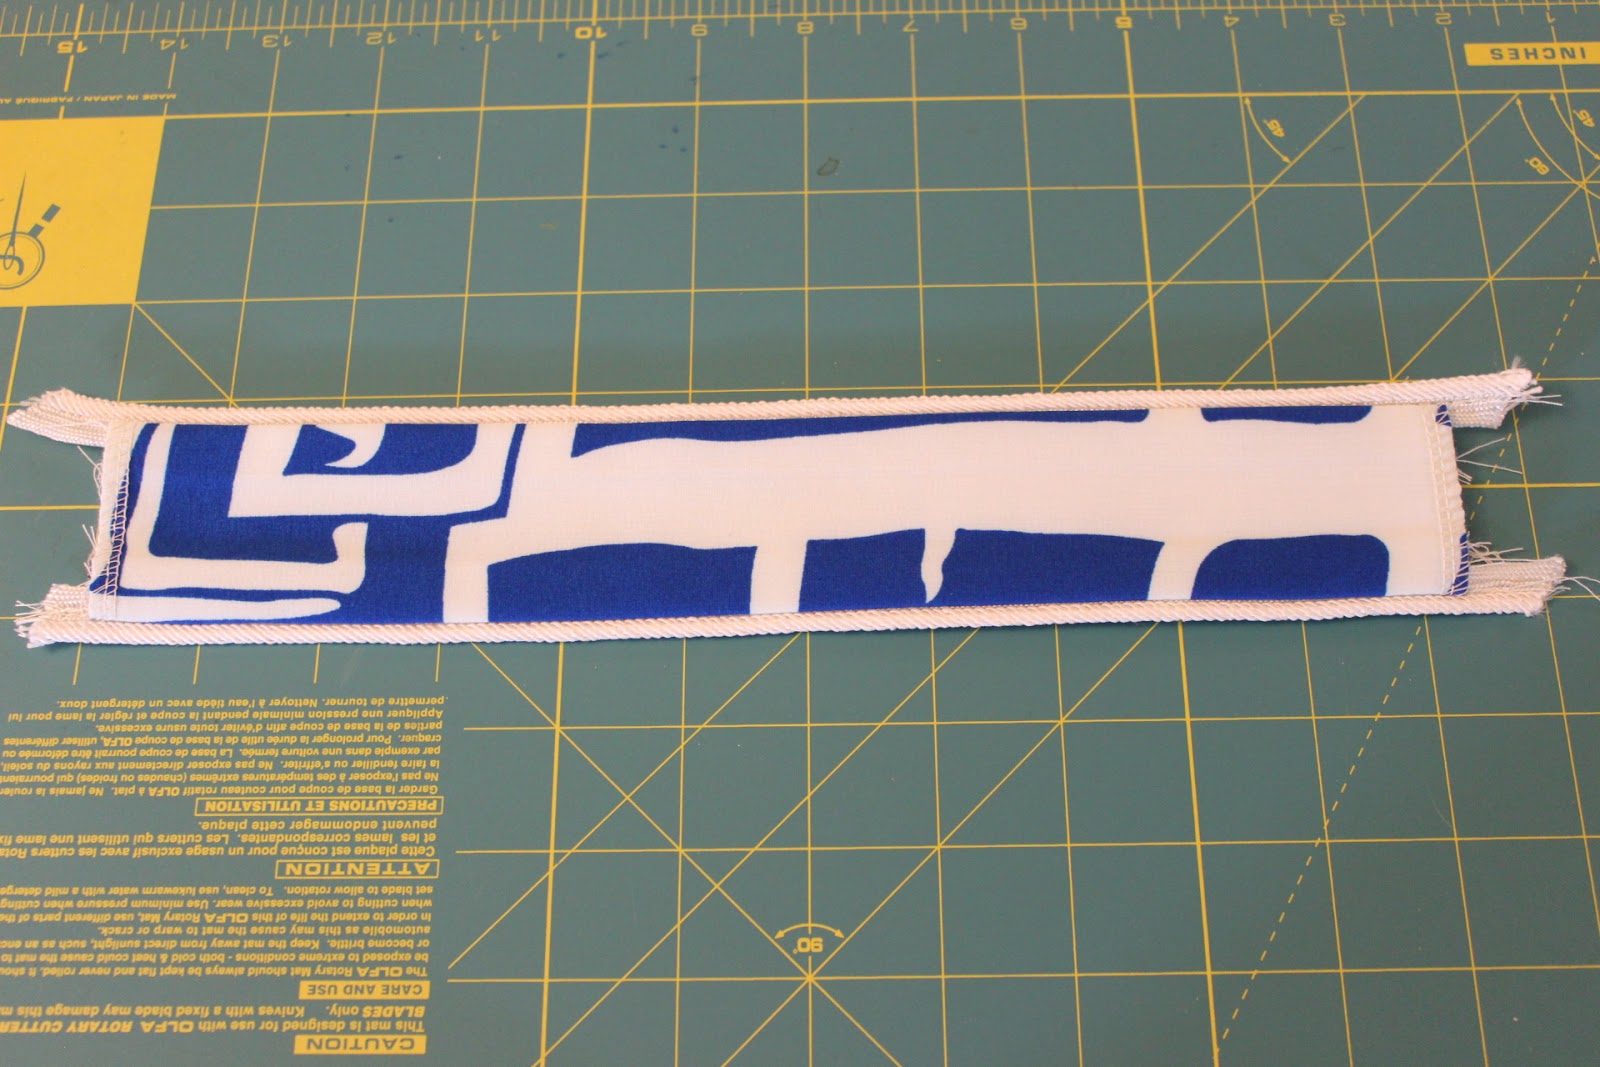
The cuff is then pressed flat and open - I use an organza pressing cloth and my sleeve board for precision.


The cuff once it's pressed flat.


Then the cuff is opened up and the side seam is sewn closed and then pressed open.


I hand basted the cuff to the sleeve. Then machine stitched it onto the sleeve. I did this so that I wouldn't have pins sticking me as I sewed the two pieces. I used my zipper foot to get as close to the piping as possible when sewing the two pieces together.


The finished sleeve waiting to be inserted into the shirt.


Making the cuffs was the easy part, sewing them to the sleeve was the hard part. Halfway through I wanted to kick myself for picking such a complicated and unnecessary design detail. Between hammering the seams to make them less bulky (yes, I did clip the seams first) and putting the first cuff on wrong then having to take it off...to hand stitching the cuff to the sleeve...those cuffs were a challenge. Let me say that again, A CHALLENGE! 

After finishing the first one, I had to take a minute before starting the next one. However, I'm glad I took the time to add the piping to the cuff because the finished button down looks great because of this detail.


Then I completely lost my mind and decided that I needed to add piping to the button placket too on the next version.


So begins the adventure for the next button down...coming soon to the blog!

...as always more later!


Wednesday, May 02, 2012

The Sleeve Details

I'm a huge fan of piping and was heavily influenced by those ads Cynthia Guffey did for the sewing machine companies back in the 80s.  Not only were the dresses impeccably sewn with matching piping at the neckline and armholes but then they would have this awesome embroidery running down the side or at the hemline. Does anyone remember those ads, besides me?


So I've been adding piping to garments for years trying to perfect that look...and now twenty years later I have my own method (culled from reading books, taking classes and by trial and error) for inserting the piping into sleeve hems. This isn't the only way that I do this process but this is the simpler application and let me add the disclaimer here...I'm sure that there are more professional, correct, by the book ways of inserting the pipingThis is just how I do it.  Sherry, who authors the blog, "Pattern...Cloth...Scissors" just posted a tutorial on how to make piping from beginning to end and add it to a waistline seam.  I would definitely check out her tutorial! 


Okay now that we've gotten that out of the way, first after cutting the pattern out, I cut 1.5" off the sleeve hem and set the strip to the side.


Then I hand stitch the piping 5/8" onto the edge of the sleeve 
leaving about a 1/2" of piping on either side.

The strip that was cut off was serged on both sides.
Next the strip was pinned to the sleeve's hem covering the piping.

Sewing the piped edge down using my zipper foot.

I use my bamboo point turner to mark a seam line as close
as possible to the piping so I'm sewing right up next to the piping.

Right side of piping inserted in the sleeve's hemline

Wrong side of piping inserted into the sleeve's hemline

The sleeves with the underarm seams sewn but not yet pressed open.

The underarm seam is pressed flat.  The extra piping cut off and 
finished with a seam sealant (Fray Check) and then
stitch witchery is placed under the seam and pressed.

The finished sleeve in the dress after a line 
of stitching has been added close to the piping.


Again, this is one of the ways that I apply piping to sleeve hems.  The other method involves applying the piping in the sleeve hem with the underarm seam sewn so that the piping is encased in the hem and the process can be found in this post.  


I will admit that after all the hand stitching I did in the dress that I got lazy at the end.  If I were a "couture" sewist, I would have gone the extra mile and encased the piping.  But last Sunday I wasn't...and since I sealed the cut piping ends and stabilized the seam, I'm not worried about the piping fraying.  Now, I'm not recommending that you follow me off the cliff, I'm just showing you what I did in this garment.


As a follow-up, I've finished the lined flare skirt from the Ten Yard Adventure Wardrobe and I've cut out a wide legged pair of pants too.  I know they need some type of lining because they are a little see-through, I just don't want to lose the drapiness of the fabric, so I'm working this through in my head.  


...as always, more later!


Monday, November 09, 2009

My Hems

If you've been following along you know that I love to put a little lace on the hem of the lining in a dress or a skirt for that matter...going for that slip like appearance without the hassle of actually wearing one!


I've used it pretty consistently on garments for the last three years and sorrowfully I've come to the bottom of my lace stash.  Now I can and probably will refill it...it's just that my previous stash was purchased at some really bargain prices...whereas the lace I'm finding today is a little pricier...*sigh*

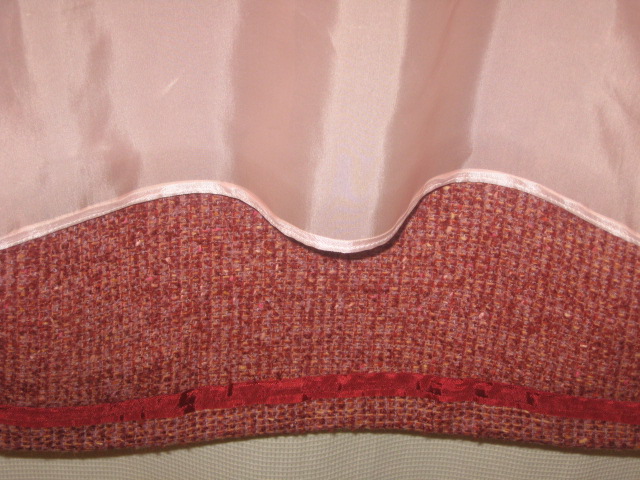
So I've had to come up with a new way to finish my linings.  Now I know that I could just turn the hem twice, press and stitch.   But where would be the fun in that!?!  After rumbling around in my trim drawer, I decided to just add some rayon hem tape to the bottom of the hems:


Lately I've decided that I really like this look...it's a clean finish that works with the tailored garments I've been making recently...because of that it's shown up in the last three dresses...

It's a very simple application.  I just fold the rayon seam binding in half, press it, then pin it to the hem of the lining.  Finally stitch it onto the lining and of course, give it one last press.  Voila ~ you're done!

I know it's a small thing...and it's one more step right at the end of the garment...when you are almost home free and done...but its such a wonderful surprise weeks later when you are wearing the garment again...to see a touch of lace or this really kewl clean finished hem.

Try it!  You will see that it makes you smile too!

Friday, September 26, 2008

Sleeve Bicep Alterations


If you've noticed, I don't write many posts on pattern alterations and there are several reasons for this:

1. I honestly believe that sewists especially beginners should be taught the proper way of constructing garments! I know that I'm shortcutting and changing things. But that's because I already KNOW and HAVE a well built foundation...so I know when I can and can't push the boundaries of construction techniques.

2. I don't think I'm a great teacher...before you start to complain...let me explain! I believe that a great teacher can share a technique in such a way that someone can understand it at a very basic level. That ain't me...I wish, but it ain't. Now can I inspire? Yes! Can I encourage? Yes! And can I enable? Yes, with the best of them! *LOL* But teaching takes a special gift that I don't believe I possess...

So it is with much reluctance, hesitancy and many, many disclaimers that I am posting how I make alterations to sleeve patterns to fit my bodacious biceps...shew, that was a long winded introduction! *LOL*

First - measurements:

I measure my bodacious biceps at their fullest point...so skimp on this measurement or be untruthful if you want but you risk having very ill-fitting sleeves if you don't take correct measurements. Personally, I don't care what the number is on the tape measure, what I care most about is the fact that a well-fitted garment actually makes you appear thinner and better looking than something you are stuffing yourself into.

Second - Ease:

The Perfect Fit in the Singer Sewing Series defines ease as, "extra room designed into a pattern or garment for comfort and style. The amount of ease varies from one fashion style to another and is often the key to how the fashion fits. Ease can be adjusted, but avoid over-fitting by removing too much ease."

To me the most important point of making a sleeve alteration is determining adequate ease before cutting up your pattern. For this you need to try on a sleeve that works for you...that is attractive to your figure type and flatters your arms. From the sleeve you tried on, determine how much ease you need/like. Then take the measurement of your biceps, add the amount of ease you want plus seam allowances...this is the final figure you need for determining how many inches to add to the pattern.

Now I use two totally different alterations for long and short sleeves...so I will deal with short sleeves first.

This picture illustrates the fact that I slice the pattern from 1/2" from the top of the sleeve cap through to the hem. I then add the additional inches determined by my formula above. The last step is to true up the hem, because the sides of the sleeve will be higher than the bottom.


By slashing and spreading you do not change the width of the sleeve cap - so it should fit into the armscye without any problems...well that is if the original sleeve cap and armsyce are drafted well...but we're not going there today! *smile* To me this is the easier of the two alterations and it allows me to add enough space to the bicep area and to lengthen my short sleeve to a flattering length for my arms.

Now for long sleeves...


To get my biceps to fit into a long sleeve I have gone through a few gyrations. I have tried the method used by Palmer and Pletsch. I have tried Cynthia Guffeys' method...all with varied measures of success. I finally settled on adding a seam to the top of the sleeve because it allows me to add at the biceps in the simpliest method possible. It also gives me quite a few opportunities for embellishments - i.e., topstitching or inserting piping...and it's become a kind of trademark of my garments.

How do I make this alteration?

**First I mark the increase at the bicep area (again taken from the formula mentioned above but divided in half).

**Then I add a 5/8" seam allowance mark to the sleeve cap and another mark at the sleeve hem.

**Two more marks are added - one between the sleeve cap and the bicep easing from the 5/8" seam allowance to the bicep allowance. And the second mark is made after the bicep mark and the sleeve hem, easing from the bicep into the sleeve hem. I use a ruler to make this line.

**I then cut out and sew together the 4 sleeve pieces making two separate sleeves.

Okay, do you have any questions? The blog is now open to questions, comments, clarifications, and other methods and/or techniques for enlarging bicep measurements.

Please feel free to ask questions, if I haven't been clear on anything in this post. Or feel free to correct something that I am advocating if you truly think it's wrong...but I do add the codacil that it's working for me so I'm not about to change...but it if will help someone else, let's add it to the conversation.


Sunday, July 13, 2008

A Piping How To

I love piping! To me it is the perfect embellishment because it adds an interesting detail to the garment but in a very subtle way. It was one of the first "difficult" techniques I learned when starting to sew because I loved the look so much. It has always appeared in my garments and over the years I have developed a sure-fire method for inserting it.

Now I have to admit that during my "fast, faster, fastest" sewing days, piping was omitted or slapped in haphazardly...but as I grew in my art I realized that I needed to have a structure so that each application would be perfect.

So this is how I add piping to a garment - emphasis on the "I"!

First a list of items you need:
1. Piping (of course) either purchased or made by yourself. My favorite source for pre-made piping is Daytona Trimmings (featured on Project Runway) in NYC...though M&J Trims has an amazing assortment too.

2. Three different feet for your sewing machine. I use a piping foot, a zipper foot and the regular zigzag foot. I mention this because you get a better application when you change the feet on your machine and when you change your needle position.


3. A hand needle and thread. Again it seems simple but I found once I used a little hand basting my applications went much smoother.

How I do it:

A. First I take the piping and pin it onto the garment exactly 5/8" from the garment edge or exactly on the seam allowance.

B. Then I hand baste the piping down. I usually use a contrasting color thread for this basting. This is the most important step to me because it stabilizes the piping preventing it from shifting around when you sew the band or facing on.


C. Next I pin the facing or band over the piped edge. If I want a finished look inside the garment, I ALWAYS add a facing, a band or a binding piece. Something that will cover the seam that's used to secure the binding to the garment.

D. Using the piping foot on my sewing machine, I sew the facing/band/binding with the piping inserted to the garment. I set my needle position so that I am sewing as close to the piping as I can without actually stitching through it. Another thing that I do to insure that I have a clear stitching line is to use my wooden pointer. I mark a line down the top of the facing, right next to the piping. I usually mark it for a couple of inches and repeat it several times so that there is a clear indentation in the fabric. Then I stitch the fabric sandwich (garment, piping, facing/band/binding) together. Following these steps usually results in a tightly piped seam.

E. Once the seam is completed, I either clip the curves and edgestitch OR I switch machine feet to my zipper foot so that I can run a line of stitching as close to the piped edge as possible. This does two things...it secures and stabilizes the clipped piped seam and it gives it a perfect finish.

F. Finally the seam is pressed flat, always with a silk organza pressing cloth because this allows me to run the tip of my iron right next to the piping without actually pressing and possibly flattening the piping.

A few more tips:

~ When starting and stopping a seam, I always use the overlap method. One piece of piping laps over another and both are folded down into the facing/band/binding piece. Summerset has described another method on her blog that she uses and it is slightly different from this method.

~ When the piping ends at the back of a neckline facing, I make sure that the piping folds back into the facing seam for a clean finish...otherwise the piping ends will be exposed and will start to fray looking very messy.


~ I only use my piping foot when inserting the piping into the seam. I use one of the other two recommended feet at different times during the insertion process. I know that other books and magazine articles recommend using the zipper or edging foot for the entire process but I've gotten my best results using this method.

~ When adding piping to a sleeve hem or dress/skirt hem, I always make a band to enclose the piping. The end result is a cleaner finish.


Some book resources on piping how-tos:

**Embellishments A to Z - authored by Stephanie Valley, published by Taunton Press
This book devotes an entire chapter to piping.

**Vogue & Butterick's Designer Sewing Techniques
Has a short blurb about designers using piping

**Fine Embellishment Techniques - by Jane Conlon, published by Taunton Press
This book has a chapter devoted to bindings and pipings and some of the best how to instructions on how to make and apply piping

Threads also has quite a series of articles on making and applying piping...search results are here.

If you haven't given piping a try because you thought it was difficult, I hope that I have inspired you to try it by adding this technique to one of your garments. It is a wonderful embellishment that adds a richness and difference to your finished pieces. I know that I love it on mine!

Also, I realize that no one does a sewing technique absolutely the same way so if you have a different way to add piping to a garment, please leave a comment. I am always interesting in learning something new or refining a technique I already use!

Sunday, January 20, 2008

Samples and more samples

I know that it seems that I sew like the wind...but actually by the time I sit down to the sewing machine I have so planned out a garment that all that is left is the sewing.

One of the things that I do is make samples of techniques, interfacing, thread usage, etc. I use to hate making samples. I thought they wasted valuable sewing time. I have since learned that making a sample actually saves me so much sewing time, especially if something I have envisioned doesn't work in the final garment. So to avoid wadders, I now make samples.

For the "Menswear Lace Dress", I actually made a couple...

This one is a lace sample....
This one is a thread sample...


Now I am actually thinking about muslining a jacket using real muslin...ohmygosh those internet sewists are working me over rough! *LOL* Seriously, I can actually see the benefit of sewing and fitting a pattern in muslin, altering it and taking the garment apart to use the muslin pieces as the actual pattern pieces...or maybe this is just another byproduct of reading the book, "The Collection"!

I haven't sewn much this weekend at all...sorry to disappoint, but I have just been so tired! And today I spent the afternoon at church watching my niece and nephew perform in the Dr. Martin Luther King Jr. Celebration Program.

Hopefully, tomorrow since I will be home all day...it is too cold for man or beast around here...maybe something will fall out of my sewing machine, into my closet and onto my blog! One can always hope!

Sunday, January 06, 2008

Darts, Darts, Darts

As I was working on my latest dress, I remembered a question that Cidell (Miss Cellies Pants) asked me when she was visiting and looking at the interior of one of my dresses and jacket. With her question resonating in my head, I thought that I would show you how I make darts...emphasis here on the "how I do it" part! 'Cause one of the beauties of sewing to me is that there are some right ways to sew and then there are some ways that just work for the individual operator!

Now that the disclaimer is out of the way...*LOL*...First I mark darts. My favorite method is to use a tracing wheel and tracing paper. Now if you haven't used tracing paper in awhile it is soooo much better than the stuff I used when I first learned to sew...y'know that wax stuff that took the "all powerful cleanser" to remove the markings from your garment! I use Dritz tracing paper probably because I can get it in the garment district at Steinlauf and Stoller, where I purchase most of my sewing notions.

After marking them, I usually sew my darts in before serge finishing the edges of my garment. I use to serge finish all the pieces (one big sergefest) before I started any construction on the garment but I have noticed that in the last year & a half that method has gone by the wayside. I think that got phased out right along with my fast, faster, fastest sewing methods.


I sew the dart by starting about a half inch in from the cut edge, sew a few stitches forward and then sew in reverse to the edge. At the edge I sew forward to the point. About a half inch from the point I shorten my stitch length to really small baby stitches (1.0 on my Janome 8000) to the end, this locks the stitches without having to backstitch. Do I always remember to do this - noooooo - *LOL* Hey I gotta be real! But most times I do...and when I don't it's because that little 7th grade girl who learned to sew kicks in and I backstitch! However, my preferred method is to shorten the stitch.

Next, cut the threads...yeah, I'm being real basic here! Then I use my 6" shears to cut the top of the dart open. Another disclaimer, I only use this technique when lining a garment. Why?? Because I want the dart to lie as flat as possible on the fashion fabric when I add the lining to it. Sometimes I add a dart to the lining and sometimes I cut the lining from the fashion fabric piece after the dart has already been sewn but in either instances, I want those two pieces of fabric loving up against each other not fighting against each other.


If I'm not lining the garment, the dart is pressed down against the fabric. I don't cut it open because I am not going to attempt to serge finish the edges and possibly cut into my fabric with the serger knife as I get closer to the point. I also don't like having the additional thread in the dart.


Here is the most important part of dart making to me ~ outside of careful marking ~ pressing it flat and open. I can not impress upon you enough that you should not press a dart open or to the side on a flat ironing board. Please, please, please use your ham or your seam roll...whichever pressing tool you own...though I prefer my ham because you can get a really good press on a curved seam on your ham! Also, do not forget to use your pressing cloth. I have ruined many a piece of fabric from being anxious and not covering the dart with the pressing cloth first. After it is pressed (not ironed) flat, I flip the piece over and press with the pressing cloth on the right side to prevent any dimpling that may occur at the dart point.


I realize that these are simple tips but I've found that sometimes reading someone else's method of doing a "simple" sewing technique has upped my game and taught me something new. And since I ascribe to the always get better idea of sewing, hopefully something that I've shared with you about how I sew darts, will help you sew better darts too!

LinkWithin

Related Posts with Thumbnails