Showing posts with label 2008 Easter Suit. Show all posts

Wednesday, April 09, 2008

More Jacket Construction - Faux Welt Pockets

I bought the Vintage Vogue Pattern from Lanetz Living in a size that I can't wear because I was so intrigued with the faux welt pockets. After getting the pattern home and reading the directions I realized that it was a very easy technique and something that I could appropriate and add to another pattern.

So to get the look I wanted, I took one TNT jacket pattern (OOP Vogue 2285), added a great instruction sheet from a vintage pattern, used several days to sew, had a spirit of adventure and got a wonderfully different jacket.

As the title states, I am going to share with you how I made the faux welt pockets. This is where the sense of adventure, the instruction sheet and a willingness to cut up a TNT pattern comes into play!

1. Pattern Alteration
First, I used the original jacket front piece. I altered this piece several jackets back so that it would have a cardigan type front. To emulate the vintage pattern, it required the high neckline so the original piece was my starting point.


Next, I cut the pattern apart. To get the same seaming detail, I laid the vintage pattern pieces on top of my original jacket piece. Drew a line across the pattern and cut. Then I added a 5/8" seam allowance to both sides of the pattern piece.


The bottom third of the jacket was cut at the pattern waistline which was marked on the original jacket pattern piece. Again I added a 5/8" seam allowance to both cut pieces. (The picture above shows my first attempt at cutting the pattern apart. Because it wasn't working, I then added the vintage pattern to the top and recut the pattern!)

To make the openings, I again used the vintage pattern pieces laid on top of my now cut apart jacket fronts. Using the markings on the vintage piece, I transferred them to my new pattern pieces with a sharpie marker to make dots. Once the dots were on my pieces, I made larger X's so that I would clearly know where to stop and start the seams.

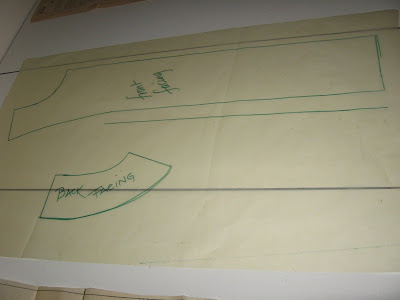
I also drafted new front and back neck facings since my TNT pattern does not include them. I did this by just laying some tracing paper on top of the original uncut pattern and drawing out the facing. I made sure that I measured the same amount on the front facing piece as the back neck facing shoulder seams...so the pieces would fit together easily when sewn. This was done to copy the look of the vintage jacket.


2. Construction
I followed the instructions in the vintage pattern step-by-step.


a. First the darts were sewn in the middle section.

b. Then the top section and the middle section were sewn, right sides together, leaving the sections at the x's open. I reversed stitched to make sure that the opening seam edges were secure. Then pressed the seam open.

c. I followed the same steps listed above to sew the bottom piece to the top piece.

d. Since I wanted my underlays to be the same as my lining and tank top fabric, I used the pattern piece from the vintage pattern. 4 underlays were cut using my Gingher pinking shears.


e. Then on the inside of the front piece, I pinned the right side of the underlay to the wrong side of the jacket, over the opening in the seam. Then the underlay was basted into place. This was repeated on all of the pieces.


f. Next I topstitched the opening edges through all the thicknesses. I used my foot as a guide to get a well stitched pocket. Isn't it kewl how just a little of the lining fabric peeks through the pocket!


And that was it! A little pattern work, a little precision and faux welt pockets! I love this look and want to make another suit from a midweight linen for spring/summer using this same technique. Maybe a black linen with white stitching and a black/white polka dot lining!

I've already done a post showing you the interior workings of the jacket. So my next post will be about the sleeves. And then a picture of me wearing the outfit!

I have to admit that before reading Shannon and Summerset's posts about their love of vintage patterns, I never really paid much attention to them. Once Summerset started to show the instruction sheets and wrote about the detailed construction tips, I became intrigued. I was hooked when I bought my first vintage pattern from Lanetz Living and got my hands on an instruction sheet.

Now I troll the site looking for patterns with interesting construction details. It is not necessary for the pattern to fit me. It is more important to see what new techniques I can learn. And that is what this project and this jacket was all about - learning a new technique! It was a very easy process and gave a tremendous bang for the buck! The jacket also is envogue but different from what everyone else was dialing up at church on Easter Sunday and in my workplace. The pattern and instruction sheet are worth way more than the $3 I paid for it!!! And I encourage everyone to purchase at least one vintage pattern...you may be surprised at what you find inside!

Monday, April 07, 2008

The Jacket is Finally Finished!!!

Yes, it is finally finished to my satisfaction and was worn to work today...

The suit stood out like a beacon in a sea of blackness...yeah, most of the women in my office wore black pantsuits today and there I stood in a seagreen jacket, coordinating seagreen striped tank top and vanilla lined tencil pants. I looked "pretty"...hopefully pretty and professional!!!

I am going to describe the construction of this jacket in a series of posts. Mainly because there was just so much that went into turning my TNT jacket pattern into a version of the Vintage Vogue pattern, that it's too much information for one post. This was one of my most ambitious interpretations but I think the final jacket and tank were worth the effort!

The vanilla skirt still needs to be constructed. As noted above, I wore it as a pantsuit today because I really wanted to wear this spring-like outfit on a dreary and dank day that is suppose to be a spring day but definitely wasn't!

However, today's post is going to be about the buttons and snaps! Might as well start at the end and work towards the beginning since this was the last thing on the jacket. *LOL* Actually, I am starting here because I haven't made a covered snap in over 20 years, so I had to relearn a technique!

Because of the faux welt pockets on the jacket front, I decided not to make buttonholes exactly like the vintage jacket. Originally I was going to add covered buttons from the jacket fabric with covered snaps as closures. Working towards that goal, I found instructions for making the covered snaps in one of my Bishop books, "Fashion Sewing by the Bishop Method."

Of course, the first one I made was very rough. By the third set I had a rhythm down and they were passable enough to put on the jacket. However, I now need to make another jacket where I can use covered snaps so that I can improve this technique.


The instructions for making the covered snaps were really simple:
  • Cut a circle of fabric the size of a small spool of thread

  • I changed this to a slightly larger spool because I was using snaps larger than pictured in the example.

  • Punch a hole into the fabric with a stiletto and place the lining over the base of the snap.

  • Sew a basting stitch around the circle of lining; draw up the thread and fasten neatly on the underside.

  • This took a lot of hand stitches on the first ones but I figured out how to draw the basting stitches tighter on the subsequent snaps.
And a hint or two:

1. Use a straight pin to find the holes on the snaps to stitch through...it was a lot easier than stabbing the needle around looking for them.

2. I also used a double waxed thread in the needle so that I didn't have to stitch through the snaps so many times.

It is a simple technique that with a little practice gives a garment a really upscale finish. I will use this technique again soon!

The final change was regarding my button choice. As I was searching for my covered button forms, I found these amazing gold & flower buttons in my button collection. They gave the jacket a more vintagey flair so I used them instead of the covered buttons. It was like adding jewelry to the jacket and I'm glad that I went with them instead of the covered buttons...plus they hid a lot of the bad hand stitching that was used to stitch the snaps onto the jacket.


It was the last thing added to the jacket but it gave the jacket a wonderful WOW factor!!! More later on the pattern alterations and making the faux welt pockets!

Sunday, March 23, 2008

"Make It Work!" Sunday

Happy Easter Everyone!

Yes, I did wear the suit to church today. I finished it enough to "make it work" and wearable, but it wasn't finished with all the detailing that I wanted. In my opinion, the jacket needs another 3-4 hours of effort before it is "perfect"!

I decided to go with the top and skirt instead of the dress after making my daughter's skirt ~ thinking that it would be quicker and I would end up with more versatile pieces...I think I sewed them so quickly that I am not happy with the final outcome. There is still some more work to be done to all of the pieces to bring them up to the level I desire.

I guess I should have cried "uncle" but I R-E-A-L-L-Y wanted to wear the suit today! *LOL* Okay, so let's start with a picture...then I will tell you everything that isn't finished or went wrong and what I'm going to do about it!


First the jacket:
1. Needs covered buttons and covered snaps added to the jacket fronts so that the jacket will close. I decided to leave these off about 10:00 pm last night.

2. Needs sleeve linings. Those sleeves only have organza in them but no sleeve linings. I jettisoned that part about 1:00 am this morning. So I will remove the hand stitching at the hem and add the sleeves by machine stitching them to the hem and then hand stitching into the jacket lining. Since I never took my jacket off, no one noticed.

The top:
I originally had a bowtie on the top. Yes, took all the time necessary to cut, stitch and add a bow-tie to the Sewing Workshop Mission Tank. The idea worked but the top looked horrible with the jacket. So then I had to remove the bowtie, however, the neckline was a little wonky due to way I cut it to add the tie. I wore it with the wonky neckline today but I will have to fix it. I think I'm going to add some pleats to the top front and a bias binding to the neckline so that it will stop slipping off my shoulders and down into the jacket sleeves.

The skirt:
It will never be worn with this jacket again. I wanted a sleeker look but started to panic at 8:30 pm last night when I realized that I hadn't started a bottom piece yet. I quickly constructed a TNT 4-gore skirt and wore it this morning. However, I don't really like this combo so I will NEVER wear the two pieces together again. I have a vanilla medium weight silk twill that will make a wonderful straight skirt for this outfit. I will use that, take my time and make a well-fitted, lined straight skirt that will add some ooommph to this outfit.

All in all I met my goal but if I was graded on my sewing techniques I would probably get a C+. On Project Runway I would not be eliminated but I wouldn't have won the challenge either. Though I don't think Jesus cared much...I mean I was clean, clothed and attended service with a pure heart so I guess that's what mattered most! *LOL*

Once the corrections are made to the pieces, I will give a full review of the process because I did do some interesting things during construction. And the jacket does have some great details that I would like to share.

On the PR reviews, one of the final questions is, "Would you make this garment again?" And my answer is I honestly don't know! I think the deadline definitely affected so much of the process, and the best thing I re-learned from this...Don't sew on a deadline because you just don't do your best work! *LOL*

Finally, one shot of the family ~ my daughters, my sister & my niece and nephew:


I hope you had a wonderful day with your family too!

Friday, March 21, 2008

Easter Suit - So Far

I am taking a break to eat so I thought I would let you know how far along I am...

First, a pic of the Vintage Vogue Jacket that I'm interpreting:


The lining and jacket shell are both almost complete, they just need to be sewn together!


The sleeves for the lining are done. However, I need to add the underlining of silk organza to the fashion fabric sleeves before setting them into the jacket. Then I will add the lining to the jacket.

I have followed most of the instructions from the Vintage Vogue pattern especially for the construction of the jacket fronts with the faux welt pockets.


Adding the silk organza underlining was part of my own plan...I wanted to give the jacket some stability but I wanted it to be lightweight like a cardigan. I do plan on wearing this outfit into spring!

Finally, I can't decide whether to make a dress using the striped silk as the top or two more pieces...the SW Mission Tank from the striped silk and a straight skirt from the wool crepe. Right now the dress is winning because it will take less time to construct than two additional pieces but we will see.

I am also struggling with the piping that I wanted to put around the jacket. When I was imagining the jacket, I could see it clearly. But now as I am working with the pieces it seems like it might be overwhelming, so I still need to make a decision about that.

Well, that's my update! Hopefully tomorrow I will be able to show you the completed suit! I will definitely have something finished to wear for Easter, because I am close enough and have enough time left to get it done! Thank Goodness! *LOL*

Thursday, March 20, 2008

And the winner is....

The Winner is Combination No. 1


with a final vote tally of 37 votes.

Combination No. 2 was a close second with 25 votes - I guess the blue fabric really resonated with quite a few people! Bringing up the rear, Combination No. 3 had 19 votes.

First I would like to thank EVERYONE who stopped by to vote! And a special thank-you to all the lurkers who voted! It was nice to see some names in the comments section that I hadn't seen in awhile and some new ones too!

Now, I know that you are all quivering with excitement wondering which combination I've chosen to work with and what it will become...but first a little backstory...*LOL* You didn't think I was gonna reveal all right away did you?

The base fabrics are wool crepes acquired from Fabric Mart during their last tremendous wool blow-out sale! The coordinating fabrics are silks and in one case a polyester acquired from Fabric Mart during the silk blow-out sale. And the reason that I am using the wool crepe as a base is because these fabrics will be used to make my Easter Suit.

Yes, Easter suit. I had originally planned on using the black/white border silk to make a dress but since the temps on Sunday are going to hover around 42 degrees Farenheit and we have a dinner reservation after church, I decided that I wanted to be chic yet comfortable.

I also decided that with all the fabric buying that has been going on here lately, everything had to come from my collections! Thus the digging around in the fabric collection, the fabric euphoria and the voting. So, my choice of fabric for my Easter Suit ~ Combination 1! Why???? I think that combination of fabrics will have a spring-like look without looking overly springy on a day that will still have a little of winter's chill knocking at the door. Everyone who picked that combination because of "The Look of Spring" were right on the money!

Now what pattern am I using? I am going to use my TNT jacket pattern and the instructions from the newly purchased Vintage pattern to make the suit.


Riding back and forth to work, I have been mentally working the construction details out in my head. I believe I have an idea of how I want to accomplish the look! So I'm locking myself into my sewing area until Saturday morning when I have to go have my hair done! I have several good take-out menus as well as a couple of bottles of Mountain Dew! *LOL* And I will crawl out and post updates over the next few days!

Again, thanks so much to everyone for taking the time to vote! I REALLY appreciated it!

LinkWithin

Related Posts with Thumbnails