Showing posts with label McCalls7481. Show all posts

Friday, February 13, 2026

If Fuzzy Wuzzy was a Bear

I saw this fabric on StyleMaker's site and all I could think was what a fun and cozy vest this would be over a turtleneck.

Supplies ~

OOP pattern McCalls 7481 - I've used this pattern several times over the years with each make being very different from the others.

1.5 yards of Checkered Cozy Teddy Sherpa Fleece (also in another color)

2 yards of polyester printed lining from Fabric Mart (deep stash)

Snaps purchased from SIL Threads (yet to be sewn on the vest)


I named this the Fuzzy Wuzzy Bear Vest because I knew it would not be a slim look on me. But I wasn't going for slim. I was going for warm and comfortable and this vest fits the bill.

A couple of things:

As expected this was a "bear" to cut out.  I had to make sure that all the pattern pieces were laying in the same direction.  I didn't want the checkers to have a variation of color in different sections of the vest.

Then there were all of the fleece cuttings flying around as I cut the pieces out. I ended up serging the edges of the pieces, even though I lined the vest, to prevent the cuttings from being everywhere.  I also had to clean my serger as I serged each piece because the cuttings were everyplace.  It was a flurry of blue sherpa fleece in every crevice.

I chose a pattern that had some interest to it but not a lot of pieces.  I'd altered this pattern back in February 2019 to include in-seam pockets in a vest. That vest inspired this one...and that's where this project went left!

There were no instructions for this vest so I went with what I remembered.  Constructing the shell wasn't a project.  I made the lining from the pattern pieces without the pockets.  Then I sewed the lining to the vest. I clipped the curves and the armholes. Went to turn the vest and it wouldn't turn. Y'all I thought I would lose my mind because no matter what I did, it wouldn't turn.  

Lining sewn to the vest

Inside shell of the vest

I had to unpick the hem and the armholes sleeves to flip the lining in.  Then because I couldn't figure out how to machine sew it together (even after consulting my internet friend, Google) I ended up handstitching the lining in.  Yes, I handstitched the hemline, and each armhole.  Luckily the furry sherpa hid my hand stitching. Then since I didn't edge stitch the lining to the sherpa fabric, I use long stitches to tuck the lining into the vest. That took 4.5 hours of watching Bridgerton Season 3, to rip and then hand stitch the vest back together.  BUT, it worked!

...and that's why the snaps purchased for the vest weren't sewn on the vest before I wore it out in public...because traumatized from all that handstitching! 😉

So here is the vest in all it's glory...

Vest worn with vintage Sarah Coventry broach


My friend makes me laugh every time she takes pics


The inside of the vest

The finished vest looks just how I imagined it would when I saw the fabric on StyleMaker's website. It's been really cold here lately, like colder than Alaska cold, so this was perfect the day I wore it to work since it was 22 degrees outside!  

This isn't the only garment I made during my holiday break, there's more coming!  Honestly it's been so dayum cold and windy, acting like we live in Antarctica, that I haven't been pressed about pictures.  Also, after these garments, I stopped sewing for a minute. I was living in cashmere sweaters and sweatshirt layers...not much me made to keep me warm against the artic temps.

So, I still have more share.  We did take more photos on another day of another pair of pants I made.  Will share that soon.  The temperatures have finally normalized and I have a few days off so maybe I will get some more sewing in.

...as always more later!


*I know Blogger has made it more challenging to sign in but would you kindly sign your name if you use anonymous.  It makes it easier to talk back to you.  Thanks so much!

Wednesday, February 13, 2019

McCalls 7481 ~ An Embroidered Denim Vest Hack

I decided that I wanted a couple of casual unlined jackets to wear this winter. I started with the ponte and lace version using McCalls 7481 and moved onto the Dover Jackets. I wanted to make another M7481 because I like the silhouette of this pattern and it's very hackable. 

So for this hack I've added the inseam pockets to the front. In my mind I call them the Rachel Comey pockets which makes it reminiscent of this Jacquard & Ponte Jacket. The thing that challenged me about that jacket was it didn't close and it fit closer in my upper body and looser in the bottom. That's because I basically used the dress pattern for my topper pattern.

For this version I added the pockets to the front which is easy because this pattern already has separate pattern pieces for the top and bottom.  So here is a picture of the completed garment...


This started as a jacket but now it's a vest. I got the jacket cut out and started to assemble it - went to add the sleeves and no bueno. The suckers just don't fit my arms...and I have no idea why. I measured them before cutting them out but they're just not working in this fabric.

At first I thought I would recut them from the fabric scraps and even came up with a plan to do so...but I kept dragging my feet. That's a sure sign this garment was done. So I finished it up and moved on. I'm wearing it above with one of the white shirts I made last spring.

Listed below is the supply list and techniques I added to make the inside as pretty as the outside.  

Supply List ~
- Embroidered Denim purchased from Metro Textiles (from the collection)
- White Piping from Daytona Trimmings
- White bias binding from the collection
- Black fusible interfacing from Steinlauf & Stoeller
- (3) 1" white buttons from the notions collection

Construction Techniques ~
I chose a very busy fabric so there were a few techniques added to it to make it work...


1. I hong kong finished the side seams, the facings and the hem.
2. The facings were cut from leftover regular denim scraps to make the fronts less bulky.
3. I added white piping to the front to give the eye a place to land and enclose the design.
4. The back was cut into three sections to break up the pattern a little but it's only noticeable at the first seam.
5. After I omitted the sleeves, I used a smaller white bias binding to bind the armholes.
6.  I decided to only add two buttons at the top because after all that work, the vest barely closes around my hips. The two top buttons allow me to close the vest without straining it over my bottom.
7.  Because of the dense embroidery design on the denim, I had to sew over the buttonholes twice to make them visible. The stitching was getting lost in the embroidery.

Otherwise, y'all this is a really simple silhouette that I changed the pockets on and then bound the heck out of the interior.


My other concern is that even though everything was pretreated, you know denim can still sweat dye in the wash. So will all my pretty white bias binding be a muddy blue after a wash? Who knows...and of course I thought of that as I pressed the last of the bias binding into place.  I think I just got excited about how great the bias binding looked on the insides without thinking about the care of the jacket until it was done.

A Few Pictures ~


Conclusion ~
This was the second garment I started during the Winter Holiday sewing bust. I did like taking my time and adding in the extra elements. As each technique was added to the vest, I got happier and happier because I'm no longer sewing to have something to wear. I'm now sewing because I like creating beautiful clothing...but it did take me until last week to make the final changes, finish it and get it ready to be worn.

It's a great vest. I love it paired with the white shirt or when worn with one of my cashmere turtlenecks on a cold winter day (not these minus days we've experienced lately). While the jacket idea didn't work out, the vest has more than surpassed my original idea. I really love this piece. It has an art teacher chic vibe. I'm thrilled I worked through the garment's challenges to add it to my wardrobe! 


...as always more later!


Wednesday, December 05, 2018

Black Ponte Jacket with Lace Trim

This jacket is made using McCalls 7481 as the base and it's Chico inspired.  


I found the inspiration jacket on Chico's website and it started this sewing journey.


All of the pattern alterations were completed that's why I started with it. I have two successful versions of the jacket in my closet another reason to use it.

Supply List ~
- 2.5 yards of black ponte fabric from Fabric Mart
- 1.5" lace from Joyce Trimmings
- 3" lace from M&J Trimmings
- black 'n white bias binding from the collection via Fabric Mart
- Five 7/8" black buttons from Pacific Trimmings
- One 1 1/8" black button from WalMart

Construction ~
I made no alterations to this pattern besides choosing the length and omitting the lining.  The Chicos inspiration jacket has a mandarin collar. I decided to use the collar from the pattern. Then I made it a journey because I added lace to the collar. Being extra again...

Side seam pockets were added but they hung funny. I thought of a couple of ideas to make the pockets work but ultimately decided that I didn't need them.  So I unpicked all of that black thread on black ponte fabric. As I was doing it, I realized that I've really grown because there was a time when I would have just chucked the outfit. But my unpicking heros, Grace and Lara have convinced me that ripping is worth it. Sometimes you've just got to do it to make your design idea work.

My silk organza pressing cloth got a work out on this project. I normally don't use one on ponte fabric but since I was doing some heavy duty pressing, I didn't want to put a shine on the fabric.  It was a good decision!


The highlight of this jacket is the lace on the collar, the sleeve and jacket hemlines.


The bias binding finishing on the inside just makes my heart sing. I only had enough in the notions stash to trim out the facings and the hemline.  So the side seams are just serged. BTW, while this bias tape came on a roll, it had to be pressed into shape to be used. It's some of the leftover binding tapes I bought from Fabric Mart over a decade ago.


A Hong Kong finish was used because I love how cleanly it finishes the seams. To me its worth the extra time and effort this finishing takes. There are loads of tutorials on how to sew Hong Kong binding in a garment, just Google it. I would hate to recommend one since there are various sewists showing how the technique is done and probably one of them is a fave of yours.

A few pictures ~


Wearing it with my TNT sleeveless white 
shirt made earlier this year!

This picture illustrates why I should stand up straight!

Wearability Factor ~
I wore this to work and out to lunch with a sewing friend this week. I dressed it down with sneakers and a ponytail and even then someone at work mentioned how dressed up I looked! LOL! I'm just not winning that one. However, since I made the jacket from ponte, it was very comfortable to wear. My other two makes include an outerwear jacket and a special events jacket


Conclusion ~
This is my third version of this jacket and I still haven't made it the way it appears on the pattern envelope! I think that's why I like the pattern so much ~  because of it's possibilities. I did check on the website and this pattern is now out of print. Which is sad because it's a great pattern to take creative journeys.  The pattern is still on the website if you want one. I'd like to use this pattern to make a few more everyday jackets, so expect to see it again.

The other thing I really liked about constructing this jacket was the details. All those extra special things really made the sewing fun. This is the type of sewing that makes me happiest. I can sew a quick project but it's not what makes my creative being sing. Give me a sewing challenge, throw in as many elements as possible to end up with a cohesive and unique garment and I'm happy. I was very happy making this jacket! *LOL*

This was the last garment I made during my Thanksgiving Break and my favorite make of the bunch. It was also the most intensive. I honestly didn't think I would get it finished in time to be photographed during the last session with my daughter. I'm glad I did. 

There is one more garment left from the photos, the Rivermont Top. It will be up next. The last of the "Border Print Series" shirts will be on the blog after that. 

...as always more later!


Wednesday, January 24, 2018

McCalls 7481 - Hack'd

This was the second piece completed during my Christmas Sewcation and the first piece of my Crazy 8 Wardrobe Plan. Just to remind you the details of the plan are in this post.

It's McCalls 7481 ~


Inspiration ~
Earlier this spring, I made this jacket using an African print. I've worn that jacket twice ~ both times out to dinner with friends. I've never worn it to work and I don't know why?  I stumbled across the inspiration jacket during my Pinterest travels. 


I follow Blair from Atlantic Pacific on Instagram, Pinterest and her blog. I'm constantly inspired by her looks and copied a garment she featured years ago too. When I saw this pic I immediately thought of McCalls 7481 as the starting point.

What I most admired about the jacket is the floral print and how it extended into the gathered bottom. It looks like it's made from a silky type fabric. However, I immediately saw it in a denim and I KNEW I had the perfect fabric in the collection to make it work.


This lightweight denim fabric is from Fabrixx in San Francisco.  Shams was shopping there and sent me a note asking if I wanted some. People seriously I have the best sewing friends! Definitely wanted some - it was just a matter of determining how much to buy...I ended up with 2 panels though later I wished I'd bought 3.

Anyhoo, when I added this jacket to my Crazy 8 Wardrobe plan I knew it would be a project. I was hacking a pattern and I was using a fabric that I hoped would work for the design. Also this style is a little out of my comfort zone. It has more of an artistic/art teacher flair to it. Clothing that I love on others but rarely make for myself.

Materials Used:
Ltwt denim border fabric from Fabrixx
Black midweight denim from Smuggler's Daughter
Ltwt fusible interfacing from Fashion Sewing Supply
Large Snaps from Pacific Trims

Pattern Alterations/Construction Techniques ~
This a great pattern to start with because it comes ready to color block.  Since I've already used the pattern all of the pattern alterations have been made to it. 


Now while the pattern has separate pieces to use in color blocking, I still traced and adjusted my already altered pieces because I didn't want to fiddle with new pattern pieces. 

My pattern changes:
1. Cut the front and back pieces adding 2" below the waistline.
2. Omit the lining since it's a denim jacket.
3. Used the front & back facing pieces I'd made for the previous jacket.
4. Omitted the pockets again ~ honestly I regret omitting now that I've worn the finished jacket.

Construction techniques:
a. Since the goal was to have a fully gathered skirt on the jacket, I used the lower front panel piece from the pattern. I cut it on the fold for the back but I used the entire length of the border print. 
b. Then I cut two front pieces from the border print using the same pattern piece.
c.  The gathering was accomplished using the dental floss technique that's worked so well for me in the past.


d. I cut the collar using a darker piece of the border print to bring some of the border print to the top of the jacket.


Sleeves ~
Let's be honest I have fat upper arms and I almost always need to make adjustments to the sleeve pattern pieces.  This pattern was no exception. Although I'd already made alterations to the sleeve pattern piece when I originally made the jacket, the sleeve didn't work as cut. I don't know if it's because my fabric is an unforgiving denim or what but they just didn't work.

Thank goodness I had enough fabric left over to recut new sleeves. I decided to add a seam down the center of the sleeve so that I could get the extra space I needed where I needed it.


By adding a center seam I solved most of my problems with how the sleeves fit and hung.  I also made the armholes a little larger when I put the sleeves in to take up some space in the jacket front that was pulling in a funny direction. 

I could tell something was wrong not only by how the jacket felt when I put it on but also how it looked. See I've started to take quick pics on my iPad when fitting. It helps me get a better idea of how a garment hangs and looks, as well as how it feels.

Now my upper arms are considerably fatter than my lower arms and wrists. So to insure that my wrists don't look like they are floating in a too big sleeve, I added ties from the border print to the bottom of the sleeve.  This way I can tie the sleeve, giving it a better fit at the wristbone.


A few construction shots ~

Pinning the gathered skirt onto the jacket 


The jacket without the sleeves after 
the bottom has been added

There was a lot of thought and care given to the interior of this jacket since it wasn't lined. I hand stitched the jacket hem as well as the sleeve hems. The front plackets were hand stitched down after I sewed the fabric covered snaps to the front bands.


A few pictures of the jacket in action ~

Wearing the jacket with a RTW pin at the neckline

Jacket front opened so you can see the covered snaps


View of the back gathered skirt

A gust of wind showing the jacket's flow

Conclusion ~
I thoroughly enjoyed making this jacket probably because I had the time to think through the challenges and execute them. I'm also thrilled that while it's not an exact replica of the inspiration jacket, it works for me.

This isn't a silhouette I usually wear and I'm even happy about that. Also, some would think this should be an outerwear jacket but it's cold here on the East Coast. It also looks like it's gonna be a very cold winter, so warm layering pieces are on my creative horizon right now.

This was my second garment of my sewcation and took the longest to complete but so worth every minute I spent working on it.

...as always more later!


Monday, April 10, 2017

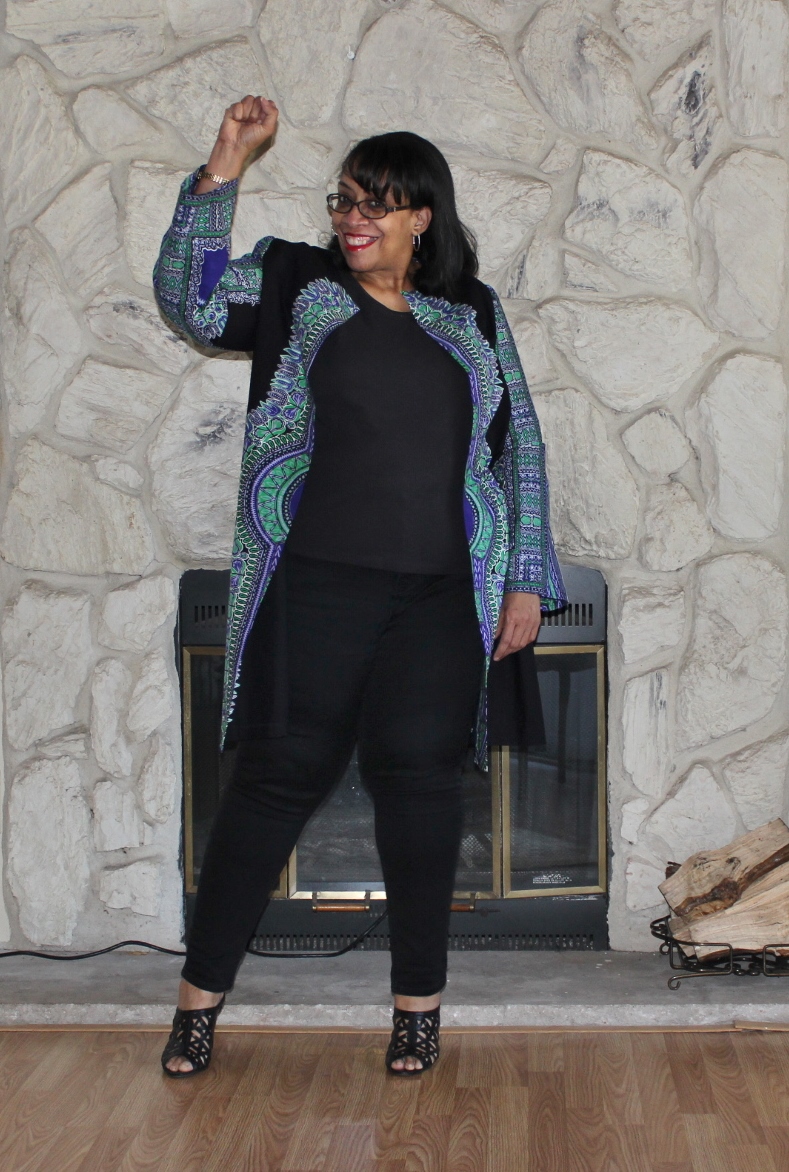
McCalls 7481 and some Dashiki Fabric

It's getting warmer and to celebrate that fact, I'm starting to sew spring. Since I bought this fabric to #CarriageCornerSewCamp and didn't get to work on it, I decided it should be the next thing up in my sewing queue.  So in that spirit, I started a topper to be worn with jeans and a tee or a tank top!


My Inspiration ~


I follow the singer Monica Brown on Instagram and loved this topper on her and thought it would be cool to add one to my wardrobe. Monica's dashiki jacket is made by DashikiPride.  

After looking at their pieces, I knew I could make my own. So I convinced Marcy to meet me at AKN Fabrics on Broadway to shop for some African Fabrics and bought this one home with me.


The pattern ~

I chose McCalls 7481 as my starting point and I made a couple of alterations to the pattern.

1. I added 5" of length to the front and back pieces. 2" at the lengthen/shorten line and 3" at the hemline.


2. To the front and back pieces I added an inch at the sides - grading down from a 1/4" to a full 1" at the hips.

3. 5/8" seam allowance was added to the back to make use of the print.


4. I also made facings since the pattern calls for the jacket to be lined and I wasn't lining this lightweight cotton jacket.

5. The pockets were omitted. I never put my hands in my pockets in a jacket like this so I left them off.

Honestly it doesn't close over my body in the hip area but since it's not made to close, that's fine for this time. If I want to use the pattern in the future, I'm going to need to add some more space so that it closes around my body.

A few pictures of the jacket ~


...and one more cause let's "Fight the Power!"


Conclusion ~
It's something new and part of my "I can wear anything I like" wardrobe. I love the dashiki print and may buy some more in the future since the African Fabric Store is only a couple of blocks from me. For now it's one of the first pieces of my spring/summer wardrobe and so I'm happy to be sewing for spring!

...as always more later!


LinkWithin

Related Posts with Thumbnails