Sunday, February 20, 2022

Who Am I?

Hi, my name is Carolyn, even though my online name for the last 16 years has been Diary of a Sewing Fanatic. It's not Caroline, Carol with or without an e, or Carolyne...but most especially it's not Caroline.  I was born the year after Caroline Kennedy was born.  At that time, the Kennedys were a beloved family.  Many people thought I should be honored to be named after Caroline Kennedy. But my parents didn't name me that, my name is Carolyn.

I love three things - sewing, reading and Barbies.  I've been sewing for 52 years and my love to sew has been well documented here. During that time I've sewn everything...coats, lingerie, wedding & prom gowns, tops, pants, tees, jackets, clothing for my children, grandchildren & ex-husband, and loads and loads of dresses.

While I can sew well, I do not tailor.  Nor do I care much about patternmaking/design, draping or quilting.  I just like to sew clothing.

My First Love is Fabric...

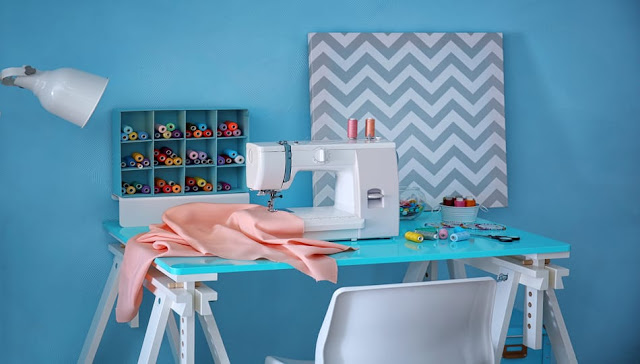
The thing I absolutely love the most about sewing is fabric. I'm sure my grandmother, who sewed herself and taught me to sew imbued her love of fabric in me.  My first sewing projects were Barbie clothes. The fabric I used was one of her recycled Church dresses. I still remember that fabric 52 years later because it was so amazing.  It was one of those early 60s dresses. A basic sheath dress made from a beautiful navy blue silk.  The overskirt was a beaded and embroidered navy silk overlay. 

I knew she'd outgrown the dress but didn't know why it was in her recycle bin. Her recycle bin was full of everything in the house that no one wore anymore. All of that was cut up and incorporated into the quilts and throws she made for the household.  Everything was reused.  Nothing was thrown out.

Every summer until I was 12 was spent with my grandparents on their 5 acre farm in South Carolina.  When I came home from that particular summer my Barbies had an amazing wardrobe that I'd hand stitched using the remarkable blue dress as my fabric.  Barbie's wardrobe had dresses, pantsuits, a jumpsuit and an amazing duster from the embroidered overlay piece.  My love of sewing, fabric and collection sewing was born.

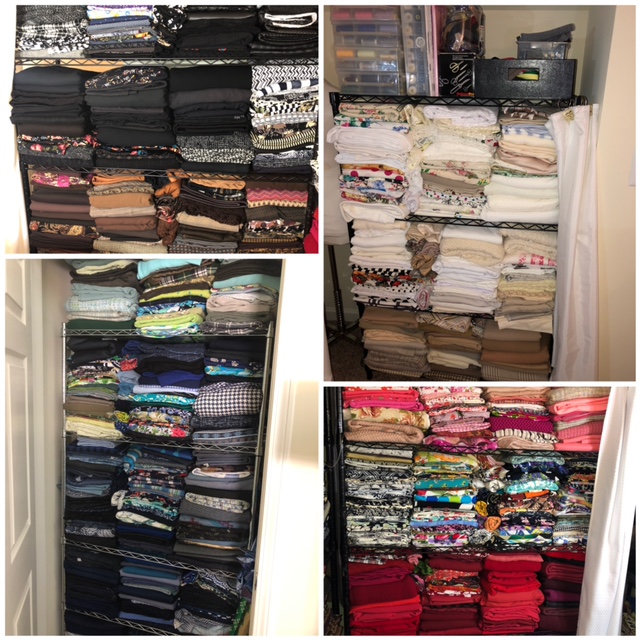
Seriously, fabric is everything to me as evidenced by my collection.  I understand that to some it could be overwhelming to own this much.  But to me, it's my comfort zone...my creative outlet...the place where I begin my sewing journeys and what I continually add to.  My fabric buying did decrease some in the last couple of years. Moving, packing and unpacking, will do that to you. However, I still love my collection and now I add special pieces to it, trying to buy more discriminately.

The Resource Center houses not only my fabric collection but also my notions,  button & trim collection, as well as, my pattern collection. Honestly, I have a hard time giving away patterns. It's like I'm giving away hopes & dreams and creative possibilities. Now this doesn't apply to fabric or trims. Those I willingly share. I just tend to hold onto patterns...so my collection is DEEP!  

Also, I use to sew ALOT.  Turning out 50-60 pieces a year.  I don't sew that much anymore.  Some of it is circumstance. Some is I no longer need to fill my life with sewing to dispel the things I didn't like in other areas of my life. Some is that the pandemic has reduced the amount of time I spend outside my home. As we're moving forward now, I'm living a hybrid life.  Time at work and time at home so my clothing needs have changed. 

Books are my Second Love...

I love a good sewing book! I've collected quite a few of them and still reference them when I need to solve a sewing challenge.  There are multiple ways to learn to sew now but books are my touchstone.  It's the way I learned and what I still reach for when I need something.

Next...

I'm on vacation until March 1st. I'm really tired since I'm finishing up two large projects at work.  Also spending a lot of time commuting to NYC is draining. I've definitely lost my commuting chops.  


For this sewcation, my intent is not to pump out a lot of garments. Since going back to work, I'm discovering pieces I haven't worn in the last two years that still fit (Praise God!) and some that don't.  Those pieces will be donated. I don't have this great need to add a lot of winter pieces to my wardrobe. I want to use this time to sew whatever comes to me...well to me from my list of course! LOL!

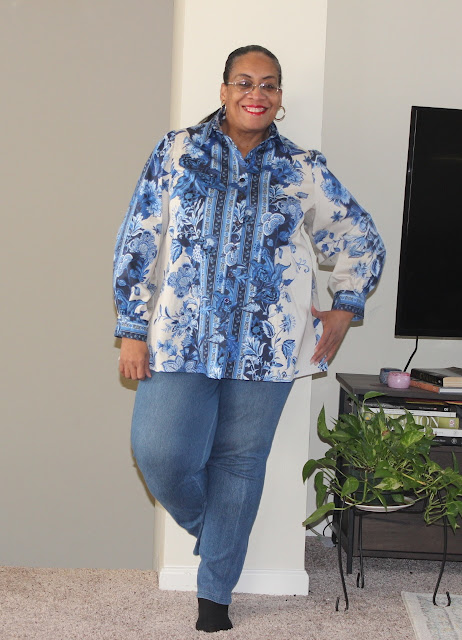
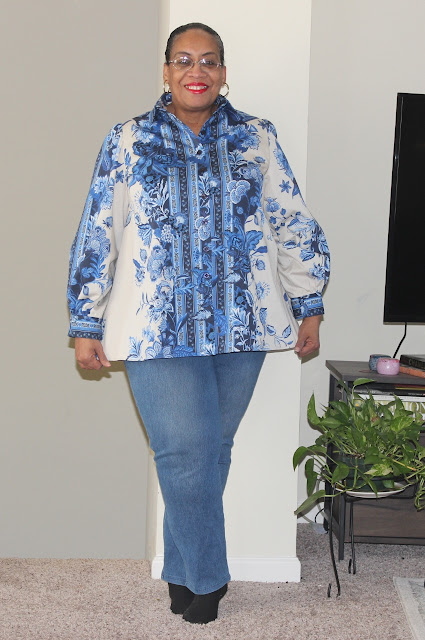
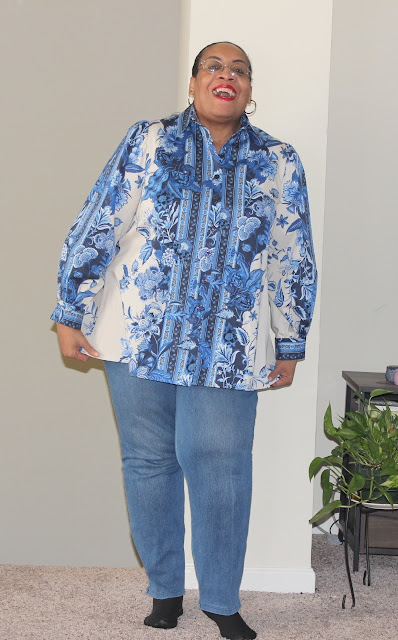
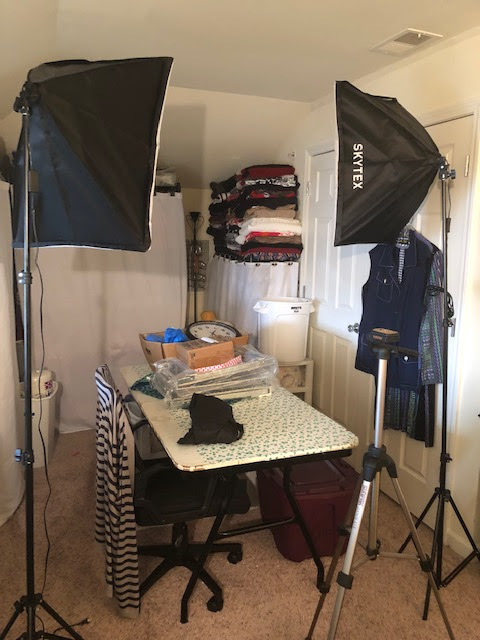
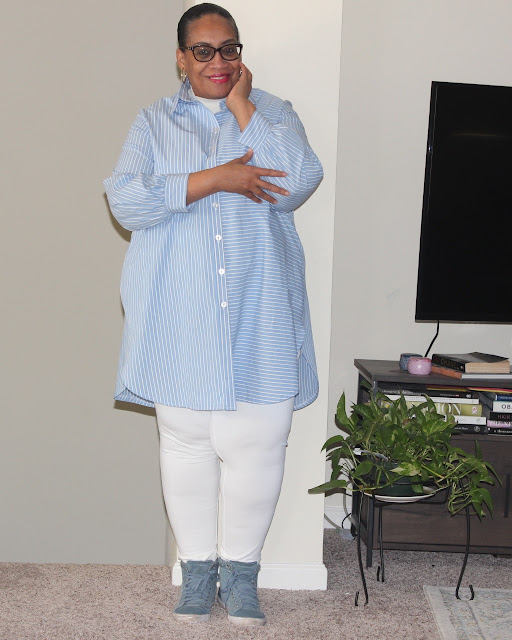
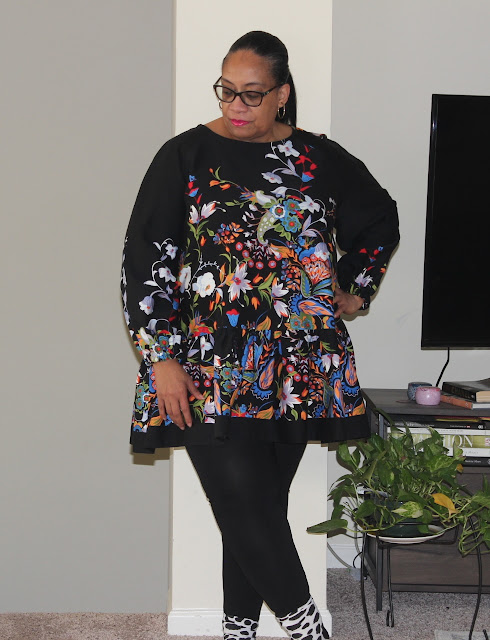
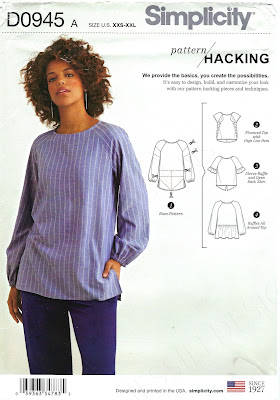
I also have two shirts that need to be photographed and blogged. I was so busy and tired that I was vegging on the weekends instead of spending quality time with my sewing machine.

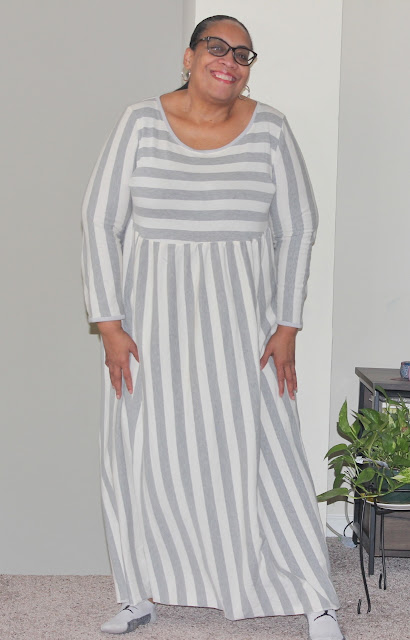
Finally, is it just me, but the desire to sew lovely spring dresses is strong with me. The days are are starting to get longer and it's not pitch dark at 5pm anymore. This year we seem to be having more warmer days interspersed with cold ones. So my thoughts are turning to spring sewing.  How about you? If you're in the Northern Hemisphere, are you still sewing winter or are you thinking about putting the heavy fabric pieces away and delving into those frothy, light fabrics for spring?


...as always more later!


Thursday, February 03, 2022

A Mood Borderprint Shirt

If you're on IG you know ads and reels rule our feeds. Whatever you show the most interest in, IG aka Meta aka Facebook picks it up and sends it back to you in a multitude of ads. I've learned not to click the ads because then one ad begets another ad and it's like rabbits multiplying.

I will admit that I don't mind the online fabric company ads, though. While 90% of the time I don't click through or make a purchase, this fabric is the direct purchase of an ad and a fellow sewist, Karon. Her IG handle is Cookeka. Yeah, y'all inspire me with your makes too! 


The Fabric ~

This borderprint showed up in my IG feed as a sponsored post. I was really intrigued by it but when I clicked in the blue that enticed me wasn't available. So I clicked out but every time the ad showed up, I checked to see if the blue was back in stock.

When it finally was in stock, I purchased four yards to make a shirt. I always buy more of a border print than I need for a standard garment. You never know how much you'll need to get the design idea you imagined.

Pattern ~

I started with my TNT shirt pattern back yoke and gathered lower back (Vogue 7700). The fronts are from Vogue 8722 (which I've used before) because I wanted solid front pieces that wouldn't interrupt the print. Collar, under collar and cuffs are from my TNT pattern which started life as Butterick 5678

I'm definitely pulling from patterns I've used before to get new looks. While I know there are new shirt patterns out there, I'm not trying to refit new patterns, especially when I know these pieces all work for me.

Cutting out the Fabric ~

As you know, cutting out a borderprint is the most important part. So I took my time to get the look I wanted. Using Karon's shirt as an inspiration, I cut the main border piece down the front so it would match at the center fronts.


Then since I was using the yoked back and gathered bottom for this shirt version, I cut the on the fold piece by centering the fold on the fabric.
 
o Pinned it on the fold line. 
o Drew around that piece.
o Then flipped it and drew around the other side before cutting it out. 
o This way I made sure the border print was perfectly centered in the center back of the piece.


The sleeve was cut with the border print down the center of the sleeve.  While the yoke, collar, under collar and cuffs were cut on the yardage featuring the the border print.


Construction ~
There are no new construction techniques used in this shirt. If you need to know about how I sew these shirts, all of the links above will take you to posts that detail my shirt construction.  The only thing I did do was change the thread during construction.  Dark navy blue in the border print areas and ivory in the other areas.

My buttons are dark navy blue purchased from Cedar Goods Dry Lane in PA during the last Sew Camp.  I deliberately chose such dark buttons so they would melt into the print. I wanted to highlight the border print.

A few photos ~


Conclusion ~

This is the first of three border print shirts I worked on during my holiday break. I know at $17 a yard that this is bordering on the high end of what I normally pay for shirting fabrics.  However, this shirt was worth every penny for the drama and affect it's giving.

I am culling, as in giving away, and altering some of my older shirts.  The more traditional closer fitting ones are going.  A few of the gathered back ones, need arms enlarged because everything about me is bigger since Covid. This go round I want more interesting shirts, different fabrics, larger more vibrant prints, nothing totally traditional since that's not my lifestyle any more.

I'm also going to make several different types of shirts, tops and blouses.  Things that will work over leggings, jeans and capris for summer.

One more cause I love this one ~


Another border print shirt is up next...


...as always more later!


Monday, January 31, 2022

January 2022 Monthly Recap

Januarys are usually a good month for me because I normally have time off during the holiday to sew.  Of course that sewing gets featured in January. Though in 2021 my sewing output was drastically reduced because I was still recovering from surgery.  Actually it seems like most of 2021 my sewing was reduced but the pandemic affected so many of us in so many different ways...

A few things ~

- I did have 10 amazing days to create at the end of December which was lovely.

- I've been living in my apartment for almost 18 months and have my creative space working well for me now.

- I spent weekends pre-cutting so all I would need to do is sew during my holiday break. A game changer that made me feel so productive.

- I finally feel like blogging again which is great since  I've become unenamoured with Instagram! 

- Most importantly I've set up my photography lamps in the Resource Room (though I've yet to use them) and figured out the spot I like to take photos in my home besides the Resource Room.

(I will take the table down when I'm ready to take pictures)

So what did I share this month ~

Share because some of these things were started or completed in December 2021 and some completed and finished in 2022.

1. The Floral Borderprint Simplicity 8658


2. The Housedress Chic Collection - (so named by my friend Wanett)

3. Vogue 9299 in stripes

Six garments in one month is MAJOR for me these days!  Next month will kick off the Borderprint Shirt Collection. I'm also taking a few days off around President's Day and will be sewing for my sanity. So more garments to come because I'm revamping my closet this year to reflect who I am now.

Going Forward in 2022 ~

There were also two great conversational posts this month.

This comment by Towanda from "Sewing to Save Money" really touched me and several other sewists.

"Most of the benefits of sewing can't be measured in terms of cost. Sewing allows me to use my problem-solving skills and keeps my brain busy. It is relaxing and serves as a therapy session. It soothes my soul during stressful times. Some people are alive and uninjured because I can retreat to my sewing room. There is a sense of satisfaction when an outfit that turns out how you envisioned it. I can't imagine not sewing."

I want to thank everyone who participated in the discussions on this and the other post. I love these conversations and hope to foster more of them in 2022. 

Finally I want to thank everyone who has hung in with me the last two years when posts were slower to post and share. I so appreciate your continual participation. My hope is to blog and sew more in 2022 especially since "Pandemic Times" has become our new normal.


...as always more later!


Thursday, January 27, 2022

Sewing to Save Money

That title is a controversial subject in the Sewing Community.  Probably because the prevailing wisdom is that you do not save money sewing for yourself. So how did this become a thought expressed by many non-sewists.

That answer is easy, because in my generation, sewing did save you money.  Sewing machines were prevalent in all households and clothing and home goods were repaired until they couldn't be. Then and only then did you venture out to purchase new.  Clothing for both adults and children were altered to hand down or reuse...and since new clothing was expensive, it was cheaper to make your own instead of buying new.

Back when sewing was a part of every junior and high school curriculum and valued as a life skill, there were no H&Ms, no Century 21s, Walmart's, Amazon or any of the other current places where fast fashion is sold.  You either paid hard earned money for it, made it yourself or had it made for you.

Most small towns had a local fabric store...not Walmart's. Where you went and purchased a pattern, fabric and notions to take home and make your garment.  Simplicity, McCalls & Vogue were the patterns offered. Simplicity was the easiest to use and Vogue Patterns more advanced with designer offerings. As an aside, I remember how proud I was when I purchased my first Vogue Pattern and the clerk at the store asking me if I was ready.  I was 17 at the time and it was Diane Von Furstenberg pattern. Back in those days, you could purchase fabric from the major department stores like Macy's and Marshall Fields...because as a young working woman I did!

For years, well into my middle age, sewing did save me money on clothing for me and my girls.  Yes, I did own a sewing machine (mid-range that I saved for) and a serger (a Christmas gift from my Father), a very small stash of fabric and patterns (because 99cent pattern sales hadn't been marketed yet) and a few notions. Dayum I remember when our local fabric/craft chain, The Rag Shop, put patterns on sale 2 for $5 and you could only buy 4 at a time.  I would make one purchase, go out to the car settle my stuff in and then head back in to buy 4 more.  That was big savings in those days!

And Lord when I found a Fabric Mart ad in the back of a Threads Magazine which I didn't subscribe to because it was too expensive an output for a year's subscription - well at least my ex-husband thought so!  So I bought them bimonthly as I could afford them. Anyway Fabric Mart had an ad for a mail subscription service where they sent you FREE fabric samples and the last page was the bargain page.  Yards of quality fabric for $1 a yard.  Y'all my work clothing came from those back page for YEARS!

All this to say that I understand where the thought comes from AND I do believe even now you can sew to save money. It's a lot smaller than what presently consumes our lives.  We didn't own a multitude of tools and honestly you don't need to.  You don't need several patterns from EVERY pattern collection that drops from the Big4 or several of the Indie patterns.  You don't need thread in every hue, yards of stabilizer in every weight, a multitude of pressing tools to create beautiful garments. You don't even need a collection of fabric to sew ~ yes, I'm pointing at myself with that one.

You need the basics:

- A good medium priced sewing machine and if you can afford it a medium priced serger

- A good pair of scissors or rotary cutter

- A good cutting mat IF you go the rotary cutter route

- 1 package of good hand sewing needles

- 1 multi package of sewing machine needles

- A tape measure, seam gauge, pkg. of multi purpose pins, pin cushion, some marking tools

- A package of basic thread (the collections they sell now)

- 4 spools each of black, grey, white serger thread

- A good sewing book and access to You-Tube for other sewing videos

- A couple of yards of fabric

Photo Credit:  The Sewing Korner

You can create quite comfortably this way.  I did for years minus the YouTube portion.  I had an Iron and Ironing board and got creative with towels and dowels (leftover from my Father's workshop) to use for pressing. I had no sewing room and kept my tools in a plastic bin (not even a sewing box because the plastic bin was cheaper) under a folding table that was put up in the corner of my dining room.  Everything was stored under that table and the sewing machines were covered so they weren't noticeable.  Probably why I can't bring myself to cover my machines now...but I digress.

All of this to say, that you can't sew to save money is a point of view.  Like many things in the Sewing Community...it's just a point of view...whether you agree or disagree.  BTW, I did write about this 11 years ago on the blog.  Linking to the blog post here if you want to see a cute picture of my youngest daughter. Interesting that this is still a discussion in the sewing community, though.

So thoughts?  Stories to share about how you learned to sew vs. how you sew now? Do you have a lot of tools or do you take a more sparse approach? Have you always had a sewing room? Finally do you need all the bells and whistles to create?  This is the Question of the Day so talk back to me...


...as always more later!


Monday, January 24, 2022

Playing with Stripes

This shirt is inspired by a fellow sewist, Pauline, who's IG handle is Jamaican Princess 215. I wanted to use a shirt fabric to make another version of the Vogue 9299 tunic. I've got loads of these "business" type shirting fabrics in the collection, so finding ways to use them for my lifestyle now is an ongoing challenge. Using the fabric for this tunic is more reflective of who I am now.

Because I chose to use a stripe shirting, I got to play with the stripes. It's the part that really excited me about using it for this tunic. It also went along with the fabric journey I was on using various borderprints to create new looks. 

Supplies ~

3 yards cotton shirting from the fabric collection via Fabric Mart

10 buttons from Nancy's Notions in Lancaster, PA

Pattern - Vogue 9299 

This is my fifth version of this pattern. I've made it enough times now that's all about playing with fabric to make each one different. I also changed up the sleeves on this one. The previous four had elastic sleeve hems. I added a cuff to these sleeves from my TNT shirt pattern. I wanted to pay homage to the fabric and give it more a shirting tunic look.

Because this one is made from shirting fabric it also fits a little closer than my previous versions. Adding a layer under it (the sleeveless turtleneck top) also made a difference. Finally it's always amazing how much fabric can change how a garment's made, wears and fits.

Ultimately, my goal is to have a wardrobe of these that I can wear in all seasons with either leggings, jeans or capris. It's comfortable, easy to wear and covers my body which is important to me. I have one more to share and then I'm giving the pattern a rest. At the end of 2020, I bought several indie and Big4 tops that I want to try.

So a Few Pictures ~


Conclusion ~

This is one of my holiday vacation sews. I got it to the point where it needed buttons and buttonholes and it sat. While I probably won't wear this until it gets a little warmer out, it did need to be documented.  

I have one more Vogue tunic on my cutting table in a quilting cotton borderprint that I bought from Zooks in Lancaster, PA during the August Sew Camp at Carriage Corners B&B

Next up are more holiday vacation sews. If you've been following along, you know I love a borderprint.  I made a couple of shirts using borderprints which are fun and interesting. Can't wait to share these with you!


...as always more later!


Wednesday, January 19, 2022

Adding to my Housedress Collection

During the winter I primarily work from home. I hate commuting in the cold and snowy weather so being able to work from home daily is perfect for me. Being home, I tend to wear house dresses. Or in my case comfy maxidresses when I don't have a lot of meetings. I do tend to dress (shirt/blouse & jeans or leggings) when I have a day full of zoom meetings but primarily house dresses are worn. Since mine were getting ratty, I was on a mission to add some new ones in a couple of different styles. 

So the premise of these dresses are well put together, comfy yet casual dresses to be worn to work from home. One thing...this post is photo heavy because I included all three dresses I made using this pattern combo in one post. 

I made this dress exactly five years ago...

...and I wore it to death finally relegating it to a nightgown/housedress. When I saw this ad on Instagram this summer, I knew I wanted another one or two!  


So I saved the ad and am just finally getting around to making more. To make my version of this dress, I started with the top of the Cashmerette Washington Dress and added the long sleeves from Cashmerette's Pembroke top. This is truly taking pieces of patterns I like and making them into the garment I want.

In this post I'm highlighting the first three versions I made ~

The first one is a grey/creme knit purchased from Fabric Mart last spring


The second version is a tie-dyed french terry purchased from Fabric Mart's online store last fall.


The third is a solid black bodice and striped skirt.  The bodice is made from a black poly/rayon/spandex knit from StyleMaker Fabrics.  The skirt is made from a rayon poly knit from Fabric Mart's brick & mortar store.  Purchased during Carriage Corner Sew Camp last August.


One thing to note ~
I was 45 lbs. lighter in the original maxidress than I am presently. Which is really interesting because I still wear the dress to sleep in - probably because the knit top has stretched and pilled. I started with a size 26 bodice for these versions instead of the size 22 I last used, because of my weight gain.

I'm also using the Pembroke sleeve pattern because Jenny updated her sleeves for wider arms in her newer patterns. This sleeve works so well in my Pembrokes that I made it work for these dresses.

The skirt is 88" wide and 42" long.  Basically I cut 3 yards in half, then cut off several inches from each side to take in some of the width.

The Grey/White Striped Version ~

Supplies ~
4 yards of a cotton/rayon knit purchased from Fabric Mart last spring
Knit bias binding gifted to me by Jenny several years ago

Construction ~
The defining factor of this dress is the stripe matching on the bodice. I took a lot of care to insure that it matched all the way across the bodice. 
  • Cutting the back pieces with a seam instead of on the center fold of the fabric.
  • After cutting basting the pieces together to insure the stripes matched
  • Then machine stitching them with a large basting stitch
  • This put the construction order out of whack
  • When it was time to put the sleeves in, I unpicked 2 of the stripes so I could sew the sleeves in flat.
Using this method insured that the stripes continued to match across the bodice and matched 80% at the bodice and sleeves. I'm fine with this. I used all of these techniques to make an upscale house dress.  Yes, I know...overkill!

A Few Pictures ~


The Yellow Tied Dyed "French Terry" Version ~

I recently bought some French Terrys from Fabric Mart. I loved the tie dyed colors. However, I was a little disappointed in the weight of them when they arrived. They felt more like ltwt. rayon jerseys than the French Terrys I'd touched in the store. Honestly, I wasn't thrilled with this purchase but decided to use the yellow for a house dress because bright color on dreary winter days.  

I'm glad I chose it because even though it's lightweight, it is comfortable, easy to wear, feels like a big warm hug and works for my work from home life. This one was a straight sew. I used no special techniques because the fabric needed none.

A Few Pictures ~


The Black Solid/Striped Version ~

I was putting fabric away when my hands touched the fabric used in this dress.  I was actually in the middle of finishing up a shirt and the urge to make this one was so strong that I set the shirt aside.  I mean there will be another sewing weekend when I can finish it right?

The fabric that I used for this one elevated it. Because I used a knit with more rayon in it, I did something with this one that I didn't do with the first two. I added bias tape to the shoulder seams and to the waistline seam. Specifically I added an iron on bias tape to the waistline thinking I definitely didn't want this one to stretch out of shape.

Well, I almost can't get into the thing because of that. The waistline is so rigid it's bordering on tight.  I'm hoping that with it's first washing maybe some of the tape will wash out...but I'm not counting on it...because I encased the bias tape with a serge finish. That beautiful gathering is basically pressed than serged in...*sigh*

Some photos ~


Conclusion ~
My goal is to get a two week work wardrobe of house dresses. I made one in 2020 out of ponte that's still going strong. Now I can add these three. I also have two more patterns that I want to use to add some variety to my house dresses. One thing I've realized is that I will never spend as much time as I once did in an office. So I need to have a good work from home wardrobe now.


...as always more later!


Saturday, January 15, 2022

Making Allowances for Age

I've been sewing since I was 11 years old. In the last couple of years, I've noticed some things related to my age that affect my sewing and what I make.  I understand if you're in your 40s this probably won't pertain to you but as a sewist that's aging I'm determined to write about MY sewing journey. Honestly there aren't many of us out there doing so.

There have been some adjustments made to what I create and how I sew.

First let's start with lighting:

I have ALOT of it because it makes completing tasks easier. Moving my sewing room to the dining room with the huge window and all of it's light is the first plus.  I have overhead lighting and my sewing machine has amazing lighting (a reason to upgrade your equipment right there) and I have task lighting behind both my sewing machine and my serger.

Behind the sewing machine...

The light above the cutting table

All of this lighting is necessary for me to see the small details. I mean I know I need to upgrade my glasses but lighting is essential to me being able to see and sew well. 

Saw this meme on Instagram and thought it was appropriate to share cause it emphasizes my point.

Buttons, Zippers & Closings:

I've been making a lot of shirts & tunics lately that button down the front and have cuffs that button. There are two things I've changed.  One I now use a bigger button than the pattern suggests because it's easier for my hands to button and unbutton. Age gives some things - wisdom and takes some things.

I rarely put buttons on my cuffs anymore. It's easier to slip my hand into the cuff than it is to button and unbutton it.  Just don't care what really constitutes a proper shirt - comfort and ease is king in my world.

I realize that some of us are challenged by back zippers and prefer side zippers. I haven't reached the stage yet where I can't undo back zippers but understand the necessity for a side zipper.

I don't do button and loop closures at the back neckline for the same reason. Especially since I have no one to help me dress...and once it comes undone it's a total PITA to get it rebuttoned. It's why I change things to zippers.

Zipper lengths are longer than the pattern suggests.  If I can step into a dress or a top and then zip it up, it works better for me. I get lost in clothing that I have to slip over my head to get on and off. That's a firm NO for me.

Looser Garments:

I honestly am more comfortable in looser garments for ease of movement than tighter garments. Again ease of movement, ease of getting into and out of are the reasons why.

I like knit pants for the same reasons. Pulling them on and being done is preferable to a button and zipper at my belly. Especially after I had surgery, pants were a real challenge and since I've always preferred a dress, ease of movement again is the reason why.

Using the same silhouettes over and over:

At this stage of my life, I know what works for my body and flatters it. I've sewn for years and made just about everything so that's not the challenge for me anymore. Making stylish comfortable clothes in pretty colors, prints and stripes is my concern.  I'm standing firm on this one. Cause what's the point of creating if I don't make things that work for me.

I will probably touch on this more this year on the blog because it's important to me that our demographic, older sewists and our needs are addressed and available for anyone seeking that information.


...as always more later!


Monday, January 10, 2022

A Floral Borderprint Simplicity 8658

These next posts will share my holiday break sewing. Being that it's winter, bright sunny days are hard to come by...as well as my desire to get out my camera equipment and experiment to get some photos.  Yeah, yeah I know dressform pictures are okay BUT you and I both know that pics on a person are much better!  

Introduction over...let's get to the good stuff!

I saw so many great versions of this pattern on the socials.  Even though it's only sized up to an XL, I wanted to try the pattern out.  So this blog post should be called, "More Adventures in Pattern Alterations!"


While this pattern has been available since 2018 and is still on their website, I of course am just getting around to making my own version.

Some Details...

Fabric:  

Cotton Sateen border print purchase from Fabric Mart's brick 'n mortar store during Carriage Corner Sew Camp.

9" black invisible zipper

3/4" elastic for the sleeve hems - the pattern recommends 1/2" - I only had 3/4" on hand

Of course there were some pattern alterations...

The finished hemline was 55" and I needed a little more room. I altered the front and back pieces by using a pivot and slide method, then cutting open the side seam to give myself the needed room.  I added 17 inches because I like alot of wearing ease and a looser fit these days! 

Pictures of the alterations below...

I added 9" to both pattern pieces by increasing the side and center back area.  


  1. I also added 9" to the ruffle sides and 2" to the hemline. 
  2. I wanted an extra flouncy and full ruffle so the added inches covered not only the amount I added to the front & back pattern pieces but also a little extra.  This is probably the only kind of flounce I like! 
  3. Also important to me was getting full body coverage with the tunic.
  4. I did not alter the sleeves. I normally have enough room in a raglan sleeve and this time was no different.

Some construction information...

  • I used a border print cotton sateen for this version and the fun for me was in the tetris problem solving to use the print to its best advantage! 
  • Also, my reminder that the best finish is solved during the cutting process.  This is the part that takes the longest and sometimes tests my resolve but it's so worth it in the end.
  • I do not lay out all the pieces and cut them at once.
  • The main body pieces are cut first and then the other pieces are cut around them so that I get the best match of the print.
  • My only other change was to add a 9" invisible zipper in the back neck. I just don't like button & loop closures.
  • Otherwise I sewed it according to the pattern instructions. I usually follow the pattern instructions on a first sew! LOL!

A Few Pictures ~


...you always need a twirling photo!


Conclusion ~

I'm definitely sewing this again, in all honesty I already own the fabric for it. I love the flounce and the length. In this version, I also like how the end of the border print formed a perfect border/ribbon like hemline. It's perfect worn over a pair of leggings and works well with my new relaxed style.

I completed five garments during the break and I have one more almost done. So as the sun shines, I will get them up here on the blog. My sewing was the perfect start to 2022.  It allowed me to claim my creativity back, calmed and soothed my soul and added a few new pieces to my wardrobe!


...as always more later!


LinkWithin

Related Posts with Thumbnails