
I really wanted to make the duster. I started out making the duster. I got to the point where the collar and front facings were on and it looked like a jacket. Thank goodness I had enough fabric leftover to cut out the sleeves...to make the jacket.
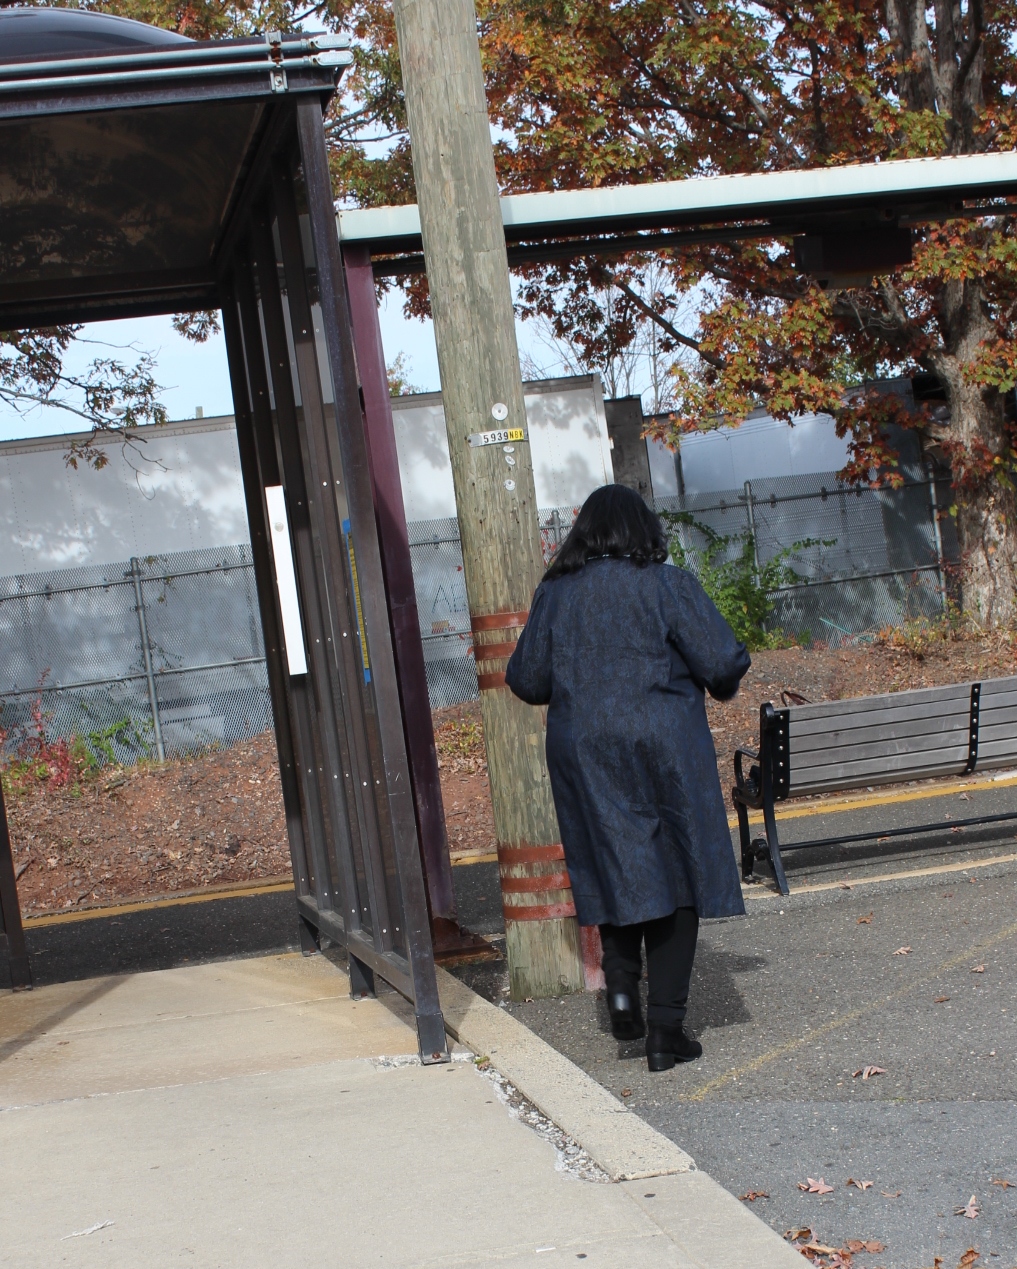
First a picture of the finished jacket~

The Pattern - Simplicity 8303 ~

Next a supply list ~
5 yards of a printed denim purchased recently from Chic Fabrics
1 yard of paisley printed cotton purchased from Mood Fabrics
5 yards of blue/white/black piping from Daytona Trimmings
A couple of yards of me made bias tape
1 elastic for the button loop
2 - 2" silver D rings from Pacific Trimmings
1" silver shank button from the collection
I made no pattern alterations. I cut a straight size 24 knowing that the jacket is supposed to be loose fitting. The only sewing change I made was to take wider seams at the front and back princess seams to narrow the shoulders. I will fix this on the pattern pieces so it will just work for the next version.
Cost to Make ~
The coat cost $54 to make. Not inexpensive but not exorbitant...and well worth the time and effort to make it. The fabric was $35 for the denim and cotton stretch paisley. The notions cost $19 with the piping taking up most of the expense.

Design Decisions ~
I really didn't want to change much design wise on this pattern. At first I played with adding some epaulets to the shoulder seams to make the jacket look more trench-like but when I decided to add piping to the front and sleeves, it seemed a tad too much.
Here are the touches I added to make the denim jacket uniquely mine:

Piping:
I added piping to the collar, the fronts, the overlap and on the sleeves. There are no tips on how to apply piping in this post because I've detailed how I add piping to garments on the blog before.
Bias Binding:
I really wanted to add bias binding to the exposed seams on the jacket. However, after putting the back together and topstitching it all down, it looked so nice and neat flat that I discarded the idea of adding it to the back seams. One of the side seams is covered by the front facing so I decided to press the side seams forward and topstitch them down. That only left the front facings exposed and that's where I decided to use the bias tape.
I haven't actually made my own bias tape from scratch in years. I could have gone to the sewing library but I wanted a tutorial that everyone could use and found a great one here. It's from the website, Make It, Love It. The instructions were easy and simple to follow and what I used to make the bias binding.
Sleeves:
I will admit that I have fat arms from the bicep to my elbow. Because of that I need to fix almost every sleeve I insert into a garment. Every.Single.One.
First thing was to measure the width of the sleeve and it's just a little too small. Now I could go through making the bicep larger but look at my first sentence. I have to add width all the way through. So I chose to use a sleeve I knew would work. I pulled the sleeve from my blouse pattern to start with...I went through my normal stages of making a pattern sandwich and adding the width. I also removed some from the sleeve cap to make an allowance for the extra width at the sleeve edges.
I cut the cuff part off and added 5/8" to the sleeve and the cuff. This was done to add piping to the sleeve hem. Once the piping was applied and the sleeve and cuff were sewn together. Then the sleeve was sewn into the jacket.
After inserting the sleeve into the jacket, I hated the extra wide seam allowance and serged it down to 1/2" wide. It gave the sleeve edge a clean finish and made getting in and out of the jacket easier. But I noticed when trying on the jacket that the tops of the sleeve were collapsing. So I added a shortened sleeve head just to the sleeve cap so it wouldn't buckle. A shoulder pad would accomplish the same thing, I just didn't want to add one.
Belt:

The belt was made according to the instructions but I added rows of stitching down the length of the belt. Again another detail that no one will really notice but something that I really wanted. Honestly I didn't think that I would wear the belt and never made the belt carriers for the coat for that reason. However, after we took the pics...I really like the belt!

Finishing:
I cut 3" off the bottom of the jacket because it was lower midcalf length and once I switched to a jacket, I wanted it a little shorter.
For the sleeve hems, the hem of the jacket and the belt, I sewed multiple lines of topstitching. Because of the print of the denim, you can't see this topstitching but I'm fine with that. I know it's there and it weighs the hems and stops them from shifting. The duster has side seam slits. I omitted them for the jacket.
And if I haven't peppered this post with enough photos here are a few more:


Conclusion:
First a shout-out to Gaylen who put up with my bitching for three weeks as I made this! Second, thanks to all the Instagram Peeps who opined about piping and which one to choose. Finally, this pattern is an easy sew. Of course, adding piping and deciding to add sleeves at the last minute added some time to it's construction but I'm so thrilled with the final garment!
I plan on using the pattern again to actually make the duster. I have some lighterweight, flowy fabrics that will accomplish what I want so hopefully I will get to it before the winter is over!
However, now I have a brand new denim jacket to wear for fall/early winter and spring. A sweater will go under the jacket and it will go great with jeans or leggings. Also, I'm kinda in awe of the fact that I got this jacket made...
...as always more later!

This is so lovely! I hear you on the long projects, but this one looks so worth it.
ReplyDeleteI love this! The style suits you perfectly. I actually got this pattern to make for my mom, and yours is a great inspiration for when I get around to making it!
ReplyDeleteVery nice coat Carolyn.
ReplyDeleteNice coat--you look great in it!
ReplyDeleteGreat job. It really looks good on
ReplyDeleteSo stylish! Looks great. Worth every minute of sitting at the machine wondering what you were thinking of when you started it. This is a win.
ReplyDeleteCarolyn,
ReplyDeleteThis may be one of my favorites! The coat is perfect in every way. The denim is perfect, the piping is perfect, the length is perfect. And the location for the photos is perfect as well. I am so glad you made it a coat and did not stop at the long vest. I imagine you will get lots of wear from this coat in fall and spring when the weather is cool but not cold. Fantastic job.
PS. I love it with the belt.
ReplyDeleteAwesome trench and looks great on you.
ReplyDeleteBeautiful! Love it! The piping really makes it!
ReplyDeleteThis is a fabulous coat and i love it belted too. It looks expensive!
ReplyDeleteThat's a fantastic coat! It's comforting to hear you talk about how you prefer faster projects, even though you are very capable of more intricate things... sometimes I feel bad for liking simple things when technically could probably handle more! I love the piping, and I agree - the belt is the icing on the cake!
ReplyDeleteHonestly I'm still rebuilding a wardrobe - quicker projects equal faster items on my back. Most of what I made my first year of casual sewing is either worn out or has been given away...so I still feel a little pressure to get things made.
DeleteThis looks fantastic!
ReplyDeleteIt looks great on you. Would,nt mind making one myself.
ReplyDeleteIt's been a while since I saw a finished product and said to myself: I NEED that pattern.
ReplyDeleteWould have looked right past it.
And now I will need to brush up on my piping skills too...
...Beautiful and practical-fabulous work...Bravo
I can't even tell you how much I love this. You followed through and it's amazing. It looks great with the belt and without. But the pictures! You and Aggie did a wonderful job. I love the location, the train and you look fabulous. This coat was an epic make you and honestly, you didn't whine that much!! g
ReplyDeleteWow! This is so fashionable and "you" besides inspiring!
ReplyDeleteSuccess! You couldn't buy one this nice. : )
ReplyDeleteEEK! I love it! The piping is gorgeous. Swoon. It fits perfectly...I'm glad you went jacket with this one!! Though I'm sure your duster will be awesome too.
ReplyDeleteLove it and all the unique touches you have given this.
ReplyDeleteYou took a good pattern and made it great.
You look fabulous x
you made a jacket! fantastic look and great pics. very NYC chic!
ReplyDeleteI love it! Very eye-catching...the kinda coat if I saw you on the street would wonder where you bought it. The belt and the piping really adds to its 'eye-candy' affect. I understand about time-consuming projects, but this (in my estimation) was worth the extra effort. As a plus sized woman, I don't see this type of coat in stores. Now I know, me and Mrs. Janome need to get committed to produce a winner like this.
ReplyDeleteRobin - you are right about not seeing this type of coat/jacket in RTW...and I don't understand why? I mean if my materials cost me $54 and they retailed this coat/jacket for $150 it would sell. Maybe not WalMart piece numbers but quite a few numbers nevertheless. I hope you make this pattern...cause I have duster ideas floating around now and just need time to make it!
DeleteSo nice to see you posting Robin! I’ve missed your regular blog posts.
DeleteThis is perfection. All the time you spent on it definitely paid off.
ReplyDeleteMaybe this year I will get around to a coat--just in time for spring, I'm sure. Yours is wonderful!
ReplyDeleteLove it!
ReplyDeleteOooh- I love this! The shape is great on you with the belted waist, and the piping is such a lovely detail. Worth the effort!
ReplyDeleteWhat a wonderful coat! You look absolutely amazing in it.
ReplyDeleteYour jacket looks beautiful on you! The piping was a wonderful addition!
ReplyDeleteWow, Carolyn, this is fantastic! It's my favorite garment you've made this year. You've styled it perfectly with the boots and the piping adds so much personality. I know many of your faithful readers will be copying this jacket. Karen
ReplyDeleteBeautiful coat. Looks super on you. Piping is good.
ReplyDeleteGorgeous coat!
ReplyDeleteThis is stunning! Im sure you will get lots of wear out of it.
ReplyDeleteCarolyn, this is a great looking duster! All of your design ideas really makes this look way better than the pattern envelope pictures. Great job as always.
ReplyDeleteCarolyn, this is superb and very flattering on you. Your added touches (piping, top stitching, sleeves) really make this special. Enjoy wearing this.
ReplyDeleteVery nice. LOTS of work with all that piping. If your blog header new? Love it.
ReplyDeleteNancy - I think I changed the blog header about 6 months ago...so no not new.
DeleteThis looks fantastic and I really love the piping. Your version is so much more inspiring than the pattern envelope.
ReplyDeleteAllison - you've known me for a minute now, when do I evah sew things that look like the pattern envelope! *LOL*
DeleteYou did a wonderful job making this coat. This looks the nicest & best fitting of any I have seen in many years - even those from expensive stores. The fine touches you speak of adding are part of what makes it a designer item. They say the clothes make the person - this coat enhances your beauty with its beauty.
ReplyDeleteLate to say how wonderfully stylish you are in your new coat! What an inspiration you continue to be for all us hidden, painfully slow sewists.
ReplyDeleteAfter seeing your version I realize the pattern picture doesn’t do justice to the pattern ... I would have never picked that up. Your version is stunning and I love the piping
ReplyDeleteI love it!!! I never would have thought about making a denim trench. So versatile and chic!
ReplyDeleteSigh. I desperately need a light weight jacket/coat and this is certainly perfect. I procrastinate on jackets since they are so time consuming. The belt looks great better than without it. It really looks good on you and the piping takes it up a level. Very nice.
ReplyDelete