Showing posts sorted by relevance for query border prints. Sort by date Show all posts

Sunday, July 14, 2019

Border Prints - Why I Love Them

I've written about my love of border prints and how to sew them before.  You can read those posts here and here. This post is about how they've made an impactful appearance in my wardrobe lately.

My latest garments made using border prints

As you can see, I've been on a border print roll lately. Why do I love border prints so much?  Because of the challenge they present when using them...because of the possibility of making something different and unusual...and because they dare me to look at a piece of fabric in a new and interesting way.

I know the most common use of border prints is at the bottom of garments just like the border lays on the fabric. But I love it when you move that border around and place it in areas where you don't normally see a border. I love using garments with several pattern pieces to get the best use out of the border print. And I especially love the puzzle of fussy cutting a border print and how it causes you to think outside of the box!

Border prints aren't easy to find. You have to search for them. Recently they've become more popular but aren't still readily available. You can find them in quite a few different fabrications. I've purchased them in everything from ITY knit, silk and even wool. I've made skirts, dresses, shirts, maxidresses and jackets all using border prints.

Simple skirts ~


In maxidresses ~

At the top and bottom of the dress


Running a border print down the side of a maxidress ~


I even did a series of shirts using border prints.


My collection of border prints run deep in my fabric shelves... 


When I see one I like, I ALWAYS purchase it even if I have no idea what it will become. To me border prints are like 4 leaf clovers ~ magical, mystical and worth searching for. That's why right now I'm working on two more garments using border prints. They will be coming to the blog before the month's over.

So how about you? Do you like to sew with a border print? Do you look for them when fabric shopping? Or are they elusive like a fabric unicorn? Let me know. I'm interested to see if I'm the only sewist in love with the magic of a border print.

...as always more later!


Saturday, July 05, 2014

Working with border prints

My Smugglers Daughter dress/Vogue 8972 bodice is made using part of a border print. The next dress I want to sew using my Milly fabric will also be made from a border print.  And over the years I've made quite a few garments from border prints.  I will of course detail how I'm using/cutting the border prints in both dress blog posts but today I thought I would share some border print resources with you.

I've searched my blog and even though I've expressed my love of border prints, I haven't really discussed how to sew with a border print.  There are a few brief tips included in this blog post, but I really want to share some references both in print and online.   Why share links and magazine articles? Because honestly why rewrite what has already been done so well.

Magazine and Book sources...

The first one I always think of when I need inspiration is a Sew News article from 1992.  Of course, I can't find an online link and somewhere in my moving I've lost the first page of the article with the article's title but what I have is inspiration enough just from the pictures/drawings included.


Does anyone know if Sew News has an online or web based archive of their older magazine articles? I have quite a few that I've cut out and saved from older issues but would love an online resource or DVD source similar to the Threads one to access.


Next, an older Threads article, "Border Prints on the Move" by Joyce Gale in the May 1996, number 64 issue is a very detailed article on what border prints are, how to lay a pattern out, examples of how to effectively sew a border print and the most interesting quote to me...

"To place a border print just where you want it, you can cut the pattern apart."


A newer Threads article, "Border Crossing" by Judith Neukam in the April/May 2014 number 172 issue, has great photographs on how to use border prints to achieve the look that you desire.  However, the other Threads article has more detailed information, so if you can get your hands on the older article I highly recommend it.

Before I move on, I'm going to put in a plug for this awesome sewing publication that is a fantastic resource for the home sewist.  Not only can Threads magazine be accessed on your tablet - android and iPad/iPhone - but they offer all of the issues on DVD and in a new web based edition.  Finally there is "Threads Insider" that is a web based resource offered for a yearly subscription price. 

In full disclosure, I own every Threads issue between the Threads archive DVD that's on my computer (for the early issues) and the subscription that I've had for the last 20 years.  One of the things that my daughter (the only one that sews) treasures is my Threads collection. Even she flips through it occasionally to learn something new.


Claire Schaeffer's book, Fabric Sewing Guide - 2nd Edition, has an entire chapter called, "Prints and Border Designs."  In this chapter, Claire discusses how to use a border print. She gives a border print sewing checklist, as well as, a section on how to plan the garment, picking a pattern, layout and seam finishings.

I think this is an essential book for every sewist to have in her library and would like to encourage you to purchase a copy if you don't already own one!

Now what if you only want online sources...

My first choice would be a $3.99 seminar from Sandra Betzina at Power Sewing. Her Episode 91, Unusual Techniques for Border Prints is a winner. Packed with loads of helpful and usable information for the price of a coffee from Starbucks but accessible for 30 days, this is an amazing resource.

Another resource would be this blogger who used border prints in what I think are an interesting way ~

The Sewing Lawyer - What to do with a border print? 

There are loads more, these were just the two that caught my eye when I did a Google search. I hope that some of this information was/is useful to you. I know that I reread the original Threads article to assist me with placement for my Smugglers Daughter dress.  More details on that soon...


...as always more later!


Wednesday, October 17, 2018

The Border Print Shirt Series

Shirts are my jam. I REALLY love sewing and wearing them. They've become my new "dress" and since I run a pattern into the ground...you know I'm sewing shirts with my TNT shirt pattern.

Backstory ~
I've been on a fabric buying binge. I've been using fabric to self medicate against the cares of the world. To slow down my fabric buying tendencies, I'd set myself monthly yardage limitages. Well in the last couple of weeks, I've purchased my fabric limit for October and November. The only good thing is that the purchases have totally inspired my makes for the next couple of weeks.

It started with this Rifle & Co. border print from Stylemaker Fabrics ~


...which I'm sorry to say is no longer on the website. However, this seems to be a pretty popular print so I'm sure if you google it, you can find it on another site.

Then I bought these cotton border prints from Fabric Mart ~


...as of now two of the fabrics are still on the site here and here. The other two are sold out.

With these border prints in hand, I realized I could make some really interesting shirts by manipulating the border prints. Since I own four prints a series was born. I mean the challenge of using the border prints creatively just made me salivate.  I spent a couple of days during the weekend working on cutting out these prints. 

So why this post? It will probably be a couple of weeks before these shirts make it to the blog. By then the last of the cotton border prints will be sold out, just wanted to give you an opportunity to purchase some of these fabrics yourself. Also, to let you know what I'm sewing next.

Next completed garment up on the blog is the Simplicity 8700 jacket. I've been working on it for a couple of weeks and I think it's ready for prime time now.

...as always more later!


Thursday, May 06, 2021

Black/White Border Print Shirtdress

As you know, I started making some late winter/early spring shirtdresses using my TNT shirtdress pattern earlier this year. This one was also finished in late January/early February but got buttonholes & buttons the first weekend in May. Dragging my feet much! LOL!

This fabric was purchased in April 2020. Before I bought it I was talking about it with Gaylen and she was so-so on it. But I saw something in it and went ahead and purchased it.  Then I found this dress online at Lane Bryant that was made from my fabric and I was so thrilled!

While I like how Lane Bryant used the print to emphasize the waist and hemline. I chose to use it a little differently.  I love h
ow a border print gives you so many opportunities to manipulate the fabric. It's what I love about working with them.

Supplies ~

4 yards of a crepey ponte knit purchased from Fabric Mart

1/2 yard of 1/4" elastic from the notions collection

11 1/2" black & white buttons from the button collection

Every supply used was already in the Resource Center.  Nothing was recently purchased to make the dress. I love when my collections work together like that!

Working with Border Prints ~

If you've been following me for awhile you know I love border and panel prints. I've sewn with quite a few and own a lot more of them. I thought I would drop a few tips I use to decide what to buy and how to use them.

Buying first ~

I look for border prints that can be used in more than one direction.  There are a lot of border prints out there that are only on the bottom of the fabric. If they're too directional, I don't purchase them.  Mainly because the print works best at the bottom of a garment. I'm looking for more versatility.

o A larger border print draws my attention faster than a smaller one.

o A mixed print & stripe or varied prints really makes my heart sing.

o Fabric content usually doesn't matter...I will figure out a way to use it!

Using them ~

My most important tip is to think outside the box and use it in a place that will really make it stand out.  A collar, a cuff, button band, insert into a side or back seam...somewhere it makes an impact...brings a little drama.

I have a rule of three.  Meaning that wherever I use the border print it has to be duplicated 3x in a garment. I also like odd number of uses over even uses.  So this meant creatively cutting the collar and collar stand with the stripe.  That way the stripes would appear at the top of the dress, the hem of the sleeve and the hem of the dress. Thus tying the fabric pieces together.

I've written a blog post highlighting my love of border prints and how to use them here if you want more information.

Construction ~

There are no new construction techniques in this make. This is a TNT sew using the fabric's border print to make it different from all the other versions. The changes I made were to...

o  Lengthened and widen the sleeves to get full sleeves with elastic in the sleeve hem

o  Cut the fabric so that the border appeared on the collar, sleeve and skirt hems

o  To emphasize the border print I cut the back skirt in half so I could match the border all the way across the bottom.

o  Used my standard button front opening on the skirt bottom. A 1.5" fold over of the fabric to match the front facing on the bodice. 

A Few Pictures ~


Parting Shot ~

My new complex has amazing green spaces. From my sewing room window, I can watch people walk their dogs, kids play and ride their bikes, and my neighbors do yoga as well as take their daily walks. There is an amazing hill that the kids sled down during the winter and my daughter took these pictures at the top of the hill.  Of course I had to take my high heeled wedges off to walk down the hill!

All of these spaces are steps from my front door and I appreciate it now that spring has arrived. No more figuring out the best naturally lit spaces in my apartment for photos...giving me time to set up a space in my "Resource Center" to take pictures when the cold dark times return in 8 months.

Finally, I'm headed back to work in my office 2 days a week - whichever 2 days I want.  I haven't decided whether to do Monday & Wednesday or Wednesday & Thursday but it's inspired me to sew again.  Now that these are finished, I'm going to be hitting up the cut pile to make some of the spring/summer pieces I've cut out.  I'm happy for spring.  I'm happy I will be leaving home and I'm really happy that people are getting vaccinated so I can leave home! Thankyouverymuch! *LOL*  


...as always more later!


Thursday, November 04, 2021

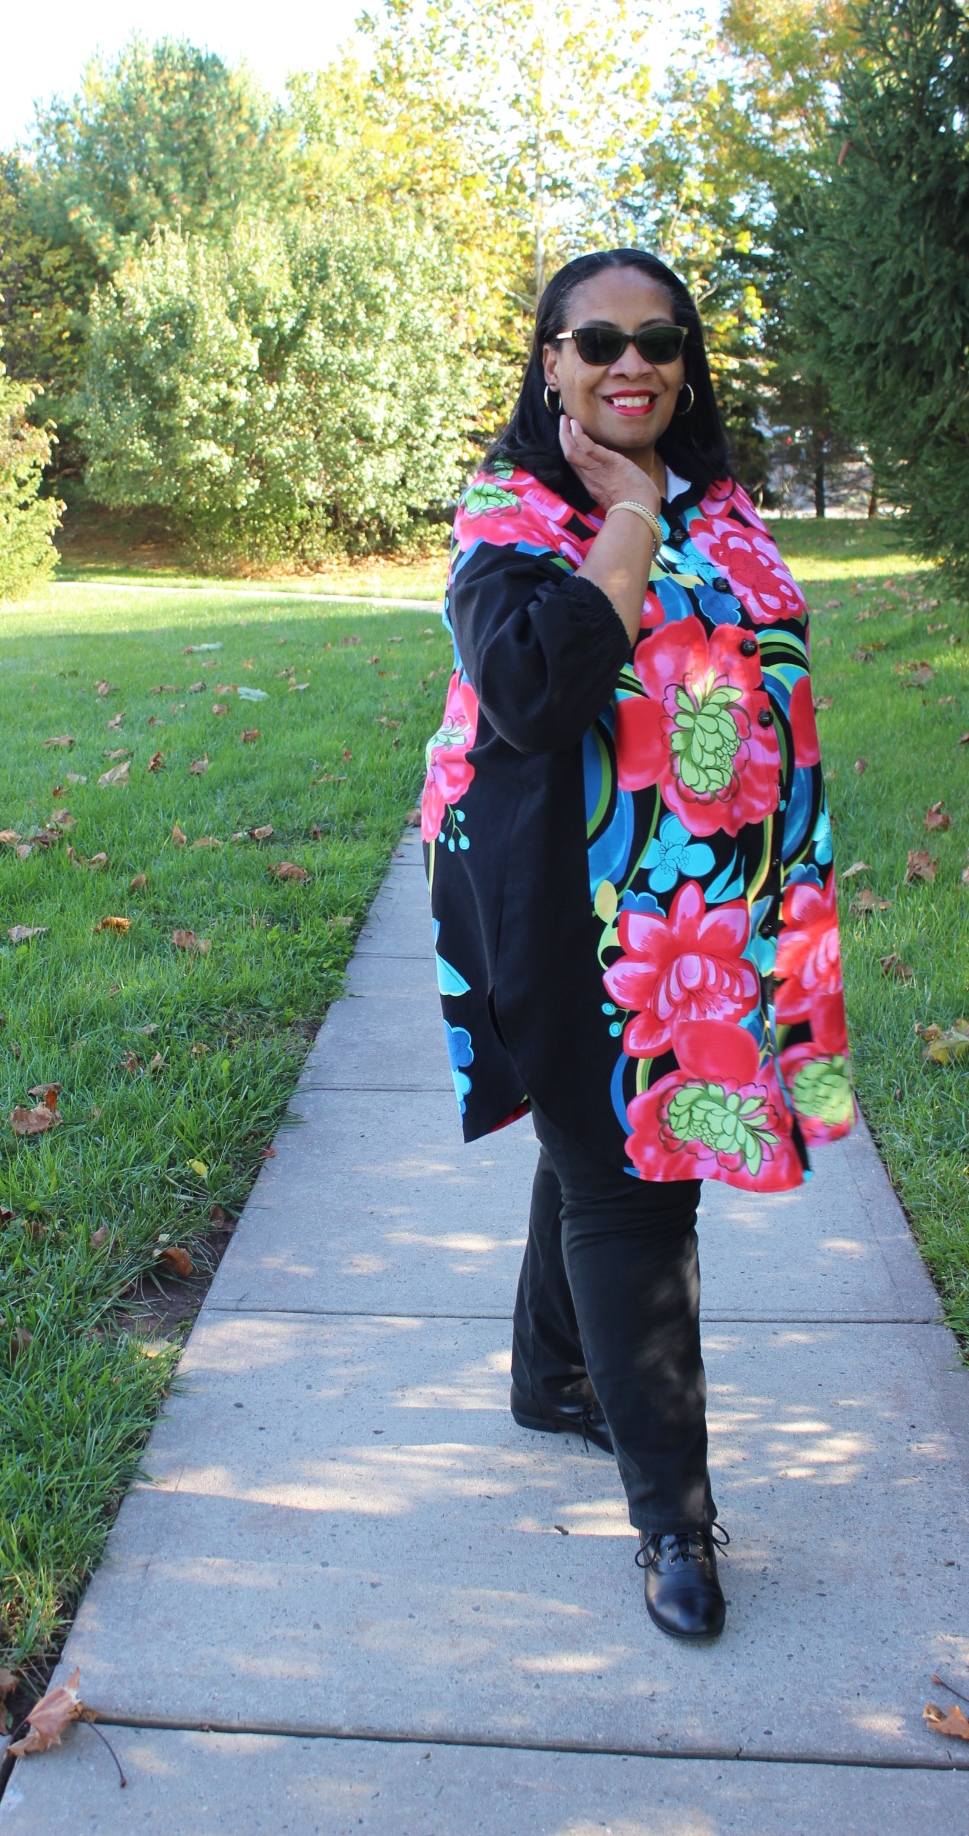
Panel Print Magic

This shirt has been finished for weeks. It's taken time to get another appointment with my daughter to photograph it. Technically it should have been photographed with the last bunch of summer dresses but that day was so dayum hot, I just couldn't handle wearing it for pictures.

Y'all know I love panel prints, border prints, directional prints, any fabric really that makes me think outside the box when using it. So of course in August during the Fabric Mart shopping spree, border and panel prints were on the top of my purchase list. I've recently acquired quite a few border/panel prints from Fabric Mart and many have made it to the blog ~ here, here, here and here.   Also, if you're new to the blog, I've written several blog posts about working with border prints, just follow the highlighted link.

For this panel print, it was the bold floral that called my name. It was such a strong calling that I sewed this up weeks after I got home. 

Supplies ~

Pattern:  Vogue 9299

Fabric:  6 cotton sateen panels from Fabric Mart's brick 'n mortar store

Buttons:  12 black domed 5/8" buttons from MJ Trimmings

Interfacing from Steinlauf & Stoeller

There are no new construction techniques in this make. For this tunic it's all about the fabric placement. 

So I'm sharing some of my construction/pattern placement pictures...

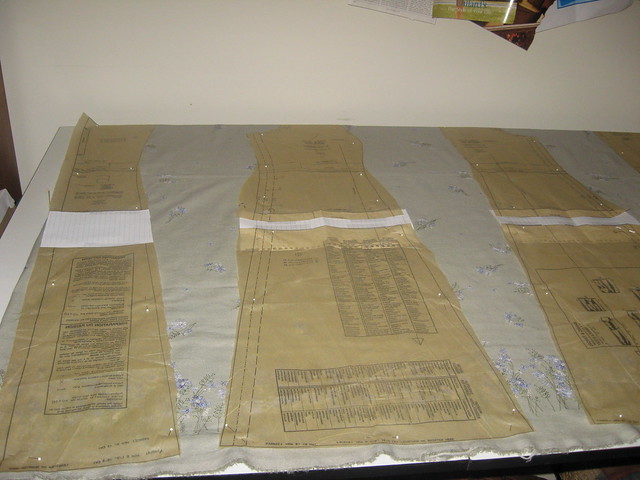
Laying the pattern pieces out to get the best placement

Matching the print on the back

Matching the print at the sleeve cap to the shirt body

Front using a sliver of the black fabric 
to add contrast to the front

Back with the yoke added to it

A Few Photos ~


I've worn this tunic to work and received a couple of compliments on it. The tunic makes a dramatic statement that's tempered by the solid black sides which add a slimming effect to it. This is the reason I love border prints and panels so much! 

It's not the last time I will use this pattern this fall/winter because it works perfectly for my lifestyle. I have more ideas using prints & stripe placements to make it sing! Plus can you really have too many comfortable tunics that layer well during the chillier weather?


...as always more later!

Thursday, July 14, 2011

A few sewing tips...

Let me start this post with a disclaimer...these are things I do to make constructing a garment go smoothly for me.  I feel that there is more than "one way to skin a cat" so if it differs from another method that you've read about or used, please feel free to ignore my techniques.

One - sewing with busy prints:
A main thing that I try to avoid when using a busy print, is the bullseye effect.  You know when some part of the print (especially circles) land right on your bust points.  To counteract this effect, I trace an entire dress or top front.  Then I lay the pattern pieces down on a single layer of fabric.  After making the front pattern piece, I then place it on top of me and stand in the mirror to mark my bust points with x's.  That way when I lay the pattern piece on top of the fabric, I can move it around (making sure that grainlines are kept intact) until I find a spot where the pattern/bust points/fabric design work best.  Yes, this requires a little extra fabric but you will eliminate the bullseye effect.


marking the bust points on a pattern piece

bustline on the dress front


Two - sewing with border prints:
Lately I've made quite a few garments with border prints.  They are fun to use and create a wonderful effect on a finished garment.  So here is my main tip on working with border prints.  Trace off right and left sides of a top, dress or skirt pattern and lay them out singly on the fabric.  I usually start with the center front piece of a dress/top/skirt, then lay each side piece beside it,  then the back pieces.  I try to leave small spaces between the pattern pieces so that the border print flows seamlessly.   I also double check several times before cutting out.


Now these are my tips, but to me the best tutorials on how to work with border prints and print fabrics have been written by Gigi of Gigi Sews.

Three - sewing with knits:
I don't sew with knits as much as many others do since I prefer woven fabrics.  However, when I do, to me what can make or break a knit garment is cutting it out.  So I pin the selvedges together the entire length of the piece several inches apart.  Once the fabric is pinned, it tends to behave better (well  at least for me!  *LOL*).  Then after it's lain on the cutting table, I smooth it out working from the pinned selvedge to the fold, this insures a perfectly smooth surface to lay the pattern pieces on...and this works for me every time!


Finally, a couple of brief things:

a.  Keep a supply of interfacings on hand.  You never know when a fabric will buck against a favorite and prefer something different.

b.  Keep a small supply of silk organza on hand.  It's a great substitute for interfacing in some woven garments as well as the scraps make great pressing cloths.

c.  Develop a source of online internet suppliers for things like zippers, bias binding and even sewing machine and serger needles.  Ordering in bulk can cut down your costs and many times these items are always in stock, versus the trip to the local craft store or Hancocks where you can return home empty handed.  Several of my favorites are Atlanta Thread, Newark Dressmakers Supply, Home Sew and Nancy's Notions.  It's nice to have everything on hand when you start a project.

d.  Have several different types of pins.  I know this might seem like a silly one but do you really want to leave holes in a silk garment because you had the wrong type of pin?

e.  Finally, here is a link to my piping tutorial.  HTH!

Okay, I hope I answered a few questions that have been left here on the blog and sent to my personal email account.  If not, or if you have more questions, please feel free to leave them in the comments section.

...as always, more later!

Friday, October 26, 2018

The Rifle & Co "English Garden" Border Print Shirt

I know Rifle & Co prints are big - HUGE! Quite a few sewists have made some beautiful garments using fabric from this line. While I like the prints I've seen, I've never felt like I NEEDED to own one...well not until I saw this one on Stylemaker Fabrics site. I was honestly bowled over by the border print which is how this shirt came to be.


There is nothing new in the construction of this shirt.  I used my close-fitting TNT shirt pattern with the shirt tail hemline for this version. Initially I was going to use the TNT shirt with the gathered back. However, after thinking about it, the border print would be more impactful in the closer fitting shirt. So that's what I did.

I'd like to discuss one thing I do in making my shirts regarding the button bands. On some shirts I use the foldover button bands. On others, I've cut it off and replaced the band with a sewn on band. 


What I'm saying is that I don't interface this band whether it's folded over or sewn on. Recently there was a popular sewist on Instagram saying that you had to add interfacing to the band, that the three layers of fabric was insufficient. 

I've made over a dozen shirts now using this fold & turn method and never had a problem with buttonholes being wonky or the buttons not being stable on my shirts. So why did I bring this up? Because there are several ways to sew things and no one way is always the "right" way. Try out a couple of techniques and see which one works for you. Then use what works for you.

Materials Used ~
4 yards Rifle & Co Empire Garden cotton border print
Interfacing from Steinlauf & Stoeller
10 1/2" 2-hole navy blue buttons from my button collection

Design Details ~
First I've used border prints before. I really like working with them and collect them whenever I find them. Here's a blog post I've written about sewing with border prints.

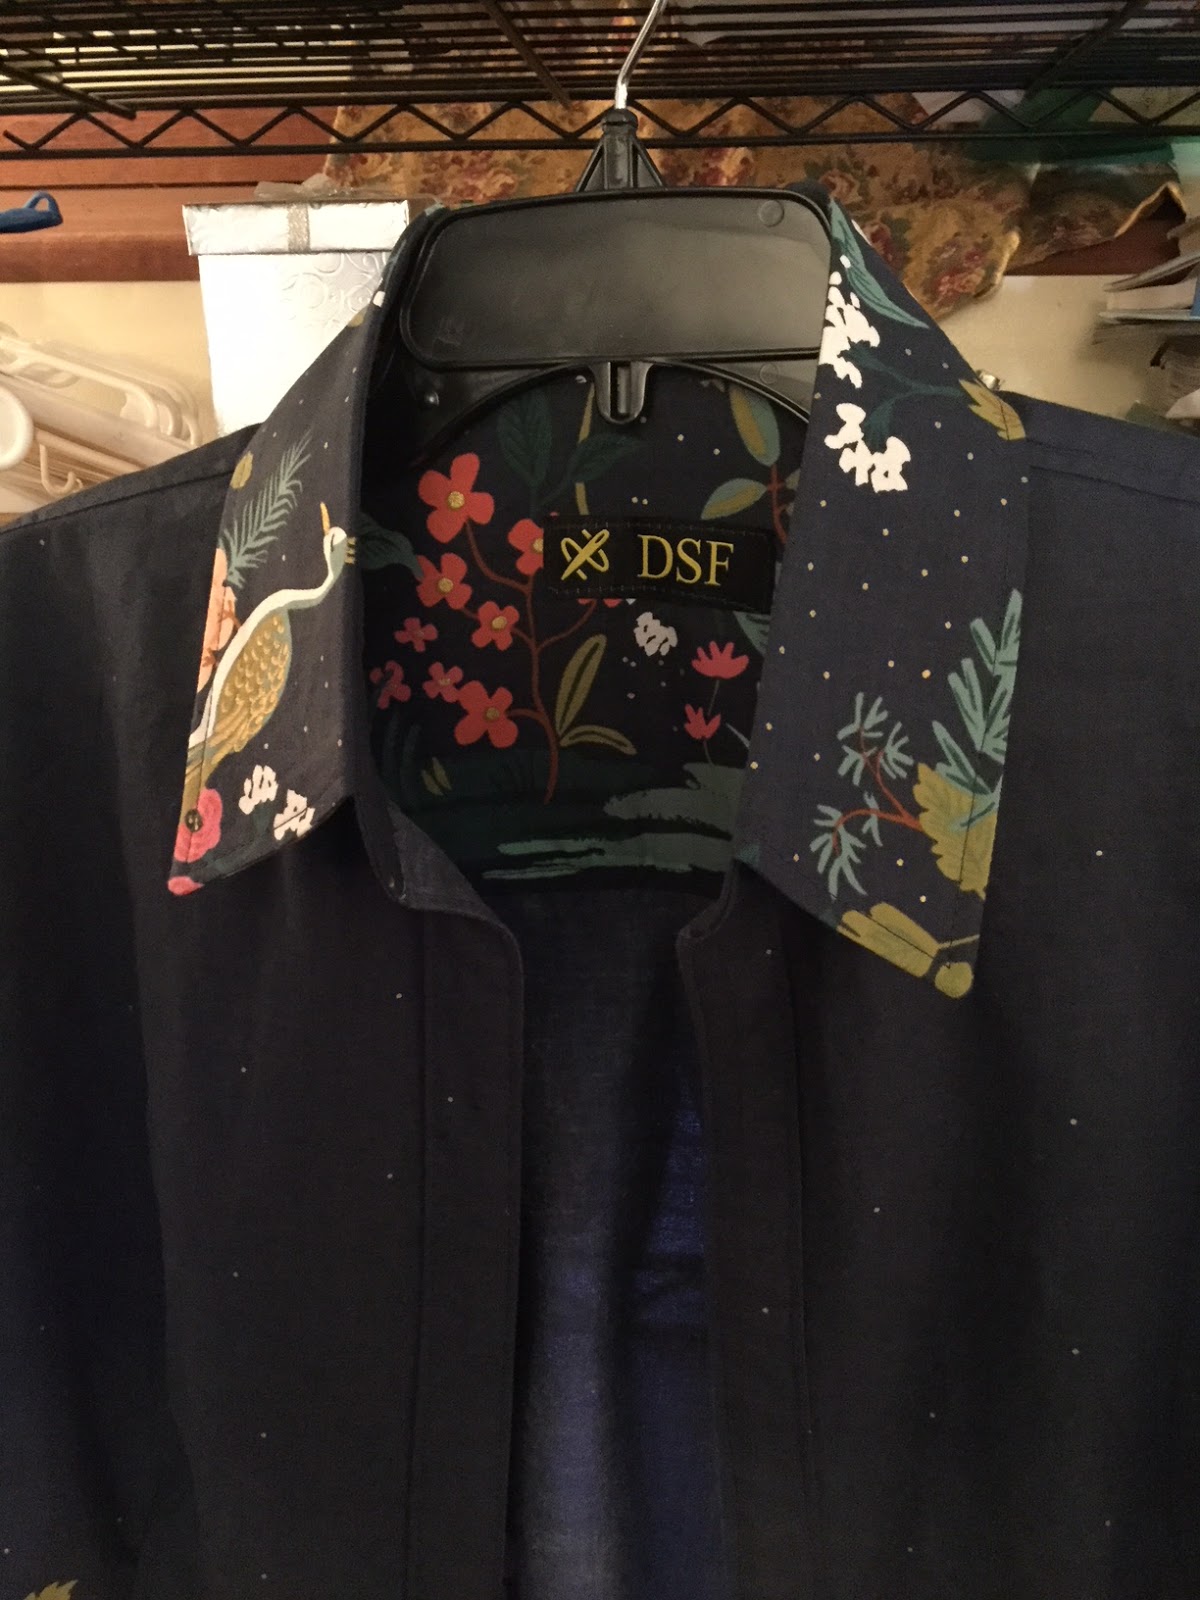
This shirt has no exceptional use of the border print but I didn't believe it needed any. This is a bold print that uses a large portion of the fabric. My decision was how to make the print work best for me. So the body of the print is along the bottom and mid-body for this shirt.  

The sleeves and back yoke were cut from the starry portion of the fabric. 


Collar, cuffs and the inner back yoke were cut from the border print.


This allowed the shirt to showcase the border print with the maximum effect.   

A few pictures ~


Conclusion ~
This is the first shirt completed in the border print shirt series. I have a few more left to make before the series is done.  Next up is a cotton sateen border print shirt made from the Fabric Mart fabric haul recently purchased.

...as always more later!

Sunday, August 19, 2007

Summer of the Dress - No. 8

I originally titled this post "Border Prints" but then I realized that this is like the 8th dress I have made this summer, I thought this title was more appropriate.

For this dress I am revisiting Vogue 9220 and using one of the border prints in my collection to make it. Personally, I love border prints. Whenever I find an interesting one in a color and print that I like, I buy it. No hesitations, no questions, just slap down that credit card for as many yards as I can afford! Border prints usually linger in my fabric collection longer than most other fabrics because it always needs the perfect pattern to showcase its beauty.

I found this embroidered rayon/linen blend at Fashion Fabrics Club last spring. FFC had it in several colorways but I really liked this sage and a navy version. The fabric is 60" wide with an embroidered garden print at the selvege. I purchased 4 yards of this fabric and put it away to wait for inspiration to strike.

After carting around the latest Sew Stylish magazine last week, there was one idea that keep coming back to me...the blouse with the tie. I loved the fact that the Editors took the bodice top and made it into a blouse and then made several modifications to the blouse neckline. You would think that this would inspire me to make a blouse (and I probably will make that blouse when the pattern arrives in the mail) but mostly I kept seeing Vogue 9220 with the ties at the neckline. I went through various sleeve modifications in my mind and had not settled on a definitive sleeve treatment by the time I sat down to work on this dress. I did cut out sleeves but as you can see I never used them.


I made several changes to the pattern to get this dress:

1. Since the neckline is pretty deep, I omitted the center back zipper. Okay, I did try "The Ladybug dress" on first to make sure the dress would go over my head without a problem! *smile*

2. The entire dress is cut on the cross grain and the pattern pieces were carefully laid out to take full advantage of the embroidered border print.


3. I added the tie by using a pattern piece from Vogue 8118 which I made last summer. However, I made two changes to the tie pattern piece...first, I lengthened the pattern piece by three inches. And then I folded the pattern piece in half and after pinning it down to the fabric added another inch to the width. This did not make it as wide as the original pattern piece but it wasn't as thin as it would have been just folded in half. So why did I even bother to change the tie piece? Because I wasn't happy with the tie on the original blouse. It is a little large and floppy at the neckline when I wear the blouse and I didn't want to duplicate that with this dress.

4. The tie was attached to the back neckline of the dress matching center seams. The part of the seam that wasn't encased in the tie was pressed, clipped and top stitched.


5. Originally I was going to add sleeves to the dress but when I tried it on I really liked it sleeveless. I own a lacy lilac cardigan sweater that I made several years ago that coordinates with the dress so I will wear that with it when the air conditioning is overwhelming.
6. The hem is not hand or machine stitched. I did a sample on a scrap but the hand stitching and the machine stitching affected the border print so I steamed in some Stitch Witchery (industrial strength!) for the hem. It actually makes the hem stiffer and weights it.

So this is my nod to pattern modification as inspired by the Fall 2007 issue of Sew Stylish!

Saturday, January 04, 2025

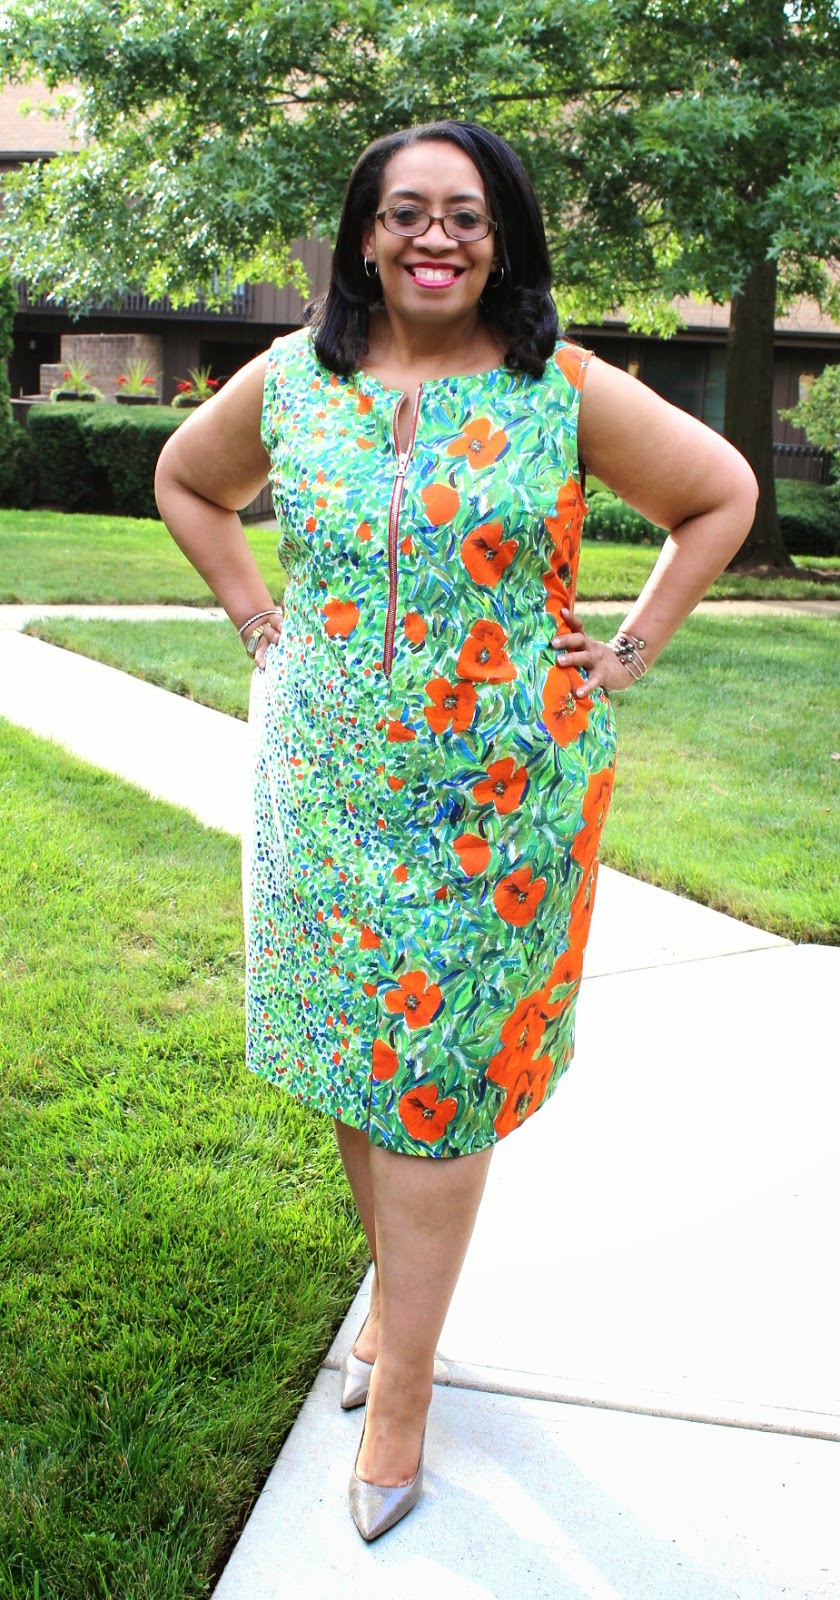
A Pretty Poppy Border Print Mysostis

It is common knowledge that I love border prints. Like my brain stands up to attention when the good ones are around.  Cause we know all border prints are NOT created equal.


My Idea:

Use the main piece as the skirt part.  The bodice would be cut from the fence part so that it would flow into the skirt piece. I personally dislike when the border print doesn't flow so I always try to plan for that. 

Here are a few photos of the cutting layout:

Cutting out the bodice, sleeve and collar

Dress bodice and skirt layout

And because I can here are...

My Top Five Border Print Rules:

1. Overbuy the amount of fabric that you usually purchase for a garment.  If a dress/shirt takes 3 yards, purchase 1.5 to 2 yards more.  Why?  Because it allows you extra fabric to match and play.  One of my very first border print dresses, I was cheap on the fabric and this was the result.


The internet was not kind. A lesson learned and never repeated because the comments were so cruel I never wore the dress.  Though I guess I really do like poppy print fabrics!

2. Find a resource that helps you with placement and how to purchase border prints.  I wrote a blog post based on an old Sew News border print article.

3. Take your time. Move the pattern pieces around until you get your desired result.  DON'T RUSH!

4. Use a pattern that doesn't have a lot of seams - though I have done that. 

5. And TNT patterns work the best because you don't have to work out fit issues.

The Poppy Print Dress:

Using my TNT Myosotis Dress pattern meant there were no fitting challenges.  Just how to manipulate the fabric to get the most pleasing result.

As I said above cutting out and using the fabric to it's best advantage is key with any border print.  Here are some photos of the finished dress...


...and a video.

I finished this and wore it back in October 2024.  Just getting around to blogging about it. If you follow me on Instagram, you've seen it already.  Just sharing a few details now.

...as always more later!


LinkWithin

Related Posts with Thumbnails