Tuesday, November 05, 2013

60s Inspired Wool Boucle Jacket

I found this awesome wool boucle on the Third Floor of Mood's NYC store.  I know people have favorite sections of the store but me, I love the third floor because it's magical!  You never know what you'll find there and every time I climb the stairs, I find the most amazing treats.

To be honest, I've had this piece for a minute.  When Todd pulled it off the rack for me, I squealed with joy because not only is it a beautiful creamy medium weight boucle but it's also backed with interfacing. And yes, Lauren this is the piece that I tried, begged & pleaded with you to buy but you passed.  Ummm, next time you'll listen to me about everything, right?!  *LOL*

Peoples when I find a fabric that's backed with interfacing it's like finding a pot of gold at the end of a rainbow.  It's like the Holy Grail of fabrics - one to be wished and hoped for...to be ever in search of...because a pre-fused piece of fabric is so wonderful to work with that like a druggie looking for a fix...I'm constantly in search of it!  *LOL*

Now I know you think I'm being extreme but I'm not...cause I purchased 2.5 yards of this loveliness...


...and this is what I made!


Patterns used to make this jacket ~
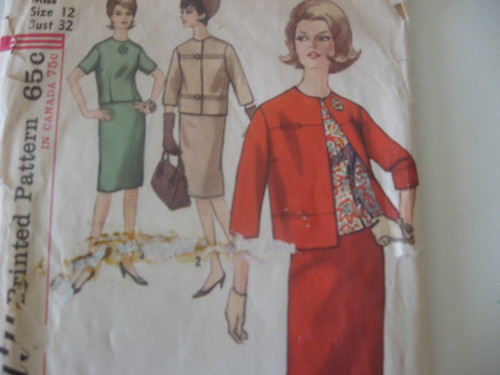
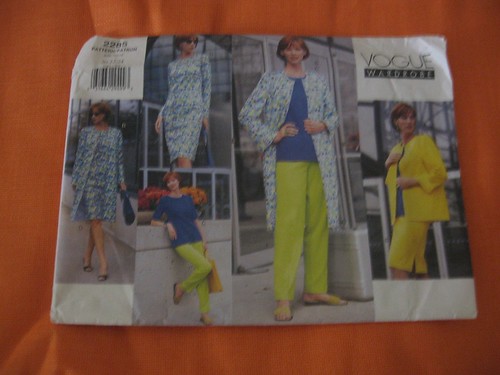
Vogue 2285 - circa 1999 and vintage 60s Simplicity 5144


Notions ~
White bemberg lining
Black & White polka dot silk used in the faux pockets 
White rayon seam tape
3/4" shoulder pads

All of the construction details regarding the sewing of this jacket are included in this post.  I didn't make any changes from my first version of this jacket but it was wonderful having a road map to assist me with it.  I made this one closer to the pattern envelope's illustration...not including any closures.  My original version did have closures on it ~ buttons backed with fabric covered snaps.


The thing I love the most about this jacket is the faux welt pockets with the black polka dot fabric inserts.  Aren't they kewl?  Of course, the instruction sheet for the Vintage Simplicity Pattern explains exactly how to accomplish this so that even a newbie could handle making these.  It's one of the things I love about vintage patterns, they have the kewlest details that really make the finished garment special.


Here is a close up of the details of the jacket modeled on Lulu.  Not only is this jacket on trend ~ vanilla is hot, hot, hot for fall/winter ~ but it goes with so many garments already living in my closet.  Another plus!  And doesn't that pin look fantastic with the jacket?!  I have loads of pins collected over the years that will work well with the jacket too.


A few more pictures of the jacket in action...


Thanks for all of the photography tips on my last post. I will be putting them to good use. Amy & Marce I will remember about direct sunlight but all that talk about lens was like alien speak to me!  LOL!  And here I thought direct sunlight was better than shade or a cloudy day even...not to mention ignoring the fact that all of my neighbors were staring at me like I was crazy cause you know people stand in the street posing with two little kids running around screaming and the photographer going don't move, don't move in a very loud voice! 

Finally here's a sneak peek at my next make which will be featured on The Mood Sewing Network tomorrow.


...as always more later!


Sunday, November 03, 2013

Learning my new camera...

Illusion:
I thought that if I just put the camera on automatic it would shoot and I'd have wonderful pictures.  I mean I just held it up and took some in the sewing cave and they looked so much better than the pictures on my Canon Elph did. I also thought since it's a better camera that I should be able to get a couple of decent sunset photos.

Fact:
Here's what I got...


...ummm not so good!  You can't see any of the details of the jacket or it's real color.  Which is better depicted in this collage...


Illusion:
I would be able to read the manual understand the settings, play with the camera and make it work thus taking great pictures.  My daughter who is handier than I would make it sing right away.

Fact:
I've spent the weekend watching a series of videos on YouTube cause I'm really more of a visual learner than learning by reading something. I even follow the pictures on the instruction sheet and in my sewing books better than just reading the text.  

My daughter did come in this afternoon, read the manual and had a better familiarity with the camera.  I also think she got over her fear of using the better, more expensive camera.

Result...
These are photos that my daughter and I took this afternoon.


  • With the help of my friends, I'm realizing that natural light is the best light...even in the house.
  • My picture size should be larger - I don't know how that's going to work with Blogger's space requirements but I'll worry about that later.  
  • The auto setting can be used but it's best used in natural light.
  • It's going to take me much longer to learn how to work all of the functions of the camera.
  • There are a lot more YouTube videos in my future on how to make this camera work! *LOL*

I've ordered another tripod and a remote so that I will be able to take pictures by myself.  My daughter's schedule is getting tighter and with two little kids running around and getting in the shots, it takes a lot longer to get some pictures than it use to.  Also I don't like imposing on my daughter's precious time like that.

There is definitely a learning curve involved with this camera and I hope that you won't mind putting up with a few less than wonderful photos here as I learn how to make my camera sing.

Oh and review of the 60's Vintage Wool Boucle jacket will be up soon...

...as always more later!


Friday, November 01, 2013

Using my Janome 8900 QCP - 10 months later

One of the things that I really wanted this year was a newer, more up-to-date sewing machine.  Since I'm a Janome woman, I knew that I was going to purchase a new Janome.  Originally I was going to purchase the 7700 used or new because it was a step up from the 6600P that I was presently using.  I have no qualms about purchasing a used sewing machine because my Janome 8000 was purchased used and my Janome 6600P was also gifted to me used.


Over time I've figured out what I need in a sewing machine.  I love the top of the line sewing machines with all of the bells and whistles, embroidery modules, loads of stitch patterns, etc.  However, I don't NEED all of that. That is not how I sew. Plus since I haven't traded in a sewing machine, I still have embroidery capabilities with the Janome 8000 - not that I use them much!

Anyway, I headed off to the sewing machine dealer and ended up bringing home the 8900QCP because the dealer gave me a great price for the machine. Now that the machine has been home for 10 months, there are a few things I'm truly thankful for in this machine.


  • It is accurate.  Seriously.  It stops on a dime and then turns on that dime.
  • The reverse stitching is accurate.  It stitches into the same row of stitching that it started in.
  • Quiet...this is the quietest sewing machine that I've ever owned.  Everyone can tell upstairs when I'm operating the serger (that I also love!) but no one can tell when I'm stitching on my sewing machine.
  • Love, love, love that I don't have to push the needle from side to side.  The machine has a button that I push on the panel for the far right setting and the far left setting which is exactly 1/4" sewing.


Photo credit:  www.thestitcherymachine.co


  • The lighting on this machine is awesome because it's in all the spots that matter.
  • The wider opening can fit anything in it.  I know it was done for quilters but being able to get an entire dress, jacket or pair of pants in the opening works so well for me too!
  • I absolutely love the cutting function.  I don't use it at the end of every seam but when I'm in some hard to reach place, it's so kewl to be able to use the cutting button.  Not only does it cut the bobbin thread so that I don't have to trim it but the upper thread is cut about an inch long.  Not much to trim there either.
  • The manual is easy to read, follow and understand.
  • Learning how to monogram was easy when I used the manual and did the process step by step.

This is the first time in over 20 years that I've purchased a new sewing machine. I'm so thrilled that I did because this machine will grow with me into the next decade even though I'm secretly coveting the new Janome Horizon Memory Craft 15000.  

In my mind the next time I purchase a new sewing machine will be when I'm ready to retire.  My 8900QCP will be more than capable to do the job until then!

...as always more later!

Thursday, October 31, 2013

Thursday Miscellaneous and other things...

First let's start with the thing everyone is wondering about...the winner of the Cynthia Guffey Skirts video is...


Mountain Woman I will send you an email with all of the information on how to claim your prize!  Congratulations!!!


+ + + + +

I finally wore some of my new fall wardrobe and I wanted to give a wearability update. I wore this combo earlier this week...


...and the jacket was a fail.  The dress was amazing ~ comfortable, easy to wear, professional.  However, the sleeves on the jacket have pilled quite badly from contact with the perforated faux leather.  This jacket won't see much wear because it's frail and that breaks my heart!

Next...


This one garnered ALOT of compliments and it wore well.  It's just lighter than I imagined.  Sewing in August/September when it's 80 degrees outside skews your perspective on how hot an actual fall/winter dress will be.  So I was actually surprised that in 40 degree weather the dress feels very lightweight. Otherwise it wore very well and was comfortable.

I still have quite a few dresses from the September sew to wear yet so as I wear them I will report back on their wearability factor...because taking pics in garments is NOT the same as putting in a 13+ workday in them!

...more later!


Tuesday, October 29, 2013

60s Inspired Vintage Boucle Jacket - Construction

The best thing about using a previously sewn pattern is that you can just cut and sew.  Your biggest problem is will the design idea work like you want it to.  I wrote my last post about choosing this jacket with this thought process...12 hours on Sunday another 4 on Monday and another 4 on Tuesday gives me 16 hours of sewing time.  Personally I can make a jacket (lined or unlined) in that amount of time from a previously sewn pattern.  8-10 hours is all I really need...y'know after I finish kicking and screaming! *LOL*

So these are the two patterns that I'm using to make my 60's vintage inspired wool boucle jacket:


And these are the fabrics...cream wool boucle already backed with fusible knit purchased from Moods 3rd floor (love that floor!) in the NYC store:


Here is the silk from the collection that I'm using to peek through the faux welt pockets:


The jacket will be lined with a cream colored bemberg rayon lining also from the collection:


Pattern Alteration and Construction ~
The first thing I needed to do was to alter the jacket sleeve.  Since the sleeve on the Vogue circa 1999 pattern and the vintage Simplicity pattern both have a one piece sleeve, I used the sleeve from my dress pattern to make a pattern sandwich to create a new sleeve for the jacket. This will solve my bodacious bicep issues.


Added a center back seam to the jacket back pattern piece.


Then the jacket fronts and backs were constructed the same way described in this post.  So this is what the jacket shell looks like now.  The only change I made this time was to use smaller pieces of fabric for the welt pocket windows.  Since I'm using a black 'n white polka dot fabric that is dark, I didn't want the fabric to show through the lining or the jacket front.


The jacket was assembled and then the sleeves sewn in.  I'm working on adding the lining now but just wanted to give an update on the construction of the jacket prior to it's reveal.


I'm really thrilled with it so far.  It was a good choice for my Mood project because the jacket pattern's fit issues had already been resolved and I like the interesting details that are featured on the jacket front.  Also it really helped that the fabric was already backed with fusible interfacing. 

I love these types of fabric cuts and always try to purchase them when I find one. One less step to do when working on a jacket project.  If you find a fabric that's backed with interfacing, I highly recommend that you purchase it.

...as always more later!


Sunday, October 27, 2013

How to Fit a Skirt by Cynthia Guffey

Back in August I reviewed the first of the Cynthia Guffey videos that I purchased from dailycrafttv.com.  I was so thrilled to find videos online that captured the essence of Cynthia and also gave me the opportunity to watch them over and over again.

At the time, I purchased The Seven Core Sewing Skills, I also purchased "How to Fit a Skirt" by Cynthia Guffey, as well as, the video, "How to Fit A Jacket." It's taken me a minute but I watched the skirt video while I was sick. Hey it was better than daytime TV! 


After viewing this 60 minute video, I will be making some fitting, construction and designing changes to my straight skirt pattern to get a better fitted straight skirt. A few general take aways first ~ she makes the changes look so easy to understand and do and she discusses how to interpret drag lines or "travel lines" as she calls them and how to fix them.

Here are some additional things I took away from the video:

~The skirt's side seams should always be straight on the side of the body.

~Adjust the widest area of the skirt first and then make everywhere else fit first.  For most of us this is the hip area but for a few it will be the waistline.

~Cynthia started with a princess seam line skirt instead of the standard one piece front and two back pieces for the skirt.  She says there are more fitting opportunities that don't involve the side seams if you use a princess seam skirt pattern.

~By using her grading techniques, you can take a skirt that use to fit and grade it up or down so that it fits you now.  A vintage skirt, a skirt pattern that you use to sew and loved can be graded to fit your body now.

~Watching her draft a new facing for the skirt instead of using a waistband was worth the cost of the video alone!  Watching her explain it and then do it was so crystal clear that I almost jumped up and down and shouted hallelujah!

~When making adjustments to the pattern, she draws a line parallel to the grainline to make changes - whether adding or subtracting width - that way the grainline is never thrown off.

~Cynthia says that one of the questions she's asked most is, "What length should the skirt be hemmed at?"  She has an interesting take which mirrors my own, that the hemline should end at the place where the leg curves into the calf, that this is the most flattering place on most women...unless of course you have amazing legs and can wear minis!

~About the circumference of the skirt - Cynthia says that she adds fullness to the front of her skirts (pleats, gathering and kickpleats) because that's where she walks (forward).  That adding to the back only ends up in the skirt pulling or the kick pleats and slits folding/bending and generally winding up looking askew. Another lightbulb moment for me!  The video is only $9.99 and chock full of wonderful tips and things to learn. 

However, the wonderful people at dailycrafttv.com are offering a free skirt video to one winner from my blog.  Yes, this is the giveaway I alluded to earlier.  So how do you win this wonderful video? Simple, just leave your name and email address in the comments section on this post ONLY by Wednesday, October 30th at 11:59pm EST.  

I will announce the winner on Thursday, October 31st and submit your name and email address to the dailycrafttv.com team who will set you up with viewing privileges.  This video is available to anyone in the world, so if you want your very own Cynthia Guffey skirt adventure, leave a comment.

Now for full disclosure, I will be reviewing one sewing video per month from the dailycrafttv.com site for free.  I do get to choose which video I want to watch and review so rest assured that they will all be about sewing...but I thought you should know that I do have a vested interest.

...as always more later!


Saturday, October 26, 2013

What to do? What to do?

So it's Saturday and I've got a pile of fabric from Mood sitting on my cutting table begging me to see something in them so that I can sew up something marvelous and have it photographed by Wednesday. See I had a project...a perfectly good project but it's a little too involved for my due date.  

I purchased the perfect fabric to make my perfect lavender transitional coat...but sickness did me in.  Gawd, I was even going to make a muslin. Bought actual muslin fabric and everything.  I nevah muslin so to say I'm disappointed that I'm not working on this project is an overstatement.  However, I will make it later on cause I really want that coat!

Now though, my self picked Mood date is approaching and here I sit trying to make it work. I've been sewing for the Mood Network for over a year now and this is the first time that sickness has derailed me.  I've been late because a garment was more intricate than I originally thought and picked another date but I've never sat in the sewing cave wondering what the hell could I sew!

I had an idea and I thought it would work until I put my two pieces of fabric side by side and they didn't play as well together as I thought they would. Back to the drawing board.  I really want a dress/jacket combo but I will need a jacket pattern that I've made before so all of my fit issues have been resolved and I have precious few of those that I presently like.  But now that I've gotten the idea in my head I can't get it out.

So I go pawing through all of the patterns that I've made for the last five years and I find this one ~ Vogue 2285 which is so out of print it's pitiful.  The pattern's copyright date is 1999 but I used it as the basis to make a vintage inspired jacket back in 2008 which became part of my Easter Outfit that year.

I've always wanted to make another jacket like it but improve upon the sleeve fit, which is what ultimately did that jacket in.  Also, I really like the faux welt pockets or slot seams that the jacket uses.  I could make this and have it photographed by Wednesday evening.  Here is a picture of the vintage jacket that inspired the original jacket and this new one...


The fabric I've chosen will work with quite a few pieces already in my wardrobe so I won't need to make a second piece to accompany it.  Finally the only pattern work I will need to do is enlarge the sleeve pattern which I'm going to do by using a sleeve pattern piece that presently works. Thankfully I blogged the entire construction process here back in 2008.

Now it's time to clear off the sewing table and make the magic happen...hahahahaha!

...as always more later!

Thursday, October 24, 2013

Thursday and it's almost the end of the week...

...and I've been home the entire time - sleeping, coughing, sneezing and dealing with bronchitis.  I don't know about anyone else but I hate being cooped up in the house with no desire to sew.  When I'm feeling well, it takes a fair amount of dragging and a large incentive to get me out of the house...probably why I like sewcations so much...but sick...by the time I'm feeling better I'm ready to run screaming into the street.

The antibiotics have finally kicked in.  I'm no longer coughing like an old diesel locomotive and no one will fear sitting next to me on the bus because the sneezing has stopped too.  So tomorrow for one lone day this week, I will venture back onto public transportation and to my job...and I can't wait!  *LOL*

It has been absolutely torturous for me to be home with no desire to sew. However, I do have a little unfinished business to attend to here.  Elizabeth did come forward and pick up her SugarPlum prize so that one is claimed. Although, I still haven't heard from Robinsnc - so the winner of the October fabric giveaway is now:

Sharon of Sharon Sews blog


Okay Sharon, contact me with your home address and I will send the box out to you...though I will probably change it up a little since I do know you.

The temperatures have dropped here on the East Coast...it's actually starting to feel fallish or so I'm told by my daughters since I haven't left the house this week except to go to the drs.  Next week I will finally start wearing all of that fall gear that I've been sewing.

My coat project has been pushed back because there is no way that I can have one completed this weekend for my Mood date next week.  So I'm racking my brain trying to think of what to make instead.  There will be more on that this weekend.  I have an idea just gotta see if I can make it work!

Thanks for all of the helpful comments left on my last post about my new camera.  I'm definitely going to keep it and like my Janome 8900 sewing machine I will learn it one function at a time.  But my grandson's little paws will NOT be allowed to touch Nana's new expensive camera!!! *LOL*

One last thing, congratulations to my friends Shams and Audrey for making it through Round 5 of the Fabric Mart Fashionistas Contest.  To say that I'm in awe of what you two have accomplished so far is an understatement. I'm thrilled that I know you both and can't wait to see what comes from your sewing machines next!  Good luck with the next round!!!

...as always more later!

Monday, October 21, 2013

No Sewing Here...

I think I've gotten that once a year "yuck" that puts me down for a few days...so no sewing here AT ALL this weekend...

However, my grandson dropped my trusty Canon ELPH and broke the lens...


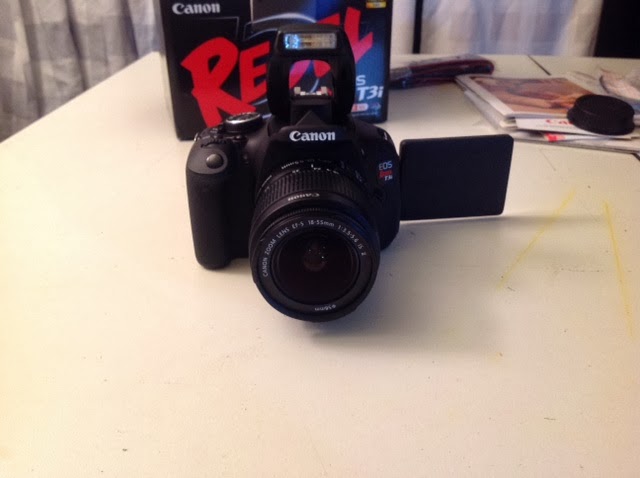
I had been going back and forth over whether I should upgrade to a Canon Rebel. After this accident and reading a few reviews on the internet, I bought a Canon Rebel T3i...


...and people this thing scares me! *LOL*  I've known for awhile that I probably should upgrade my camera but I was comfortable with my ELPH...plus it was gifted to me by my old boss.  So it was important to me and I was loathe to part with it especially since it still worked.

Because I had no service contract on the ELPH, when I took it to Radio Shack to see if it could be fixed, it was suggested that I purchase another one.  Cost of repair vs. cost of new one plus wait time for it to show back up 'cause no one does repairs in-house anymore, meant I bought a new one.  Now I have to learn another camera. It's been here a few days and I've managed to get the date and time set, get the lens on, remember to take the lens cap off when shooting and do a few other basic adjustments by reading the instruction manual.

I know that a year from now I'll be twirling the lens, touching all of those buttons with ease but right now, it's just overwhelming.  So overwhelming that I cheated and bought another ELPH, just in case.  I think I'm going to take the ELPH back and learn to use the Rebel especially since it's unboxed now!  *LOL*

Any hints or tips that you can share with the neophyte would be appreciated. Here are a few of my first photos taken of the sewing cave...


...oh yeah and I might have bought a couple of pieces of fabric...but I was stressed alright?! I think the quality of the photo is better than my ELPH but I still have to learn how to make this sucker work...

Finally, I will be picking two new winners tomorrow because I haven't heard from the previous winners.  I'm a little sad about that but I need to move on because believe it or not, I have another giveaway to offer and I need to get it up on the blog!

...as always more later!


Saturday, October 19, 2013

Saturday Miscellaneous

I will be working on my coat project this weekend but I'm taking today off since I seem to have caught whatever is making the rounds this month...

However, I have a little unfinished business...neither Elizabeth who won the SugarPlum pattern giveaway or Robinsnc, who won the monthly fabric giveaway have contacted me about their winnings.  Please get in touch with me by Monday, October 21st or I will pull other names for the giveaways.  You can reach me via email or by leaving a comment on this post with your email address and I will get back to you.

And finally I found this quote on Pinterest and I wanted to share it...


...this is how I feel about you my fellow sewists and what I'm attempting to do here on my blog, in my corner of the internet...

...as always more later!


Tuesday, October 15, 2013

Vogue 8935 - Finished

This took a little longer to complete than I thought it would...but sometimes that's just how it works out.  I have a queue of fall garments to wear and the temps just haven't dropped enough yet to wear them.  So I guess my sewing mojo has taken a bit of a hit due to that...

Anyway here is Vogue 8935...


A few stats...

Pattern ~
Vogue 8935 - the pattern consists of a loose-fitting, pullover top with a collar sleeves with a button pleat and stitched hem. A straight skirt without a waistband and a pair of straight leg pants are included in the pattern.  It's a Very Easy Vogue pattern that any level sewist could sew up easily.


Fabric ~
Navy/beige poly/wool blend pinstripe from the collection by way of Fabric Mart
White cotton pique from the collection by way of fabric.com

Notions ~
Navy blue rayon bemberg lining
9" navy blue invisible zipper
A pair of 1/2" shoulder pads
navy blue rayon seam tape
2 - 1/2" pearl ball buttons
2 - 1/2" clear & gold buttons

Construction ~
Pattern alterations for the top are contained in this post.  For the skirt I used my TNT pattern because why mess with what works.


  • I used fabric to give this pattern some pizzazz.
  • I also cut the pinstripe on the bias for the skirt to add some visual interest to the outfit.  Though to be perfectly honest, I did a so-so job in cutting it out and matching the chevron'd pinstripes.  Because the pinstripe is pretty subtle it doesn't look terrible but it definitely could have been done better.
  • The collar and cuffs for the top were cut from the contrast cotton pique fabric so that the top would look like it has a shirt under it.
  • The top was given a closer fit to lose some of the boxy-ness that the pattern envelope displayed.
  • My neckline is low cut.  I could have fixed it but I didn't want to have any trouble getting this top on and off.  So I'm opting to wear a cami with it.
  • I added a pair of 1/2" shoulder pads to the top because even though I narrowed the shoulder seam, it laid kinda flat on my shoulder.  Adding the shoulder pad gave it some ummph and squared my shoulders off. 
  • There is quite a bit of hand stitching in this garment - hand stitched the collar neckband down.  Hand stitched the hems in the top & the skirt and I even hand stitched down the waistband.
  • Used two buttons & buttonholes for the waistband closure.
  • Two pearl buttons were used on the cuffs - it really adds to the business vibe of the white collar/cuffs and the pinstripe fabric used in the body of the outfit.
  • The skirt is fully lined.
Construction Pics ~


Sleeve cuff with pearl button


Inside of the cuff

Close-up of the collar

Two buttons on the waistband with invisible zipper

Conclusion...
This is a nice outfit and will play well in my work environment.  However, this is a one and done use of this pattern...something that's infrequent in my world.  It is an easy sew and I knew this pattern had a lot of potential when it first came out. It was just a matter of bringing that potential out so that everyone else could see it.  As stated above, choosing the right fabric was crucial to making this outfit work but I don't need another outfit from this pattern.

A few more pics...

The chevron pattern looks pretty good on the skirt
despite my concerns...

Trying to give off that "Pro-fessional" Look! hahahaha

Mary Beth this crossed leg pose is for you! *smile*

This is my third garment from the Five in Five grouping.  I won't be working on the last two dresses for awhile because I need to move onto my Butterick coat since it's due by the end of the month.  I will pick the Five in Five project back up after the coat is finished.

Finally, thanks for the love on the Internet post.  I read each and every comment left along with several that were sent to my email address.  I appreciate the fact that you enjoy sharing my creative journey and that I've encouraged so many of my plus size sistahs to sew again! Halfway through the day, I thought maybe it wasn't the best plan to write that as a blog post but at the time I was very annoyed. Truly the comments written by that person should have been like water off a duck's back, but isn't that how people get away with having those kinds of attitudes when no one shines a light on them?!  Anyway, have no fears, there was never a chance that I was going to quit blogging...I'm having too much fun here...overweight styling and all! *LOL*

...as always more later!


LinkWithin

Related Posts with Thumbnails