Friday, October 26, 2018

The Rifle & Co "English Garden" Border Print Shirt

I know Rifle & Co prints are big - HUGE! Quite a few sewists have made some beautiful garments using fabric from this line. While I like the prints I've seen, I've never felt like I NEEDED to own one...well not until I saw this one on Stylemaker Fabrics site. I was honestly bowled over by the border print which is how this shirt came to be.


There is nothing new in the construction of this shirt.  I used my close-fitting TNT shirt pattern with the shirt tail hemline for this version. Initially I was going to use the TNT shirt with the gathered back. However, after thinking about it, the border print would be more impactful in the closer fitting shirt. So that's what I did.

I'd like to discuss one thing I do in making my shirts regarding the button bands. On some shirts I use the foldover button bands. On others, I've cut it off and replaced the band with a sewn on band. 


What I'm saying is that I don't interface this band whether it's folded over or sewn on. Recently there was a popular sewist on Instagram saying that you had to add interfacing to the band, that the three layers of fabric was insufficient. 

I've made over a dozen shirts now using this fold & turn method and never had a problem with buttonholes being wonky or the buttons not being stable on my shirts. So why did I bring this up? Because there are several ways to sew things and no one way is always the "right" way. Try out a couple of techniques and see which one works for you. Then use what works for you.

Materials Used ~
4 yards Rifle & Co Empire Garden cotton border print
Interfacing from Steinlauf & Stoeller
10 1/2" 2-hole navy blue buttons from my button collection

Design Details ~
First I've used border prints before. I really like working with them and collect them whenever I find them. Here's a blog post I've written about sewing with border prints.

This shirt has no exceptional use of the border print but I didn't believe it needed any. This is a bold print that uses a large portion of the fabric. My decision was how to make the print work best for me. So the body of the print is along the bottom and mid-body for this shirt.  

The sleeves and back yoke were cut from the starry portion of the fabric. 


Collar, cuffs and the inner back yoke were cut from the border print.
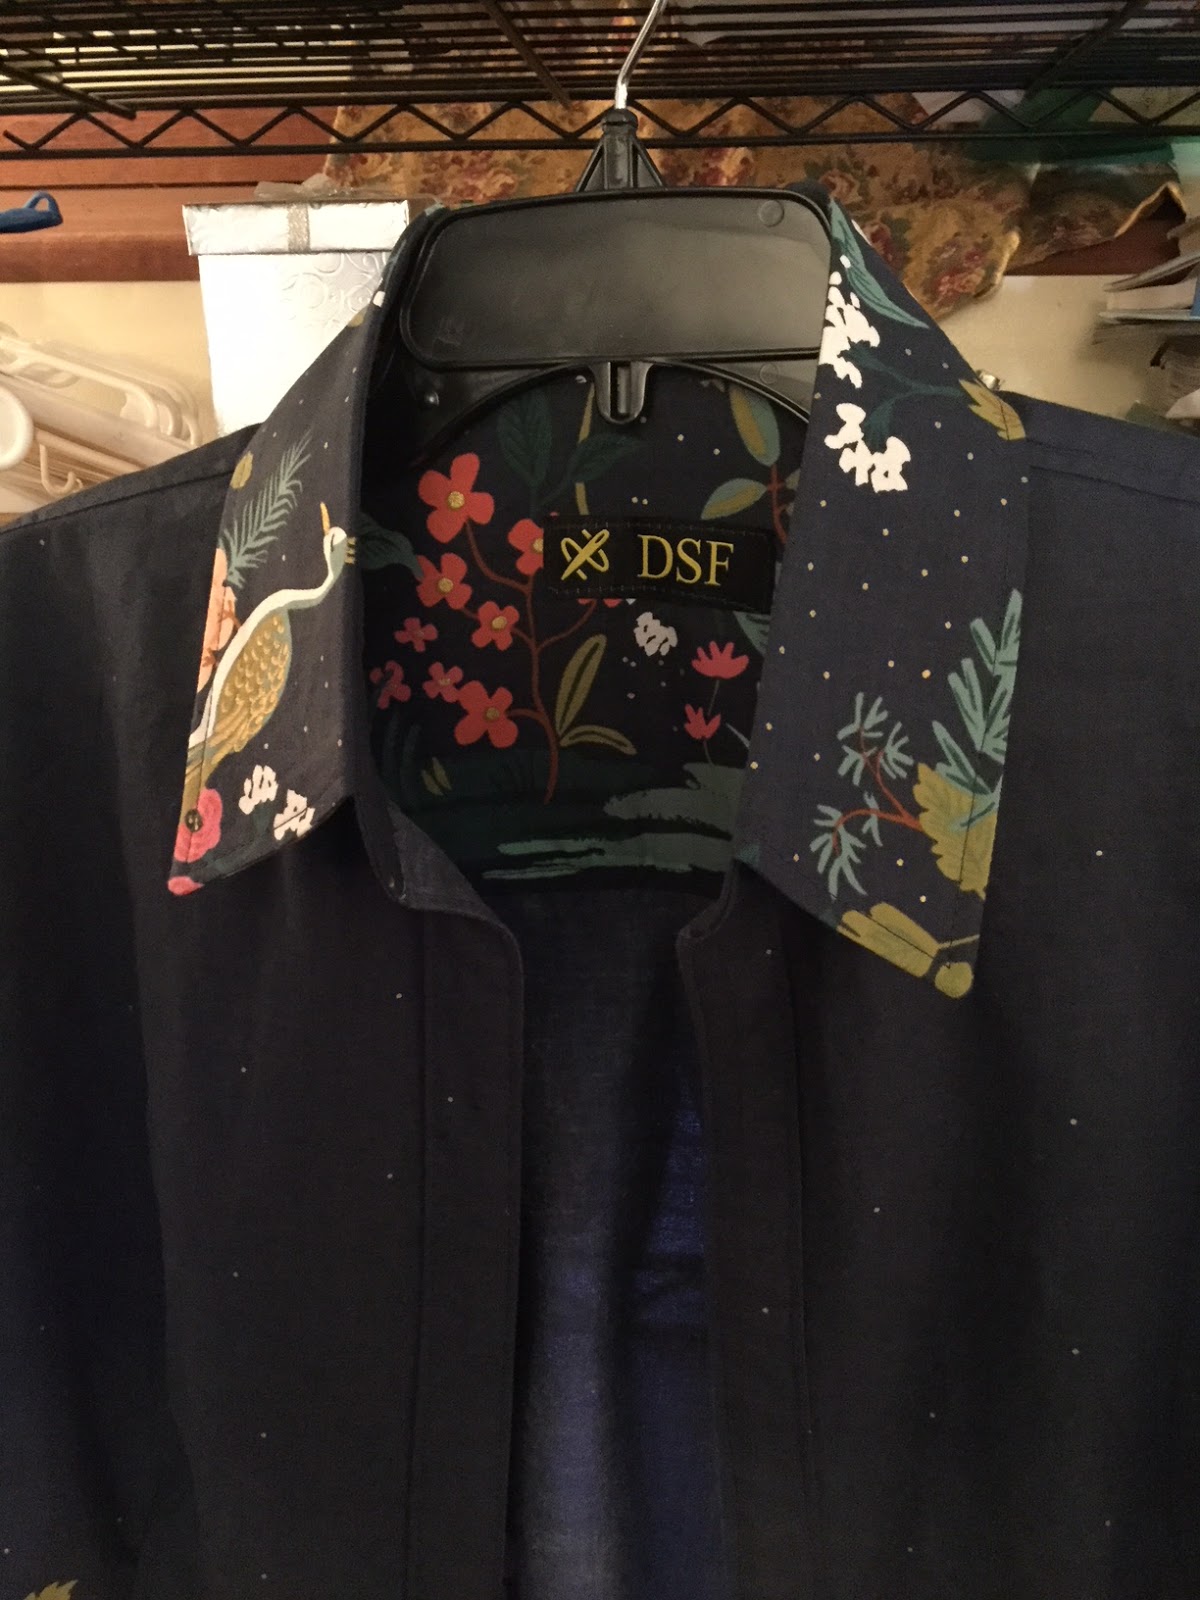

This allowed the shirt to showcase the border print with the maximum effect.   

A few pictures ~


Conclusion ~
This is the first shirt completed in the border print shirt series. I have a few more left to make before the series is done.  Next up is a cotton sateen border print shirt made from the Fabric Mart fabric haul recently purchased.

...as always more later!

Tuesday, October 23, 2018

Love to Sew Podcast

I am really honored and thrilled that I'm featured this week on the Love to Sew Podcast.


It was a really interesting conversation.  Especially since it's hit me this year that I've been sewing almost 50 years. I think I even said several times during the conversation, I'm old! But it's not in a negative "ohmygodI'msoold" way but more in a celebration of the fact that I've lived this long. That I'm in relatively good health and will probably live a couple more decades sewing until the very end. 

Anyway, if you get a chance, check out the podcast here. If you haven't listened to any of the other podcasts (really why not?) check out some of the other interviews and discussions. Caroline (proprieter of Blackbird Fabrics) and Helen (designer of Helen's Closet Patterns) have a variety of sewing discussions, as well as, interviews with sewing entrepreneurs and sewing bloggers. Check them out because I'm sure there is someone or something you want to know more about.

Okay back to normal sewing journeys and conversations!

...as always more later! 


Sunday, October 21, 2018

Simplicity 8700 - A Denim Jacket

When the air gets crisp and it's chilly in the morning, my thoughts turn to jackets. I'm not really a coat maker but a cute jacket is right up my alley.


I've made a few in the last couple of years that I've enjoyed wearing.  So when I saw this Simplicity pattern...


I knew I wanted to add it to my collection. But me being me, I was going all in to get the look I saw in my head. There are loads of photos and information in this post. So if you're not interested in the design and construction information, skip down to the photos and conclusion to see the finished jacket.

Supply List ~
1. Medium weight star denim fabric from the collection by way of Fabric Mart
2. Black 'n white stripe remnant - used in this shirt
3. 7 - 7/8" buttons from the button collection
4. 2 - 1/2" buttons from the button collection
5. 1 - 1" O ring from Lauren Trimmings
6. 2 - 2" O rings from Lauren Trimmings
7. Pieces of 1" black twill tape from the notions stash
8. 7 yds of smoky black bias binding from Pacific Trimmings
9. Black topstitching thread from SIL Thread

Pattern Alterations ~
Let me state that this pattern only goes up to an XL with a bust measurement of 46" and waist of 48". There's no hip measurement on the outside of the pattern envelope...but when I measured the pattern pieces it was 58" before the seam allowances were taken off. I knew I would have to alter the main pattern pieces to fit around my hips.

I made my alterations to the front and back piece...in the sides between the large and extra large cutting lines...slashing and spreading so that I ended up with 1.5" at the hemline on each side. 


Besides the side alterations for the back piece, I also did a pivot and slide of 2" on the fabric prior to cutting it out. 


There was no need to make an adjustment to the sleeve pattern because it was wide enough. It means that my version won't have the loose sleeve look of the pattern envelope but I'm good with that.

The final pattern alteration was regarding the front facing piece. Brittany mentioned it in her review so I knew to look out for the issue. To solve the problem, I drafted a back neck facing. so that the collar would be enclosed in facings which means I did NOT apply it as the pattern states.

I made a back neck facing by using the back yoke piece. I measured the width of the facing piece. Then I used my curved ruler to make the facing bottom deeper.  Here is a pic of it before I traced it off onto pattern paper...


Then I omitted the back yoke. Yeap, went my own way. It's a stretch denim jacket and I thought it just didn't need it. One of my reasons was the weight of the denim and some of it was the look I wanted. This is what my collar looks like with the front facing.


Design Changes ~
I acknowledge that I went overboard with my design changes. I threw everything into this jacket except for the kitchen sink. I may not have hacked the pattern much but I did hack the design!


My first thought when I saw the pattern was to add some O rings to the flaps. I saw this on a dress on Monica's Instagram account and I really liked the look. I'd been waiting for a garment to add that O ring accent to. I thought this jacket was perfect for it. So I added the rings to all of the pockets.


The second design change I made was to use leftover shirting materials from this shirt for my facings, under flaps and the shoulder tabs.

As pocket linings

For the tabs


The third change was to add binding everywhere to give this very busy print boundaries. So it was added to the collar, inserted into the sleeve band hems and down the front of the jacket. I also used it to bind the seams and hemline of the jacket.


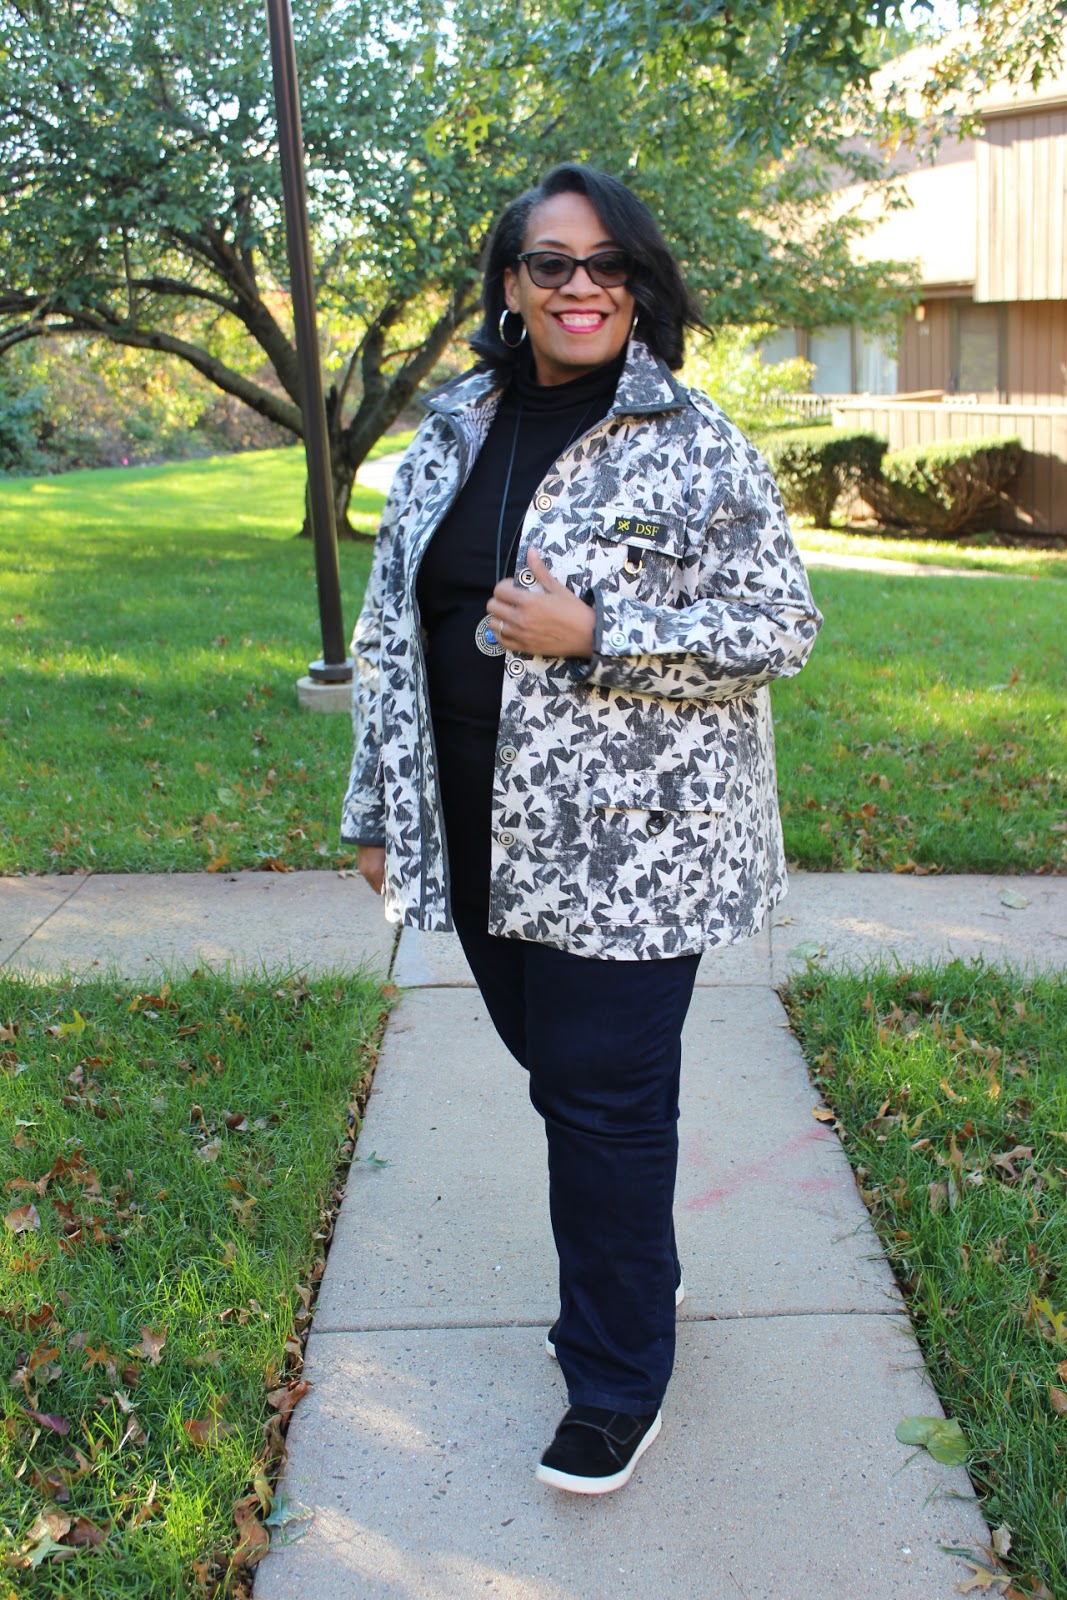
The last thing was a "by chance" thing. I ordered some new labels from Dutch Label Shop. I wanted a label that better reflected where I am now in my creative journey. This label is designed to look like my blog header. After I sewed it onto the upper pocket flap, I thought it was perfect.

While I really like my design changes, they added considerable sewing time to this make...considerable time! 

Construction Information ~
I read the pattern instructions and then proceeded to sew the jacket in the order I wanted after the basic assembly was done. Most of my construction changes were sewn with the pieces flat. 

A few things I want to note:
I basted the sides together to check fit ~ once I realized the fit was okay ~ took it apart and added the pocket flaps. I didn't want to do all of the extra work for the pockets if the jacket didn't fit.
One of the suggestions that the pattern makes is adding twill tabs to the pocket flaps. The O rings were my design decision although I don't think they stand out as much as I thought they would.
Binding isn't suggested in the pattern instructions. That was all me trying to contain the fabric print a little. I'm glad I added it and used a hong kong type of finishing to attach it. However, adding it to the front really defined the button area and gave more definition to the jacket front.
- There's a lot of topstitching on ERRYTHING! From the tabs on the shoulders to the sleeves and hems. Everything is topstitched.
- The cuffs were way too large on my jacket. So I did my normal trick of making a pleat and adding a button.

Original cuff - topstitched with bias binding

Cuff with pleat added

A few pictures ~


Conclusion ~
This is one of Simplicity's "Pattern Hacking" patterns so it comes with several options to make the jacket. You can make it as simple as possible or you can go full in and add everything the pattern suggests and then a few of your own designs. As explained above, I went all in. LOL!

You would have thought that I'd have been realistic about the amount of time it would take to sew this jacket especially since I put every design detail into it. But no...about halfway through the construction I got annoyed! *LOL* When I finally thought about it I realized that it takes time to get a more detailed garment made. I needed the time to bring to fruition all the things I saw in my head. When I understood that the sewing became more enjoyable. Does this happen to anyone else? Just wondering if I'm standing on this creative cliff alone?

I will be using this pattern again. I can see it in different fabrics with less of the details I used in this one. Hopefully I will get more of them made before spring shows up because I always think I have more time to sew than I actually do! *LOL*

One other thing happened after I took the photos. My Mother saw me standing in the kitchen with the jacket on and asked where I bought it. I think that's the ultimate sewists compliment!

The first shirt from the border print series is up next on the blog.

...as always more later!


Wednesday, October 17, 2018

The Border Print Shirt Series

Shirts are my jam. I REALLY love sewing and wearing them. They've become my new "dress" and since I run a pattern into the ground...you know I'm sewing shirts with my TNT shirt pattern.

Backstory ~
I've been on a fabric buying binge. I've been using fabric to self medicate against the cares of the world. To slow down my fabric buying tendencies, I'd set myself monthly yardage limitages. Well in the last couple of weeks, I've purchased my fabric limit for October and November. The only good thing is that the purchases have totally inspired my makes for the next couple of weeks.

It started with this Rifle & Co. border print from Stylemaker Fabrics ~


...which I'm sorry to say is no longer on the website. However, this seems to be a pretty popular print so I'm sure if you google it, you can find it on another site.

Then I bought these cotton border prints from Fabric Mart ~


...as of now two of the fabrics are still on the site here and here. The other two are sold out.

With these border prints in hand, I realized I could make some really interesting shirts by manipulating the border prints. Since I own four prints a series was born. I mean the challenge of using the border prints creatively just made me salivate.  I spent a couple of days during the weekend working on cutting out these prints. 

So why this post? It will probably be a couple of weeks before these shirts make it to the blog. By then the last of the cotton border prints will be sold out, just wanted to give you an opportunity to purchase some of these fabrics yourself. Also, to let you know what I'm sewing next.

Next completed garment up on the blog is the Simplicity 8700 jacket. I've been working on it for a couple of weeks and I think it's ready for prime time now.

...as always more later!


Sunday, October 14, 2018

The First Shirt of the Fall Season

It's October and while the month kicked off with some warm late summer type weather, we all know the dark days of winter are coming. Now while I'm no longer wearing my lightweight summer clothing, it's not yet time to bundle up in the wool and cashmere.

It is shirt wearing season though...so this is my first fall shirt.  I used the close fitting version of my TNT pattern.


Some stats ~
Fabric:
100% cotton from Zooks in Lancaster, PA

Notions:
Rick Rack from Home Sew via the collection
12 4-hole 1/2" white buttons from the collection
Light Crisp Shirting Fusible Interfacing from Fashion Sewing Supply

Additional Info ~
There are no new construction techniques for this make. The difference with this one is the embellishment I added. I'm a fan of rick rack and I added it to the collar, left front button placket and in the back yoke seam. I've used it on a number of garments and think it can be used in adult garments as well as children's no problem.

While I'll make various versions of this TNT pattern this fall/winter, it will be the fabric, the embellishment and trims, I use to make each one different. I'll be documenting them here because this is my diary/record of my makes. It's a great place to keep a photo of each one. Long after they've been discarded or donated, I have a record that I made it. It's one of the things I love about my blog.

Pictures ~


I added a little rick rack to the back yoke too

Conclusion ~
This is the first one of my shirts for fall/winter.  However, I do have a few other shirt patterns I'm planning on using. I'm loving this one though, due to the fabric and color. Perfect for the weather we're having now and easy to wear.

...as always more later!


Wednesday, October 10, 2018

Vogue 7448 - Out of Print Blouse - Wearable Muslin

I found this blouse pattern in one of the online vintage pattern shops a few years ago. I was looking for a soft 80's type blouse and this one fit the bill. 


I bought it for my old corporate lifestyle to go over a skirt or pair of trousers and under a cardigan. While I liked the pattern, once that lifestyle disappeared I wasn't sure I would be able to use it. Though I wasn't ready to part with it.


Background Information ~
First a little about the pattern ~ the copyright date is 2001. The pattern description says, "Loose-fitting, above-hip length blouse (may be worn tucked in or out) has front-button closing and short sleeves. The back I'm using has a pleat into back yokes and shawl collar."

This pattern has no darts which I will admit had me a little concerned. Also, it's not as loose-fitting as the pattern envelope's picture. Finally let's not forget that kinda lowish (BurdaStyle) neckline. That's why I did something I don't normally do, I made a wearable muslin.

Supplies ~
- A poly print from the collection that has no tag so I have no idea how long it's been there
- silk organza for the interfacing
- blue & white shell buttons from the button collection

Pattern Alterations ~
To add width to the hemline on the front piece, I slit the front stitching line and added 1.75" of space there.


After making the blouse, I went back and added the insert from the bust point to the hemline. 


To the back piece I did a pivot and slide and added 4" to the hemline. I did the pivot and slide on the fabric. Then went back and added the alteration to the pattern, after I knew it worked. 


For the sleeve, I slit it up to the sleeve cap and added 1" to the bicep. Then I added 5" to the length. It was the perfect length to add a hem of 3" and then turn up a 2" cuff.

I shortened the shoulder seam by 1" for my narrower shoulders on the front and back yoke pattern pieces.

Construction ~
I constructed the blouse just like the pattern instructions stated. The only thing I didn't do was handstitch the front down, however, I did handstitch the back neckline down. 

I also added topstitching on the outer collar, down the front and around the hemline.

As I mentioned in the pattern alterations, my sleeves were cut longer than the pattern instructions and I added a 2" cuff to them. I wanted to give the blouse a sporty look with the cuffs.

A few pictures ~

Blouse shown with TNT linen pants


Conclusion ~
This is a pretty good wearable muslin. I think I still need another inch in the the abdomen and hip area for me to be comfortable wearing this as a closed front blouse. I also want to make it about 2" longer - more thigh length. This version comes across as a camp shirt. Once all of the changes were made to the pattern, I wanted to use it with a navy double silk chiffon to make the top and a pair of pants...sort of a jumpsuit look without the jumpsuit all in oneness.

I won't get to this now that the chill is settling in. I have another version of this blouse with longer sleeves and a cuff roaming around in my brain. I want to make it this fall now I have all of the fitting challenges worked out.

Me and Samantha who started Pre-K4 this September

Next up on the blog will be a new fall shirt!

...as always more later!


Sunday, October 07, 2018

A Katie for Late Summer

Or as a subtext, "Its all about the fabric!"  Now I know...I know I'm running this pattern into the ground. Seriously though it is one of the most comfortable garments I've made this season. I love it's flexibility. How it can be a top, tunic or a dress. I LOVE how it wears. It's comfortable yet stylish. I can use a variety of fabrics to make it, as evidenced by the Telio pebble crepe for this version.

Here is the latest one...


...and there will be one more made from some denim I picked up at JoAnn's of all places. I will probably retire the pattern after the denim top. Though I'm sure I will bring it out next spring to make a few more!

So let's discuss this version...

Supply List ~
3 yards of pebble polyester crepe purchased earlier this summer from fabric.com
10 1/2" white/beige buttons from the collection
Ltwt fusible interfacing from Steinlauf & Stoeller

Pattern Alterations ~
I removed all of the additions I made to the pattern by folding them up and pinning them down. I wanted to keep them for future renditions of the pattern.

Construction Changes ~
1. The hemline:
For this version because the fabric is so lightweight, I didn't want the large hembands. So I sewed them onto the hemline and then cut them the facing in half. That was folded and machine stitched down. It did add to the weight of the hemline without overpowering it.

2. Long sleeves with cuffs:
I used the sleeves from this Katie and the cuffs from my TNT shirt pattern. However, when I finished the shirt and tried it on the cuffs were really large. So I put a pleat on the cuff and sewed a button on each one. This worked like a charm and my skinny wrists no longer float inside the cuffs.

Those are the only construction changes made to this version.

A few pictures ~


These were taken at my job because I broke my rule and wore it to work before photographing. But I wanted something new to wear to our company meetings! This was me talking when we had to introduce ourselves.


Conclusion ~
Making this from a drapier poly type fabric totally changed the look and hang of the tunic. I also added long sleeves making it a colorful piece for my fall wardrobe.

Next up on the blog is a new blouse pattern I'm trying out...well actually its a vintage pattern that I've had for awhile but I love the silhouette.

One More Thing ~
Since I haven't heard from CarlaF - I pulled another number for the winner of the $100 Smugglers Daughter gift card - #30 Whitney Luckenbill!  Please contact me by Wednesday, October 10th!


...as always more later!


Friday, October 05, 2018

Final Gift Card Winner & Some Thank Yous

Even though it's October and National Sewing Month is over, I would like to thank all of the online fabric stores for supplying the gift cards this month! I'm  truly grateful that you were willing to participate in the giveaways. 


I'd also like to thank everyone who left a comment for each of the giveaways. Every comment was read and noted and I'm appreciative that you took the time to leave them.

One more note before announcing the last winner...CarlaF from Atlanta I still haven't heard from you.  If you don't contact me by tomorrow, I will pick a new winner for the Smugglers Daughter $100 gift card.

Now for the winner of the Fabric Mart gift card...


#42 - MaryEllen


Please contact me at my email address in the about me section and I will forward your information to Fabric Mart.

Again, thank you to everyone who participated.  Regular blog posts will resume on Sunday.

...as always more later!

Wednesday, October 03, 2018

It's Fall Y'all

I borrowed that title from a Draper James ad - my new RTW obsession! See I've been thinking about what I want to sew for fall because it is getting chillier here. In the last couple of years, I've bought about 15 pairs of jeans and another 10 pairs of leggings in ponte, pleather and a thicker knit.  So my bottom situation is solved...and no I probably won't be making jeans this fall/winter.

However, I'm still fascinated with shirts and blouses so I know I will be adding more of them to my wardrobe. Especially since I love the process of making a shirt.


I've also become enamored of this Nancy Zieman shirt...


I can imagine some amazing new shirts made from scraps of other shirting fabrics (I'm accumulating a collection) or by manipulating stripes and prints to get some great new shirts for fall.

There are also a few toppers on my list.  I have three patterns pulled that I want to work with and will share more as they come up in the queue. I didn't make any cardigans last fall/winter and want to add a couple to my wardrobe. There's loads of sweater fabric in the collection and I want to use some of it this year.  Also, some of my cardis are starting to look old & worn so it will be time to move them out of the wardrobe. A cardi, a shirt and jeans was last winter's go-to look.

As far as I can tell, my fall/winter sewing will be all about the separates. I have a list (a short one for a change! LOL!) that I will be working from using TNT patterns and fabric to make the pieces interesting. I even want to use some dyeing and fabric manipulation techniques this year.

Fabric In/Out Totals ~
Well September started out being a good month. I used 12 yards of fabric to make 4 garments.  I gave away 56.25 yards of fabric so my total out for the month was 68.25 yards.

Then I got an email from Fabric Mart for Premium Members and fell down that rabbit hole - 9 yards of chambray tencil showed up. Work has been challenging this month (as well as that whole Supreme Court Justice circus) and another 12 yards showed up from StyleMaker Fabrics.

This leaves me with 68.25 yards out and 21 yards in with a YTD out total of 191.25. While this number seems high, I don't really feel like I'm winning here! *LOL* Gotta remember not to stress fabric shop though it's definitely better than stress eating!

Next up ~
I feel like I've figured out who I want to be for this final stage of my working life and my sewing can now reflect that. I will be sharing a couple of garments that were finished in September next on the blog.

BTW, tomorrow is the last day to leave a comment on the last post to win the $50 gift card from Fabric Mart. If you're interested in winning some free fabric, leave a comment!

...always more later!


LinkWithin

Related Posts with Thumbnails