Sunday, September 15, 2013

September Fabric Winners

I've been with the grandkids and my daughter all day at The Central Park Zoo...


So I'm just getting around to pulling fabric from the collection and the names from the jar...

The two September winners are...


**Gaylen, GMarieSews**

**ValerieC from valeriec(at)inlandwireless dot com**

Fabric pulled for the winners is:

Gaylen - I'm sending you wool, yes wool to sew!


Gray herringbone wool, cranberry wool crepe
printed gray/white rayon, brown/black printed rayon blend

...and Valerie, I'm sending you a black & creme print knit, 2 yds of the red eyelet that I used for this dress and some rayons...


I will be sending these along this weekend...as well as Aleksandra's...yeah I'm that far behind and I apologize profusely!

Postscript ~
I don't know if you followed the blog, All My Seams, but the author Gwen has passed on.  Her daughter Colette generously wrote her last blog post here.  If you have fond memories of her Mom, please stop by and leave a message. Personally I will miss Gwen because her clothing was so well constructed and fun. Her voice will be missed in the sewing blogosphere as well as her local sewing community.

Rest in Peace Gwen. As your daughter said, may you bling out your garments as you walk the streets of gold with our Heavenly Father!


...as always more later!

Saturday, September 14, 2013

My Fabric Confession

It took exactly 62 days to break my fabric vow...

...and once broken I fell off that dayum wagon, rolled down the hill, through the bramble bushes before I arrived in the gully...and looked up to see how far I'd fallen.

Yeap, I bought fabric and not just a yard or two of fabric nahhhhh I went big with it and bought loads of fabric.  You would think that I would know better. You would think that I would be stronger.  You would think I would be more disciplined...you would be wrong! Wrong, wrong, wrong!

I was a little frustrated during this sewcation and I can definitely say that the fabric buying was a result of that frustration.  It started with a couple of pieces that I bought from Marcy Tilton.


2 yds of a lacy knit because I liked it...


This is a boiled wool with a black
cotton lace over it - had to have it!!!

I thought I would be fine with those two pieces.  They were bought for a specific purpose and I don't own anything like them...but it was like uncorking the bottle!

Cause I got an email from Fabric Mart with suiting 50% off...why did I look? Seriously, I shouldn't have looked because I put about 10 fabrics in the cart...culled it down to 6 and then finally down to 4.  Then I closed the site out...but the fabrics kept calling my name...so 24 hours later I bought them.


Rust/gold/gray houndstooth


Brown stretch herringbone

Gray paisley cotton jacquard


Aqua silk/cotton metallic suiting
(Honestly I've been drooling over this piece for weeks!)

Finally, I saw this on Emmaonesock.  It's the only place I finally showed some restraint. I bought a yard and a half because I want to use this fabric for accents on a dress...


Way too much fabric arrived at my house...so this month two people's names will be pulled from the jar to compensate for my loss of control.  It's so much easier to acquire than it is to sew it down.  I made 6 garments during my sewcation.  I only used 6 yards from the collection.  

Since July 1st, not including the sewcation totals, I've used 9.5 yards of fabric from the collection.  However, I've given away 25 pieces of fabric ~ impressive but not enough to make a dent in the collection because three bins still sit in the garage.

I'm trying not to feel like this is a futile exercise...I know that I still have three more months of giveaways and sewing.  There's plenty of opportunity to sew up more fabric - hopefully - and there will be more given away.  I've just got to get up, dust myself off, and keep on keeping on.  I think it's time to stay away from the fabric sites though. *LOL*

Tomorrow is the drawing...so stay tuned to see who the next two lucky winners will be!

...as always more later!

Thursday, September 12, 2013

Throwback Thursday #1

I found this skirt when I was emptying out one of those garage fabric bins...


I made it from a wool/cotton blend purchased from Fabric Mart back in 2006. It was part of a SWAP wardrobe called "Pinstripe Falling Into Spring." which was entered in the Timmel Swap contest that year.

The pattern is my TNT four gore skirt pattern. It's one of the first ones I made from the altered pattern. However, when you flip it inside out, the time I took with the construction and finishing of this simple skirt, makes me feel really good about my sewing.

Let me share some of those details with you....


skirt hem with lining

hemline with folded rayon seam tape finish

Waistline turned under and finished with folded rayon seam tape

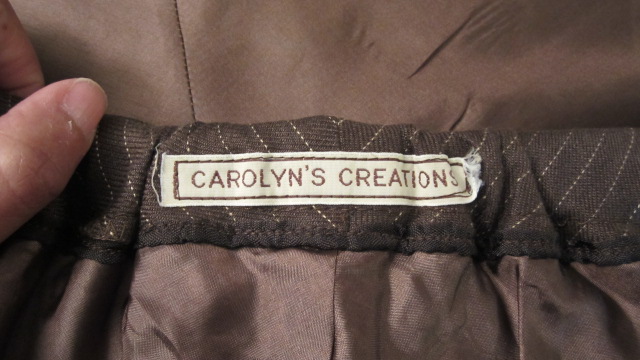
My label added to the back of the waistline casing

...and this is how I plan on wearing the skirt now.  


Using a RTW Isaac Mitzrahi cardigan from QVC (I'm honestly addicted to these cardigans because of their fit and stylishness!) to achieve the latest trend of coordinating prints and stripes.  


Most of this SWAP collection no longer exists in my wardrobe.  Some pieces were donated right away and others have just melted away over the years.  I do still have the solid brown skirt and wore it last winter. Now that I've found this one, it will make it's way back into my clothing rotation.

That's my garment for "Throwback Thursday."  Periodically I will highlight other pieces in my closet that are several years old and still being worn!

...as always more later!

Tuesday, September 10, 2013

An Update from the Sewing Cave...

I thought I would answer some of the questions posed during the sewcation as well as document some of my thoughts in this post.  However, I thought I would start with a picture of the completed garments...


Pleather jacket, white/black herringbone skirt, CRR wool doubleknit suit
RTW cardigan w/brown pinstripe skirt, cranberry wool crepe lace dress
and finally the Chado Ralph Rucci doubleknit dress

I completed:

2 skirts
2 dresses and
2 jackets

6 items in all

So my thoughts and answers to a couple of questions follows...

I loved the Cynthia Guffey video and I immediately started using some of her techniques...

1.  Pinned the pattern perpedicular instead of horizontally.  Years and years ago I learned to pin patterns to fabric horizontally.  I've seen other sewists pin differently than I did but hey it was working for me - so what was broke didn't need fixing until Cynthia explained why I should.

2.  I'm a scissors/shears girl.  I own a rotary cutter and I do use it to cut bias strips, strips of fusible interfacing, etc. but I cut out garments with my shears. So when Cynthia explained a better way to cut out, I changed the way I was doing that too.  CG explained that you should cut with your scissors/shears between your body and the fabric/pattern because you get less ragged edges that way.  I've always wondered why one side of my pattern would be raggedly cut and the other side clean.  I always fixed it at the serger but its good to know that I can do it right on both sides with a little forethought!

3.  I know that Cynthia doesn't promote fast sewing - and by following her don't move anything after it's pressed until its cold and dry (from the steam) slowed me down considerably. I thought I was good about not moving freshly steamed pieces but when you're conscientious about it, you realize how much time goes by before a piece really is ready to be moved from the ironing board.

+ + + + +

You know the best thing about having a bunch of time to just sew?  You slow down and enjoy the process. What do I mean?  I take my time on the weekends when I sew.  I try hard not to rush any process but there is always a clock in the back of my head telling me I have only so many hours left before I need to shut down for the weekend.  With seven/eight days to sew, the clock doesn't tick as loudly.  I mean it did when I first started but midway into the week, I stopped hearing it.  All I felt was the joy of the process that thing that I was longing for.

+ + + + + 

My Janome 8900 QCP isn't a year old but it has changed my sewing life.  I loved my Memory Craft 6600P but I absolutely adore my 8900.  This week not only have I appreciated the fact that it has the ability to lift the foot in two positions to get lofter pieces of fabric under it but I am also loving my teflon foot.  This foot isn't part of the original feet included with the 8900.  My dealer gave it to me as a gift when I purchased the machine.  I was happy to get it when I got my sewing machine but I was thrilled with it when I needed it to sew the pleather/ponte sweater jacket. Thrilled.

+ + + + +

There were several comments on my preservance on the B6002 pleather jacket.  After thinking about it, I realized that I never felt overwhelmed or bothered until the end.  Maybe if it had been a weekend sew I might have been more challenged...but I had time to think things through and let it rest so I was fine with it.  What a difference having time makes vs. rushing.  And of course the fabric put up a fight...it is beautiful and not easy to sew but so worth the effort...so worth the effort.  

Rachel, I'm sorry but the pleather is only available at Mood's NYC store. Normally I say call the store and see if there is some left but I bought this at the end of July and I just don't know how much or if any is left. However, Mood does have an amazing assortment of pleather online here.  Don't be put off by the fact that Mood calls the pleather vinyl, just know that it's what I've bought and used for a couple of pieces.


+ + + + +


More questions about the sleeve board/shoulder stand that I used for the sleeves on the pleather jacket... I bought this board/stand after seeing it on Ann of Gorgeous Fabrics blog.  You can get one here.  Best $40 I ever spent and a wonderful addition to my pressing arsenal.  I blogged about it here.

+ + + + +

After a week of sewing fall garments, the one downfall is that I won't be able to wear them until it gets quite a bit colder.  It's kind of nice being able to wear the things I've labored over when I go back to work and that won't be happening this time!  Also, photographing these pieces in the heat was a little much!  Seriously, I took one set of pictures in tights and boots and thought it is time to make a transitional dress/outfit instead of all of these fall garments! *LOL*

+ + + + +

After a slow start due to the Labor Day celebrations, I've ended up with six great pieces, and I'm calm & collected ready to go back to work.  Stay tuned there are a few more posts about the garments I made, as well as the September Fabric Giveaway winner!

...as always more later!


Monday, September 09, 2013

A Wool Crepe Dress ala Michael Kors

This dress is on my fall sewing list but it wasn't one of the items I was thinking of working on during the sewcation.  However, I saw this on "The Lisa Robertson Show" on QVC...


...and I had the original Michael Kors dress saved in my inspiration file...


Kerry Washington wore it as Olivia Pope in Scandal

I've thought about making this in several different color and lace combinations but settled on this one...


I wanted some color since it seems like I've sewn black, black and more black for the last week.  Since this is a simple sheath dress with a black lace insert, I started with my TNT dress pattern.


Notions ~
22" red invisible zipper
7" wide black lace purchased from M&J Trims
red bemberg lining
red rayon seam tape
Ltwt. fusible knit interfacing strips

Construction Information ~
One of the interesting parts of this dress is the lace insert and it's placement. Since I'm plus size the lace emphasizes my hips (at least to me) rather than the slim waistline emphasized in the pics above.  Honestly at one point while applying the lace I wondered if this look would actually work for me but after getting the lace applied...I do like the look.

Applying the Lace to the Dress ~
Before inserting the lining to the dress, I tried it on to find the best point to place the lace on my dress and my body.

*Then I pinned the lace at the center fronts top and bottom and the side seams.  Managed to do this with a minimum amount of twisting and turning...


*Pinned the lace to the dress front and back at the top and the bottom. Double checked by measuring from the top and bottom of the dress front to insure that it was the same all the way around.

*Stitched the top of the lace to the dress by hand.

*Put the dress on again to check placement.

*Hand stitched the bottom band of the lace to the dress.


*Carefully cut around the lace motifs at the zipper center back insuring that the lace wasn't too close to the seam to get caught in the zipper...even added an additional piece of lace to cover some empty spots...

Second design feature ~
The neckline must have been stretched out when I was handling the dress. This could have been prevented if I had stay stitched the dress' neckline but of course, I didn't.  I could have used the pattern piece to snug the dress' neckline back up but after taking a tuck in it, I decided that I liked the tuck. 

It made a great design feature. So I edge stitched both tucks and pressed it flat.  Then the top of the tuck was basted down prior to the lining being inserted into the dress. Finally I added a few quick stitches at the bottom of the tucks so that they wouldn't release.


When I added the lining to the dress, I added a row of gathering to snug up the lining so that both necklines would match when sewing them together.


Technically this is a mistake.  I should have taken better care when handling the fabric BUT I like to think of it as a design feature. *LOL*

Otherwise the dress was assembled as I normally do. Here's a few pics of the dress in motion...


...and how I'll wear it with a black cardigan


I know I've just made another version of my TNT dress with lace on it but lace is still trending strong for fall.  I've got an entire Pinterest folder to reflect that trend and every day I find more things to add to it.  I also really like how lace softens office wear so there may be more of it showing up in my work wardrobe.

...as always more later!


Saturday, September 07, 2013

Butterick 6002 ~ A Pleather & Ponte Sweater Cardigan

I thought about making a dress next, honestly I did.  I have two pieces of fabric pretreated and set aside and a pattern that's been screaming my name for the last two weeks.  Funny how it's stopped yelling "Look at me, Pick me!" since I've been home...*sigh*  Anyway after finishing up the last of the Chado Ralph Rucci pieces, I couldn't wrap my mind around the necessary pattern alterations for one dress or the pattern instructions for the new pattern. So much for "pick me!" *LOL*


I'd put these two pieces of fabric together weeks ago.  I thought I would have gotten to them sooner but I got sidetracked by the Burda Dress (which I am getting back to) and then the Chado Ralph Rucci fabric. 

The first piece is a lacy pleather that I bought from Mood after seeing it on Instagram - seriously I need to stop being enticed by those pieces!  


The second piece is a black cotton sweater weight ponte from Mood that I've been holding onto waiting for the perfect garment.  I've wanted a version of this topper from Lafayette 148 since I saw it online.  Honestly, I want about half of the Lafayette 148 company's fall offerings...so expect to see more interpretations from this line.


Although the fabric in the inspiration jacket is actually lace, I thought the lacy pleather would work just as well.  So I pulled out my trusty Butterick 6002 jacket pattern to use with these fabrics. 

Construction ~
The jacket shell sewed up quickly since I only used three of the pattern pieces. There were some things that I wanted to share with you about the construction.  

One, the only way that I could sew the pleather fabric to the cotton ponte was with my Teflon foot.  Once I put it on my sewing machine, it just glided over the fabric.


...and yes I used pins to hold the pleather to the cotton ponte.  The fabric is full of holes so who would notice a few pin holes, if you could even see them. Because believe me I pinned the hell outta this piece and you can't see a pin mark in the finished jacket! *LOL*

Two, pressing was challenging. I really didn't want to burn or scorch this fabric so I took a lot of care pressing the pieces...ALOT of care!  It took two days to complete this jacket and pressing or the need to press the pleather very lightly & carefully was a major reason why.  Let's just say that the sleeve board and my clapper got a heavy work out.


I'm loving this sleeve board more with each garment I sew!

Three, to get a flat appearance on the seams of the body of the jacket, I resorted to stitching them flat.  I knew I wouldn't get a good press with steam where the ponte and pleather intersected so stitching them flat worked best.


Four, usually when inserting sleeves, I pin, then baste, then machine stitch. The pleather because of the holes was fragile and I knew it couldn't handle all of that work.  A lot of pins and some careful stitching then alot of steam on only the ponte part got the sleeves in. Though to be honest, I ended up taking the sleeves out (very, very carefully) and making some alterations to the jacket fronts because pleather doesn't lay as flat as drapier fabrics do.  I would have rather put the sleeves in with a flat application but again I was worried about the pleather to ponte seams.

Finishing the Jacket ~
The hardest part, however, was finishing the jacket neckline, front edges and hemline.  The pattern comes with facing pieces but I didn't want to add them because I wanted the jacket to resemble the inspiration piece. So I added a leather binding that I had on hand.


I thought the application would be simple but seriously I wanted to kill myself by the time I got it on. The first step was to serge off 5/8" around the jacket so that I would lose most of the jacket's overlap because I wasn't adding buttons to the front.


Then when I started to pin the leather binding onto the front of the jacket about every yard I noticed that there was a sticky substance for a few inches. I even went back to Simplicity's site where I purchased the binding to see if they said that it was glued together...nuthin'.  

I tried to machine stitch the binding down and the Janome hated it.  The teflon foot got gooey.  The feed dogs wouldn't push it through...it got ugly quickly!  So I decided that I would hand sew it down. Why didn't I just stop then and come up with an alternate?  Because half of the binding had been sewn down by me coaxing the machine, promising it goodies, anything to get it to sew before I gave up...and I realized that I had to find a solution or remove the binding and that just wasn't happening!

So at 2 am, I sat down and hand stitched the binding to the jacket...slowly and constantly removing the gook from my needle by using an alcohol swab to keep it clean.  I then pinned the binding to the wrong side of the garment and went to bed.

The next morning I sat down and using a small amount of steam, my silk organza press cloth folded into fourths, I pressed a section and then added the clapper to hold it down.  To press the entire neckline, front edges and hemline flat took two hours.  After that I applied my teflon foot to my sewing machine and with a little push & pull stitched the binding down.  


I tried the jacket on and the pleather fronts buckled funnily around the armholes....ummm fabric doesn't drape. I resorted to cutting the offending fabric out of the jacket fronts and pulled all of the gathering out of the armholes so that the sleeves would fit.  I'm sure that there is some prooo-fessional way to accomplish this and I'm sure the muslin-ites would say a muslin would have solved this but this time I beg to disagree.  I've made this jacket successfully two other times and never had this issue.  This was a fabric issue that maybe I should have realized would happen when working with it but the fabric whisperer missed that one ~ SERIOUSLY!

The sleeve hems ~
By the time I got to the sleeve hems, I felt like I was in the home stretch.  I turned them under when I tried the jacket on to make sure that I'd gotten most of the offending & misbehaving fabric out of the jacket. 

  • Pressed the hems flat then cut about an inch off the fabric.  
  • Serged stitch witchery to the wrong sides of the new sleeve hems.
  • Pressed it flat.
  • Then I added a twin needle hem.


Now I know quite a few people complain of the tunneling that occurs when using a twin needle on hems.  I've been thinking about this wondering why it doesn't occur on my hems and I realized it's because I use stitch witchery in the hems prior to stitching them.  I'm sure that a light fusible knit interfacing would work the same way.

Button & Snap Closure ~
I put the jacket on...snapped a couple of terrible selfies (no you won't see them! *LOL*) and realized that the inspiration garment has a hook and eye closure. Now I know that I had some furrier hook & eyes around but I couldn't find the suckers even though I tore the sewing room apart. Guess I'll be picking some up the next time I'm at Pacific Trimmings.


Instead I went with a snap with a vintage glass button over it as the closure. The button is a little heavy but it works and at this time it's staying.

Are you still here cause this is a long behind post...if so, here are pictures of the jacket on Lulu...


(gonna press that back seam again - it's looking kinda hinky!)

The jacket is done and hanging waiting for modeled pictures, which will happen later. 

So I'm back to my original challenge...what dress next? I thought the jacket would be a quick, easy and relaxing sew while I figured out what to make next.  Instead I need a large cold Mountain Dew to rest my furrowed sewing brow.  Stay tuned because I've gained my Monday vacation day back...I don't need to go into work after all.  However, I swear something quick and easy to sew would be appreciated right now! *LOL*


...as always more later! 

LinkWithin

Related Posts with Thumbnails